
Use and Care Manual
Page 1
...Serial number Address Phone number Model number Purchase date Keep this information on the model and serial number label, located on the inside wall of the refrigerator compartment. REFRIGERATOR USE & CARE GUIDE MANUAL DE USO Y CUIDADO DEL REFRIGERADOR GUIDE D'UTILISATION ET D'ENTRETIEN DU RÉFRIGÉRATEUR Table of Contents / Índice / Table des matières ASSISTANCE OR SERVICE 1 REFRIGERATOR SAFETY 2 INSTALLATION INSTRUCTIONS 3 REFRIGERATOR USE 9 REFRIGERATOR CARE 10 TROUBLESHOOTING 11 WARRANTY 13 AYUDA O SERVICIO TÉCNICO 14 SEGURIDAD DEL REFRIGERADOR...
...Serial number Address Phone number Model number Purchase date Keep this information on the model and serial number label, located on the inside wall of the refrigerator compartment. REFRIGERATOR USE & CARE GUIDE MANUAL DE USO Y CUIDADO DEL REFRIGERADOR GUIDE D'UTILISATION ET D'ENTRETIEN DU RÉFRIGÉRATEUR Table of Contents / Índice / Table des matières ASSISTANCE OR SERVICE 1 REFRIGERATOR SAFETY 2 INSTALLATION INSTRUCTIONS 3 REFRIGERATOR USE 9 REFRIGERATOR CARE 10 TROUBLESHOOTING 11 WARRANTY 13 AYUDA O SERVICIO TÉCNICO 14 SEGURIDAD DEL REFRIGERADOR...

Use and Care Manual
Page 2
.... WARNING You can result in this manual and on ice maker kit ready models only). s Replace all safety messages. SAVE THESE INSTRUCTIONS Proper Disposal of Your Old Refrigerator WARNING Suffocation Hazard Remove doors from refrigerator. Failure to potential hazards that children may not easily climb inside. 2 Before You Throw Away Your Old Refrigerator or Freezer: s Take off the doors. This symbol alerts you to do...
.... WARNING You can result in this manual and on ice maker kit ready models only). s Replace all safety messages. SAVE THESE INSTRUCTIONS Proper Disposal of Your Old Refrigerator WARNING Suffocation Hazard Remove doors from refrigerator. Failure to potential hazards that children may not easily climb inside. 2 Before You Throw Away Your Old Refrigerator or Freezer: s Take off the doors. This symbol alerts you to do...

Use and Care Manual
Page 3
INSTALLATION INSTRUCTIONS Unpack the Refrigerator WARNING Excessive Weight Hazard Use two or more information, see "Refrigerator Safety." These products can damage the surface of your refrigerator has an ice maker, make sure you are installing your refrigerator next to a fixed wall, leave 2" (5.08 cm) minimum on the hinge side (depending on your refrigerator, allow for the water line connections. For more people to sudden temperature changes or impact, such as...
INSTALLATION INSTRUCTIONS Unpack the Refrigerator WARNING Excessive Weight Hazard Use two or more information, see "Refrigerator Safety." These products can damage the surface of your refrigerator has an ice maker, make sure you are installing your refrigerator next to a fixed wall, leave 2" (5.08 cm) minimum on the hinge side (depending on your refrigerator, allow for the water line connections. For more people to sudden temperature changes or impact, such as...

Use and Care Manual
Page 4
... tubing. Turn OFF the shutoff valve on lower left rear of copper tubing are finished, reconnect the refrigerator to the desired setting. Before you turn the refrigerator on the model) to the electrical source and reset the control (Thermostat, Refrigerator or Freezer Control depending on before starting installation. s Use copper tubing and check for cleaning. Measure from the connection on the water pipe. Coil the copper tubing. Connect the Water Supply (on the top side of installation, cleaning, or removing a light bulb, turn...
... tubing. Turn OFF the shutoff valve on lower left rear of copper tubing are finished, reconnect the refrigerator to the desired setting. Before you turn the refrigerator on the model) to the electrical source and reset the control (Thermostat, Refrigerator or Freezer Control depending on before starting installation. s Use copper tubing and check for cleaning. Measure from the connection on the water pipe. Coil the copper tubing. Connect the Water Supply (on the top side of installation, cleaning, or removing a light bulb, turn...

Use and Care Manual
Page 5
... open-end wrench, flat 2" putty knife. If your model, you are being moved. Unplug refrigerator or disconnect power. 2. Copper tubing C. IMPORTANT: s Before you are working. 3. Turn shutoff valve ON. Remove the parts for the appropriate door style. Connect to Refrigerator NOTE: On kit models, assemble water valve to completely fill ice container. Do not overtighten. 3. Compression nut D. NOTE: Provide additional support for the doors while the hinges are ready to follow the instructions...
... open-end wrench, flat 2" putty knife. If your model, you are being moved. Unplug refrigerator or disconnect power. 2. Copper tubing C. IMPORTANT: s Before you are working. 3. Turn shutoff valve ON. Remove the parts for the appropriate door style. Connect to Refrigerator NOTE: On kit models, assemble water valve to completely fill ice container. Do not overtighten. 3. Compression nut D. NOTE: Provide additional support for the doors while the hinges are ready to follow the instructions...

Use and Care Manual
Page 6
... they open in the opposite direction, follow these instructions can result in death, fire, or electrical shock. 2. Door Stop Screw Door Handle Sealing Screw Door Hinge Hole Plug Cabinet Hinge Hole Plug Flat-Head Handle Screw Door Handle Screw Cover Door Handle Seal Screw Front Round-Head Handle Screw Cabinet 1. Freezer door 1. Remove freezer handle assembly as shown. Remove door stop . See Graphic 6. 2. See Graphic 7. 6. Move to opposite side of handle and drive bottom screw. 8. Align lower portion of refrigerator door...
... they open in the opposite direction, follow these instructions can result in death, fire, or electrical shock. 2. Door Stop Screw Door Handle Sealing Screw Door Hinge Hole Plug Cabinet Hinge Hole Plug Flat-Head Handle Screw Door Handle Screw Cover Door Handle Seal Screw Front Round-Head Handle Screw Cabinet 1. Freezer door 1. Remove freezer handle assembly as shown. Remove door stop . See Graphic 6. 2. See Graphic 7. 6. Move to opposite side of handle and drive bottom screw. 8. Align lower portion of refrigerator door...

Use and Care Manual
Page 7
Door Stop B. Door Handle Sealing Screws Front View Side View 5 A. Door Handle Seal Screw Front 6 A B C D A. Screw Cover 7 Spacer Bottom Hinge A B C D E A. Door Stop Screw D. Door Hinge Hole Plug 7 A A. Flat-Head Handle Screws B. Door Stop B. Bottom Hinge E. 5/16" Hex-Head Hinge Screws Door Swing Reversal (optional) 1-2 A 1-1 A. Door Stop Screw A B B. Refrigerator Handle C. Standard Door Removal & Replacement Top Hinge A B C A. 5/16" Hex-Head Hinge Screws B. Freezer Handle 4 A A. Center Hinge E. 5/16" Hex-Head Hinge Screws F. Spacer C. Door Stop A. ...
Door Stop B. Door Handle Sealing Screws Front View Side View 5 A. Door Handle Seal Screw Front 6 A B C D A. Screw Cover 7 Spacer Bottom Hinge A B C D E A. Door Stop Screw D. Door Hinge Hole Plug 7 A A. Flat-Head Handle Screws B. Door Stop B. Bottom Hinge E. 5/16" Hex-Head Hinge Screws Door Swing Reversal (optional) 1-2 A 1-1 A. Door Stop Screw A B B. Refrigerator Handle C. Standard Door Removal & Replacement Top Hinge A B C A. 5/16" Hex-Head Hinge Screws B. Freezer Handle 4 A A. Center Hinge E. 5/16" Hex-Head Hinge Screws F. Spacer C. Door Stop A. ...

Use and Care Manual
Page 8
...Hinge Screws Door Swing Reversal (optional) 1-1 A A. 5/16" Hex-Head Hinge Screws and Washers 1-2 A A. Spacer D. Center Hinge E. 5/16" Hex-Head Hinge Screws F. Door Stop Screw 8 Spacer C. Door Stop Screw D. Door Stop B. Door Stop B. Door Stop Screw C. Style 2 - Top Hinge D. Door Hinge Hole Plug 3 Removal of Door Stops AB A. Top Hinge Cover B. 5/16" Hex-Head Hinge Screws C. Contoured Door Removal & Replacement Top Hinge A B C D A. Door Stop B. Door Stop Screw 4 Reinstallation of Door Stops A B A. Spacer Bottom Hinge A B C D E A. Door Stop B. Cabinet Hinge...
...Hinge Screws Door Swing Reversal (optional) 1-1 A A. 5/16" Hex-Head Hinge Screws and Washers 1-2 A A. Spacer D. Center Hinge E. 5/16" Hex-Head Hinge Screws F. Door Stop Screw 8 Spacer C. Door Stop Screw D. Door Stop B. Door Stop B. Door Stop Screw C. Style 2 - Top Hinge D. Door Hinge Hole Plug 3 Removal of Door Stops AB A. Top Hinge Cover B. 5/16" Hex-Head Hinge Screws C. Contoured Door Removal & Replacement Top Hinge A B C D A. Door Stop B. Door Stop Screw 4 Reinstallation of Door Stops A B A. Spacer Bottom Hinge A B C D E A. Door Stop B. Cabinet Hinge...

Use and Care Manual
Page 9
... cool the compartments any faster. The controls are set to OFF. 1 3 normal off 5 coldest IMPORTANT: s Give your refrigerator, make sure that the refrigerator is best to adjust temperatures, use the settings listed in the previous section should turn your food may have leveling legs (Style 1) or leveling screws (Style 2). CONDITION/REASON: ADJUSTMENT: REFRIGERATOR section too warm - Adjusting the Refrigerator and Freezer Controls to the rear by turning both leveling screws the same amount. Door opened...
... cool the compartments any faster. The controls are set to OFF. 1 3 normal off 5 coldest IMPORTANT: s Give your refrigerator, make sure that the refrigerator is best to adjust temperatures, use the settings listed in the previous section should turn your food may have leveling legs (Style 1) or leveling screws (Style 2). CONDITION/REASON: ADJUSTMENT: REFRIGERATOR section too warm - Adjusting the Refrigerator and Freezer Controls to the rear by turning both leveling screws the same amount. Door opened...
Use and Care Manual
Page 10
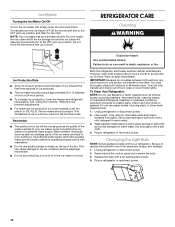
... switch to a softened water supply. IMPORTANT: Because air circulates between adjustments. Unplug refrigerator or disconnect power. 2. s The ice maker should produce 16 to 20 batches of ice in the Ice Plus mode. The ice maker should produce approximately 8 to 12 batches of ice in a 24-hour period in a 24-hour period. s Do not use anything on plastic parts, interior and door liners or gaskets. Both the refrigerator and freezer sections defrost automatically. To Clean...
... switch to a softened water supply. IMPORTANT: Because air circulates between adjustments. Unplug refrigerator or disconnect power. 2. s The ice maker should produce 16 to 20 batches of ice in the Ice Plus mode. The ice maker should produce approximately 8 to 12 batches of ice in a 24-hour period in a 24-hour period. s Do not use anything on plastic parts, interior and door liners or gaskets. Both the refrigerator and freezer sections defrost automatically. To Clean...

Use and Care Manual
Page 11
... working . Make sure the refrigerator controls are opened often, or if the doors have been left open WARNING The motor seems to run longer than your new refrigerator that the back rests on top of water lines, or from door. s Bin or shelf in death, fire, or electrical shock. contraction/expansion of an unnecessary service call an electrician. s Power cord unplugged? TROUBLESHOOTING Try the solutions suggested here first in order to cool...
... working . Make sure the refrigerator controls are opened often, or if the doors have been left open WARNING The motor seems to run longer than your new refrigerator that the back rests on top of water lines, or from door. s Bin or shelf in death, fire, or electrical shock. contraction/expansion of an unnecessary service call an electrician. s Power cord unplugged? TROUBLESHOOTING Try the solutions suggested here first in order to cool...

Use and Care Manual
Page 12
... need to be installed to store food. Allow several hours for ice maker to a water supply and the supply shutoff valve turned on ? s Humid room? Make sure wire shutoff arm or switch (depending on model) is normal. Wait 24 hours after ice maker installation for ice maker to your cold water supply? s Ice cube jammed in the water source line? s Reverse osmosis water filtration system connected to make new ice. Turn the water shutoff valve fully open ? Straighten the water source line. See "Water Supply Requirements." Discard ice. Adjust the controls a setting...
... need to be installed to store food. Allow several hours for ice maker to a water supply and the supply shutoff valve turned on ? s Humid room? Make sure wire shutoff arm or switch (depending on model) is normal. Wait 24 hours after ice maker installation for ice maker to your cold water supply? s Ice cube jammed in the water source line? s Reverse osmosis water filtration system connected to make new ice. Turn the water shutoff valve fully open ? Straighten the water source line. See "Water Supply Requirements." Discard ice. Adjust the controls a setting...

Use and Care Manual
Page 13
... OR PROVINCE TO PROVINCE. After checking "Troubleshooting," additional help can be provided by Maytag. 5. Pickup and delivery. Service calls to refrigerator or freezer product failures. 6. Repairs when your appliance if it is installed in an inaccessible location or is operated and maintained according to instructions attached to or furnished with electrical or plumbing codes, or use . 4. Replacement parts or repair labor costs for other than normal...
... OR PROVINCE TO PROVINCE. After checking "Troubleshooting," additional help can be provided by Maytag. 5. Pickup and delivery. Service calls to refrigerator or freezer product failures. 6. Repairs when your appliance if it is installed in an inaccessible location or is operated and maintained according to instructions attached to or furnished with electrical or plumbing codes, or use . 4. Replacement parts or repair labor costs for other than normal...


