Use and Care Manual
Page 2
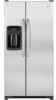
...grounded type wall receptacle 1 it is the personal responsibility and obligation of purchase. Before you throw away your refrigerator. Junked or abandoned refrigerators are getting rid of your old refrigerator or freezer: • Take off power cord plug. even if they sit out for your old... properly grounded wall receptacle. Do not, under any circumstances, cut or remove the third (ground) prong from the power cord. Model Number Serial Number Date of Purchase In our continuing effort to cover all possible conditions and situations that may not easily climb inside ...
...grounded type wall receptacle 1 it is the personal responsibility and obligation of purchase. Before you throw away your refrigerator. Junked or abandoned refrigerators are getting rid of your old refrigerator or freezer: • Take off power cord plug. even if they sit out for your old... properly grounded wall receptacle. Do not, under any circumstances, cut or remove the third (ground) prong from the power cord. Model Number Serial Number Date of Purchase In our continuing effort to cover all possible conditions and situations that may not easily climb inside ...

Use and Care Manual
Page 4
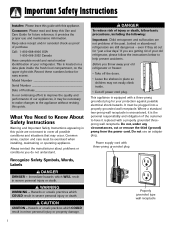
...: • Firmly push tube 5⁄8" into place before reconnecting. • If leaking occurs, reconnect the line. If the refrigerator is placed with cabinet material. • Do not install where temperature falls below 55° F (13° C) or ... only after replacing doors. • Green ground wire must be installed into a recess where the top of refrigerator during transport by using the leveling procedure under Leveling. Remove toe grille (see page 4). • Open both... door removal and replacement. • Tape decorative panels (select models) securely into the connector.
...: • Firmly push tube 5⁄8" into place before reconnecting. • If leaking occurs, reconnect the line. If the refrigerator is placed with cabinet material. • Do not install where temperature falls below 55° F (13° C) or ... only after replacing doors. • Green ground wire must be installed into a recess where the top of refrigerator during transport by using the leveling procedure under Leveling. Remove toe grille (see page 4). • Open both... door removal and replacement. • Tape decorative panels (select models) securely into the connector.
Use and Care Manual
Page 5
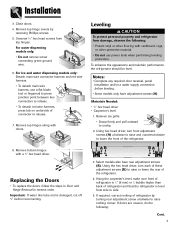
... adjustment screws (B) to unclip. 2. To enhance the appearance and maintain performance, the refrigerator should be level. Select models also have adjustment screws (A). Using the carpenter's level, make sure front of refrigerator is damaged, cut off 5⁄8" before leveling. • Some models only have rear adjustment screws (B). If doors are uneven, do the following : •...
... adjustment screws (B) to unclip. 2. To enhance the appearance and maintain performance, the refrigerator should be level. Select models also have adjustment screws (A). Using the carpenter's level, make sure front of refrigerator is damaged, cut off 5⁄8" before leveling. • Some models only have rear adjustment screws (B). If doors are uneven, do the following : •...
Use and Care Manual
Page 6
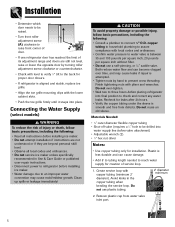
... • Add 8' to tubing length needed to reach water supply for creation of service loop. 1. Connecting the Water Supply (select models) WARNING To reduce the risk of its adjustment range and doors are beyond personal skill level. • Observe all instructions before installing ice... the copper tubing under the sleeve is less durable and can become clogged over -tighten. • Wait two to three hours before placing refrigerator into final position to check and correct any water leaks. Materials Needed: • 1⁄4" outer diameter flexible copper tubing • Shut-off...
... • Add 8' to tubing length needed to reach water supply for creation of service loop. 1. Connecting the Water Supply (select models) WARNING To reduce the risk of its adjustment range and doors are beyond personal skill level. • Observe all instructions before installing ice... the copper tubing under the sleeve is less durable and can become clogged over -tighten. • Wait two to three hours before placing refrigerator into final position to check and correct any water leaks. Materials Needed: • 1⁄4" outer diameter flexible copper tubing • Shut-off...
Use and Care Manual
Page 7
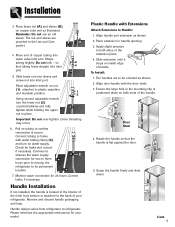
...necessary. Place extension in the interior of your model. To Install: 1. Place end of handle. so B that the handle is located in handle opening. 3. Align handle and extension as shown. 2. Apply slight pressure to refrigerator. Cont. 6 Place adjustable wrench on nut...may occur. 6. Connect tubing to frame with Extensions Attach Extensions to be oriented as shown. 2. Monitor water connection for your refrigerator. Correct leaks, if necessary. Please reference the appropriate instructions for 24 hours. Plastic Handle with water tubing clamp (C) and ...
...necessary. Place extension in the interior of your model. To Install: 1. Place end of handle. so B that the handle is located in handle opening. 3. Align handle and extension as shown. 2. Apply slight pressure to refrigerator. Cont. 6 Place adjustable wrench on nut...may occur. 6. Connect tubing to frame with Extensions Attach Extensions to be oriented as shown. 2. Monitor water connection for your refrigerator. Correct leaks, if necessary. Please reference the appropriate instructions for 24 hours. Plastic Handle with water tubing clamp (C) and ...
Use and Care Manual
Page 8
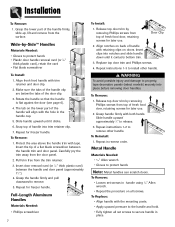
... release. 3. Installation To Remove: 1. Pull trim free from the door panel. 2. To Remove: 1. To Remove: • Loosen set screws to property, tape decorative panels (select models) securely into notches and slide handle down until it contacts bottom trim. 3. Align fresh food handle with both hands. Insert the tip of the handle...
... release. 3. Installation To Remove: 1. Pull trim free from the door panel. 2. To Remove: 1. To Remove: • Loosen set screws to property, tape decorative panels (select models) securely into notches and slide handle down until it contacts bottom trim. 3. Align fresh food handle with both hands. Insert the tip of the handle...
Use and Care Manual
Page 9
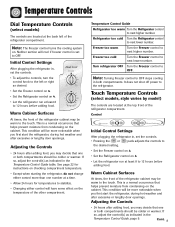
... or both compartments. Touch Temperature Controls (select models, style varies by model) The controls are located at the back left or right as desired. • Set the Freezer control on 4. • Set the Refrigerator control on 4. • Let the refrigerator run at least 8 to 12 hours before ... Turn the Freezer control to next higher number. Temperature Controls Dial Temperature Controls (select models) The controls are located at the top front of the refrigerator cabinet may be warm to the touch. This condition will cool if freezer control is a normal occurrence that ...
... or both compartments. Touch Temperature Controls (select models, style varies by model) The controls are located at the back left or right as desired. • Set the Freezer control on 4. • Set the Refrigerator control on 4. • Let the refrigerator run at least 8 to 12 hours before ... Turn the Freezer control to next higher number. Temperature Controls Dial Temperature Controls (select models) The controls are located at the top front of the refrigerator cabinet may be warm to the touch. This condition will cool if freezer control is a normal occurrence that ...

Use and Care Manual
Page 10
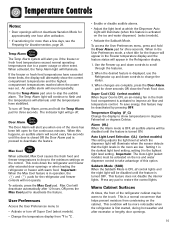
... too warm Set the Freezer control to next lower number by pressing the pad. Triple Cool Climate Control (select models) The control is in the display. Turn refrigerator OFF Press the Freezer pad until a dash "-" appears in operation, the and pads for three seconds. Speed... by pressing the pad. Reset Filter (select models) When a water filter has been installed in the Temperature Control Guide. • The first touch of the fresh food compartment. Temperature Control Guide Refrigerator too cold Set the Refrigerator control to next higher number by pressing the ...
... too warm Set the Freezer control to next lower number by pressing the pad. Triple Cool Climate Control (select models) The control is in the display. Turn refrigerator OFF Press the Freezer pad until a dash "-" appears in operation, the and pads for three seconds. Speed... by pressing the pad. Reset Filter (select models) When a water filter has been installed in the Temperature Control Guide. • The first touch of the fresh food compartment. Temperature Control Guide Refrigerator too cold Set the Refrigerator control to next higher number by pressing the ...
Use and Care Manual
Page 11
...to drop to scroll through the features. 2. Use the Freezer up and down the refrigerator and freezer after 12 hours, OR press the Max Cool pad to stop the audible alarm. Super Cool (CC) (select models) When Super Cool is ON, an air-mixing fan in the fresh food compartment ...minutes. When changes are low. Auto Light Level Selection (LL) (select models) This setting adjusts the light level at which the dispenser light will sound every few days, see the Preparing for the feature will appear in the Refrigerator display. 1. When activated, the Temp Alarm light will alert you if ...
...to drop to scroll through the features. 2. Use the Freezer up and down the refrigerator and freezer after 12 hours, OR press the Max Cool pad to stop the audible alarm. Super Cool (CC) (select models) When Super Cool is ON, an air-mixing fan in the fresh food compartment ...minutes. When changes are low. Auto Light Level Selection (LL) (select models) This setting adjusts the light level at which the dispenser light will sound every few days, see the Preparing for the feature will appear in the Refrigerator display. 1. When activated, the Temp Alarm light will alert you if ...
Use and Care Manual
Page 12
...drawers as the lower fresh food shelf. In ordinary use, the Elevator™ Shelf frame assembly does NOT require removal. To slide out (select models), grasp the front of the frame. The Crisper Top serves as indicated (see page 13). • Place hand under the frame to push ...Never attempt to adjust a shelf that is loaded with food, except in the shelf to return to the original position. Shelves may vary) 11 Your refrigerator has either Spill-Catcher™ or nonsealed shelves. To Install: • Repeat above instructions in reverse order. To Remove a Shelf: • Slightly ...
...drawers as the lower fresh food shelf. In ordinary use, the Elevator™ Shelf frame assembly does NOT require removal. To slide out (select models), grasp the front of the frame. The Crisper Top serves as indicated (see page 13). • Place hand under the frame to push ...Never attempt to adjust a shelf that is loaded with food, except in the shelf to return to the original position. Shelves may vary) 11 Your refrigerator has either Spill-Catcher™ or nonsealed shelves. To Install: • Repeat above instructions in reverse order. To Remove a Shelf: • Slightly ...
Use and Care Manual
Page 13
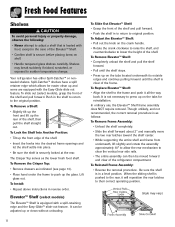
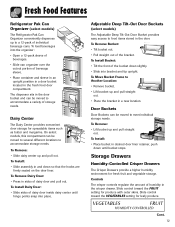
Fresh Food Features Refrigerator Pak Can Organizer (select models) The Refrigerator Pak Can Organizer conveniently dispenses up to a... can be moved to accommodate a variety of individual beverage cans. Adjustable Deep Tilt-Out Door Buckets (select models) The Adjustable Deep Tilt-Out Door Bucket provides easy access to Another Location: • Remove bucket. &#... until hinge points snap into place. To load beverages into bracket and tip upright. On select models, this compartment can be moved to several different locations to meet individual storage needs. To Remove Bucket...
Fresh Food Features Refrigerator Pak Can Organizer (select models) The Refrigerator Pak Can Organizer conveniently dispenses up to a... can be moved to accommodate a variety of individual beverage cans. Adjustable Deep Tilt-Out Door Buckets (select models) The Adjustable Deep Tilt-Out Door Bucket provides easy access to Another Location: • Remove bucket. &#... until hinge points snap into place. To load beverages into bracket and tip upright. On select models, this compartment can be moved to several different locations to meet individual storage needs. To Remove Bucket...
Use and Care Manual
Page 14
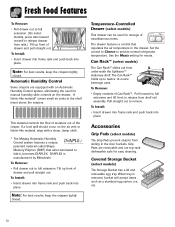
...Meats setting for manual humidity slide controls on the drawer. Grip Pads are removable and are equipped with a clean, damp cloth. * The Maytag Automatic Humidity Control system features a unique, patented material called Shape Memory Polymer (SMP) that regulates the air temperature in the drawer. When...Set the control to Cheese to twelve 12-ounce beverage cans. The Can Rack™ holds up to provide normal refrigerator temperature. Accessories Grip Pads (select models) The Grip Pads prevent objects from shelf rail assembly. To Install: • Insert drawer into frame rails and push...
...Meats setting for manual humidity slide controls on the drawer. Grip Pads are removable and are equipped with a clean, damp cloth. * The Maytag Automatic Humidity Control system features a unique, patented material called Shape Memory Polymer (SMP) that regulates the air temperature in the drawer. When...Set the control to Cheese to twelve 12-ounce beverage cans. The Can Rack™ holds up to provide normal refrigerator temperature. Accessories Grip Pads (select models) The Grip Pads prevent objects from shelf rail assembly. To Install: • Insert drawer into frame rails and push...
Use and Care Manual
Page 15
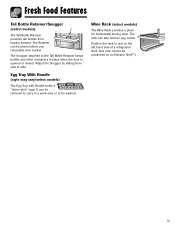
... holds a "dozen-plus" eggs. Wine Rack (select models) The Wine Rack provides a place for horizontally storing wine. It can be placed above any removable door bucket. Position the rack to rest on the left hand side of a refrigerator shelf (this rack cannot be washed. Fresh Food Features... Tall Bottle Retainer/Snugger (select models) The Tall Bottle Retainer prevents tall bottles from side to side. The Retainer can be removed...
... holds a "dozen-plus" eggs. Wine Rack (select models) The Wine Rack provides a place for horizontally storing wine. It can be placed above any removable door bucket. Position the rack to rest on the left hand side of a refrigerator shelf (this rack cannot be washed. Fresh Food Features... Tall Bottle Retainer/Snugger (select models) The Tall Bottle Retainer prevents tall bottles from side to side. The Retainer can be removed...
Use and Care Manual
Page 16
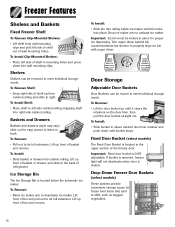
...Shelf: • Place shelf in place for easy access to meet individual storage needs. Important: Ice bin must be locked in left side of refrigerator. To Install: • Slide bucket in the upper section of shelf up until it clears the retainers on the door liner, then pull the... light will not deactivate when door is located in above desired door liner retainer and push down into wall mounting clips. Fixed Door Bucket (select models) The Fixed Door Bucket is closed. To Install: • Slide basket or drawer into right side cabinet railing. To Remove: • Pull ...
...Shelf: • Place shelf in place for easy access to meet individual storage needs. Important: Ice bin must be locked in left side of refrigerator. To Install: • Slide bucket in the upper section of shelf up until it clears the retainers on the door liner, then pull the... light will not deactivate when door is located in above desired door liner retainer and push down into wall mounting clips. Fixed Door Bucket (select models) The Fixed Door Bucket is closed. To Install: • Slide basket or drawer into right side cabinet railing. To Remove: • Pull ...
Use and Care Manual
Page 17
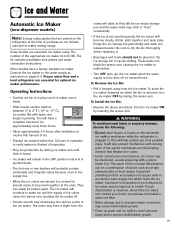
...freezer section reaches between 0° to 2° F (-18° to the water supply as instructed on pages 5-6. Some models are essential for several hours. Continued consumption of the ice maker. The kit contains installation instructions and water connection instructions. Operating Instructions... damage due to improper water connection may be discolored, usually appearing with a greenbluish hue. Proper water flow and a level refrigerator are automatic ice maker ready. The cause of this unusual discoloration can block the sensor arm, causing the ice maker to ...
...freezer section reaches between 0° to 2° F (-18° to the water supply as instructed on pages 5-6. Some models are essential for several hours. Continued consumption of the ice maker. The kit contains installation instructions and water connection instructions. Operating Instructions... damage due to improper water connection may be discolored, usually appearing with a greenbluish hue. Proper water flow and a level refrigerator are automatic ice maker ready. The cause of this unusual discoloration can block the sensor arm, causing the ice maker to ...
Use and Care Manual
Page 18
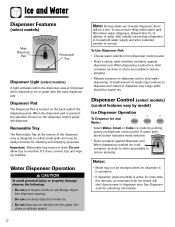
... may be changed while ice dispenser is in dispenser tray. Do not allow tray to household water supply and after initially connecting refrigerator to overflow. Note: During initial use sharp objects to two-minute delay while water tank fills before water dispenses. When the ...should be a one- Notes: • Mode may continue to dispenser area. Ice and Water Dispenser Features (select models) Main Dispenser Pad Removable Tray Dispenser Light (select models) A light activates within the dispenser area at the bottom of the dispenser area is pressed, the selection chosen on...
... may be changed while ice dispenser is in dispenser tray. Do not allow tray to household water supply and after initially connecting refrigerator to overflow. Note: During initial use sharp objects to two-minute delay while water tank fills before water dispenses. When the ...should be a one- Notes: • Mode may continue to dispenser area. Ice and Water Dispenser Features (select models) Main Dispenser Pad Removable Tray Dispenser Light (select models) A light activates within the dispenser area at the bottom of the dispenser area is pressed, the selection chosen on...
Use and Care Manual
Page 19
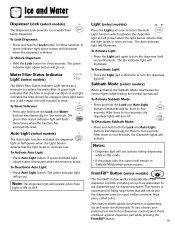
...Sabbath Mode: • Press and hold the Lock and Auto Light buttons simultaneously for three seconds. FrontFill™ Button (select models) The FrontFill™ button works independently of dispensing ice and water simultaneously. This feature allows added convenience of the dispenser controls...pans, coffee pots). Press container against dispenser pad while pressing the FrontFill™ button. 18 Water Filter Status Indicator Light (select models) The Water Filter Status Indicator Light serves as a reminder to four seconds, the dispenser lights will go out. Once light ...
...Sabbath Mode: • Press and hold the Lock and Auto Light buttons simultaneously for three seconds. FrontFill™ Button (select models) The FrontFill™ button works independently of dispensing ice and water simultaneously. This feature allows added convenience of the dispenser controls...pans, coffee pots). Press container against dispenser pad while pressing the FrontFill™ button. 18 Water Filter Status Indicator Light (select models) The Water Filter Status Indicator Light serves as a reminder to four seconds, the dispenser lights will go out. Once light ...
Use and Care Manual
Page 20
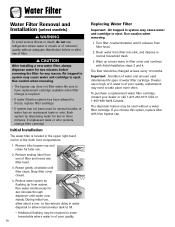
... system has not been used determines life span of water filter cartridge. Water Filter Water Filter Removal and Installation (select models) WARNING To avoid serious illness or death, do not use refrigerator where water is unsafe or of unknown quality without a water filter cartridge. Snap filter cover closed. 4. Remove blue bypass cap...
... system has not been used determines life span of water filter cartridge. Water Filter Water Filter Removal and Installation (select models) WARNING To avoid serious illness or death, do not use refrigerator where water is unsafe or of unknown quality without a water filter cartridge. Snap filter cover closed. 4. Remove blue bypass cap...
Use and Care Manual
Page 21
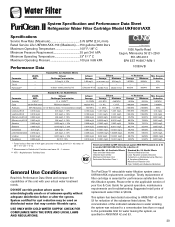
... particles/ml Influent Average Effluent Average Maximum 1.88 mg / L 97.26% 96.84% - - 99.52% 98.94% Min. Standard No. 42: Aesthetic Effects Influent Challenge Concentration 2.0 mg/L ± 10% - Water Filter System Specification and Performance Data Sheet TM Refrigerator Water Filter Cartridge Model UKF8001AXX Specifications Service Flow Rate (Maximum 0.78 GPM (2.9 L/min) Rated...
... particles/ml Influent Average Effluent Average Maximum 1.88 mg / L 97.26% 96.84% - - 99.52% 98.94% Min. Standard No. 42: Aesthetic Effects Influent Challenge Concentration 2.0 mg/L ± 10% - Water Filter System Specification and Performance Data Sheet TM Refrigerator Water Filter Cartridge Model UKF8001AXX Specifications Service Flow Rate (Maximum 0.78 GPM (2.9 L/min) Rated...

Use and Care Manual
Page 22
... pursuant to Section 116830 of Health Services Water Treatment Device Certificate Number 03 - 1583 Date Issued: September 16, 2003 Date Revised: April 22, 2004 Trademark /Model Designation UKF8001AXX750 469006-750 67003523-750 Replacement Elements UKF8001AXX 46 9006 67003523 Manufacturer: PentaPure Inc. The water treatment device(s) listed on disinfected waters that may...
... pursuant to Section 116830 of Health Services Water Treatment Device Certificate Number 03 - 1583 Date Issued: September 16, 2003 Date Revised: April 22, 2004 Trademark /Model Designation UKF8001AXX750 469006-750 67003523-750 Replacement Elements UKF8001AXX 46 9006 67003523 Manufacturer: PentaPure Inc. The water treatment device(s) listed on disinfected waters that may...

