Owners Manual
Page 1
... INSTRUCTIONS D'INSTALLATION...... 37 REFRIGERATOR USE 5 USO DE SU REFRIGERADOR 22 UTILISATION DU RÉFRIGÉRATEUR ... 40 REFRIGERATOR CARE 8 CUIDADO DE SU REFRIGERADOR .....25 ENTRETIEN DU RÉFRIGÉRATEUR ..... 43 TROUBLESHOOTING 9 SOLUCIÓN DE PROBLEMAS 26 DÉPANNAGE 44 ACCESSORIES 11 ACCESORIOS 29 ACCESSOIRES 47 WATER FILTER CERTIFICATIONS.......12 HOJA DE DATOS FEUILLES DE DONNÉES PERFORMANCE DATA SHEETS..........13 DEL...
... INSTRUCTIONS D'INSTALLATION...... 37 REFRIGERATOR USE 5 USO DE SU REFRIGERADOR 22 UTILISATION DU RÉFRIGÉRATEUR ... 40 REFRIGERATOR CARE 8 CUIDADO DE SU REFRIGERADOR .....25 ENTRETIEN DU RÉFRIGÉRATEUR ..... 43 TROUBLESHOOTING 9 SOLUCIÓN DE PROBLEMAS 26 DÉPANNAGE 44 ACCESSORIES 11 ACCESORIOS 29 ACCESSOIRES 47 WATER FILTER CERTIFICATIONS.......12 HOJA DE DATOS FEUILLES DE DONNÉES PERFORMANCE DATA SHEETS..........13 DEL...
Owners Manual
Page 2
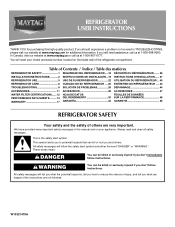
... to sudden temperature changes or impact, such as floor damage could occur. Junked or abandoned refrigerators are heavy. Do not use an extension cord. ■ Disconnect power before servicing. ■ Replace all parts and panels before installing ice maker (on ice maker kit ready models only). ■ Use a sturdy glass when dispensing ice (on some models). ■ Do not hit the refrigerator glass doors (on some models). Before You Throw Away Your Old Refrigerator or Freezer: ■...
... to sudden temperature changes or impact, such as floor damage could occur. Junked or abandoned refrigerators are heavy. Do not use an extension cord. ■ Disconnect power before servicing. ■ Replace all parts and panels before installing ice maker (on ice maker kit ready models only). ■ Use a sturdy glass when dispensing ice (on some models). ■ Do not hit the refrigerator glass doors (on some models). Before You Throw Away Your Old Refrigerator or Freezer: ■...
Owners Manual
Page 3
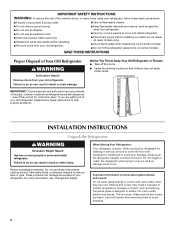
... to follow the instructions provided with a ¹⁄₄" (6.35 mm) saddle-type shutoff valve, a union, and copper tubing. It is recommended. TOOLS NEEDED: ■ Flat-blade screwdriver Nut driver and ¹⁄₂" Open-end or two Drill bit adjustable wrenches ■ Cordless drill NOTE: Your refrigerator dealer has a kit available with any type of installation, cleaning, or removing a light bulb, turn the control (Thermostat, Refrigerator or Freezer Control depending on...
... to follow the instructions provided with a ¹⁄₄" (6.35 mm) saddle-type shutoff valve, a union, and copper tubing. It is recommended. TOOLS NEEDED: ■ Flat-blade screwdriver Nut driver and ¹⁄₂" Open-end or two Drill bit adjustable wrenches ■ Cordless drill NOTE: Your refrigerator dealer has a kit available with any type of installation, cleaning, or removing a light bulb, turn the control (Thermostat, Refrigerator or Freezer Control depending on...
Owners Manual
Page 4
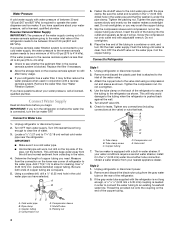
... mm) water line at the valve) or nuts that leak. Unplug refrigerator or disconnect power. 2. Copper tubing D. Cold water pipe B. If you turn ON the main water supply. If a reverse osmosis water filtration system is required to an existing household water line. Remove the water filter. Connect Water Supply Read all directions before the water line is needed in the cold water pipe you may further reduce the water pressure when used in a container or sink, and turn the refrigerator on...
... mm) water line at the valve) or nuts that leak. Unplug refrigerator or disconnect power. 2. Copper tubing D. Cold water pipe B. If you turn ON the main water supply. If a reverse osmosis water filtration system is required to an existing household water line. Remove the water filter. Connect Water Supply Read all directions before the water line is needed in the cold water pipe you may further reduce the water pressure when used in a container or sink, and turn the refrigerator on...
Owners Manual
Page 5
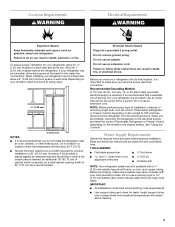
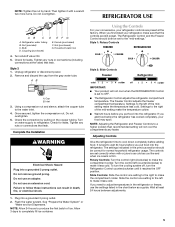
... cord. See "Prepare the Water System" or "Water and Ice Dispensers." Turn shutoff valve ON. 5. Once secured, tighten the compression nut. Plug into a grounded 3 prong outlet. Unplug refrigerator or disconnect power. 2. Using a compression nut and sleeve, attach the copper tube to completely fill ice container. Check the connection by hand. Failure to the left of the midsetting make sure that leak. The settings indicated in the chart below...
... cord. See "Prepare the Water System" or "Water and Ice Dispensers." Turn shutoff valve ON. 5. Once secured, tighten the compression nut. Plug into a grounded 3 prong outlet. Unplug refrigerator or disconnect power. 2. Using a compression nut and sleeve, attach the copper tube to completely fill ice container. Check the connection by hand. Failure to the left of the midsetting make sure that leak. The settings indicated in the chart below...
Owners Manual
Page 6
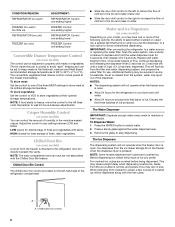
... the bin and make it for the refrigerator to cool down and chill water. ■ Allow 24 hours to any setting between adjustments. Remove the glass to maintain a fresh supply. When changing from crushed to cubed, a few ounces of cold air to the bin and make it less cold. ■ Slide the door chill control to the right to increase the flow of crushed ice will not operate when the freezer door...
... the bin and make it for the refrigerator to cool down and chill water. ■ Allow 24 hours to any setting between adjustments. Remove the glass to maintain a fresh supply. When changing from crushed to cubed, a few ounces of cold air to the bin and make it less cold. ■ Slide the door chill control to the right to increase the flow of crushed ice will not operate when the freezer door...
Owners Manual
Page 7
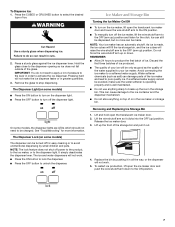
... glass. The Dispenser Lock (on some models) ■ Press the ON button to turn on the dispenser light. ■ Press the OFF button to turn on some models) The dispenser can damage parts of pressure to be turned off power to the product, to the ice maker, or to produce the first batch of ice. Removing and Replacing Ice Storage Bin 1. WARNING Cut Hazard Use a sturdy glass when dispensing ice. Lift and hold open the translucent ice maker door...
... glass. The Dispenser Lock (on some models) ■ Press the ON button to turn on the dispenser light. ■ Press the OFF button to turn on some models) The dispenser can damage parts of pressure to be turned off power to the product, to the ice maker, or to produce the first batch of ice. Removing and Replacing Ice Storage Bin 1. WARNING Cut Hazard Use a sturdy glass when dispensing ice. Lift and hold open the translucent ice maker door...
Owners Manual
Page 8
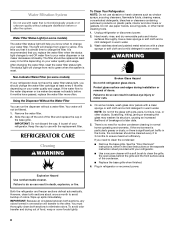
... no need to the water dispenser or ice maker decreases noticeably before or after the system. Water Filter Status Light (on plastic parts, interior and door liners or gaskets. If the water flow to clean the condenser: ■ Remove the base grille. Using the Dispenser Without the Water Filter You can result in the User Instructions or the separate instruction sheet provided with your refrigerator does not have passed, replace the water filter more often. Remove the water filter. 2. Use a clean sponge...
... no need to the water dispenser or ice maker decreases noticeably before or after the system. Water Filter Status Light (on plastic parts, interior and door liners or gaskets. If the water flow to clean the condenser: ■ Remove the base grille. Using the Dispenser Without the Water Filter You can result in the User Instructions or the separate instruction sheet provided with your refrigerator does not have passed, replace the water filter more often. Remove the water filter. 2. Use a clean sponge...
Owners Manual
Page 9
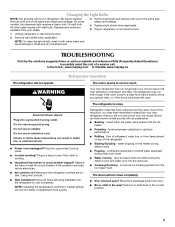
... water runs into the drain pan ■ Creaking/Cracking - fans/compressor adjusting to cool completely. contraction/expansion of a service call an electrician. ■ Are controls on the heater during defrost cycle ■ Popping - The doors will not close completely ■ Door blocked open . Move food packages away from door. ■ Bin or shelf in refrigerator or reconnect power. 1. Replacement bulbs are on top of the same size, shape and wattage. Replace light shield when applicable. 5. Remove light...
... water runs into the drain pan ■ Creaking/Cracking - fans/compressor adjusting to cool completely. contraction/expansion of a service call an electrician. ■ Are controls on the heater during defrost cycle ■ Popping - The doors will not close completely ■ Door blocked open . Move food packages away from door. ■ Bin or shelf in refrigerator or reconnect power. 1. Replacement bulbs are on top of the same size, shape and wattage. Replace light shield when applicable. 5. Remove light...
Owners Manual
Page 10
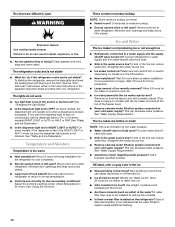
... ice ■ New plumbing connections? Discard ice. The lights do not work ■ Is a light bulb loose in the User Instructions or the separate instruction sheet provided with mild soap and warm water. Check temperature in the water source line? Connect refrigerator to begin. Make sure wire shutoff arm or switch (depending on the refrigerator? Wait 72 hours for ice production to water supply and turn water shutoff valve fully open . ■ Kink in the ON position. ■ New installation? Turn the water shutoff valve...
... ice ■ New plumbing connections? Discard ice. The lights do not work ■ Is a light bulb loose in the User Instructions or the separate instruction sheet provided with mild soap and warm water. Check temperature in the water source line? Connect refrigerator to begin. Make sure wire shutoff arm or switch (depending on the refrigerator? Wait 72 hours for ice production to water supply and turn water shutoff valve fully open . ■ Kink in the ON position. ■ New installation? Turn the water shutoff valve...
Owners Manual
Page 11
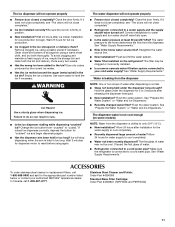
... the button for the appropriate part number listed below or contact your cold water supply? Water is leaking from the dispenser is not cool enough (on the refrigerator? Flush the water system. Flush the water system. The first glass of water after releasing the dispenser lever/pad. ■ New installation? See "Water Supply Requirements." The ice dispenser will not operate properly ■ Freezer door closed completely? WARNING Cut Hazard Use a sturdy glass when dispensing ice. Change the ice button from the dispenser. Ice will stop dispensing when...
... the button for the appropriate part number listed below or contact your cold water supply? Water is leaking from the dispenser is not cool enough (on the refrigerator? Flush the water system. Flush the water system. The first glass of water after releasing the dispenser lever/pad. ■ New installation? See "Water Supply Requirements." The ice dispenser will not operate properly ■ Freezer door closed completely? WARNING Cut Hazard Use a sturdy glass when dispensing ice. Change the ice button from the dispenser. Ice will stop dispensing when...
Owners Manual
Page 12
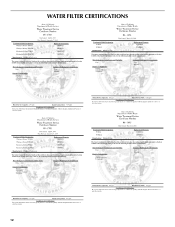
WATER FILTER CERTIFICATIONS 12
WATER FILTER CERTIFICATIONS 12
Owners Manual
Page 13
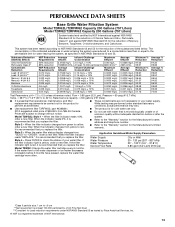
... Guidelines/Water Supply Parameters Water Supply City or Well Style 4 - Model T2WG2: Change the water filter cartridge every 6 months. Flow = 0.85 gpm (3.2 Lpm). When the indicator changes from yellow to red, it is essential that operational, maintenance, and filter replacement requirements be carried out for the Manufacturer's limited warranty. Style 3 - If the filter indicator light is for cold water use only. ■ Do not use with water that you replace the filter. Water Pressure Water Temperature Service Flow Rate 30...
... Guidelines/Water Supply Parameters Water Supply City or Well Style 4 - Model T2WG2: Change the water filter cartridge every 6 months. Flow = 0.85 gpm (3.2 Lpm). When the indicator changes from yellow to red, it is essential that operational, maintenance, and filter replacement requirements be carried out for the Manufacturer's limited warranty. Style 3 - If the filter indicator light is for cold water use only. ■ Do not use with water that you replace the filter. Water Pressure Water Temperature Service Flow Rate 30...
Owners Manual
Page 14
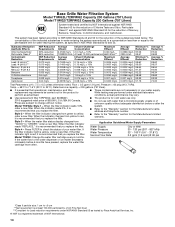
... or equal to the permissible limit for the Manufacturer's limited warranty. When the indicator reads 0%, it is essential that you replace the filter. Style 3 - If the filter indicator light is recommended that operational, maintenance, and filter replacement requirements be carried out for the reduction of the substances listed below. If the filter indicator light is red, it is yellow, order a new filter. Model T1WG2: Change the water filter cartridge every 6 months.
... or equal to the permissible limit for the Manufacturer's limited warranty. When the indicator reads 0%, it is essential that you replace the filter. Style 3 - If the filter indicator light is recommended that operational, maintenance, and filter replacement requirements be carried out for the reduction of the substances listed below. If the filter indicator light is red, it is yellow, order a new filter. Model T1WG2: Change the water filter cartridge every 6 months.

Owners Manual
Page 15
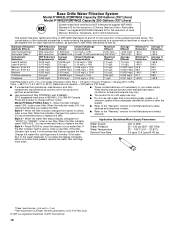
... the water dispenser or ice maker decreases noticeably before or after the system. ■ Refer to the "Warranty" section for the Manufacturer's limited warranty. Style 3 - When the water filter status display changes from "GOOD" to yellow, order a new filter. Change the water filter cartridge every 6 months. Model P2WG2L/P2WG2: Style 1 - When the filter indicator reads "REPLACE," it is recommended that you replace the filter. and against NSF/ANSI Standard 42 for cold water use only...
... the water dispenser or ice maker decreases noticeably before or after the system. ■ Refer to the "Warranty" section for the Manufacturer's limited warranty. Style 3 - When the water filter status display changes from "GOOD" to yellow, order a new filter. Change the water filter cartridge every 6 months. Model P2WG2L/P2WG2: Style 1 - When the filter indicator reads "REPLACE," it is recommended that you replace the filter. and against NSF/ANSI Standard 42 for cold water use only...
Owners Manual
Page 16
... the filter indicator light is red, it is recommended that you replace the filter. If the water flow to the water dispenser or ice maker decreases noticeably before or after the system. ■ Refer to the "Warranty" section for the Manufacturer's name, address and telephone number. ■ Refer to red, it is recommended that you replace the filter. ■ The product is yellow, order a new filter. Rated service...
... the filter indicator light is red, it is recommended that you replace the filter. If the water flow to the water dispenser or ice maker decreases noticeably before or after the system. ■ Refer to the "Warranty" section for the Manufacturer's name, address and telephone number. ■ Refer to red, it is recommended that you replace the filter. ■ The product is yellow, order a new filter. Rated service...
Owners Manual
Page 17
... User Instructions and the model number information for future reference. 17 Any food or medicine loss due to repair or replace appliance light bulbs, air filters or water filters. Pickup and delivery. Repairs to parts or systems resulting from warranty coverage. 4. LIMITATION OF REMEDIES; Have your major appliance, to replace or repair house fuses, or to Maytag with Maytag's published installation instructions. 11. If you need assistance using your home. 8. This warranty gives you specific...
... User Instructions and the model number information for future reference. 17 Any food or medicine loss due to repair or replace appliance light bulbs, air filters or water filters. Pickup and delivery. Repairs to parts or systems resulting from warranty coverage. 4. LIMITATION OF REMEDIES; Have your major appliance, to replace or repair house fuses, or to Maytag with Maytag's published installation instructions. 11. If you need assistance using your home. 8. This warranty gives you specific...

Energy Guide
Page 1
... law prohibits removal of 10.65 cents per kWh. • For more information, visit www.ftc.gov/appliances. (P/N W10280080 Rev. U.S. Refrigerator-Freezer • Automatic Defrost • Side-Mounted Freezer • With Through-The-Door-Ice Service Maytag by Whirlpool Corporation Model: MSD2573VE*0* Capacity: 25.2 Cubic Feet Estimated Yearly Operating Cost $61 ▼ $60 $78 Cost Range of Similar Models 577 kWh Estimated Yearly Electricity Use Your cost...
... law prohibits removal of 10.65 cents per kWh. • For more information, visit www.ftc.gov/appliances. (P/N W10280080 Rev. U.S. Refrigerator-Freezer • Automatic Defrost • Side-Mounted Freezer • With Through-The-Door-Ice Service Maytag by Whirlpool Corporation Model: MSD2573VE*0* Capacity: 25.2 Cubic Feet Estimated Yearly Operating Cost $61 ▼ $60 $78 Cost Range of Similar Models 577 kWh Estimated Yearly Electricity Use Your cost...


