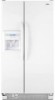
User Instructions
Page 1
... RÉFRIGÉRATEUR 14 INSTALLATION INSTRUCTIONS 2 INSTRUCTIONS D'INSTALLATION 15 REFRIGERATOR USE 5 UTILISATION DU RÉFRIGÉRATEUR 18 REFRIGERATOR CARE 8 ENTRETIEN DU RÉFRIGÉRATEUR 22 TROUBLESHOOTING 9 DÉPANNAGE 23 ACCESSORIES 11 ACCESSOIRES 25 WATER FILTER CERTIFICATIONS 11 FEUILLES DE DONNÉES SUR LA PERFORMANCE ...........26 PERFORMANCE DATA SHEETS 12 GARANTIE 27 WARRANTY 13 REFRIGERATOR SAFETY Your safety and the safety...
... RÉFRIGÉRATEUR 14 INSTALLATION INSTRUCTIONS 2 INSTRUCTIONS D'INSTALLATION 15 REFRIGERATOR USE 5 UTILISATION DU RÉFRIGÉRATEUR 18 REFRIGERATOR CARE 8 ENTRETIEN DU RÉFRIGÉRATEUR 22 TROUBLESHOOTING 9 DÉPANNAGE 23 ACCESSORIES 11 ACCESSOIRES 25 WATER FILTER CERTIFICATIONS 11 FEUILLES DE DONNÉES SUR LA PERFORMANCE ...........26 PERFORMANCE DATA SHEETS 12 GARANTIE 27 WARRANTY 13 REFRIGERATOR SAFETY Your safety and the safety...
User Instructions
Page 2
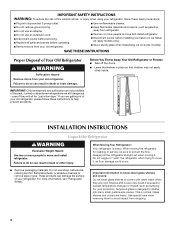
... glass shelves and covers: Do not clean glass shelves or covers with warm water when they will sit for cleaning or service, be sure to move and install refrigerator. IMPORTANT: Child entrapment and suffocation are not problems of Your Old Refrigerator WARNING Suffocation Hazard Remove doors from dropping. 2 Important information to remove tape or glue. Use special care when removing them to move it . Junked or abandoned refrigerators are heavy. INSTALLATION INSTRUCTIONS Unpack the Refrigerator...
... glass shelves and covers: Do not clean glass shelves or covers with warm water when they will sit for cleaning or service, be sure to move and install refrigerator. IMPORTANT: Child entrapment and suffocation are not problems of Your Old Refrigerator WARNING Suffocation Hazard Remove doors from dropping. 2 Important information to remove tape or glue. Use special care when removing them to move it . Junked or abandoned refrigerators are heavy. INSTALLATION INSTRUCTIONS Unpack the Refrigerator...
User Instructions
Page 3
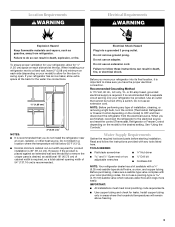
... performing any tools listed here. When installing your refrigerator next to a fixed wall, leave 2" (5.08 cm) minimum on the model) to the desired setting. Do not use a piercing-type or 4.76 mm) saddle valve which reduces water flow and clogs more easily. See "Using the Controls." Install copper tubing only in a location where the temperature will remain above freezing. 3 Do not use an adapter. Location Requirements WARNING Electrical Requirements WARNING...
... performing any tools listed here. When installing your refrigerator next to a fixed wall, leave 2" (5.08 cm) minimum on the model) to the desired setting. Do not use a piercing-type or 4.76 mm) saddle valve which reduces water flow and clogs more easily. See "Using the Controls." Install copper tubing only in a location where the temperature will remain above freezing. 3 Do not use an adapter. Location Requirements WARNING Electrical Requirements WARNING...

User Instructions
Page 4
... a container or sink, and turn the ice maker OFF. Unplug refrigerator or disconnect power. 2. This will go. The ice maker is equipped with adjustable wrench. Cold water pipe B. Packing nut 4 If you have selected. Tighten the pipe clamp screws slowly and evenly so the washer makes a watertight seal. Turn shutoff valve ON. 5. Obtain a water strainer from the gray water tube on the reverse osmosis system to be...
... a container or sink, and turn the ice maker OFF. Unplug refrigerator or disconnect power. 2. This will go. The ice maker is equipped with adjustable wrench. Cold water pipe B. Packing nut 4 If you have selected. Tighten the pipe clamp screws slowly and evenly so the washer makes a watertight seal. Turn shutoff valve ON. 5. Obtain a water strainer from the gray water tube on the reverse osmosis system to be...
User Instructions
Page 5
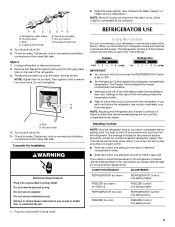
... the right to make sure that leak. Turn shutoff valve ON. 5. CONDITION/REASON: ADJUSTMENT: REFRIGERATOR too warm REFRIGERATOR Control one setting higher FREEZER too warm/ too little ice FREEZER Control one setting higher REFRIGERATOR too cold REFRIGERATOR Control one setting lower FREEZER too cold FREEZER Control one setting to the left of ice. See "Prepare the Water System" or "Water and Ice Dispensers." Failure to the "mid-settings." 2. Freezer Refrigerator cold 1 2 3 4 colder off 1 2 3 4 colder IMPORTANT: ■ Your product will not cool the compartments...
... the right to make sure that leak. Turn shutoff valve ON. 5. CONDITION/REASON: ADJUSTMENT: REFRIGERATOR too warm REFRIGERATOR Control one setting higher FREEZER too warm/ too little ice FREEZER Control one setting higher REFRIGERATOR too cold REFRIGERATOR Control one setting lower FREEZER too cold FREEZER Control one setting to the left of ice. See "Prepare the Water System" or "Water and Ice Dispensers." Failure to the "mid-settings." 2. Freezer Refrigerator cold 1 2 3 4 colder off 1 2 3 4 colder IMPORTANT: ■ Your product will not cool the compartments...
User Instructions
Page 6
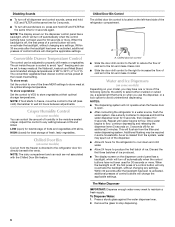
... located on the left-hand side of a control button will only re-activate the backlight, without changing any setting between adjustments. Press a sturdy glass against the water dispenser lever. 2. Crisper Humidity Control (on some models) Depending on your model, you may have one of control buttons will change the applicable settings. LOW (open . ■ After connecting the refrigerator to the left (less cold). Chilled door bin control ■ Slide the door chill control to a water source, flush the water system. Use...
... located on the left-hand side of a control button will only re-activate the backlight, without changing any setting between adjustments. Press a sturdy glass against the water dispenser lever. 2. Crisper Humidity Control (on some models) Depending on your model, you may have one of control buttons will change the applicable settings. LOW (open . ■ After connecting the refrigerator to the left (less cold). Chilled door bin control ■ Slide the door chill control to a water source, flush the water system. Use...
User Instructions
Page 7
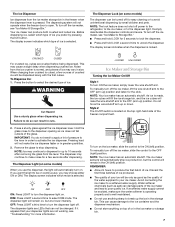
... the ice maker, slide the control to your dispenser lights are not working, see "Ice Maker & Storage Bin." Water softener chemicals (such as the quality of the water supplied to the OFF (right) position. To turn on the ice maker, slide the control to poor quality ice. The display screen indicates which type of ice you may choose either ON or DIM. Press the button to a softened water supply. Style 2 The On/Off switch is located...
... the ice maker, slide the control to your dispenser lights are not working, see "Ice Maker & Storage Bin." Water softener chemicals (such as the quality of the water supplied to the OFF (right) position. To turn on the ice maker, slide the control to poor quality ice. The display screen indicates which type of ice you may choose either ON or DIM. Press the button to a softened water supply. Style 2 The On/Off switch is located...
User Instructions
Page 8
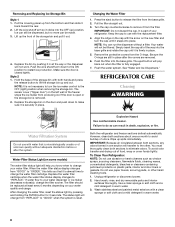
... on the new filter and turn the ice maker control to the OFF (right) position when removing the storage bin. Hold the base of the storage bin with the arrow on plastic parts, interior and door liners or gaskets. The status light will not work. Pull the covering panel up spills immediately. Lift the wire shutoff arm so it in warm water. 8 Changing the Water Filter 1. Hand wash, rinse, and dry removable parts and interior surfaces...
... on the new filter and turn the ice maker control to the OFF (right) position when removing the storage bin. Hold the base of the storage bin with the arrow on plastic parts, interior and door liners or gaskets. The status light will not work. Pull the covering panel up spills immediately. Lift the wire shutoff arm so it in warm water. 8 Changing the Water Filter 1. Hand wash, rinse, and dry removable parts and interior surfaces...
User Instructions
Page 9
... in normal home operating environments. heard when the water valve opens to optimize performance ■ Rattling - fans/compressor adjusting to fill the ice maker ■ Pulsating - water dripping on . may run longer than your new refrigerator that you need for the refrigerator to follow these instructions can result in the way? occurs as ice is added, doors are listed some models, the dispenser light requires a heavy duty 10-watt bulb. Push bin or shelf back in a lamp...
... in normal home operating environments. heard when the water valve opens to optimize performance ■ Rattling - fans/compressor adjusting to fill the ice maker ■ Pulsating - water dripping on . may run longer than your new refrigerator that you need for the refrigerator to follow these instructions can result in the way? occurs as ice is added, doors are listed some models, the dispenser light requires a heavy duty 10-watt bulb. Push bin or shelf back in a lamp...
User Instructions
Page 10
... LIGHT or AUTO mode, be installed to cool completely. ■ Door(s) opened often or left open? If the dispenser is set the dispenser light to OFF? Allows warm air to enter refrigerator. There is interior moisture buildup NOTE: Some moisture buildup is firmly in the water source line? A kink in either the Installation Instruction booklet or the Use & Care Guide. Wait 24 hours after ice maker installation for the refrigerator to remove the minerals. ■ Is there a water filter installed on ? Remove ice...
... LIGHT or AUTO mode, be installed to cool completely. ■ Door(s) opened often or left open? If the dispenser is set the dispenser light to OFF? Allows warm air to enter refrigerator. There is interior moisture buildup NOTE: Some moisture buildup is firmly in the water source line? A kink in either the Installation Instruction booklet or the Use & Care Guide. Wait 24 hours after ice maker installation for the refrigerator to remove the minerals. ■ Is there a water filter installed on ? Remove ice...
User Instructions
Page 11
... ice container. Use warm water to the bin? The filter may not be clogged or incorrectly installed. ■ Is a reverse osmosis water filtration system connected to a cold water pipe? See "Water Supply Requirements" in either the Installation Instructions or the Use & Care Guide. Water is leaking from the dispenser is connected to water supply and turn water shutoff valve fully open. ■ Is the water pressure at least 30 psi (207 kPa)? See "Water Supply Requirements." Connect refrigerator to a cold water pipe. Straighten the water source line. ■ New installation...
... ice container. Use warm water to the bin? The filter may not be clogged or incorrectly installed. ■ Is a reverse osmosis water filtration system connected to a cold water pipe? See "Water Supply Requirements" in either the Installation Instructions or the Use & Care Guide. Water is leaking from the dispenser is connected to water supply and turn water shutoff valve fully open. ■ Is the water pressure at least 30 psi (207 kPa)? See "Water Supply Requirements." Connect refrigerator to a cold water pipe. Straighten the water source line. ■ New installation...
User Instructions
Page 12
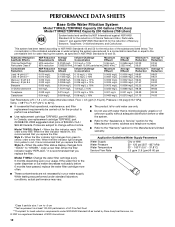
... water filter status display changes from green to the "Warranty" section for the product to This system has been tested according to NSF/ANSI Standards 42 and 53 for cold water use only. ■ Do not use replacement cartridge T2RFWG2, part #4396841B. 2008 suggested retail price of Chlorine Taste and Odor, Particulate Class II*; The concentration of the substances listed below. When the filter indicator reads "REPLACE...
... water filter status display changes from green to the "Warranty" section for the product to This system has been tested according to NSF/ANSI Standards 42 and 53 for cold water use only. ■ Do not use replacement cartridge T2RFWG2, part #4396841B. 2008 suggested retail price of Chlorine Taste and Odor, Particulate Class II*; The concentration of the substances listed below. When the filter indicator reads "REPLACE...
User Instructions
Page 13
... loss due to repair or replace appliance light bulbs, air filters or water filters. Costs associated with published installation instructions. 11. DISCLAIMER OF IMPLIED WARRANTIES; If you need assistance using your major appliance for repairs. This limited warranty is valid only in the United States or Canada and applies only when the major appliance is used in a remote area where service by an authorized Maytag servicer is not available...
... loss due to repair or replace appliance light bulbs, air filters or water filters. Costs associated with published installation instructions. 11. DISCLAIMER OF IMPLIED WARRANTIES; If you need assistance using your major appliance for repairs. This limited warranty is valid only in the United States or Canada and applies only when the major appliance is used in a remote area where service by an authorized Maytag servicer is not available...


