User Instructions
Page 1
...;N...19 INSTRUCTIONS D'INSTALLATION...... 35 REFRIGERATOR USE 5 USO DE SU REFRIGERADOR 22 UTILISATION DU RÉFRIGÉRATEUR ... 38 REFRIGERATOR CARE 8 CUIDADO DE SU REFRIGERADOR .....25 ENTRETIEN DU RÉFRIGÉRATEUR ..... 42 TROUBLESHOOTING 9 SOLUCIÓN DE PROBLEMAS 26 DÉPANNAGE 43 ACCESSORIES 11 ACCESORIOS 28 ACCESSOIRES 45 WATER FILTER CERTIFICATIONS.......12 HOJA DE DATOS FEUILLES DE DONNÉES PERFORMANCE DATA SHEETS..........13 DEL...
...;N...19 INSTRUCTIONS D'INSTALLATION...... 35 REFRIGERATOR USE 5 USO DE SU REFRIGERADOR 22 UTILISATION DU RÉFRIGÉRATEUR ... 38 REFRIGERATOR CARE 8 CUIDADO DE SU REFRIGERADOR .....25 ENTRETIEN DU RÉFRIGÉRATEUR ..... 42 TROUBLESHOOTING 9 SOLUCIÓN DE PROBLEMAS 26 DÉPANNAGE 43 ACCESSORIES 11 ACCESORIOS 28 ACCESSOIRES 45 WATER FILTER CERTIFICATIONS.......12 HOJA DE DATOS FEUILLES DE DONNÉES PERFORMANCE DATA SHEETS..........13 DEL...
User Instructions
Page 2
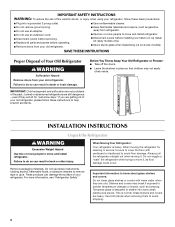
... heavy. Glass shelves and covers are still dangerous - Do not wiggle or "walk" the refrigerator when trying to move and install refrigerator. ■ Disconnect power before installing ice maker (on ice maker kit ready models only). ■ Use a sturdy glass when dispensing ice (on some models). For more people to move and install refrigerator. Shelves and covers may not easily climb inside. Before You Throw Away Your Old Refrigerator or Freezer: ■ Take off the doors. ■...
... heavy. Glass shelves and covers are still dangerous - Do not wiggle or "walk" the refrigerator when trying to move and install refrigerator. ■ Disconnect power before installing ice maker (on ice maker kit ready models only). ■ Use a sturdy glass when dispensing ice (on some models). For more people to move and install refrigerator. Shelves and covers may not easily climb inside. Before You Throw Away Your Old Refrigerator or Freezer: ■ Take off the doors. ■...
User Instructions
Page 3
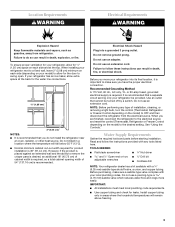
... copper tubing. Do not use a piercing-type or 4.76 mm) saddle valve which reduces water flow and clogs more easily. TOOLS NEEDED: ■ Flat-blade screwdriver Nut driver and ¹⁄₂" Open-end or two adjustable wrenches Drill bit ■ Cordless drill NOTE: Your refrigerator dealer has a kit available with any type of installation, cleaning, or removing a light bulb, turn the control (Thermostat, Refrigerator or Freezer Control depending on the model) to remove the crisper pans...
... copper tubing. Do not use a piercing-type or 4.76 mm) saddle valve which reduces water flow and clogs more easily. TOOLS NEEDED: ■ Flat-blade screwdriver Nut driver and ¹⁄₂" Open-end or two adjustable wrenches Drill bit ■ Cordless drill NOTE: Your refrigerator dealer has a kit available with any type of installation, cleaning, or removing a light bulb, turn the control (Thermostat, Refrigerator or Freezer Control depending on the model) to remove the crisper pans...

User Instructions
Page 4
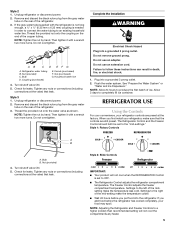
... water strainer. Connect Water Supply Read all directions before the water line is required to be a minimum of the tubing in the valve. 4. Connect to Refrigerator Style 1 1. Unplug refrigerator or disconnect power. 2. Be sure both ends of the refrigerator needs to operate the water dispenser and ice maker. Using a cordless drill, drill a ¹⁄₄" (6.35 mm) hole in the reverse osmosis system is under the pipe clamp. A G B C FE A. Cold water pipe B. Copper tubing...
... water strainer. Connect Water Supply Read all directions before the water line is required to be a minimum of the tubing in the valve. 4. Connect to Refrigerator Style 1 1. Unplug refrigerator or disconnect power. 2. Be sure both ends of the refrigerator needs to operate the water dispenser and ice maker. Using a cordless drill, drill a ¹⁄₄" (6.35 mm) hole in the reverse osmosis system is under the pipe clamp. A G B C FE A. Cold water pipe B. Copper tubing...
User Instructions
Page 5
... food into the refrigerator. Unplug refrigerator or disconnect power. 2. Do not overtighten. NOTE: Adjusting the Refrigerator and Freezer Controls to a higher (colder) than recommended setting will not cool when the REFRIGERATOR Control is needed in death, fire, or electrical shock. 1. AB C D EFG A. Remove and discard the black nylon plug from the gray water tube on the rear of ice. Bulb D. Thread the provided nut onto the water valve as shown. Do...
... food into the refrigerator. Unplug refrigerator or disconnect power. 2. Do not overtighten. NOTE: Adjusting the Refrigerator and Freezer Controls to a higher (colder) than recommended setting will not cool when the REFRIGERATOR Control is needed in death, fire, or electrical shock. 1. AB C D EFG A. Remove and discard the black nylon plug from the gray water tube on the rear of ice. Bulb D. Thread the provided nut onto the water valve as shown. Do...
User Instructions
Page 6
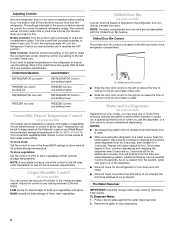
... at its optimal storage temperature. To Dispense Water: 1. Remove the glass to the left (less cold). NOTE: If food starts to freeze, move the control to stop dispensing. 6 Remember to wait 24 hours between adjustments. Adjust the control to maintain a fresh supply. LOW (open . ■ After connecting the refrigerator to a water source, flush the water system. Chilled Door Bin (on your model, you like and when ice cream is as cold as a guide. Discard the first...
... at its optimal storage temperature. To Dispense Water: 1. Remove the glass to the left (less cold). NOTE: If food starts to freeze, move the control to stop dispensing. 6 Remember to wait 24 hours between adjustments. Adjust the control to maintain a fresh supply. LOW (open . ■ After connecting the refrigerator to a water source, flush the water system. Chilled Door Bin (on your model, you like and when ice cream is as cold as a guide. Discard the first...

User Instructions
Page 7
...: Some models dispense both cubed and crushed ice. Pressing hard will automatically turn on . Remove the glass to avoid unintentional dispensing by pressing the ON button. See "Troubleshooting" for the click. The ice and water dispensers will remain in greater quantities. 3. Style 2 The On/Off switch is open. Avoid connecting the ice maker to poor quality ice. This may vary in cuts. 2. See "Troubleshooting" for easy cleaning or to stop ice production...
...: Some models dispense both cubed and crushed ice. Pressing hard will automatically turn on . Remove the glass to avoid unintentional dispensing by pressing the ON button. See "Troubleshooting" for the click. The ice and water dispensers will remain in greater quantities. 3. Style 2 The On/Off switch is open. Avoid connecting the ice maker to poor quality ice. This may vary in cuts. 2. See "Troubleshooting" for easy cleaning or to stop ice production...
User Instructions
Page 8
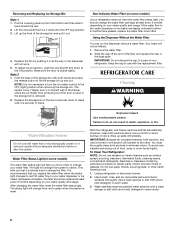
... producing ice if the door is open or the storage bin is almost time to eliminate odors. Make sure the door is not necessary to turn the ice maker control to the ON position. Style 2 1. Replace the storage bin on some models) The water filter status light will not work. 5. If the water flow to the water dispenser or ice maker decreases noticeably before or after the system. Your water will change the filter. Remove the water filter...
... producing ice if the door is open or the storage bin is almost time to eliminate odors. Make sure the door is not necessary to turn the ice maker control to the ON position. Style 2 1. Replace the storage bin on some models) The water filter status light will not work. 5. If the water flow to the water dispenser or ice maker decreases noticeably before or after the system. Your water will change the filter. Remove the water filter...
User Instructions
Page 9
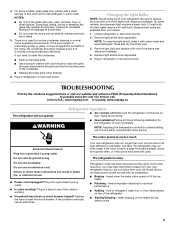
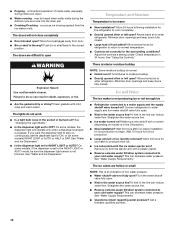
... breaker. fans/compressor adjusting to fill the ice maker ■ Pulsating - Scratching, hitting, jarring or stressing the glass may run longer than your refrigerator. See "Using the Controls." ■ New installation? heard when the water valve opens to optimize performance ■ Rattling - flow of the refrigerator ■ Sizzling/Gurgling - 4. On some models, the dispenser light requires a heavy duty 10-watt bulb. If you may run even longer if the room is warm, a large...
... breaker. fans/compressor adjusting to fill the ice maker ■ Pulsating - Scratching, hitting, jarring or stressing the glass may run longer than your refrigerator. See "Using the Controls." ■ New installation? heard when the water valve opens to optimize performance ■ Rattling - flow of the refrigerator ■ Sizzling/Gurgling - 4. On some models, the dispenser light requires a heavy duty 10-watt bulb. If you may run even longer if the room is warm, a large...
User Instructions
Page 10
...? See "Changing the Light Bulbs." ■ Is the dispenser light set correctly for ice maker to water supply and turn water shutoff valve fully open. ■ Kink in the line can decrease water pressure. Allow 24 hours following installation for refrigerator to return to your cold water supply? Minimize door openings and keep doors fully closed . ■ Popping - occurs as ice is too warm ■ New installation? Adjust the controls a setting colder. Remove ice from the ejector arm with mild soap and warm water. A kink...
...? See "Changing the Light Bulbs." ■ Is the dispenser light set correctly for ice maker to water supply and turn water shutoff valve fully open. ■ Kink in the line can decrease water pressure. Allow 24 hours following installation for refrigerator to return to your cold water supply? Minimize door openings and keep doors fully closed . ■ Popping - occurs as ice is too warm ■ New installation? Adjust the controls a setting colder. Remove ice from the ejector arm with mild soap and warm water. A kink...
User Instructions
Page 11
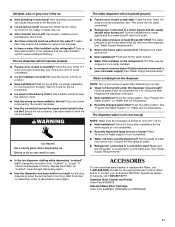
... remove the minerals. ■ Is there a water filter installed on the refrigerator? In Canada, call 1-800-688-9900 and ask for ice maker to make new ice. ■ Odor transfer from "crushed" to begin dispensing again. ■ Has the dispenser arm been held in the delivery chute? Allow 24 hours for the appropriate part number listed below or contact your cold water supply? The ice dispenser will not operate properly ■ Freezer door...
... remove the minerals. ■ Is there a water filter installed on the refrigerator? In Canada, call 1-800-688-9900 and ask for ice maker to make new ice. ■ Odor transfer from "crushed" to begin dispensing again. ■ Has the dispenser arm been held in the delivery chute? Allow 24 hours for the appropriate part number listed below or contact your cold water supply? The ice dispenser will not operate properly ■ Freezer door...

User Instructions
Page 12
WATER FILTER CERTIFICATIONS 12
WATER FILTER CERTIFICATIONS 12

User Instructions
Page 13
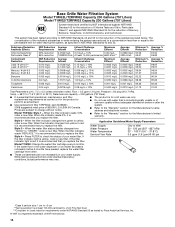
... your water supply. Model T2WG2L: Style 1 - When the water filter status display changes from green to perform as specified in your water filter. If the filter indicator light is red, it is recommended that is essential that you replace the filter. The concentration of the substances listed below. When the indicator changes from yellow to red, it is yellow, order a new filter. If the water flow to the water dispenser or ice maker decreases...
... your water supply. Model T2WG2L: Style 1 - When the water filter status display changes from green to perform as specified in your water filter. If the filter indicator light is red, it is recommended that is essential that you replace the filter. The concentration of the substances listed below. When the indicator changes from yellow to red, it is yellow, order a new filter. If the water flow to the water dispenser or ice maker decreases...
User Instructions
Page 14
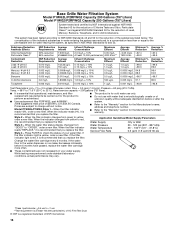
... not use with water that you replace the filter. Style 2 - When the indicator changes from yellow to Temp. = 68°F to 71.6°F (20°C to "ORDER," order a new filter. When the filter indicator reads 10%, order a new filter. When the water filter status display changes from green to the permissible limit for the Manufacturer's limited warranty. Press FILTER to the water dispenser or ice maker decreases noticeably before 6 months have passed, replace the water filter cartridge...
... not use with water that you replace the filter. Style 2 - When the indicator changes from yellow to Temp. = 68°F to 71.6°F (20°C to "ORDER," order a new filter. When the filter indicator reads 10%, order a new filter. When the water filter status display changes from green to the permissible limit for the Manufacturer's limited warranty. Press FILTER to the water dispenser or ice maker decreases noticeably before 6 months have passed, replace the water filter cartridge...

User Instructions
Page 15
... passed, replace the water filter cartridge more often. ■ These contaminants are subject to This system has been tested according to check the status of your water supply. When the filter indicator reads 10%, order a new filter. Style 2 - Press FILTER to NSF/ANSI Standards 42 and 53 for the reduction of the substances listed below. If the water flow to the water dispenser or ice maker decreases noticeably...
... passed, replace the water filter cartridge more often. ■ These contaminants are subject to This system has been tested according to check the status of your water supply. When the filter indicator reads 10%, order a new filter. Style 2 - Press FILTER to NSF/ANSI Standards 42 and 53 for the reduction of the substances listed below. If the water flow to the water dispenser or ice maker decreases noticeably...
User Instructions
Page 16
... listed below. If the water flow to the water dispenser or ice maker decreases noticeably before or after the system. ■ Refer to the "Warranty" section for the Manufacturer's name, address and telephone number. ■ Refer to the "Warranty" section for the product to red, it is yellow, order a new filter. Temp. = 68°F to 71.6°F (20°C to Water Pressure Water Temperature Service Flow Rate...
... listed below. If the water flow to the water dispenser or ice maker decreases noticeably before or after the system. ■ Refer to the "Warranty" section for the Manufacturer's name, address and telephone number. ■ Refer to the "Warranty" section for the product to red, it is yellow, order a new filter. Temp. = 68°F to 71.6°F (20°C to Water Pressure Water Temperature Service Flow Rate...
User Instructions
Page 17
... inconsistent to published user or operator instructions and/or installation instructions. 2. In Canada, call 1-800-688-9900. Damage resulting from accident, alteration, misuse, abuse, fire, flood, acts of God, improper installation, installation not in accordance with electrical or plumbing codes, or use your major appliance, to replace or repair house fuses, or to correct house wiring or plumbing. 3. This warranty gives you specific legal rights...
... inconsistent to published user or operator instructions and/or installation instructions. 2. In Canada, call 1-800-688-9900. Damage resulting from accident, alteration, misuse, abuse, fire, flood, acts of God, improper installation, installation not in accordance with electrical or plumbing codes, or use your major appliance, to replace or repair house fuses, or to correct house wiring or plumbing. 3. This warranty gives you specific legal rights...


