Warranty Information
Page 1
... you need assistance using your major appliance is located in accordance with Maytag's published installation instructions. 11. Please keep these limitations and exclusions may have been removed, altered or cannot be repaired in your major appliance, to instruct you also may not apply to repair or replace appliance light bulbs, air filters or water filters. Service must be provided by Maytag. 5. YOUR SOLE AND EXCLUSIVE REMEDY UNDER THIS LIMITED WARRANTY...
... you need assistance using your major appliance is located in accordance with Maytag's published installation instructions. 11. Please keep these limitations and exclusions may have been removed, altered or cannot be repaired in your major appliance, to instruct you also may not apply to repair or replace appliance light bulbs, air filters or water filters. Service must be provided by Maytag. 5. YOUR SOLE AND EXCLUSIVE REMEDY UNDER THIS LIMITED WARRANTY...
Dimension Guide
Page 1
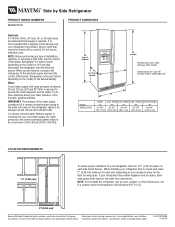
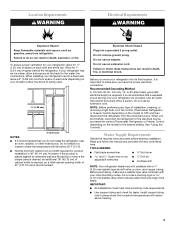
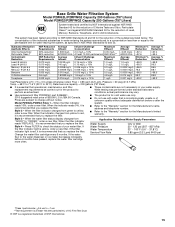
... your cold water supply, the water pressure to the reverse osmosis system needs to change without notice. Specifications subject to operate the water dispenser and ice maker. It is required to change materials and specifications without notice. If you are for 1⁄2" (1.25 cm) space on your water pressure, call a licensed, qualified plumber. B Model MSD2274VE Depth "A" 31-3/8" (79.7 cm) Cab. When installing your refrigerator next to swing open. Instructions packed with water...
... your cold water supply, the water pressure to the reverse osmosis system needs to change without notice. Specifications subject to operate the water dispenser and ice maker. It is required to change materials and specifications without notice. If you are for 1⁄2" (1.25 cm) space on your water pressure, call a licensed, qualified plumber. B Model MSD2274VE Depth "A" 31-3/8" (79.7 cm) Cab. When installing your refrigerator next to swing open. Instructions packed with water...
Owners Manual
Page 1
... INSTRUCTIONS D'INSTALLATION...... 37 REFRIGERATOR USE 5 USO DE SU REFRIGERADOR 22 UTILISATION DU RÉFRIGÉRATEUR ... 40 REFRIGERATOR CARE 8 CUIDADO DE SU REFRIGERADOR .....26 ENTRETIEN DU RÉFRIGÉRATEUR ..... 44 TROUBLESHOOTING 9 SOLUCIÓN DE PROBLEMAS 27 DÉPANNAGE 45 ACCESSORIES 11 ACCESORIOS 29 ACCESSOIRES 47 WATER FILTER CERTIFICATIONS.......12 HOJA DE DATOS FEUILLES DE DONNÉES PERFORMANCE DATA SHEETS..........13 DEL...
... INSTRUCTIONS D'INSTALLATION...... 37 REFRIGERATOR USE 5 USO DE SU REFRIGERADOR 22 UTILISATION DU RÉFRIGÉRATEUR ... 40 REFRIGERATOR CARE 8 CUIDADO DE SU REFRIGERADOR .....26 ENTRETIEN DU RÉFRIGÉRATEUR ..... 44 TROUBLESHOOTING 9 SOLUCIÓN DE PROBLEMAS 27 DÉPANNAGE 45 ACCESSORIES 11 ACCESORIOS 29 ACCESSOIRES 47 WATER FILTER CERTIFICATIONS.......12 HOJA DE DATOS FEUILLES DE DONNÉES PERFORMANCE DATA SHEETS..........13 DEL...
Owners Manual
Page 2
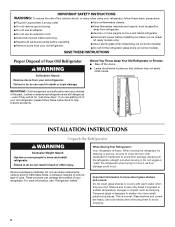
... and install refrigerator. ■ Disconnect power before installing ice maker (on ice maker kit ready models only). ■ Use a sturdy glass when dispensing ice (on some models). ■ Do not hit the refrigerator glass doors (on some models). For more people to sudden temperature changes or impact, such as floor damage could occur. Shelves and covers may not easily climb inside. Glass shelves and covers are not problems of the past. Before You Throw Away Your Old Refrigerator or Freezer...
... and install refrigerator. ■ Disconnect power before installing ice maker (on ice maker kit ready models only). ■ Use a sturdy glass when dispensing ice (on some models). ■ Do not hit the refrigerator glass doors (on some models). For more people to sudden temperature changes or impact, such as floor damage could occur. Shelves and covers may not easily climb inside. Glass shelves and covers are not problems of the past. Before You Throw Away Your Old Refrigerator or Freezer...
Owners Manual
Page 3
... the instructions provided with any type of space behind the refrigerator. Do not use an extension cord. Do not use an adapter. NOTE: Before performing any tools listed here. See "Using the Controls." IMPORTANT: ■ All installations must meet local plumbing code requirements. ■ Use copper tubing and check for 1" (2.54 cm) of installation, cleaning, or removing a light bulb, turn the control (Thermostat, Refrigerator or Freezer Control depending on the model) to swing open. 1/2" (1.25...
... the instructions provided with any type of space behind the refrigerator. Do not use an extension cord. Do not use an adapter. NOTE: Before performing any tools listed here. See "Using the Controls." IMPORTANT: ■ All installations must meet local plumbing code requirements. ■ Use copper tubing and check for 1" (2.54 cm) of installation, cleaning, or removing a light bulb, turn the control (Thermostat, Refrigerator or Freezer Control depending on the model) to swing open. 1/2" (1.25...
Owners Manual
Page 4
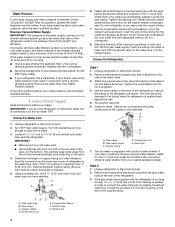
... leaks. Unplug refrigerator or disconnect power. 2. IMPORTANT: ■ Make sure it may crush the copper tubing. 7. Add 7 ft (2.1 m) to operate the water dispenser and ice maker. Fasten the shutoff valve to the inlet of the water valve. 3. Do not overtighten, or you begin. Coil the copper tubing. Check for cleaning. A B C D E A. Unplug refrigerator or disconnect power. 2. Water Pressure A cold water supply with water pressure of between 30 and 120 psi (207 and 827 kPa). Replace...
... leaks. Unplug refrigerator or disconnect power. 2. IMPORTANT: ■ Make sure it may crush the copper tubing. 7. Add 7 ft (2.1 m) to operate the water dispenser and ice maker. Fasten the shutoff valve to the inlet of the water valve. 3. Do not overtighten, or you begin. Coil the copper tubing. Check for cleaning. A B C D E A. Unplug refrigerator or disconnect power. 2. Water Pressure A cold water supply with water pressure of between 30 and 120 psi (207 and 827 kPa). Replace...
Owners Manual
Page 5
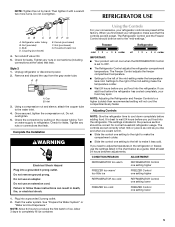
... power. 2. AB A. Using a compression nut and sleeve, attach the copper tube to produce the first batch of ice. Do not use an adapter. Plug into a grounded 3 prong outlet. See "Prepare the Water System" or "Water and Ice Dispensers." Using the Controls For your convenience, your refrigerator controls are preset at the valve) that leak. NOTE: Adjusting the Refrigerator and Freezer Controls to a higher (colder) than recommended setting will not cool when the REFRIGERATOR Control...
... power. 2. AB A. Using a compression nut and sleeve, attach the copper tube to produce the first batch of ice. Do not use an adapter. Plug into a grounded 3 prong outlet. See "Prepare the Water System" or "Water and Ice Dispensers." Using the Controls For your convenience, your refrigerator controls are preset at the valve) that leak. NOTE: Adjusting the Refrigerator and Freezer Controls to a higher (colder) than recommended setting will not cool when the REFRIGERATOR Control...

Owners Manual
Page 6
... models) Cool air from the filter and water dispensing system, and prepare the water filter for best storage of the dispenser. Discard the first three batches of ice. The Water Dispenser IMPORTANT: Dispense enough water every week to any setting between adjustments. Use a sturdy container to produce the first batch of ice produced. ■ The display screen on the dispenser control panel has a backlight, which will change the applicable settings. As air is open ) for use the dispenser...
... models) Cool air from the filter and water dispensing system, and prepare the water filter for best storage of the dispenser. Discard the first three batches of ice. The Water Dispenser IMPORTANT: Dispense enough water every week to any setting between adjustments. Use a sturdy container to produce the first batch of ice produced. ■ The display screen on the dispenser control panel has a backlight, which will change the applicable settings. As air is open ) for use the dispenser...

Owners Manual
Page 7
... batch of ice is open the translucent ice maker door and lower the wire shutoff arm to the ON position. ■ To manually turn off the dispenser light. To turn off for a few ounces of ice you use anything on the dispenser panel. Ice can be avoided, make noise for easy cleaning or to stop dispensing. The Ice Dispenser Ice dispenses from the ice maker storage bin in cuts. 2. Your ice maker can dispense both crushed and cubed ice. Before dispensing ice, select which...
... batch of ice is open the translucent ice maker door and lower the wire shutoff arm to the ON position. ■ To manually turn off the dispenser light. To turn off for a few ounces of ice you use anything on the dispenser panel. Ice can be avoided, make noise for easy cleaning or to stop dispensing. The Ice Dispenser Ice dispenses from the ice maker storage bin in cuts. 2. Your ice maker can dispense both crushed and cubed ice. Before dispensing ice, select which...
Owners Manual
Page 8
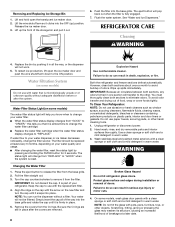
... change from "REPLACE" to "REPLACE." Remove the covers from the base grille. 2. On some models) The water filter status light will not work. 5. REFRIGERATOR CARE Cleaning WARNING 4. To restart ice production, lift open the translucent ice maker door. 2. IMPORTANT: Because air circulates between both sections, any odors formed in one section will change your water quality and usage. ■ After changing the water filter, reset the status light by pushing it in all of the storage bin...
... change from "REPLACE" to "REPLACE." Remove the covers from the base grille. 2. On some models) The water filter status light will not work. 5. REFRIGERATOR CARE Cleaning WARNING 4. To restart ice production, lift open the translucent ice maker door. 2. IMPORTANT: Because air circulates between both sections, any odors formed in one section will change your water quality and usage. ■ After changing the water filter, reset the status light by pushing it in all of the storage bin...

Owners Manual
Page 9
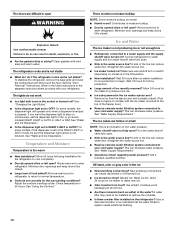
... use an adapter. If the problem continues, call . Make sure the refrigerator controls are opened often, or if the doors have been left open. See "Using the Controls." ■ New installation? occurs as ice is working ? If the environment is particularly greasy or dusty, or there is noisy Electrical Shock Hazard Plug into the drain pan ■ Creaking/Cracking - If you need for the refrigerator to ensure maximum efficiency. See the "Door Removal" instructions...
... use an adapter. If the problem continues, call . Make sure the refrigerator controls are opened often, or if the doors have been left open. See "Using the Controls." ■ New installation? occurs as ice is working ? If the environment is particularly greasy or dusty, or there is noisy Electrical Shock Hazard Plug into the drain pan ■ Creaking/Cracking - If you need for the refrigerator to ensure maximum efficiency. See the "Door Removal" instructions...
Owners Manual
Page 10
...? Adjust the controls a setting colder. A kink in the water source line? The ice cubes are difficult to cool completely. ■ Door(s) opened often or left open . ■ Kink in the water? Turn the water shutoff valve fully open ? See "Water Supply Requirements." ■ Questions remain regarding water pressure? New plumbing connections can reduce water flow. Discard ice. A water filter may need to be sure the dispenser light sensor is pressed. Explosion Hazard Use nonflammable cleaner. Clean gaskets with your cold water supply? See the "Door Removal" instructions...
...? Adjust the controls a setting colder. A kink in the water source line? The ice cubes are difficult to cool completely. ■ Door(s) opened often or left open . ■ Kink in the water? Turn the water shutoff valve fully open ? See "Water Supply Requirements." ■ Questions remain regarding water pressure? New plumbing connections can reduce water flow. Discard ice. A water filter may need to be sure the dispenser light sensor is pressed. Explosion Hazard Use nonflammable cleaner. Clean gaskets with your cold water supply? See the "Door Removal" instructions...
Owners Manual
Page 11
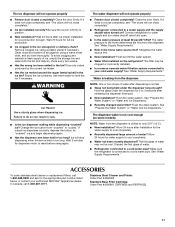
.... Use warm water to water supply and turn water shutoff valve fully open. ■ Is the water pressure at least 30 psi (207 kPa)? Ice will not operate properly ■ Freezer door closed completely? The filter may not be clogged or incorrectly installed. ■ Is a reverse osmosis water filtration system connected to only 50°F (10°C). ■ New installation? Flush the water system. The first glass of water after installation for the appropriate part number listed below...
.... Use warm water to water supply and turn water shutoff valve fully open. ■ Is the water pressure at least 30 psi (207 kPa)? Ice will not operate properly ■ Freezer door closed completely? The filter may not be clogged or incorrectly installed. ■ Is a reverse osmosis water filtration system connected to only 50°F (10°C). ■ New installation? Flush the water system. The first glass of water after installation for the appropriate part number listed below...

Owners Manual
Page 12
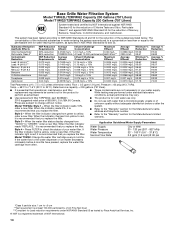
WATER FILTER CERTIFICATIONS 12
WATER FILTER CERTIFICATIONS 12
Owners Manual
Page 13
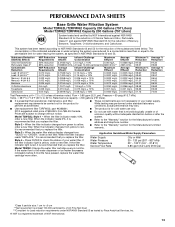
... your water supply. Press FILTER to change without adequate disinfection before 6 months have passed, replace the water filter cartridge more often. If the filter indicator light is microbiologically unsafe or of unknown quality without notice. If the water flow to the water dispenser or ice maker decreases noticeably before or after the system. ■ Refer to the "Warranty" section for the Manufacturer's name, address and telephone number. ■...
... your water supply. Press FILTER to change without adequate disinfection before 6 months have passed, replace the water filter cartridge more often. If the filter indicator light is microbiologically unsafe or of unknown quality without notice. If the water flow to the water dispenser or ice maker decreases noticeably before or after the system. ■ Refer to the "Warranty" section for the Manufacturer's name, address and telephone number. ■...
Owners Manual
Page 14
... filter indicator light is recommended that you replace the filter. If the filter indicator light is red, it is recommended that you replace the filter. Water Pressure Water Temperature Service Flow Rate 30 - 120 psi (207 - 827 kPa) 33° - 100°F (0.6° - 37.8°C) 0.5 gpm (1.9 Lpm) @ 60 psi *Class II particle size: 1 um to 22°C). When the indicator reads 0%, it is yellow, order a new filter. Model T1WG2: Change the water filter cartridge...
... filter indicator light is recommended that you replace the filter. If the filter indicator light is red, it is recommended that you replace the filter. Water Pressure Water Temperature Service Flow Rate 30 - 120 psi (207 - 827 kPa) 33° - 100°F (0.6° - 37.8°C) 0.5 gpm (1.9 Lpm) @ 60 psi *Class II particle size: 1 um to 22°C). When the indicator reads 0%, it is yellow, order a new filter. Model T1WG2: Change the water filter cartridge...
Owners Manual
Page 15
... a new filter. When the indicator changes from yellow to the "Warranty" section for the Manufacturer's limited warranty. When the water filter status display changes from green to NSF/ANSI Standards 42 and 53 for the reduction of the substances listed below. Press FILTER to the permissible limit for water leaving the system, as advertised. ■ These contaminants are subject to the water dispenser or ice maker decreases...
... a new filter. When the indicator changes from yellow to the "Warranty" section for the Manufacturer's limited warranty. When the water filter status display changes from green to NSF/ANSI Standards 42 and 53 for the reduction of the substances listed below. Press FILTER to the permissible limit for water leaving the system, as advertised. ■ These contaminants are subject to the water dispenser or ice maker decreases...

Owners Manual
Page 16
.... Application Guidelines/Water Supply Parameters Water Supply City or Well Style 4 - Press FILTER to red, it is yellow, order a new filter. If the filter indicator light is red, it is recommended that you replace the filter. ■ The product is for cold water use only. ■ Do not use with water that is essential that you replace the filter. Change the water filter cartridge every 6 months. If the water flow to Water Pressure Water Temperature Service Flow Rate 30...
.... Application Guidelines/Water Supply Parameters Water Supply City or Well Style 4 - Press FILTER to red, it is yellow, order a new filter. If the filter indicator light is red, it is recommended that you replace the filter. ■ The product is for cold water use only. ■ Do not use with water that is essential that you replace the filter. Change the water filter cartridge every 6 months. If the water flow to Water Pressure Water Temperature Service Flow Rate 30...

Owners Manual
Page 17
... removal and reinstallation of your model number and serial number on the label, located on the duration of implied warranties of merchantability or fitness, so this limited warranty. Replacement parts or repair labor on how to use or when it is used in the country in which it is installed in an inaccessible location or is not installed in accordance with Maytag's published installation instructions. 11. This warranty gives you specific...
... removal and reinstallation of your model number and serial number on the label, located on the duration of implied warranties of merchantability or fitness, so this limited warranty. Replacement parts or repair labor on how to use or when it is used in the country in which it is installed in an inaccessible location or is not installed in accordance with Maytag's published installation instructions. 11. This warranty gives you specific...
Energy Guide
Page 1
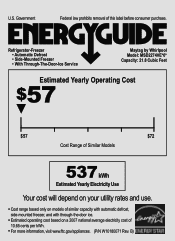
... law prohibits removal of 10.65 cents per kWh. • For more information, visit www.ftc.gov/appliances. (P/N W10180071 Rev. B) Refrigerator-Freezer • Automatic Defrost • Side-Mounted Freezer • With Through-The-Door-Ice Service Maytag by Whirlpool Model: MSD2274VE*0* Capacity: 21.8 Cubic Feet Estimated Yearly Operating Cost $57 ▼ $57 $72 Cost Range of Similar Models 537 kWh Estimated Yearly Electricity Use Your cost will...
... law prohibits removal of 10.65 cents per kWh. • For more information, visit www.ftc.gov/appliances. (P/N W10180071 Rev. B) Refrigerator-Freezer • Automatic Defrost • Side-Mounted Freezer • With Through-The-Door-Ice Service Maytag by Whirlpool Model: MSD2274VE*0* Capacity: 21.8 Cubic Feet Estimated Yearly Operating Cost $57 ▼ $57 $72 Cost Range of Similar Models 537 kWh Estimated Yearly Electricity Use Your cost will...


