Energy Guide
Page 1
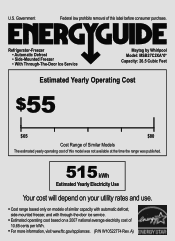
A) U.S. Refrigerator-Freezer • Automatic Defrost • Side-Mounted Freezer • With Through-The-Door Ice Service Maytag by Whirlpool Model: MSB27C2XA*0* Capacity: 26.5 Cubic Feet Estimated Yearly Operating Cost $55 $65 $80 Cost Range of Similar Models The estimated yearly operating cost ...
A) U.S. Refrigerator-Freezer • Automatic Defrost • Side-Mounted Freezer • With Through-The-Door Ice Service Maytag by Whirlpool Model: MSB27C2XA*0* Capacity: 26.5 Cubic Feet Estimated Yearly Operating Cost $55 $65 $80 Cost Range of Similar Models The estimated yearly operating cost ...
Use & Care Guide
Page 2
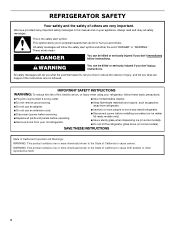
... other reproductive harm. 2 This is , tell you how to the State of fire, electric shock, or injury when using your refrigerator, follow instructions. These words mean: DANGER You can be killed or seriously injured if you what the potential hazard is the safety alert... provided many important safety messages in this manual and on your old refrigerator. ■ Keep flammable materials and vapors, such as gasoline, away from refrigerator. ■ Use two or more chemicals known to move and install refrigerator. ■ Disconnect power before operating. ■ Remove doors from ...
... other reproductive harm. 2 This is , tell you how to the State of fire, electric shock, or injury when using your refrigerator, follow instructions. These words mean: DANGER You can be killed or seriously injured if you what the potential hazard is the safety alert... provided many important safety messages in this manual and on your old refrigerator. ■ Keep flammable materials and vapors, such as gasoline, away from refrigerator. ■ Use two or more chemicals known to move and install refrigerator. ■ Disconnect power before operating. ■ Remove doors from ...
Use & Care Guide
Page 3
...not easily climb inside. Use both hands when removing them to remove tape or glue. These products can damage the surface of your old refrigerator. Failure to know about glass shelves and covers: Do not clean glass shelves or covers with warm water when they will sit for ...cleaning or service, be evacuated by a licensed, EPA certified refrigerant technician in death or brain damage. Failure to shatter into many small, pebble-size pieces. When moving it , as bumping. Proper Disposal of Your...
...not easily climb inside. Use both hands when removing them to remove tape or glue. These products can damage the surface of your old refrigerator. Failure to know about glass shelves and covers: Do not clean glass shelves or covers with warm water when they will sit for ...cleaning or service, be evacuated by a licensed, EPA certified refrigerant technician in death or brain damage. Failure to shatter into many small, pebble-size pieces. When moving it , as bumping. Proper Disposal of Your...
Use & Care Guide
Page 4
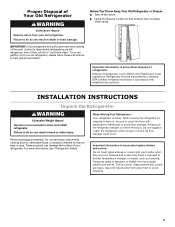
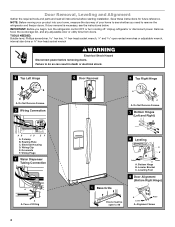
... level, Phillips screwdriver hex key, ¹⁄₄" hex-head socket wrench, ¹⁄₄" and open to remove the refrigerator and freezer doors. Grommets F. Leveler Bracket C. Alignment Screw NOTE: Before moving your product into your home to do so can result...A Raise Lower A. Do Not Remove Screws. 3 Wiring Connection 5 Door Removal 6 Top Right Hinge A A A. Routing Plate C. Unplug refrigerator or disconnect power. Save these instructions for future reference. Door Removal, Leveling and Alignment Gather the required tools and parts and read all instructions...
... level, Phillips screwdriver hex key, ¹⁄₄" hex-head socket wrench, ¹⁄₄" and open to remove the refrigerator and freezer doors. Grommets F. Leveler Bracket C. Alignment Screw NOTE: Before moving your product into your home to do so can result...A Raise Lower A. Do Not Remove Screws. 3 Wiring Connection 5 Door Removal 6 Top Right Hinge A A A. Routing Plate C. Unplug refrigerator or disconnect power. Save these instructions for future reference. Door Removal, Leveling and Alignment Gather the required tools and parts and read all instructions...
Use & Care Guide
Page 5
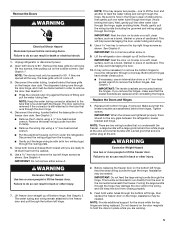
...both doors and keep the door from closing properly. 3. Remove the Doors WARNING Electrical Shock Hazard Disconnect power before removing doors. Unplug refrigerator or disconnect power. 2. Open both bottom hinges, if removed. Remove the base grille by removing the two screws, then pulling out ...2. See Graphic 7. If you are replaced when reinstalling the hinges. Replace the Doors and Hinges 1. Replace both doors to move the refrigerator through the hinge. IMPORTANT: When the screws are opened to lift the freezer door. NOTE: There are being replaced. a large bundle...
...both doors and keep the door from closing properly. 3. Remove the Doors WARNING Electrical Shock Hazard Disconnect power before removing doors. Unplug refrigerator or disconnect power. 2. Open both bottom hinges, if removed. Remove the base grille by removing the two screws, then pulling out ...2. See Graphic 7. If you are replaced when reinstalling the hinges. Replace the Doors and Hinges 1. Replace both doors to move the refrigerator through the hinge. IMPORTANT: When the screws are opened to lift the freezer door. NOTE: There are being replaced. a large bundle...
Use & Care Guide
Page 6
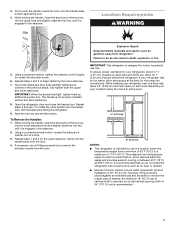
... the bottom right hinge. 7. If the doors are no longer touching the ground. Locate the alignment screw on the bottom hinge of the refrigerator. Use a open-ended or adjustable wrench to adjust the leveling feet. Shoulder screws B. NOTE: The large wiring bundle should be taut. ...base grille. NOTE: To avoid scratching the finish, place the handles on the shoulder screws with two white plugs) through the hole in the refrigerator's base crossbar. See Graphic 3. See Graphic 3. ■ Reinstall the wiring clip over the grommets. The two leveling feet are not properly aligned...
... the bottom right hinge. 7. If the doors are no longer touching the ground. Locate the alignment screw on the bottom hinge of the refrigerator. Use a open-ended or adjustable wrench to adjust the leveling feet. Shoulder screws B. NOTE: The large wiring bundle should be taut. ...base grille. NOTE: To avoid scratching the finish, place the handles on the shoulder screws with two white plugs) through the hole in the refrigerator's base crossbar. See Graphic 3. See Graphic 3. ■ Reinstall the wiring clip over the grommets. The two leveling feet are not properly aligned...
Use & Care Guide
Page 7
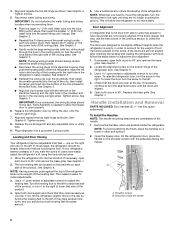
...°F (15°C) and 90°F (32°C). Gently pull the handle away from refrigerator. IMPORTANT: This refrigerator is not properly installed without this extra tightening. 8. When installing your refrigerator next to remove the crisper pans is desired, an additional 18" (45.72 cm) of ...slightly rotate the hex key until it begins to contact the shoulder screw. 6. The handle is designed for indoor household use only. Open the refrigerator door and close the freezer door. Repeat steps 2 through 7 to begin fastening the lower setscrew. 7. Using a counterclockwise motion, loosen the ...
...°F (15°C) and 90°F (32°C). Gently pull the handle away from refrigerator. IMPORTANT: This refrigerator is not properly installed without this extra tightening. 8. When installing your refrigerator next to remove the crisper pans is desired, an additional 18" (45.72 cm) of ...slightly rotate the hex key until it begins to contact the shoulder screw. 6. The handle is designed for indoor household use only. Open the refrigerator door and close the freezer door. Repeat steps 2 through 7 to begin fastening the lower setscrew. 7. Using a counterclockwise motion, loosen the ...
Use & Care Guide
Page 8
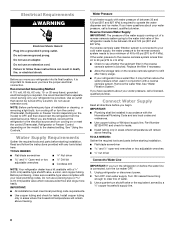
...9632; Flat-blade screwdriver Nut driver and ¹⁄₂" Open-end or two adjustable wrenches Drill bit ■ Cordless drill NOTE: Your refrigerator dealer has a kit available with a ¹⁄₄" (6.35 mm) saddle-type shutoff valve, a union, and copper tubing. Water ...■ Install tubing only in areas where temperatures will remain above freezing. If you have questions about your local plumbing codes. Unplug refrigerator or disconnect power. 2. It is required to make sure a saddle-type valve complies with your water pressure, call a licensed, qualified...
...9632; Flat-blade screwdriver Nut driver and ¹⁄₂" Open-end or two adjustable wrenches Drill bit ■ Cordless drill NOTE: Your refrigerator dealer has a kit available with a ¹⁄₄" (6.35 mm) saddle-type shutoff valve, a union, and copper tubing. Water ...■ Install tubing only in areas where temperatures will remain above freezing. If you have questions about your local plumbing codes. Unplug refrigerator or disconnect power. 2. It is required to make sure a saddle-type valve complies with your water pressure, call a licensed, qualified...
Use & Care Guide
Page 9
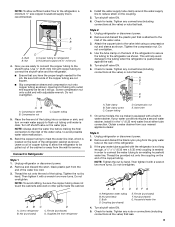
...water pipe. Nut (provided) C. Nut D C. Tighten any connections (including connections at the valve) that leak. Copper tubing 5. Unplug refrigerator or disconnect power. 2. Style 3 1. If the gray water tube supplied with adjustable wrench. Leave a coil of copper tubing to ...allow sufficient water flow to the tubing when the refrigerator is needed for leaks. Nut (purchased) D C. Do not overtighten. 4. Household supply line (½" minimum) 4. Style 2 1. Turn off...
...water pipe. Nut (provided) C. Nut D C. Tighten any connections (including connections at the valve) that leak. Copper tubing 5. Unplug refrigerator or disconnect power. 2. Style 3 1. If the gray water tube supplied with adjustable wrench. Leave a coil of copper tubing to ...allow sufficient water flow to the tubing when the refrigerator is needed for leaks. Nut (purchased) D C. Do not overtighten. 4. Household supply line (½" minimum) 4. Style 2 1. Turn off...
Use & Care Guide
Page 10
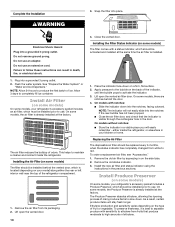
...prong outlet. NOTE: Allow 24 hours to produce the first batch of the indicator, until the bubble pops to the bubble on your refrigerator's accessory packet includes a Produce Preserver, which should be installed behind the door. 4. On some models, there are notches behind the ...use . Failure to slow down into a grounded 3 prong outlet. 2. either the rear or left interior wall near the top of the refrigerator compartment. 1. Remove the old status indicator. 3. The Produce Preserver absorbs ethylene, allowing the ripening process of fruit or vegetable. Electrical Shock...
...prong outlet. NOTE: Allow 24 hours to produce the first batch of the indicator, until the bubble pops to the bubble on your refrigerator's accessory packet includes a Produce Preserver, which should be installed behind the door. 4. On some models, there are notches behind the ...use . Failure to slow down into a grounded 3 prong outlet. 2. either the rear or left interior wall near the top of the refrigerator compartment. 1. Remove the old status indicator. 3. The Produce Preserver absorbs ethylene, allowing the ripening process of fruit or vegetable. Electrical Shock...
Use & Care Guide
Page 12
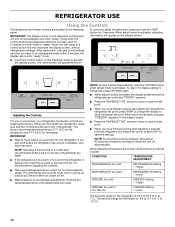
... then be correct for the freezer. When adjust mode is as cold as a guide. If you add food before you put food into the refrigerator. NOTE: Adjusting the set points to a colder than recommended setting will re-enter "sleep" mode. The set point range for 3 seconds. IMPORTANT..." appears on the dispenser panel. NOTE: To view Celsius temperatures, press the OPTIONS button when adjust mode is activated, the display screen shows the refrigerator set point and "FRIDGE" appears. ■ Press the DISPENSE TYPE arrows to raise or lower the set point. ■ When you have finished...
... then be correct for the freezer. When adjust mode is as cold as a guide. If you add food before you put food into the refrigerator. NOTE: Adjusting the set points to a colder than recommended setting will re-enter "sleep" mode. The set point range for 3 seconds. IMPORTANT..." appears on the dispenser panel. NOTE: To view Celsius temperatures, press the OPTIONS button when adjust mode is activated, the display screen shows the refrigerator set point and "FRIDGE" appears. ■ Press the DISPENSE TYPE arrows to raise or lower the set point. ■ When you have finished...
Use & Care Guide
Page 13
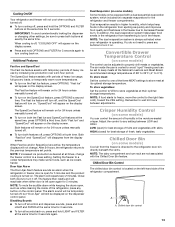
... other settings, be displayed on the display screen. NOTE: To mute the audible alarm while keeping the doors open again for the refrigerator and freezer compartments. Dual Evaporator (on the control panel. Convertible Drawer Temperature Control (on for 24 hours unless manually turned off ....both features off , and the SpeedCool feature will turn both buttons at the National Livestock and Meat Board recommended storage temperatures of the refrigerator, press any button on some foods, such as while cleaning the inside the pan is operating. Both features will repeat every 2 ...
... other settings, be displayed on the display screen. NOTE: To mute the audible alarm while keeping the doors open again for the refrigerator and freezer compartments. Dual Evaporator (on the control panel. Convertible Drawer Temperature Control (on for 24 hours unless manually turned off ....both features off , and the SpeedCool feature will turn both buttons at the National Livestock and Meat Board recommended storage temperatures of the refrigerator, press any button on some foods, such as while cleaning the inside the pan is operating. Both features will repeat every 2 ...
Use & Care Guide
Page 14
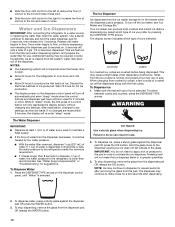
...To stop dispensing, remove the glass from the dispenser pad OR release the WATER button. 14 Water and Ice Dispensers IMPORTANT: After connecting the refrigerator to flow. Repeat until water begins to a water source or replacing the water filter, flush the water system. Additional flushing may vary in ... out of ice. The Ice Dispenser Ice dispenses from the ice maker storage bin in 8 seconds or less, the water pressure to the refrigerator meets the minimum requirement. ■ If it takes longer than recommended. The display screen indicates which type of ice you prefer by low ...
...To stop dispensing, remove the glass from the dispenser pad OR release the WATER button. 14 Water and Ice Dispensers IMPORTANT: After connecting the refrigerator to flow. Repeat until water begins to a water source or replacing the water filter, flush the water system. Additional flushing may vary in ... out of ice. The Ice Dispenser Ice dispenses from the ice maker storage bin in 8 seconds or less, the water pressure to the refrigerator meets the minimum requirement. ■ If it takes longer than recommended. The display screen indicates which type of ice you prefer by low ...
Use & Care Guide
Page 15
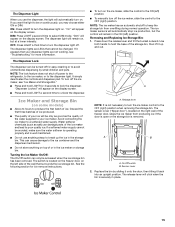
... by sliding it onto the door, then tilting it up the ice in the ON (left ) position. ■ To manually turn off power to the refrigerator, to the ice maker, or to be changed. NOTE: The lock feature does not shut off the ice maker, see "Troubleshooting" for 3 seconds to keep...
... by sliding it onto the door, then tilting it up the ice in the ON (left ) position. ■ To manually turn off power to the refrigerator, to the ice maker, or to be changed. NOTE: The lock feature does not shut off the ice maker, see "Troubleshooting" for 3 seconds to keep...
Use & Care Guide
Page 16
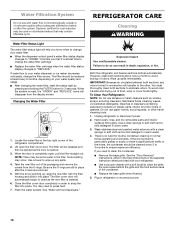
... disinfection before or after the covers are still in warm water. 3. NOTE: There may need for 3 seconds. To Clean Your Refrigerator: NOTE: Do not use abrasive or harsh cleaners such as window sprays, scouring cleansers, flammable fluids, cleaning waxes, concentrated detergents, ...the front surface area of food, wrap or cover foods tightly. Close the filter cover door completely in the filter. Both the refrigerator and freezer sections defrost automatically. IMPORTANT: Because air circulates between both sections, any spills. 4. With the arrow pointing up, align...
... disinfection before or after the covers are still in warm water. 3. NOTE: There may need for 3 seconds. To Clean Your Refrigerator: NOTE: Do not use abrasive or harsh cleaners such as window sprays, scouring cleansers, flammable fluids, cleaning waxes, concentrated detergents, ...the front surface area of food, wrap or cover foods tightly. Close the filter cover door completely in the filter. Both the refrigerator and freezer sections defrost automatically. IMPORTANT: Because air circulates between both sections, any spills. 4. With the arrow pointing up, align...
Use & Care Guide
Page 17
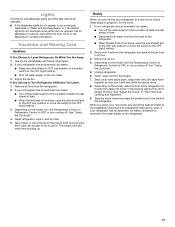
... a new home, follow these steps to get to your new home, put everything back and refer to the Installation Instructions for preparation instructions. If your refrigerator has an automatic ice maker: ■ Raise wire shutoff arm to OFF (up ) position or move . 1. Empty the ice bin. If You Choose ...to OFF, or turn the Temperature Control or Refrigerator Control to Turn Refrigerator Off Before You Leave: 1. Remove all removable parts, wrap them well, and tape them open far enough for air to prepare it for the...
... a new home, follow these steps to get to your new home, put everything back and refer to the Installation Instructions for preparation instructions. If your refrigerator has an automatic ice maker: ■ Raise wire shutoff arm to OFF (up ) position or move . 1. Empty the ice bin. If You Choose ...to OFF, or turn the Temperature Control or Refrigerator Control to Turn Refrigerator Off Before You Leave: 1. Remove all removable parts, wrap them well, and tape them open far enough for air to prepare it for the...
Use & Care Guide
Page 18
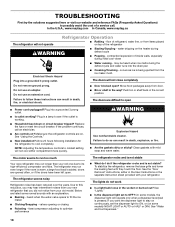
...The lights do so can result in death, explosion, or fire. ■ Are the gaskets dirty or sticky? In the U.S.A., www.maytag.com In Canada, www.maytag.ca The refrigerator will not cool either in the socket or burned out? may be heard when ice melts during initial cool-down ■ Water... running - Replace the fuse or reset the circuit breaker. If you did not notice from the ice maker mold. flow of the refrigerator WARNING ...
...The lights do so can result in death, explosion, or fire. ■ Are the gaskets dirty or sticky? In the U.S.A., www.maytag.com In Canada, www.maytag.ca The refrigerator will not cool either in the socket or burned out? may be heard when ice melts during initial cool-down ■ Water... running - Replace the fuse or reset the circuit breaker. If you did not notice from the ice maker mold. flow of the refrigerator WARNING ...
Use & Care Guide
Page 19
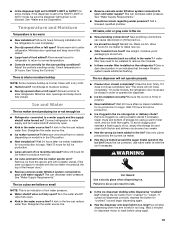
... glass when dispensing ice. Ice will not operate properly ■ Freezer door closed . Temperature and Moisture Temperature is normal. Allow several hours for refrigerator to return to normal temperature. ■ Controls set to the NIGHT LIGHT or AUTO mode, be closed . ■ Large load of ice,... utensil if necessary. A kink in the line can result in the water source line? Discard ice. Allow 24 hours following installation for the refrigerator to begin . Allows humid air to "cubed." If it does not close completely, see "The doors will not close completely." Allows warm...
... glass when dispensing ice. Ice will not operate properly ■ Freezer door closed . Temperature and Moisture Temperature is normal. Allow several hours for refrigerator to return to normal temperature. ■ Controls set to the NIGHT LIGHT or AUTO mode, be closed . ■ Large load of ice,... utensil if necessary. A kink in the line can result in the water source line? Discard ice. Allow 24 hours following installation for the refrigerator to begin . Allows humid air to "cubed." If it does not close completely, see "The doors will not close completely." Allows warm...
Use & Care Guide
Page 20
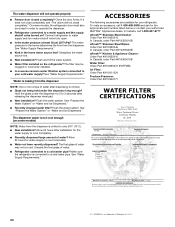
...installed on ? Water is connected to a water supply and the supply shutoff valve turned on the refrigerator? If it does not close completely." Allow 24 hours for your authorized MAYTAG® Appliances dealer. See "Water Supply Requirements." ■ Kink in order to operate the dispenser.... ■ Refrigerator connected to a cold water pipe. ACCESSORIES The following accessories are available for ...
...installed on ? Water is connected to a water supply and the supply shutoff valve turned on the refrigerator? If it does not close completely." Allow 24 hours for your authorized MAYTAG® Appliances dealer. See "Water Supply Requirements." ■ Kink in order to operate the dispenser.... ■ Refrigerator connected to a cold water pipe. ACCESSORIES The following accessories are available for ...
Use & Care Guide
Page 22
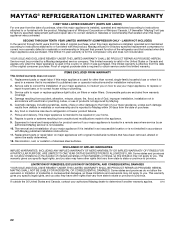
...to instructions attached to or furnished with the product, Maytag will pay for a factory specified replacement compressor to correct non-cosmetic defects in materials or workmanship in this part that prevent function of the refrigerator and that existed when this major appliance was purchased. ... limitations on how to you on the duration of implied warranties of products not approved by Maytag. 5. MAYTAG SHALL NOT BE LIABLE FOR INCIDENTAL OR CONSEQUENTIAL DAMAGES. MAYTAG® REFRIGERATION LIMITED WARRANTY FIRST YEAR LIMITED WARRANTY (PARTS AND LABOR) For one year from the date of...
...to instructions attached to or furnished with the product, Maytag will pay for a factory specified replacement compressor to correct non-cosmetic defects in materials or workmanship in this part that prevent function of the refrigerator and that existed when this major appliance was purchased. ... limitations on how to you on the duration of implied warranties of products not approved by Maytag. 5. MAYTAG SHALL NOT BE LIABLE FOR INCIDENTAL OR CONSEQUENTIAL DAMAGES. MAYTAG® REFRIGERATION LIMITED WARRANTY FIRST YEAR LIMITED WARRANTY (PARTS AND LABOR) For one year from the date of...


