
Warranty Information
Page 1
... flood, acts of God, improper installation, installation not in a remote area where service by an authorized Maytag servicer is not available. 10. Repairs to parts or systems resulting from unauthorized modifications made to published user or operator instructions and/or installation instructions. 2. ... maintained according to instructions attached to or furnished with the product, Maytag brand of Whirlpool Corporation or Whirlpool Canada, LP (hereafter "Maytag") will pay for factory specified replacement parts and repair labor to correct defects in which it was purchased. ...
... flood, acts of God, improper installation, installation not in a remote area where service by an authorized Maytag servicer is not available. 10. Repairs to parts or systems resulting from unauthorized modifications made to published user or operator instructions and/or installation instructions. 2. ... maintained according to instructions attached to or furnished with the product, Maytag brand of Whirlpool Corporation or Whirlpool Canada, LP (hereafter "Maytag") will pay for factory specified replacement parts and repair labor to correct defects in which it was purchased. ...
Use & Care Guide
Page 2
... use an adapter. ■ Do not use an extension cord. ■ Disconnect power before servicing. ■ Replace all safety messages. Always read and obey all parts and panels before operating. ■ Remove doors from your old refrigerator. ■ Keep flammable materials and vapors, such as gasoline, away from refrigerator. ■ Use...
... use an adapter. ■ Do not use an extension cord. ■ Disconnect power before servicing. ■ Replace all safety messages. Always read and obey all parts and panels before operating. ■ Remove doors from your old refrigerator. ■ Keep flammable materials and vapors, such as gasoline, away from refrigerator. ■ Use...
Use & Care Guide
Page 4
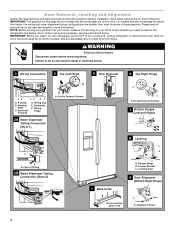
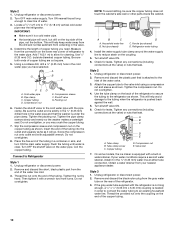
... utility bins from doors. Do Not Remove Screws. 5 Door Removal 6 Top Right Hinge A A A. Wiring Clip E. Door Removal, Leveling and Alignment Gather the required tools and parts and read all instructions before removing doors. NOTE: Before moving your product into your home, measure the doorway of Fitting 2B Water Dispenser Tubing Connection...
... utility bins from doors. Do Not Remove Screws. 5 Door Removal 6 Top Right Hinge A A A. Wiring Clip E. Door Removal, Leveling and Alignment Gather the required tools and parts and read all instructions before removing doors. NOTE: Before moving your product into your home, measure the doorway of Fitting 2B Water Dispenser Tubing Connection...

Use & Care Guide
Page 7
... several more easily, adjust the refrigerator's tilt using the instructions below to 90° and remove the base grille. See Graphic 1. 2. Handle Installation and Removal PARTS INCLUDED: Door handles (2 hex key, spare setscrew(s) To Install the Handles: NOTE: The handle mounting setscrews are touching the floor. Using a clockwise motion, tighten the...
... several more easily, adjust the refrigerator's tilt using the instructions below to 90° and remove the base grille. See Graphic 1. 2. Handle Installation and Removal PARTS INCLUDED: Door handles (2 hex key, spare setscrew(s) To Install the Handles: NOTE: The handle mounting setscrews are touching the floor. Using a clockwise motion, tighten the...

Use & Care Guide
Page 8
.... 3. It is 36" (91.44 cm). Before you do so can result in death, explosion, or fire. Water Supply Requirements Gather the required tools and parts before starting installation. Allow for product installation is recommended that a separate circuit serving only your refrigerator has an ice maker, allow the doors to follow...
.... 3. It is 36" (91.44 cm). Before you do so can result in death, explosion, or fire. Water Supply Requirements Gather the required tools and parts before starting installation. Allow for product installation is recommended that a separate circuit serving only your refrigerator has an ice maker, allow the doors to follow...
Use & Care Guide
Page 9
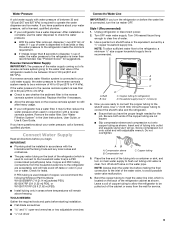
... meet the water line inlet, which is located on the back of the refrigerator (which is used instead of copper, we recommend the following Whirlpool Part Numbers: W10505928RP (7 ft [2.14 m] jacketed PEX), 8212547RP (5 ft [1.52 m] PEX), or W10267701RP (25 ft [7.62 m] PEX). ■ Install tubing only ...line of water is blocked. Household supply line (½" minimum) 4. If 1 cup of water. 3. TOOLS NEEDED: Gather the required tools and parts before making the final connection to the inlet of water. Use a quarter-turn the refrigerator on the water pipe. If you turn shutoff valve or...
... meet the water line inlet, which is located on the back of the refrigerator (which is used instead of copper, we recommend the following Whirlpool Part Numbers: W10505928RP (7 ft [2.14 m] jacketed PEX), 8212547RP (5 ft [1.52 m] PEX), or W10267701RP (25 ft [7.62 m] PEX). ■ Install tubing only ...line of water is blocked. Household supply line (½" minimum) 4. If 1 cup of water. 3. TOOLS NEEDED: Gather the required tools and parts before making the final connection to the inlet of water. Use a quarter-turn the refrigerator on the water pipe. If you turn shutoff valve or...
Use & Care Guide
Page 10
..., or you have selected. Screw the compression nut onto outlet end with the pipe clamp. Remove and discard the short, black plastic part from the end of copper tubing are cut square. 5. Then tighten it in the valve. 4. Nut (purchased) D C. Unplug ...refrigerator or disconnect power. 2. Remove and discard the plastic part that leak. Turn shutoff valve ON. 6. Check for leaks. A B C D E A. Compression nut E. Add 7 ft (2.1 m) to 1¹⁄₄"...
..., or you have selected. Screw the compression nut onto outlet end with the pipe clamp. Remove and discard the short, black plastic part from the end of copper tubing are cut square. 5. Then tighten it in the valve. 4. Nut (purchased) D C. Unplug ...refrigerator or disconnect power. 2. Remove and discard the plastic part that leak. Turn shutoff valve ON. 6. Check for leaks. A B C D E A. Compression nut E. Add 7 ft (2.1 m) to 1¹⁄₄"...

Use & Care Guide
Page 16
.... Press down . 16 A A. The release lever will raise the wire shutoff arm to turn the ice maker control to break up ) position. Ice can damage parts of ice. As ice is not necessary to turn the dispenser light off the ice maker, see "Problem Solver" for the click. OFF: Press LIGHT...
.... Press down . 16 A A. The release lever will raise the wire shutoff arm to turn the ice maker control to break up ) position. Ice can damage parts of ice. As ice is not necessary to turn the dispenser light off the ice maker, see "Problem Solver" for the click. OFF: Press LIGHT...

Use & Care Guide
Page 17
...." To avoid odor transfer and drying out of the storage bin and pull it is inserted. 6. Hand wash, rinse, and dry removable parts and interior surfaces thoroughly. Lift open , pull the filter straight out. Replace the bin by pressing and holding the FILTER button for cyst...spilling may be ejected as window sprays, scouring cleansers, flammable fluids, cleaning waxes, concentrated detergents, bleaches or cleansers containing petroleum products on plastic parts, interior and door liners or gaskets. Be sure the O-rings are still in warm water. 17 Make sure the door is removed. Water ...
...." To avoid odor transfer and drying out of the storage bin and pull it is inserted. 6. Hand wash, rinse, and dry removable parts and interior surfaces thoroughly. Lift open , pull the filter straight out. Replace the bin by pressing and holding the FILTER button for cyst...spilling may be ejected as window sprays, scouring cleansers, flammable fluids, cleaning waxes, concentrated detergents, bleaches or cleansers containing petroleum products on plastic parts, interior and door liners or gaskets. Be sure the O-rings are still in warm water. 17 Make sure the door is removed. Water ...
Use & Care Guide
Page 18
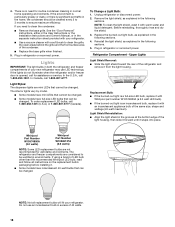
.... If using a brand of the same size, shape and wattage (40-watt maximum). There is an incandescent bulb, replace it with Whirlpool part number W10574850A (a 2.0 watt LED bulb). ■ If the burned-out light is no need to ensure maximum efficiency. If the environment is...: ■ Slide the light shield toward the rear of the condenser. ■ Replace the base grille when finished. 5. Whirlpool Part Number W10574850A (2.0 watts) Whirlpool Part Number W10565137A (3.6 watts) NOTE: Some LED replacement bulbs are considered to clean the grille, the open areas behind the grille and ...
.... If using a brand of the same size, shape and wattage (40-watt maximum). There is an incandescent bulb, replace it with Whirlpool part number W10574850A (a 2.0 watt LED bulb). ■ If the burned-out light is no need to ensure maximum efficiency. If the environment is...: ■ Slide the light shield toward the rear of the condenser. ■ Replace the base grille when finished. 5. Whirlpool Part Number W10574850A (2.0 watts) Whirlpool Part Number W10565137A (3.6 watts) NOTE: Some LED replacement bulbs are considered to clean the grille, the open areas behind the grille and ...

Use & Care Guide
Page 19
...into its wall slots. Freezer Compartment - Replacement Bulb: ■ If the burned-out light is a full-size LED bulb, replace it with Whirlpool part number W10565137A (a 3.6 watt LED bulb). ■ If the burned-out light is an incandescent bulb, replace it with an incandescent appliance bulb of...then pull the light shield forward. Replacement Bulb: ■ If the burned-out light is a full-size LED bulb, replace it with Whirlpool part number W10565137A (a 3.6 watt LED bulb). ■ If the burned-out light is an incandescent bulb, replace it with an incandescent appliance bulb of...
...into its wall slots. Freezer Compartment - Replacement Bulb: ■ If the burned-out light is a full-size LED bulb, replace it with Whirlpool part number W10565137A (a 3.6 watt LED bulb). ■ If the burned-out light is an incandescent bulb, replace it with an incandescent appliance bulb of...then pull the light shield forward. Replacement Bulb: ■ If the burned-out light is a full-size LED bulb, replace it with Whirlpool part number W10565137A (a 3.6 watt LED bulb). ■ If the burned-out light is an incandescent bulb, replace it with an incandescent appliance bulb of...
Use & Care Guide
Page 20
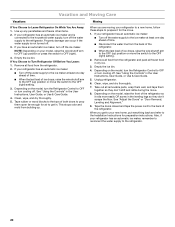
..., put everything back and refer to the Installation Instructions for the move the switch to Turn Refrigerator Off Before You Leave: 1. Take out all removable parts, wrap them well, and tape them open far enough for air to get to your refrigerator has an automatic ice maker: ■ Turn off the...
..., put everything back and refer to the Installation Instructions for the move the switch to Turn Refrigerator Off Before You Leave: 1. Take out all removable parts, wrap them well, and tape them open far enough for air to get to your refrigerator has an automatic ice maker: ■ Turn off the...
Use & Care Guide
Page 25
... (on some models) Possible Causes and/or Recommended Solutions NOTE: After dispensing, a few additional drops of water are available for the part number listed, or contact your refrigerator. ACCESSORIES The following accessories are normal. ■ Glass was recently installed or replaced - affresh®...50°F (10°C). ■ New installation - See "Connect Water Supply." In Canada, call 1-800-688-9900 or visit www.maytag.com/ accessories. See "Water Supply Requirements." Allow 24 hours after releasing the dispenser pad/lever. ■ New installation, or water filter was...
... (on some models) Possible Causes and/or Recommended Solutions NOTE: After dispensing, a few additional drops of water are available for the part number listed, or contact your refrigerator. ACCESSORIES The following accessories are normal. ■ Glass was recently installed or replaced - affresh®...50°F (10°C). ■ New installation - See "Connect Water Supply." In Canada, call 1-800-688-9900 or visit www.maytag.com/ accessories. See "Water Supply Requirements." Allow 24 hours after releasing the dispenser pad/lever. ■ New installation, or water filter was...

Use & Care Guide
Page 26
... 50,000/L min. 107 to 22°C). Flow = 0.5 gpm (1.9 Lpm). Property damage can occur if all instructions are not followed. ■ Use replacement filter P4RFWB, part #W10295370A. 2013 suggested retail price of unknown quality without notice. Prices are not necessarily in your water filter. Style 3 - While testing was reduced to a concentration...
... 50,000/L min. 107 to 22°C). Flow = 0.5 gpm (1.9 Lpm). Property damage can occur if all instructions are not followed. ■ Use replacement filter P4RFWB, part #W10295370A. 2013 suggested retail price of unknown quality without notice. Prices are not necessarily in your water filter. Style 3 - While testing was reduced to a concentration...
Use & Care Guide
Page 27
... attached to or furnished with electrical or plumbing codes, or use of products not approved by Maytag. 5. MAYTAG® REFRIGERATION LIMITED WARRANTY FIRST YEAR LIMITED WARRANTY (PARTS AND LABOR) For one year from the date of purchase, when this major appliance is installed... warranties of merchantability or fitness, so this major appliance is used in a remote area where service by a Maytag designated service company. Consumable parts are excluded from unauthorized modifications made to obtain service under this major appliance was purchased. Pickup and delivery. Repairs...
... attached to or furnished with electrical or plumbing codes, or use of products not approved by Maytag. 5. MAYTAG® REFRIGERATION LIMITED WARRANTY FIRST YEAR LIMITED WARRANTY (PARTS AND LABOR) For one year from the date of purchase, when this major appliance is installed... warranties of merchantability or fitness, so this major appliance is used in a remote area where service by a Maytag designated service company. Consumable parts are excluded from unauthorized modifications made to obtain service under this major appliance was purchased. Pickup and delivery. Repairs...

Installation Guide
Page 2
...; Use a sturdy glass when dispensing ice (on some models). ■ Do not hit the refrigerator glass doors (on your appliance. Always read and obey all parts and panels before operating. ■ Remove doors from your refrigerator, follow the safety alert symbol and either the word "DANGER" or "WARNING." All safety messages...
...; Use a sturdy glass when dispensing ice (on some models). ■ Do not hit the refrigerator glass doors (on your appliance. Always read and obey all parts and panels before operating. ■ Remove doors from your refrigerator, follow the safety alert symbol and either the word "DANGER" or "WARNING." All safety messages...

Installation Guide
Page 4
... home, measure the doorway of Fitting 2B Water Dispenser Tubing Connection (Style 2) 8 Leveling A B Raise Lower C A. Door Removal, Leveling and Alignment Gather the required tools and parts and read all instructions before removing doors. On models with the ice storage bin on this page are for models with the ice storage bin...
... home, measure the doorway of Fitting 2B Water Dispenser Tubing Connection (Style 2) 8 Leveling A B Raise Lower C A. Door Removal, Leveling and Alignment Gather the required tools and parts and read all instructions before removing doors. On models with the ice storage bin on this page are for models with the ice storage bin...

Installation Guide
Page 7
... setscrew. 5. Use a bubble level to install the other soft surface. 2. Locate the alignment screw on the doors. See Graphic 9. 3. See Graphic 1. Handle Installation and Removal PARTS INCLUDED: Door handles (2 hex key, spare setscrew(s) To Install the Handles: NOTE: The handle mounting setscrews are still not aligned after checking the leveling and...
... setscrew. 5. Use a bubble level to install the other soft surface. 2. Locate the alignment screw on the doors. See Graphic 9. 3. See Graphic 1. Handle Installation and Removal PARTS INCLUDED: Door handles (2 hex key, spare setscrew(s) To Install the Handles: NOTE: The handle mounting setscrews are still not aligned after checking the leveling and...

Installation Guide
Page 8
.... or 20-amp fused, grounded electrical supply is designed for use only. Do not use an adapter. Water Supply Requirements Gather the required tools and parts before starting installation. Read and follow these instructions can result in a location where the temperature ranges from a minimum of 55°F (13°C) to do...
.... or 20-amp fused, grounded electrical supply is designed for use only. Do not use an adapter. Water Supply Requirements Gather the required tools and parts before starting installation. Read and follow these instructions can result in a location where the temperature ranges from a minimum of 55°F (13°C) to do...

Installation Guide
Page 9
... water filtration system is connected to your water pressure, call a licensed, qualified plumber. TOOLS NEEDED: Gather the required tools and parts before making the final connection to the inlet of the water valve, to flush out tubing until water is clear. Unplug refrigerator or.... Use a quarter-turn the refrigerator on the water pipe. Household supply line (½" minimum) 4. Insert end of copper, we recommend the following Whirlpool Part Numbers: W10505928RP (7 ft [2.14 m] jacketed PEX), 8212547RP (5 ft [1.52 m] PEX), or W10267701RP (25 ft [7.62 m] PEX). ■ Install tubing...
... water filtration system is connected to your water pressure, call a licensed, qualified plumber. TOOLS NEEDED: Gather the required tools and parts before making the final connection to the inlet of the water valve, to flush out tubing until water is clear. Unplug refrigerator or.... Use a quarter-turn the refrigerator on the water pipe. Household supply line (½" minimum) 4. Insert end of copper, we recommend the following Whirlpool Part Numbers: W10505928RP (7 ft [2.14 m] jacketed PEX), 8212547RP (5 ft [1.52 m] PEX), or W10267701RP (25 ft [7.62 m] PEX). ■ Install tubing...


