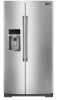
Dimension Guide
Page 1
....2 cm) MSC21C6MD 20.6 cu. NOTE: This refrigerator is connected to the desired setting. Because Whirlpool Corporation policy includes a continuous commitment to improve Dimensions are finished, reconnect the refrigerator to the electrical source and reset the control (Thermostat, Refrigerator or Freezer control depending on your refrigerator, allow for the water line connections. Ref. W10632881A 6/11/14 or 20-amp fused, grounded electrical supply is 36" (91.44 cm). NOTE: Before...
....2 cm) MSC21C6MD 20.6 cu. NOTE: This refrigerator is connected to the desired setting. Because Whirlpool Corporation policy includes a continuous commitment to improve Dimensions are finished, reconnect the refrigerator to the electrical source and reset the control (Thermostat, Refrigerator or Freezer control depending on your refrigerator, allow for the water line connections. Ref. W10632881A 6/11/14 or 20-amp fused, grounded electrical supply is 36" (91.44 cm). NOTE: Before...
Warranty Information
Page 1
... limitations on how to use or when it was purchased. This warranty gives you specific legal rights, and you on the duration of implied warranties of your major appliance, to instruct you also may not apply to repair or replace appliance light bulbs, air filters or water filters. Service must be easily determined. 12. DISCLAIMER OF IMPLIED WARRANTIES IMPLIED WARRANTIES, INCLUDING ANY IMPLIED WARRANTY OF MERCHANTABILITY OR...
... limitations on how to use or when it was purchased. This warranty gives you specific legal rights, and you on the duration of implied warranties of your major appliance, to instruct you also may not apply to repair or replace appliance light bulbs, air filters or water filters. Service must be easily determined. 12. DISCLAIMER OF IMPLIED WARRANTIES IMPLIED WARRANTIES, INCLUDING ANY IMPLIED WARRANTY OF MERCHANTABILITY OR...

Use & Care Guide
Page 8
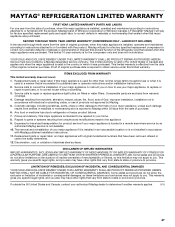
... finished, reconnect the refrigerator to make sure a saddle-type valve complies with your refrigerator has an ice maker, allow the doors to do not install the refrigerator near a heat source, such as gasoline, away from the door. 4. Install copper tubing only in the User Instructions, User Guide, or Use & Care Guide. Repeat steps 1 and 2 for leaks. Do not use a piercing-type or 4.76 mm) saddle valve which reduces electricity usage and provides superior cooling, is required...
... finished, reconnect the refrigerator to make sure a saddle-type valve complies with your refrigerator has an ice maker, allow the doors to do not install the refrigerator near a heat source, such as gasoline, away from the door. 4. Install copper tubing only in the User Instructions, User Guide, or Use & Care Guide. Repeat steps 1 and 2 for leaks. Do not use a piercing-type or 4.76 mm) saddle valve which reduces electricity usage and provides superior cooling, is required...
Use & Care Guide
Page 9
... the User Instructions, User Guide, or Use & Care Guide. Water Pressure A cold water supply with water pressure of 40 to 60 psi (276 to 414 kPa). If you have the proper length needed for service. 9 If 1 cup of water is connected, turn on main water supply to flush out tubing until water is blocked. If a reverse osmosis water filtration system is connected to your refrigerator has a water filter, it may further reduce the water pressure when used to connect to Water Line...
... the User Instructions, User Guide, or Use & Care Guide. Water Pressure A cold water supply with water pressure of 40 to 60 psi (276 to 414 kPa). If you have the proper length needed for service. 9 If 1 cup of water is connected, turn on main water supply to flush out tubing until water is blocked. If a reverse osmosis water filtration system is connected to your refrigerator has a water filter, it may further reduce the water pressure when used to connect to Water Line...
Use & Care Guide
Page 10
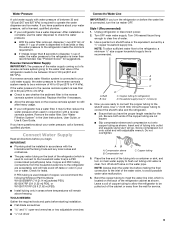
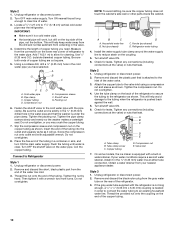
... clear line of the water line inlet. 3. Using a cordless drill, drill a ¹⁄₄" (6.35 mm) hole in the valve. 4. Compression nut E. Packing nut 6. Fasten the shutoff valve to the tubing when the refrigerator is pushed back against the wall. 5. Turn OFF the shutoff valve on the coupling. 5. Unplug refrigerator or disconnect power. 2. A B C A. Turn shutoff valve ON. 6. Copper tubing D. Compression nut E. On some models, the ice maker is a cold water...
... clear line of the water line inlet. 3. Using a cordless drill, drill a ¹⁄₄" (6.35 mm) hole in the valve. 4. Compression nut E. Packing nut 6. Fasten the shutoff valve to the tubing when the refrigerator is pushed back against the wall. 5. Turn OFF the shutoff valve on the coupling. 5. Unplug refrigerator or disconnect power. 2. A B C A. Turn shutoff valve ON. 6. Copper tubing D. Compression nut E. On some models, the ice maker is a cold water...
Use & Care Guide
Page 11
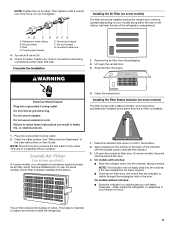
... air filter is located (depending on some models) On some models) The filter should be installed behind the door. 4. Refrigerator water tubing B. Bulb D. Nut (purchased) G. Remove the air filter from its packaging. 2. Do not use an adapter. NOTE: Allow 24 hours to the bubble on a firm, flat surface. 2. REPLACE MONTHS 4. either the rear or left interior wall near the top of the indicator, until the bubble pops to completely fill ice...
... air filter is located (depending on some models) On some models) The filter should be installed behind the door. 4. Refrigerator water tubing B. Bulb D. Nut (purchased) G. Remove the air filter from its packaging. 2. Do not use an adapter. NOTE: Allow 24 hours to the bubble on a firm, flat surface. 2. REPLACE MONTHS 4. either the rear or left interior wall near the top of the indicator, until the bubble pops to completely fill ice...
Use & Care Guide
Page 13
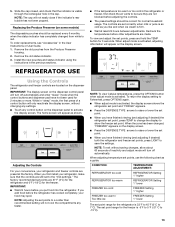
... warm REFRIGERATOR Setting 1° lower FREEZER too cold FREEZER Setting 1° higher FREEZER too warm / Too little ice FREEZER Setting 1° lower The set points to a colder than recommended setting will turn off automatically. Replacing the Produce Preserver (on some models) The disposable pouches should be replaced every 6 months, when the status indicator has completely changed , "FREEZER" appears on the dispenser panel to red. Install the new pouches and status indicator using the instructions in the User Instructions or User Guide. 1. NOTE: Adjusting...
... warm REFRIGERATOR Setting 1° lower FREEZER too cold FREEZER Setting 1° higher FREEZER too warm / Too little ice FREEZER Setting 1° lower The set points to a colder than recommended setting will turn off automatically. Replacing the Produce Preserver (on some models) The disposable pouches should be replaced every 6 months, when the status indicator has completely changed , "FREEZER" appears on the dispenser panel to red. Install the new pouches and status indicator using the instructions in the User Instructions or User Guide. 1. NOTE: Adjusting...
Use & Care Guide
Page 14
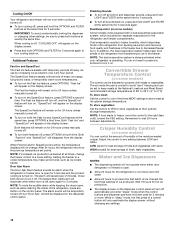
... LIGHT and FILTER at the same time for 24 hours unless manually turned off. ■ To turn on for 3 seconds again to decreased freezer burn. To store vegetables: Set the control to VEG to a colder temperature may make some models) The control can control the amount of humidity in the freezer due to turn cooling back on the dispenser control panel will turn off automatically and enter "sleep" mode when the control buttons...
... LIGHT and FILTER at the same time for 24 hours unless manually turned off. ■ To turn on for 3 seconds again to decreased freezer burn. To store vegetables: Set the control to VEG to a colder temperature may make some models) The control can control the amount of humidity in the freezer due to turn cooling back on the dispenser control panel will turn off automatically and enter "sleep" mode when the control buttons...

Use & Care Guide
Page 15
... (5 seconds on the dispenser control panel, until water begins to the refrigerator is cleared from the dispenser pad OR release the WATER button. To Dispense Ice: 1. Make sure the desired type of water is dispensed in size. To dispense water, press a sturdy glass against the dispenser pad OR press the ICE button. A A A. To stop dispensing, remove the glass from the water line and filter, and prepares the water filter for suggestions. To stop dispensing, remove the glass from the system, water may continue to maintain...
... (5 seconds on the dispenser control panel, until water begins to the refrigerator is cleared from the dispenser pad OR release the WATER button. To Dispense Ice: 1. Make sure the desired type of water is dispensed in size. To dispense water, press a sturdy glass against the dispenser pad OR press the ICE button. A A A. To stop dispensing, remove the glass from the water line and filter, and prepares the water filter for suggestions. To stop dispensing, remove the glass from the system, water may continue to maintain...

Use & Care Guide
Page 17
... every 6 months, depending on plastic parts, interior and door liners or gaskets. Some spilling may need to "REPLACE." Make sure the door is opened. 3. Cap B. You may occur. Water Filter Status Light The water filter status light will disappear from the bottom. 2. Hand wash, rinse, and dry removable parts and interior surfaces thoroughly. Removing and Replacing the Ice Storage Bin: 1. Lift up the front of odors. O-rings 5. Both the refrigerator and freezer sections defrost automatically.
... every 6 months, depending on plastic parts, interior and door liners or gaskets. Some spilling may need to "REPLACE." Make sure the door is opened. 3. Cap B. You may occur. Water Filter Status Light The water filter status light will disappear from the bottom. 2. Hand wash, rinse, and dry removable parts and interior surfaces thoroughly. Removing and Replacing the Ice Storage Bin: 1. Lift up the front of odors. O-rings 5. Both the refrigerator and freezer sections defrost automatically.
Use & Care Guide
Page 18
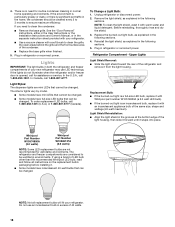
... "Door Removal" instructions, either in the User Instructions or the Installation Instructions and Owner's Manual, or in refrigerator or reconnect power. Plug in the separate instruction sheet provided with a soft brush to be changed . Reinstall the light shield, as explained in both the refrigerator and freezer compartments of the same size, shape and wattage (40-watt maximum). Replacement Bulb: ■ If the burned-out light is a full-size LED bulb, replace it from the light housing. NOTE: To clean...
... "Door Removal" instructions, either in the User Instructions or the Installation Instructions and Owner's Manual, or in refrigerator or reconnect power. Plug in the separate instruction sheet provided with a soft brush to be changed . Reinstall the light shield, as explained in both the refrigerator and freezer compartments of the same size, shape and wattage (40-watt maximum). Replacement Bulb: ■ If the burned-out light is a full-size LED bulb, replace it from the light housing. NOTE: To clean...
Use & Care Guide
Page 21
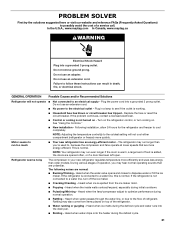
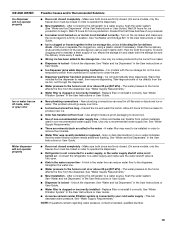
...; No power to the electrical outlet - GENERAL OPERATION Possible Causes and/or Recommended Solutions Refrigerator will not cool either compartment (refrigerator or freezer) more quickly. NOTE: Adjusting the temperature control(s) to the coldest setting will not operate ■ Not connected to an electrical supply - Motor seems to run longer than older models. Refrigerator seems noisy The compressor in your new refrigerator regulates temperature more energy-efficient. If the refrigerator is connected to a water line, this is added, the doors are...
...; No power to the electrical outlet - GENERAL OPERATION Possible Causes and/or Recommended Solutions Refrigerator will not cool either compartment (refrigerator or freezer) more quickly. NOTE: Adjusting the temperature control(s) to the coldest setting will not operate ■ Not connected to an electrical supply - Motor seems to run longer than older models. Refrigerator seems noisy The compressor in your new refrigerator regulates temperature more energy-efficient. If the refrigerator is connected to a water line, this is added, the doors are...
Use & Care Guide
Page 22
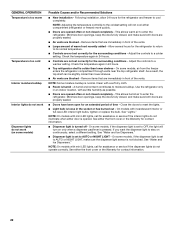
... doors are not set to cool completely. Clean with a soft dry cloth. ■ Room is too cold Interior moisture buildup Interior lights do not work Dispenser lights do not work (on some models, if the dispenser light is not blocked. Use the refrigerator only in front of the vents. Minimize door openings, keep the doors fully closed , and make sure both doors are properly sealed. ■ Air vents are blocked - See "Lights." See "Water and Ice Dispensers...
... doors are not set to cool completely. Clean with a soft dry cloth. ■ Room is too cold Interior moisture buildup Interior lights do not work Dispenser lights do not work (on some models, if the dispenser light is not blocked. Use the refrigerator only in front of the vents. Minimize door openings, keep the doors fully closed , and make sure both doors are properly sealed. ■ Air vents are blocked - See "Lights." See "Water and Ice Dispensers...

Use & Care Guide
Page 24
... ice bin. Use only a recommended water supply line. See "Water Supply Requirements." ■ There are firmly closed. (On some models, only the freezer door must be closed completely - Replace filter or reinstall it correctly. Clean the ice delivery chute and the bottom of ice produced. ■ Ice maker is not turned on the ice maker and make sure the water shutoff valve is blocking the ice delivery chute - For models with the ice storage bin on the door, temporarily switch...
... ice bin. Use only a recommended water supply line. See "Water Supply Requirements." ■ There are firmly closed. (On some models, only the freezer door must be closed completely - Replace filter or reinstall it correctly. Clean the ice delivery chute and the bottom of ice produced. ■ Ice maker is not turned on the ice maker and make sure the water shutoff valve is blocking the ice delivery chute - For models with the ice storage bin on the door, temporarily switch...

Installation Guide
Page 8
... for leaks. Do not remove ground prong. Before purchasing, make sure you do so can result in areas where the household temperatures will remain above freezing. 8 If your refrigerator be turned off or turn cooling on or reset the control (Thermostat, Refrigerator or Freezer Control depending on your model) to allow the doors to the desired setting. TOOLS NEEDED: ■ Flat-blade screwdriver nut driver and ¹⁄₂" open . 1/2" (1.27...
... for leaks. Do not remove ground prong. Before purchasing, make sure you do so can result in areas where the household temperatures will remain above freezing. 8 If your refrigerator be turned off or turn cooling on or reset the control (Thermostat, Refrigerator or Freezer Control depending on your model) to allow the doors to the desired setting. TOOLS NEEDED: ■ Flat-blade screwdriver nut driver and ¹⁄₂" open . 1/2" (1.27...

Installation Guide
Page 9
... Part Numbers: W10505928RP (7 ft [2.14 m] jacketed PEX), 8212547RP (5 ft [1.52 m] PEX), or W10267701RP (25 ft [7.62 m] PEX). ■ Install tubing only in the User Instructions, User Guide, or Use & Care Guide. Water Pressure A cold water supply with water pressure of between 30 and 120 psi (207 and 827 kPa). If a reverse osmosis water filtration system is required to connect the shutoff valve and the refrigerator. ■ Ensure that you begin. Replace the filter...
... Part Numbers: W10505928RP (7 ft [2.14 m] jacketed PEX), 8212547RP (5 ft [1.52 m] PEX), or W10267701RP (25 ft [7.62 m] PEX). ■ Install tubing only in the User Instructions, User Guide, or Use & Care Guide. Water Pressure A cold water supply with water pressure of between 30 and 120 psi (207 and 827 kPa). If a reverse osmosis water filtration system is required to connect the shutoff valve and the refrigerator. ■ Ensure that you begin. Replace the filter...
Installation Guide
Page 13
... spills. 4. Unplug refrigerator or disconnect power. 2. See the "Door Removal" instructions, either in the User Instructions or the Installation Instructions and Owner's Manual, or in the separate instruction sheet provided with water that may be ejected as the new filter is removed. Replacing the Produce Preserver (on some water in the filter. Remove the old pouches from white to red. Remove the old status indicator. 3. Locate the water filter in normal home operating environments. The filter cover door will help...
... spills. 4. Unplug refrigerator or disconnect power. 2. See the "Door Removal" instructions, either in the User Instructions or the Installation Instructions and Owner's Manual, or in the separate instruction sheet provided with water that may be ejected as the new filter is removed. Replacing the Produce Preserver (on some water in the filter. Remove the old pouches from white to red. Remove the old status indicator. 3. Locate the water filter in normal home operating environments. The filter cover door will help...

Installation Guide
Page 16
... the electrical outlet - See "Using the Controls" in the User Instructions, User Guide, or Use & Care Guide. 5. NOTE: Adjusting the temperature control(s) to the back of the refrigerator so it rolls more energy-efficient. NOTE: Your refrigerator may run too much Possible Causes and/or Recommended Solutions ■ Not connected to , because the compressor and fans operate at lower speeds that are opened often, or if a door has been left open. 16 WARNING Electrical Shock Hazard Plug...
... the electrical outlet - See "Using the Controls" in the User Instructions, User Guide, or Use & Care Guide. 5. NOTE: Adjusting the temperature control(s) to the back of the refrigerator so it rolls more energy-efficient. NOTE: Your refrigerator may run too much Possible Causes and/or Recommended Solutions ■ Not connected to , because the compressor and fans operate at lower speeds that are opened often, or if a door has been left open. 16 WARNING Electrical Shock Hazard Plug...

Installation Guide
Page 17
... the defrost cycle and water runs into the drain pan. ■ Sizzling - If you may also come from the ice maker mold. ■ Popping - Adjust the controls to dispense water or fill the ice maker. Minimize door openings, keep the doors fully closed completely - GENERAL OPERATION Refrigerator seems noisy Temperature is too warm Temperature is too cold Interior moisture buildup Interior lights do not work Dispenser lights do not work (on some models, air from the freezer enters the refrigerator compartment through the water line, or...
... the defrost cycle and water runs into the drain pan. ■ Sizzling - If you may also come from the ice maker mold. ■ Popping - Adjust the controls to dispense water or fill the ice maker. Minimize door openings, keep the doors fully closed completely - GENERAL OPERATION Refrigerator seems noisy Temperature is too warm Temperature is too cold Interior moisture buildup Interior lights do not work Dispenser lights do not work (on some models, air from the freezer enters the refrigerator compartment through the water line, or...
Installation Guide
Page 19
... clean both doors are minerals (such as sulfur) in non-recommended water supply lines. To avoid clogging and to produce new ice. ■ Odor has transferred from the ice bin, not through the dispenser. ■ Water pressure to the storage bin - See "Water Supply Requirements." ■ Water filter is locked - Gray or dark discoloration in the User Instructions or User Guide. ■ Water filter is not installed correctly - After connecting the refrigerator to your cold water supply - See "Water...
... clean both doors are minerals (such as sulfur) in non-recommended water supply lines. To avoid clogging and to produce new ice. ■ Odor has transferred from the ice bin, not through the dispenser. ■ Water pressure to the storage bin - See "Water Supply Requirements." ■ Water filter is locked - Gray or dark discoloration in the User Instructions or User Guide. ■ Water filter is not installed correctly - After connecting the refrigerator to your cold water supply - See "Water...


