

Use & Care Guide
Page 2
... if you don't immediately follow instructions. This is , tell you what can kill or hurt you to persons when using the refrigerator, follow the safety alert symbol and either the word "DANGER" or "WARNING." All safety messages will follow basic precautions, including the...power before servicing. ■ Replace all safety messages. Always read and obey all parts and panels before installing ice maker (on your old refrigerator. ■ Use nonflammable cleaner. ■ Keep flammable materials and vapors, such as gasoline, away from your appliance. WARNING: This product...
... if you don't immediately follow instructions. This is , tell you what can kill or hurt you to persons when using the refrigerator, follow the safety alert symbol and either the word "DANGER" or "WARNING." All safety messages will follow basic precautions, including the...power before servicing. ■ Replace all safety messages. Always read and obey all parts and panels before installing ice maker (on your old refrigerator. ■ Use nonflammable cleaner. ■ Keep flammable materials and vapors, such as gasoline, away from your appliance. WARNING: This product...

Use & Care Guide
Page 3
... flammable fluids, or abrasive cleaners to avoid dropping. 3 If the insert is located behind the control panel on the ceiling of the refrigerator (on the refrigerator. See the cleaning instructions in place so that is removed, ice may break if exposed to shatter into many small, pebble-size pieces.... Use both hands when removing them to remove tape or glue. If you remove all packaging materials. When Moving Your Refrigerator: Your refrigerator is part of the refrigerator and not part of liquid dish soap over the adhesive with cardboard or hardboard to move and install...
... flammable fluids, or abrasive cleaners to avoid dropping. 3 If the insert is located behind the control panel on the ceiling of the refrigerator (on the refrigerator. See the cleaning instructions in place so that is removed, ice may break if exposed to shatter into many small, pebble-size pieces.... Use both hands when removing them to remove tape or glue. If you remove all packaging materials. When Moving Your Refrigerator: Your refrigerator is part of the refrigerator and not part of liquid dish soap over the adhesive with cardboard or hardboard to move and install...
Use & Care Guide
Page 4
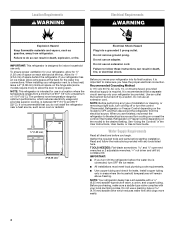
... source, such as gasoline, away from the electrical source. or 20-amp fused, grounded electrical supply is recommended that a separate circuit serving only your refrigerator next to a fixed wall, leave a 2" (5.08 cm) minimum space on the model) to a maximum of installation or cleaning, or removing ...so can result in a location where the temperature ranges from a minimum of 55°F (13°C) to OFF, and then disconnect the refrigerator from refrigerator. Do not use an extension cord. Recommended Grounding Method A 115 volt, 60 Hz, AC only, 15- It is required. When you...
... source, such as gasoline, away from the electrical source. or 20-amp fused, grounded electrical supply is recommended that a separate circuit serving only your refrigerator next to a fixed wall, leave a 2" (5.08 cm) minimum space on the model) to a maximum of installation or cleaning, or removing ...so can result in a location where the temperature ranges from a minimum of 55°F (13°C) to OFF, and then disconnect the refrigerator from refrigerator. Do not use an extension cord. Recommended Grounding Method A 115 volt, 60 Hz, AC only, 15- It is required. When you...

Use & Care Guide
Page 5
...Do not remove ground prong. Plug into a grounded 3 prong outlet. Do not overtighten. 8. Coil the copper tubing. Attach the copper tubing to the refrigerator as shown. Tighten the compression nut. A B C D E A. If your water conditions require a second water strainer, install it will help avoid ... Be sure the outlet end is solidly in the ¹⁄₄" drilled hole in a container or sink, and turn ON the refrigerator before you have questions about your water pressure, call a licensed, qualified plumber. Tighten the pipe clamp screws slowly and evenly so washer ...
...Do not remove ground prong. Plug into a grounded 3 prong outlet. Do not overtighten. 8. Coil the copper tubing. Attach the copper tubing to the refrigerator as shown. Tighten the compression nut. A B C D E A. If your water conditions require a second water strainer, install it will help avoid ... Be sure the outlet end is solidly in the ¹⁄₄" drilled hole in a container or sink, and turn ON the refrigerator before you have questions about your water pressure, call a licensed, qualified plumber. Tighten the pipe clamp screws slowly and evenly so washer ...

Use & Care Guide
Page 6
...the hinge from the top hinge and lift up to remove the hinge. Set aside. Washer 6 Hex-Head Hinge Screw 1. Bottom hinge A. Unplug refrigerator or disconnect power. 2. Spacer 3. Tools Needed hex-head socket wrench, #2 Phillips screwdriver, flat-blade screwdriver open from the center hinge and remove the...hold the doors in place while you are being moved. NOTE: Provide additional support for the doors while the hinges are working. Refrigerator Doors Depending on the width of your doorway, you must reverse the door swing. 5. Do not depend on the right-hand side....
...the hinge from the top hinge and lift up to remove the hinge. Set aside. Washer 6 Hex-Head Hinge Screw 1. Bottom hinge A. Unplug refrigerator or disconnect power. 2. Spacer 3. Tools Needed hex-head socket wrench, #2 Phillips screwdriver, flat-blade screwdriver open from the center hinge and remove the...hold the doors in place while you are being moved. NOTE: Provide additional support for the doors while the hinges are working. Refrigerator Doors Depending on the width of your doorway, you must reverse the door swing. 5. Do not depend on the right-hand side....

Use & Care Guide
Page 8
...against the door. 10. B B 5. Replace the door stop plate is aligned perfectly with the shoulder screw. Pull the handle away from refrigerator door. Remove the screw attaching the hinge pin to replace and align the freezer door later. Place the plastic spacer beneath the hinge so ... is aligned perfectly with the hole for the bottom hinge pin. 8. A C C A A. Fasten the top hinge to the opposite side of the refrigerator door, making sure the holes are in the Reversibility Kit. 7. Remove the screws from the left-hand side of the freezer door. Plastic spacer 8...
...against the door. 10. B B 5. Replace the door stop plate is aligned perfectly with the shoulder screw. Pull the handle away from refrigerator door. Remove the screw attaching the hinge pin to replace and align the freezer door later. Place the plastic spacer beneath the hinge so ... is aligned perfectly with the hole for the bottom hinge pin. 8. A C C A A. Fasten the top hinge to the opposite side of the refrigerator door, making sure the holes are in the Reversibility Kit. 7. Remove the screws from the left-hand side of the freezer door. Plastic spacer 8...

Use & Care Guide
Page 9
...center hinge. 2. Place washer on the upper hinge pin of the freezer door. Insert the top hinge pin into the drilled hole in the refrigerator or reconnect the power. 4. NOTE: The distance between the doors should be approximately 16 mm). 9 NOTE: Provide additional support for the ...to doors and food to the correct height, and then fully tighten the screws. 4. A A. Do not tighten the screws completely. 3. Install Refrigerator Door 1. Replace the parts for the bottom hinge as previously shown and tighten all screws. Push the base grille toward the cabinet until it is...
...center hinge. 2. Place washer on the upper hinge pin of the freezer door. Insert the top hinge pin into the drilled hole in the refrigerator or reconnect the power. 4. NOTE: The distance between the doors should be approximately 16 mm). 9 NOTE: Provide additional support for the ...to doors and food to the correct height, and then fully tighten the screws. 4. A A. Do not tighten the screws completely. 3. Install Refrigerator Door 1. Replace the parts for the bottom hinge as previously shown and tighten all screws. Push the base grille toward the cabinet until it is...

Use & Care Guide
Page 11
... or wrench. 2. Replace the base grille. Loosen the top hinge screws using the following instructions: 1. Replace the top hinge cover, if removed in "Refrigerator Doors." See the Base Grille graphic in Step 1. 11 NOTE: To avoid scratching the door, do not use the Brand Badge Placement template and the... following instructions to install the Brand Badge on the left . If your refrigerator seems unsteady or you should turn the leveling screw to the left to the rear by lifting up the right-hand side and peeling ...
... or wrench. 2. Replace the base grille. Loosen the top hinge screws using the following instructions: 1. Replace the top hinge cover, if removed in "Refrigerator Doors." See the Base Grille graphic in Step 1. 11 NOTE: To avoid scratching the door, do not use the Brand Badge Placement template and the... following instructions to install the Brand Badge on the left . If your refrigerator seems unsteady or you should turn the leveling screw to the left to the rear by lifting up the right-hand side and peeling ...

Use & Care Guide
Page 12
... the LED in the first position is located on your model) along either the rear or left interior wall near the top of the refrigerator compartment. 1. Lift open the vented air filter door. IMPORTANT: ■ The recommended setting should be replaced every 6 months. Temperature Control...Filter The disposable air filter should be sure they are set to a colder than one setting at the top front of odors. either the refrigerator or freezer compartment, use . To turn cooling off. Lift open the vented door. 3. On models without notches: ■ Store the ...
... the LED in the first position is located on your model) along either the rear or left interior wall near the top of the refrigerator compartment. 1. Lift open the vented air filter door. IMPORTANT: ■ The recommended setting should be replaced every 6 months. Temperature Control...Filter The disposable air filter should be sure they are set to a colder than one setting at the top front of odors. either the refrigerator or freezer compartment, use . To turn cooling off. Lift open the vented door. 3. On models without notches: ■ Store the ...

Use & Care Guide
Page 13
... . NOTE: For the first to clean the bin. Airflow Control The Airflow control regulates the amount of the four LEDs will keep the refrigerator operating at 3, move it to between 3 and 4.) Wait 24 hours and, if necessary, gradually turn the Freezer Control to the highest... setting, waiting 24 hours between the freezer and the refrigerator compartments. When you have reached the coldest setting. CONDITION/REASON: ADJUSTMENT: Heavy ice use , full grocery loads or temporarily warm room temperatures....
... . NOTE: For the first to clean the bin. Airflow Control The Airflow control regulates the amount of the four LEDs will keep the refrigerator operating at 3, move it to between 3 and 4.) Wait 24 hours and, if necessary, gradually turn the Freezer Control to the highest... setting, waiting 24 hours between the freezer and the refrigerator compartments. When you have reached the coldest setting. CONDITION/REASON: ADJUSTMENT: Heavy ice use , full grocery loads or temporarily warm room temperatures....

Use & Care Guide
Page 14
...supporting bottom of the shelf into the shelf track. See the following chart for best storage of the shelf past the drawer stop . 2. Refrigerator Shelves The shelves in your model, lift back or front of fresh, leafy vegetables. ■ Leafy vegetables: Wash in the moisture-sealed crisper... items together in plastic bag or crisper. Remove items from the shelf. 2. Replace the shelf by pushing it back in crisper. 14 REFRIGERATOR FEATURES Your model may break if exposed to avoid dropping. When storing meat longer than the times given, freeze the meat. Adjust the ...
...supporting bottom of the shelf into the shelf track. See the following chart for best storage of the shelf past the drawer stop . 2. Refrigerator Shelves The shelves in your model, lift back or front of fresh, leafy vegetables. ■ Leafy vegetables: Wash in the moisture-sealed crisper... items together in plastic bag or crisper. Remove items from the shelf. 2. Replace the shelf by pushing it back in crisper. 14 REFRIGERATOR FEATURES Your model may break if exposed to avoid dropping. When storing meat longer than the times given, freeze the meat. Adjust the ...
Use & Care Guide
Page 16
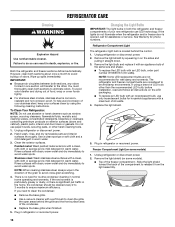
...considered to be cleaned every 2 to 3 months to clean the grille, the open areas behind the control. 1. Unplug refrigerator or disconnect power. 2. REFRIGERATOR CARE Cleaning WARNING Explosion Hazard Use nonflammable cleaner. Wipe up spills immediately. Plug in one section will transfer to avoid water...shield by using a brand of the grain to avoid water spots. To help avoid corrosion of your stainless steel, keep your new refrigerator use paper towels, scouring pads, or other than the recommended LED bulb, before installation, read and follow all instructions on some models...
...considered to be cleaned every 2 to 3 months to clean the grille, the open areas behind the control. 1. Unplug refrigerator or disconnect power. 2. REFRIGERATOR CARE Cleaning WARNING Explosion Hazard Use nonflammable cleaner. Wipe up spills immediately. Plug in one section will transfer to avoid water...shield by using a brand of the grain to avoid water spots. To help avoid corrosion of your stainless steel, keep your new refrigerator use paper towels, scouring pads, or other than the recommended LED bulb, before installation, read and follow all instructions on some models...

Use & Care Guide
Page 17
...bulb, order part number W10574850 (2.0 watts). Empty the ice bin. 4. Clean, wipe, and dry thoroughly. 7. NOTE: Some LED replacement bulbs are moving your refrigerator has an automatic ice maker, and is not turned off the water supply to prop them together so they don't scrape the floor. Remove all... instructions on the model, raise the front of the refrigerator. Unplug refrigerator. 6. Tape rubber or wood blocks to the tops of both doors to the ice maker at least one day ahead of time. ■...
...bulb, order part number W10574850 (2.0 watts). Empty the ice bin. 4. Clean, wipe, and dry thoroughly. 7. NOTE: Some LED replacement bulbs are moving your refrigerator has an automatic ice maker, and is not turned off the water supply to prop them together so they don't scrape the floor. Remove all... instructions on the model, raise the front of the refrigerator. Unplug refrigerator. 6. Tape rubber or wood blocks to the tops of both doors to the ice maker at least one day ahead of time. ■...

Use & Care Guide
Page 18
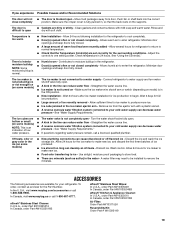
...include a daytime phone number in your mobile device, or visit www.maytag.com/product_help. Do not use an extension cord. ■ No power to the electrical outlet - Failure to run too much Your new refrigerator may be heard when ice melts during defrost cycle ■ Popping... remove ground prong. The motor seems to follow these instructions can result in death, fire, or electrical shock. Energy efficient refrigerators run longer at the address below: In the U.S.A.: Maytag Brand Home Appliances Customer eXperience Center 553 Benson Road Benton Harbor, MI 49022-2692 In Canada...
...include a daytime phone number in your mobile device, or visit www.maytag.com/product_help. Do not use an extension cord. ■ No power to the electrical outlet - Failure to run too much Your new refrigerator may be heard when ice melts during defrost cycle ■ Popping... remove ground prong. The motor seems to follow these instructions can result in death, fire, or electrical shock. Energy efficient refrigerators run longer at the address below: In the U.S.A.: Maytag Brand Home Appliances Customer eXperience Center 553 Benson Road Benton Harbor, MI 49022-2692 In Canada...
Use & Care Guide
Page 19
...9632; New plumbing connections can reduce water flow - Discard the ice and wash the ice storage bin. In the U.S.A., visit www.maytag.com/accessories or call 1-800-807-6777. Allow several hours for ice maker to make new ice, and discard the first three batches...and warm water. Clean gaskets and contact surfaces with a plastic utensil. ■ A reverse osmosis water filtration system connected to your refrigerator. Connect refrigerator to normal temperature. ■ Check that the back rests on the supports. Allow sufficient time for your cold water supply can develop ...
...9632; New plumbing connections can reduce water flow - Discard the ice and wash the ice storage bin. In the U.S.A., visit www.maytag.com/accessories or call 1-800-807-6777. Allow several hours for ice maker to make new ice, and discard the first three batches...and warm water. Clean gaskets and contact surfaces with a plastic utensil. ■ A reverse osmosis water filtration system connected to your refrigerator. Connect refrigerator to normal temperature. ■ Check that the back rests on the supports. Allow sufficient time for your cold water supply can develop ...
Use & Care Guide
Page 20
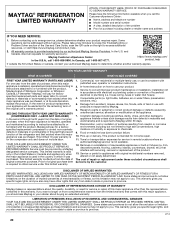
...it was purchased. Removal or reinstallation of the refrigerator and that comes with this major appliance was purchased, or at its sole discretion replace the product. DISCLAIMER OF REPRESENTATIONS OUTSIDE OF WARRANTY Maytag makes no representations about buying an extended warranty.... or need for factory specified replacement parts and repair labor to or furnished with products not approved by a Maytag designated service company. MAYTAG® REFRIGERATION LIMITED WARRANTY ATTACH YOUR RECEIPT HERE. and Canada, direct all requests for the remaining term of product replacement,...
...it was purchased. Removal or reinstallation of the refrigerator and that comes with this major appliance was purchased, or at its sole discretion replace the product. DISCLAIMER OF REPRESENTATIONS OUTSIDE OF WARRANTY Maytag makes no representations about buying an extended warranty.... or need for factory specified replacement parts and repair labor to or furnished with products not approved by a Maytag designated service company. MAYTAG® REFRIGERATION LIMITED WARRANTY ATTACH YOUR RECEIPT HERE. and Canada, direct all requests for the remaining term of product replacement,...
Dimension Guide
Page 1
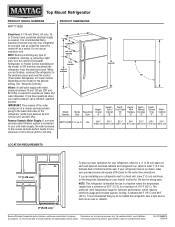
... with product. Model Reversible Overall Size Door "A" Height Top of cabinet 1 A overall C 90˚ Model Number Height - If your refrigerator has an ice maker, make sure you are for planning purposes only. Ref. See "Using the Controls." IMPORTANT: The pressure of the ...158.1 cm) (87.3 cm) (82.3 cm) (72.4 cm) (83.2 cm) LOCATION REQUIREMENTS 1/2" (1.25 cm) To ensure proper ventilation for your refrigerator, allow for a 1⁄2" (1.25 cm) space on your model) to allow for optimum performance, which reduces electricity usage and provides superior cooling, is required...
... with product. Model Reversible Overall Size Door "A" Height Top of cabinet 1 A overall C 90˚ Model Number Height - If your refrigerator has an ice maker, make sure you are for planning purposes only. Ref. See "Using the Controls." IMPORTANT: The pressure of the ...158.1 cm) (87.3 cm) (82.3 cm) (72.4 cm) (83.2 cm) LOCATION REQUIREMENTS 1/2" (1.25 cm) To ensure proper ventilation for your refrigerator, allow for a 1⁄2" (1.25 cm) space on your model) to allow for optimum performance, which reduces electricity usage and provides superior cooling, is required...

Warranty Information
Page 1
... from the date of surfaces resulting from defects in materials or workmanship that interfere with original model/serial numbers removed, altered or not easily determined. MAYTAG® REFRIGERATION LIMITED WARRANTY ATTACH YOUR RECEIPT HERE. SECOND THROUGH TENTH YEAR LIMITED WARRANTY (COMPRESSOR ONLY - Removal or reinstallation of Whirlpool Corporation or Whirlpool Canada, LP...
... from the date of surfaces resulting from defects in materials or workmanship that interfere with original model/serial numbers removed, altered or not easily determined. MAYTAG® REFRIGERATION LIMITED WARRANTY ATTACH YOUR RECEIPT HERE. SECOND THROUGH TENTH YEAR LIMITED WARRANTY (COMPRESSOR ONLY - Removal or reinstallation of Whirlpool Corporation or Whirlpool Canada, LP...


