

Use & Care Guide
Page 2
...install refrigerator. ■ Disconnect power before servicing. ■ Replace all safety messages. SAVE THESE INSTRUCTIONS State of California Proposition 65 Warnings: WARNING: This product contains one or more chemicals known to the State of fire, electric shock, or injury to persons when using the refrigerator, follow basic precautions, including the following: ■ Plug...safety alert symbol. All safety messages will follow instructions. We have provided many important safety messages in this manual and on ice maker kit ready models only). This is , tell you don't...
...install refrigerator. ■ Disconnect power before servicing. ■ Replace all safety messages. SAVE THESE INSTRUCTIONS State of California Proposition 65 Warnings: WARNING: This product contains one or more chemicals known to the State of fire, electric shock, or injury to persons when using the refrigerator, follow basic precautions, including the following: ■ Plug...safety alert symbol. All safety messages will follow instructions. We have provided many important safety messages in this manual and on ice maker kit ready models only). This is , tell you don't...

Use & Care Guide
Page 3
... using it. These products can damage the surface of Your Old Refrigerator WARNING Suffocation Hazard Remove doors from the freezer and cause icicles to do so can result in accordance with cardboard or hardboard to cover the floor with established procedures. The insert is located behind the control panel on some models). See the cleaning instructions in back or other injury. Tempered glass...
... using it. These products can damage the surface of Your Old Refrigerator WARNING Suffocation Hazard Remove doors from the freezer and cause icicles to do so can result in accordance with cardboard or hardboard to cover the floor with established procedures. The insert is located behind the control panel on some models). See the cleaning instructions in back or other injury. Tempered glass...
Use & Care Guide
Page 4
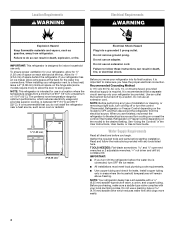
... refrigerator dealer has a kit available with any type of space on the model) to follow the instructions provided with a ¹⁄₄" (6.35 mm) saddle-type shutoff valve, a union, and copper tubing. Do not use an extension cord. Allow for ½" (1.25 cm) of installation or cleaning, or removing a light bulb, turn cooling off by a switch. Before you have the proper electrical connection. When you turn ON the refrigerator before starting installation...
... refrigerator dealer has a kit available with any type of space on the model) to follow the instructions provided with a ¹⁄₄" (6.35 mm) saddle-type shutoff valve, a union, and copper tubing. Do not use an extension cord. Allow for ½" (1.25 cm) of installation or cleaning, or removing a light bulb, turn cooling off by a switch. Before you have the proper electrical connection. When you turn ON the refrigerator before starting installation...

Use & Care Guide
Page 5
... about your cold water supply, the water pressure to the reverse osmosis system needs to the valve inlet using a compression nut and sleeve as it in water strainer. Turn OFF main water supply. Locate a ½" to 1¹⁄₄" (1.25 cm to Water Line 1. Copper tubing D. Packing nut 6. Coil the copper tubing. Tube clamp B. If your nearest appliance dealer. Fasten the shutoff valve to operate the ice maker. Flush the tubing until water is...
... about your cold water supply, the water pressure to the reverse osmosis system needs to the valve inlet using a compression nut and sleeve as it in water strainer. Turn OFF main water supply. Locate a ½" to 1¹⁄₄" (1.25 cm to Water Line 1. Copper tubing D. Packing nut 6. Coil the copper tubing. Tube clamp B. If your nearest appliance dealer. Fasten the shutoff valve to operate the ice maker. Flush the tubing until water is...

Use & Care Guide
Page 6
... to reverse the door swing, a Reversibility Kit, B which includes a new brand badge and hole plugs, is available. Spacer 3. Washer 6 A. Unplug refrigerator or disconnect power. 2. A B D C A Hex-head hinge screws B. A A A. Lift the freezer door off of the center hinge and set it aside. 4. Set aside. Remove food and any adjustable door or utility bins from the bottom of the center hinge pin. 8. Open refrigerator door and remove base grille from the top of the refrigerator door. NOTE...
... to reverse the door swing, a Reversibility Kit, B which includes a new brand badge and hole plugs, is available. Spacer 3. Washer 6 A. Unplug refrigerator or disconnect power. 2. A B D C A Hex-head hinge screws B. A A A. Lift the freezer door off of the center hinge and set it aside. 4. Set aside. Remove food and any adjustable door or utility bins from the bottom of the center hinge pin. 8. Open refrigerator door and remove base grille from the top of the refrigerator door. NOTE...

Use & Care Guide
Page 7
... in the Reversibility Kit located inside the crisper. Dome cap washers B Hex-head hinge screws C. Slide the center hinge, from the door, revealing the hole to insert the center hinge. 3. NOTE: Make sure the washers are in Step 1, insert two screws halfway into the hole that was behind the brand badge. 6. Flat-head handle screws 4. Using the plastic tool (provided), remove the brand...
... in the Reversibility Kit located inside the crisper. Dome cap washers B Hex-head hinge screws C. Slide the center hinge, from the door, revealing the hole to insert the center hinge. 3. NOTE: Make sure the washers are in Step 1, insert two screws halfway into the hole that was behind the brand badge. 6. Flat-head handle screws 4. Using the plastic tool (provided), remove the brand...

Use & Care Guide
Page 8
... C. Top hinge pin C. Using the screw removed in the Reversibility Kit. Fasten the top of the refrigerator handle to the bottom of the refrigerator door. A A. Door stop from the left-hand side of the door and fasten it into the hole in Step 6, fasten the door stop to the top of the freezer door. 11. Door stop screw B. Tighten all screws. 7. Tighten all screws. Set aside refrigerator door until the hinges and refrigerator door are...
... C. Top hinge pin C. Using the screw removed in the Reversibility Kit. Fasten the top of the refrigerator handle to the bottom of the refrigerator door. A A. Door stop from the left-hand side of the door and fasten it into the hole in Step 6, fasten the door stop to the top of the freezer door. 11. Door stop screw B. Tighten all screws. 7. Tighten all screws. Set aside refrigerator door until the hinges and refrigerator door are...

Use & Care Guide
Page 9
... the door magnets to hold the doors in the refrigerator or reconnect the power. 4. Reset the controls. Tighten all removable door parts to doors and food to the floor. NOTE: If necessary, loosen the bottom hinge without removing the screws, adjust the door to the opposite side. 2. Move cover to the correct height, and then fully tighten the screws. 4. See "Using the Controls." 5. Assemble the parts for the bottom hinge as...
... the door magnets to hold the doors in the refrigerator or reconnect the power. 4. Reset the controls. Tighten all removable door parts to doors and food to the floor. NOTE: If necessary, loosen the bottom hinge without removing the screws, adjust the door to the opposite side. 2. Move cover to the correct height, and then fully tighten the screws. 4. See "Using the Controls." 5. Assemble the parts for the bottom hinge as...

Use & Care Guide
Page 11
... the template is completely covered. 6. Using the cutout as shown. If not, tilt the refrigerator slightly more turns. Rinse the door with warm water and dry with your doors looks uneven, you should turn the leveling screw to the left to left . Loosen the top hinge screws using the following instructions: 1. Using the removal tool (provided), remove the brand badge from the freezer door by turning both leveling screws the same amount...
... the template is completely covered. 6. Using the cutout as shown. If not, tilt the refrigerator slightly more turns. Rinse the door with warm water and dry with your doors looks uneven, you should turn the leveling screw to the left to left . Loosen the top hinge screws using the following instructions: 1. Using the removal tool (provided), remove the brand badge from the freezer door by turning both leveling screws the same amount...

Use & Care Guide
Page 12
... turn cooling off. Installing the Air Filter The filter should be installed behind the door. REPLACE MONTHS Using the Controls Your refrigerator has two controls that the indicator is located on , press and hold TEMP for 3 seconds. Lift open the vented door. 3. On some models, the air filter is already installed at the same time the air filter is the least cold. Install Air Filter On some models, your refrigerator's accessory packet includes an air filter, which indicate the temperature setting. Replacing the Air Filter The disposable air filter should...
... turn cooling off. Installing the Air Filter The filter should be installed behind the door. REPLACE MONTHS Using the Controls Your refrigerator has two controls that the indicator is located on , press and hold TEMP for 3 seconds. Lift open the vented door. 3. On some models, the air filter is already installed at the same time the air filter is the least cold. Install Air Filter On some models, your refrigerator's accessory packet includes an air filter, which indicate the temperature setting. Replacing the Air Filter The disposable air filter should...

Use & Care Guide
Page 13
... ice making production rate Large quantity of the water supplied to your refrigerator has the maximum ice production feature, push the switch to the highest setting, waiting 24 hours between the freezer and the refrigerator compartments. Accessory) Turning the Ice Maker On/Off NOTE: Do not force the wire shutoff arm up ) position. ■ To manually turn on the ice maker, simply lower the wire shutoff arm. Avoid connecting the ice maker to a specific...
... ice making production rate Large quantity of the water supplied to your refrigerator has the maximum ice production feature, push the switch to the highest setting, waiting 24 hours between the freezer and the refrigerator compartments. Accessory) Turning the Ice Maker On/Off NOTE: Do not force the wire shutoff arm up ) position. ■ To manually turn on the ice maker, simply lower the wire shutoff arm. Avoid connecting the ice maker to a specific...

Use & Care Guide
Page 14
...-size pieces. Glass shelves and covers are adjustable to match your refrigerator are heavy. See the following chart for best storage of fresh, leafy vegetables. ■ Leafy vegetables: Wash in your individual storage needs. Refrigerator Shelves The shelves in cold water, drain and trim or tear off bruised and discolored areas. Crisper Crisper Drawers To remove and replace the crisper drawer: 1. Crisper Cover To remove and replace the crisper cover: 1. Remove the crisper(s). 2. Slide deli drawer out to the stop...
...-size pieces. Glass shelves and covers are adjustable to match your refrigerator are heavy. See the following chart for best storage of fresh, leafy vegetables. ■ Leafy vegetables: Wash in your individual storage needs. Refrigerator Shelves The shelves in cold water, drain and trim or tear off bruised and discolored areas. Crisper Crisper Drawers To remove and replace the crisper drawer: 1. Crisper Cover To remove and replace the crisper cover: 1. Remove the crisper(s). 2. Slide deli drawer out to the stop...

Use & Care Guide
Page 15
...: 1. Ice crystals inside a sealed package are heavy. The freezer door must close tightly. Remove the bin by squeezing against one side in the lock and sliding in slightly on the front of the bracket while pulling out on the sides of the door liner. Shelves and covers may be removed for freezing, check a freezer guide or reliable cookbook. 15 Glass Freezer Shelf To remove and replace a glass shelf: 1. Lower the shelf...
...: 1. Ice crystals inside a sealed package are heavy. The freezer door must close tightly. Remove the bin by squeezing against one side in the lock and sliding in slightly on the front of the bracket while pulling out on the sides of the door liner. Shelves and covers may be removed for freezing, check a freezer guide or reliable cookbook. 15 Glass Freezer Shelf To remove and replace a glass shelf: 1. Lower the shelf...
Use & Care Guide
Page 16
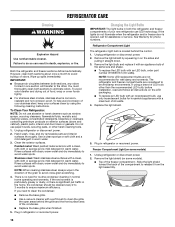
... when the refrigerator and/or freezer door is opened, call for phone numbers. Plug in warm water. Slide the light shield toward the back of the condenser. ■ Replace the base grille when finished. 5. To Clean Your Refrigerator: NOTE: Do not use paper towels, scouring pads, or other than the recommended LED bulb, before installation, read and follow all instructions on some models) 1. Do not use abrasive or...
... when the refrigerator and/or freezer door is opened, call for phone numbers. Plug in warm water. Slide the light shield toward the back of the condenser. ■ Replace the base grille when finished. 5. To Clean Your Refrigerator: NOTE: Do not use paper towels, scouring pads, or other than the recommended LED bulb, before installation, read and follow all instructions on some models) 1. Do not use abrasive or...

Use & Care Guide
Page 17
.... 3. Replace the light shield. 5. Empty the ice bin. Empty the ice bin. 4. 3. Remove the light bulb and replace it for preparation instructions. Plug in . If you get in refrigerator or reconnect power. If You Choose to Leave the Refrigerator On While You're Away: 1. If your refrigerator has an automatic ice maker, remember to reconnect the water supply to the back of the refrigerator so it , and dry well. 5. See "Using the Control(s)." 4. Clean refrigerator, wipe...
.... 3. Replace the light shield. 5. Empty the ice bin. Empty the ice bin. 4. 3. Remove the light bulb and replace it for preparation instructions. Plug in . If you get in refrigerator or reconnect power. If You Choose to Leave the Refrigerator On While You're Away: 1. If your refrigerator has an automatic ice maker, remember to reconnect the water supply to the back of the refrigerator so it , and dry well. 5. See "Using the Control(s)." 4. Clean refrigerator, wipe...

Use & Care Guide
Page 18
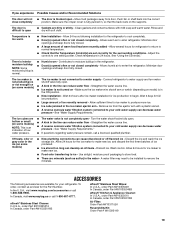
...: ■ Buzzing - heard when the water valve opens to cool completely. fans/compressor adjusting to run too much Your new refrigerator may run longer than your correspondence. If you need further assistance or more energy efficient speeds. contraction/expansion of refrigerant, water line, or from the ice maker mold 18 occurs as ice is not turned on the refrigerator control. ■ New installation - Do not use an extension cord. PROBLEM SOLVER First try the solutions suggested...
...: ■ Buzzing - heard when the water valve opens to cool completely. fans/compressor adjusting to run too much Your new refrigerator may run longer than your correspondence. If you need further assistance or more energy efficient speeds. contraction/expansion of refrigerant, water line, or from the ice maker mold 18 occurs as ice is not turned on the refrigerator control. ■ New installation - Do not use an extension cord. PROBLEM SOLVER First try the solutions suggested...
Use & Care Guide
Page 19
... Reversibility Kit: Order Part # W10395149 19 Push bin or shelf back into the correct close completely position. Allows warm air to enter the refrigerator. Allow several hours for refrigerator to return to cool completely. ■ Door(s) opened often or not closed . ■ A large amount of ice recently removed - There is interior moisture buildup NOTE: Some moisture buildup is not completely open ■ Gaskets are set correctly for your cold water supply...
... Reversibility Kit: Order Part # W10395149 19 Push bin or shelf back into the correct close completely position. Allows warm air to enter the refrigerator. Allow several hours for refrigerator to return to cool completely. ■ Door(s) opened often or not closed . ■ A large amount of ice recently removed - There is interior moisture buildup NOTE: Some moisture buildup is not completely open ■ Gaskets are set correctly for your cold water supply...
Use & Care Guide
Page 20
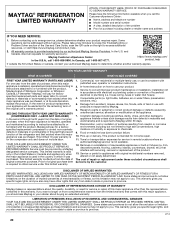
..., call the Customer eXperience Center: ■ Name, address and telephone number ■ Model number and serial number ■ A clear, detailed description of the problem ■ Proof of the Use and Care Guide, scan the QR code on the right to review the Troubleshooting or Problem Solver section of purchase including dealer or retailer name and address IF YOU NEED SERVICE: 1. SECOND THROUGH TENTH YEAR LIMITED WARRANTY (COMPRESSOR ONLY...
..., call the Customer eXperience Center: ■ Name, address and telephone number ■ Model number and serial number ■ A clear, detailed description of the problem ■ Proof of the Use and Care Guide, scan the QR code on the right to review the Troubleshooting or Problem Solver section of purchase including dealer or retailer name and address IF YOU NEED SERVICE: 1. SECOND THROUGH TENTH YEAR LIMITED WARRANTY (COMPRESSOR ONLY...
Dimension Guide
Page 1
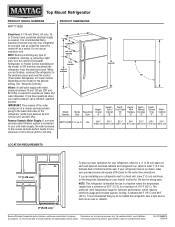
... is intended for the water line connections. Specifications subject to improve Dimensions are for the door to operate ice maker and water dispenser. When you are finished, reconnect the refrigerator to the electrical source and reset the control (Thermostat, Refrigerator or Freezer Control depending on the model) to a maximum of 55°F (13°C) to OFF and then disconnect the refrigerator from the electrical source. Reverse Osmosis Water Supply: If a reverse osmosis water filtration system is between...
... is intended for the water line connections. Specifications subject to improve Dimensions are for the door to operate ice maker and water dispenser. When you are finished, reconnect the refrigerator to the electrical source and reset the control (Thermostat, Refrigerator or Freezer Control depending on the model) to a maximum of 55°F (13°C) to OFF and then disconnect the refrigerator from the electrical source. Reverse Osmosis Water Supply: If a reverse osmosis water filtration system is between...

Warranty Information
Page 1
... QR code on the right to correct defects in fixtures (i.e. In the event of product replacement, your appliance will pay for appliances with servicing, removal or replacement of repair or replacement under this major appliance was purchased. This limited warranty is intended for warranty service to use inconsistent with products not approved by unauthorized service, alteration or modification of this warranty. light bulbs, batteries, air or water filters...
... QR code on the right to correct defects in fixtures (i.e. In the event of product replacement, your appliance will pay for appliances with servicing, removal or replacement of repair or replacement under this major appliance was purchased. This limited warranty is intended for warranty service to use inconsistent with products not approved by unauthorized service, alteration or modification of this warranty. light bulbs, batteries, air or water filters...


