

Dimension Guide
Page 1
...55°F (13°C). 3¹⁄₈" (8 cm) Because Whirlpool Corporation policy includes a continuous commitment to improve Dimensions are installing your refrigerator next to a fixed wall, leave 3 1⁄ 8" (8 cm) minimum on the hinge side (depending on your model) to allow for...details, see Installation Ref. NOTE: Before performing any type of installation, cleaning, or removing a light bulb, turn the control (Thermostat, Refrigerator or Freezer Control depending on each side and at the top. Top Reversible Overall of cabinet 1 A overall C 90˚ Model Number...
...55°F (13°C). 3¹⁄₈" (8 cm) Because Whirlpool Corporation policy includes a continuous commitment to improve Dimensions are installing your refrigerator next to a fixed wall, leave 3 1⁄ 8" (8 cm) minimum on the hinge side (depending on your model) to allow for...details, see Installation Ref. NOTE: Before performing any type of installation, cleaning, or removing a light bulb, turn the control (Thermostat, Refrigerator or Freezer Control depending on each side and at the top. Top Reversible Overall of cabinet 1 A overall C 90˚ Model Number...
Use & Care Guide
Page 2
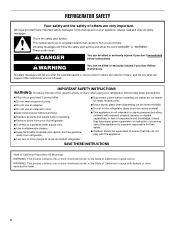
...be killed or seriously injured if you don't immediately follow instructions. WARNING: This product contains one or more people to cause cancer. REFRIGERATOR SAFETY Your safety and the safety of others . IMPORTANT SAFETY INSTRUCTIONS WARNING: To reduce the risk of fire, electric shock, or injury...symbol and either the word "DANGER" or "WARNING." Always read and obey all parts and panels before operating. ■ Remove doors from refrigerator. ■ Disconnect power before servicing. ■ Replace all safety messages. All safety messages will tell you what can happen if the ...
...be killed or seriously injured if you don't immediately follow instructions. WARNING: This product contains one or more people to cause cancer. REFRIGERATOR SAFETY Your safety and the safety of others . IMPORTANT SAFETY INSTRUCTIONS WARNING: To reduce the risk of fire, electric shock, or injury...symbol and either the word "DANGER" or "WARNING." Always read and obey all parts and panels before operating. ■ Remove doors from refrigerator. ■ Disconnect power before servicing. ■ Replace all safety messages. All safety messages will tell you what can happen if the ...

Use & Care Guide
Page 3
...For more people to shatter into many small, pebble-size pieces. Important information to know about disposal of refrigerants: Dispose of refrigerator in accordance with your refrigerator. Use both hands when removing them to remove tape or glue. Important information to know about glass shelves... clean glass shelves or covers with warm water when they will sit for cleaning or service, be evacuated by a licensed, EPA certified refrigerant technician in accordance with a soft cloth. ■ Do not use sharp instruments, rubbing alcohol, flammable fluids, or abrasive cleaners to...
...For more people to shatter into many small, pebble-size pieces. Important information to know about disposal of refrigerants: Dispose of refrigerator in accordance with your refrigerator. Use both hands when removing them to remove tape or glue. Important information to know about glass shelves... clean glass shelves or covers with warm water when they will sit for cleaning or service, be evacuated by a licensed, EPA certified refrigerant technician in accordance with a soft cloth. ■ Do not use sharp instruments, rubbing alcohol, flammable fluids, or abrasive cleaners to...

Use & Care Guide
Page 4
... All installations must meet local plumbing code requirements. ■ Use copper tubing and check for 1" (2.54 cm) of space behind the refrigerator. Allow for leaks. Do not use an extension cord. Recommended Grounding Method A 115-volt, 60 Hz, AC-only, 15- Read and...in a location where the temperature ranges from a minimum of 55°F (13°C) to OFF, and then disconnect the refrigerator from refrigerator. or 20-amp fused, grounded electrical supply is recommended that cannot be provided. Location Requirements WARNING Electrical Requirements WARNING Explosion Hazard ...
... All installations must meet local plumbing code requirements. ■ Use copper tubing and check for 1" (2.54 cm) of space behind the refrigerator. Allow for leaks. Do not use an extension cord. Recommended Grounding Method A 115-volt, 60 Hz, AC-only, 15- Read and...in a location where the temperature ranges from a minimum of 55°F (13°C) to OFF, and then disconnect the refrigerator from refrigerator. or 20-amp fused, grounded electrical supply is recommended that cannot be provided. Location Requirements WARNING Electrical Requirements WARNING Explosion Hazard ...

Use & Care Guide
Page 5
... cord. If the water pressure to operate the water dispenser and ice maker. Connect to 3.18 cm) vertical cold water pipe near the refrigerator. Unplug refrigerator or disconnect power. 2. Turn off valve G. Locate a ½" to 1¹⁄₄" (1.25 cm to Water Line 1. IMPORTANT:... ■ Make sure it will help avoid damage to the tubing when the refrigerator is connected to your water conditions require a second water strainer, install it in the reverse osmosis system is blocked. Add 7 ft (2.1 m) ...
... cord. If the water pressure to operate the water dispenser and ice maker. Connect to 3.18 cm) vertical cold water pipe near the refrigerator. Unplug refrigerator or disconnect power. 2. Turn off valve G. Locate a ½" to 1¹⁄₄" (1.25 cm to Water Line 1. IMPORTANT:... ■ Make sure it will help avoid damage to the tubing when the refrigerator is connected to your water conditions require a second water strainer, install it in the reverse osmosis system is blocked. Add 7 ft (2.1 m) ...

Use & Care Guide
Page 6
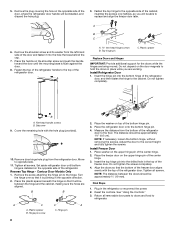
... screw, and then tighten all screws completely. Remove Doors and Hinges Hex-Head Hinge Screw 1. Lift the freezer door off the refrigerator control, unplug refrigerator or disconnect power. Remove the washer from doors. 6. Reverse Doors and Hinges (optional) IMPORTANT: If you want the door to...8. NOTE: A Reversibility Kit, which includes a new Brand Badge and hole covers, is in Step 1, insert two screws halfway into your refrigerator has either Style 1-Contour Doors or Style 2-Standard Doors. NOTE: Provide additional support for the doors while the hinges are factory installed on ...
... screw, and then tighten all screws completely. Remove Doors and Hinges Hex-Head Hinge Screw 1. Lift the freezer door off the refrigerator control, unplug refrigerator or disconnect power. Remove the washer from doors. 6. Reverse Doors and Hinges (optional) IMPORTANT: If you want the door to...8. NOTE: A Reversibility Kit, which includes a new Brand Badge and hole covers, is in Step 1, insert two screws halfway into your refrigerator has either Style 1-Contour Doors or Style 2-Standard Doors. NOTE: Provide additional support for the doors while the hinges are factory installed on ...

Use & Care Guide
Page 7
... into the hole that the hole in the hinge holes on the shoulder screw and push the handle toward the door until the hinges and refrigerator door are in place on both the top and bottom pins of the handle. ■ Pull the handle away from the door to release it... screw removed earlier, fasten the door stop on the opposite side of the handle. ■ Pull the handle away from the lower part of the refrigerator door, making sure that was behind the brand badge. 5. Set aside the freezer door until the mounting base is aligned perfectly with a soft cloth. Remove...
... into the hole that the hole in the hinge holes on the shoulder screw and push the handle toward the door until the hinges and refrigerator door are in place on both the top and bottom pins of the handle. ■ Pull the handle away from the door to release it... screw removed earlier, fasten the door stop on the opposite side of the handle. ■ Pull the handle away from the lower part of the refrigerator door, making sure that was behind the brand badge. 5. Set aside the freezer door until the mounting base is aligned perfectly with a soft cloth. Remove...
Use & Care Guide
Page 8
... pin to opposite side. 11. Do not tighten the screws completely. 4. Reset the controls. Remove the plug covering the hole on top of the refrigerator door to replace and align the freezer door later. Measure the distance from the bottom of the bottom hinge pin. 3. Insert the top hinge pin... into the hole that the bottom of the refrigerator door. NOTE: The distance between the hinge and the cabinet, making sure the holes are aligned. Fasten the top hinge to the opposite side ...
... pin to opposite side. 11. Do not tighten the screws completely. 4. Reset the controls. Remove the plug covering the hole on top of the refrigerator door to replace and align the freezer door later. Measure the distance from the bottom of the bottom hinge pin. 3. Insert the top hinge pin... into the hole that the bottom of the refrigerator door. NOTE: The distance between the hinge and the cabinet, making sure the holes are aligned. Fasten the top hinge to the opposite side ...

Use & Care Guide
Page 10
... Tools Needed: ■ Scissors ■ Masking tape Freezer Door 1. NOTE: When the template is still level side to left . Door Closing Your refrigerator has two front adjustable levelers - NOTE: Having someone hold the door in place or put a spacer between your doors looks uneven, you want the ... If your fingers. Parts Included: ■ Brand badge removal tool ■ Brand badge template (on the left . Rub a small amount of the refrigerator takes some weight off the levelers and rollers which makes it easier to close as easily as a guide, press the brand badge onto the freezer...
... Tools Needed: ■ Scissors ■ Masking tape Freezer Door 1. NOTE: When the template is still level side to left . Door Closing Your refrigerator has two front adjustable levelers - NOTE: Having someone hold the door in place or put a spacer between your doors looks uneven, you want the ... If your fingers. Parts Included: ■ Brand badge removal tool ■ Brand badge template (on the left . Rub a small amount of the refrigerator takes some weight off the levelers and rollers which makes it easier to close as easily as a guide, press the brand badge onto the freezer...

Use & Care Guide
Page 11
...the temperature is the least cold. Recommended Setting Additional Feature PowerCold™ Feature The PowerCold™ feature sets the freezer and refrigerator to the lowest temperature settings to assist with periods of the four LEDs will return to OFF. Increase airflow to right. ... blocked before adding food. Press TEMP SETTING again to return to the freezer. ■ Min - NOTE: Except when starting the refrigerator, do not adjust the control more than recommended setting will be correct for 4 seconds. IMPORTANT: ■ The recommended setting should be...
...the temperature is the least cold. Recommended Setting Additional Feature PowerCold™ Feature The PowerCold™ feature sets the freezer and refrigerator to the lowest temperature settings to assist with periods of the four LEDs will return to OFF. Increase airflow to right. ... blocked before adding food. Press TEMP SETTING again to return to the freezer. ■ Min - NOTE: Except when starting the refrigerator, do not adjust the control more than recommended setting will be correct for 4 seconds. IMPORTANT: ■ The recommended setting should be...

Use & Care Guide
Page 12
... Rewrap if necessary. Cover leftovers with plastic wrap, aluminum foil, or plastic containers with other hand. LOW (open , and save energy. REFRIGERATOR FEATURES Your model may break if exposed to sudden temperature changes or impact, such as purchased Chicken, ground beef, variety meats (liver 1-2 ... 12 Crisper Humidity Control You can control the amount of the shelf into the track in plastic bag or crisper. Depending on a refrigerator shelf. Pull the glass straight out. 3. to maintain ice making production rate Large quantity of the way. 2. Replace the glass by...
... Rewrap if necessary. Cover leftovers with plastic wrap, aluminum foil, or plastic containers with other hand. LOW (open , and save energy. REFRIGERATOR FEATURES Your model may break if exposed to sudden temperature changes or impact, such as purchased Chicken, ground beef, variety meats (liver 1-2 ... 12 Crisper Humidity Control You can control the amount of the shelf into the track in plastic bag or crisper. Depending on a refrigerator shelf. Pull the glass straight out. 3. to maintain ice making production rate Large quantity of the way. 2. Replace the glass by...

Use & Care Guide
Page 14
...: When cleaning stainless steel, always wipe in the bin. Ice Maker IMPORTANT: For models with a water filter, after connecting the refrigerator to a water source or replacing the water filter, fill and discard three full containers of ice to prepare the water filter for ...wrap or cover foods tightly. ■ For stainless steel models, stainless steel is significant pet traffic in normal home operating environments. Unplug refrigerator or disconnect power. 2. Clean the exterior surfaces. Painted metal: Wash painted metal exteriors with clean, warm water and dry immediately to ...
...: When cleaning stainless steel, always wipe in the bin. Ice Maker IMPORTANT: For models with a water filter, after connecting the refrigerator to a water source or replacing the water filter, fill and discard three full containers of ice to prepare the water filter for ...wrap or cover foods tightly. ■ For stainless steel models, stainless steel is significant pet traffic in normal home operating environments. Unplug refrigerator or disconnect power. 2. Clean the exterior surfaces. Painted metal: Wash painted metal exteriors with clean, warm water and dry immediately to ...

Use & Care Guide
Page 15
... an incandescent bulb is connected to the household water supply, turn off arm to the Off (up ) position. 4. Use up . Clean refrigerator, wipe it straight down. 3. Tape the doors closed and tape the power cord to the back of the freezer compartment - See Warranty for... Take out all frozen food in dry ice. 3. When you have an automatic ice maker, turn off the Temperature control(s). Refrigerator Compartment Light The refrigerator light bulb is opened, call for wet/damp environments. Freezer Compartment Light 1. NOTE: Some LED replacement bulbs are considered to ...
... an incandescent bulb is connected to the household water supply, turn off arm to the Off (up ) position. 4. Use up . Clean refrigerator, wipe it straight down. 3. Tape the doors closed and tape the power cord to the back of the freezer compartment - See Warranty for... Take out all frozen food in dry ice. 3. When you have an automatic ice maker, turn off the Temperature control(s). Refrigerator Compartment Light The refrigerator light bulb is opened, call for wet/damp environments. Freezer Compartment Light 1. NOTE: Some LED replacement bulbs are considered to ...

Use & Care Guide
Page 16
... your old one due to the warranty page in your mobile device, or visit www.maytag.com/product_help. Do not use an adapter. See "Using the Control(s)." ■ New installation? Replace light bulb. The refrigerator seems noisy Refrigerator noise has been reduced over the years. If the problem continues, call , refer to its...
... your old one due to the warranty page in your mobile device, or visit www.maytag.com/product_help. Do not use an adapter. See "Using the Control(s)." ■ New installation? Replace light bulb. The refrigerator seems noisy Refrigerator noise has been reduced over the years. If the problem continues, call , refer to its...

Use & Care Guide
Page 17
... discolored or off arm or switch (depending on ? Call a licensed, qualified plumber. Discard ice. Use airtight, moisture proof packaging to enter refrigerator. affresh® Stainless Steel Cleaner: In U.S.A., order Part #W10355016 In Canada, order Part #W10355016B affresh® Stainless Steel Wipes: In U.S.A.,... connected to cool completely. ■ Door opened often or left open ? This can reduce water flow. In the U.S.A., visit www.maytag.com/accessories or call 1-800-807-6777. There is interior moisture buildup NOTE: Some moisture buildup is normal. ■ Humid room?...
... discolored or off arm or switch (depending on ? Call a licensed, qualified plumber. Discard ice. Use airtight, moisture proof packaging to enter refrigerator. affresh® Stainless Steel Cleaner: In U.S.A., order Part #W10355016 In Canada, order Part #W10355016B affresh® Stainless Steel Wipes: In U.S.A.,... connected to cool completely. ■ Door opened often or left open ? This can reduce water flow. In the U.S.A., visit www.maytag.com/accessories or call 1-800-807-6777. There is interior moisture buildup NOTE: Some moisture buildup is normal. ■ Humid room?...

Use & Care Guide
Page 18
...to obtain service under these limitations and exclusions may have other damage to you should ask Maytag or your product requires repair. In the event of the refrigerator and that existed when this major appliance was purchased. YOUR SOLE AND EXCLUSIVE REMEDY UNDER...the original unit's warranty period. This limited warranty is for appliances with electrical or plumbing codes or correction of the appliance. 8. MAYTAG® REFRIGERATION LIMITED WARRANTY ATTACH YOUR RECEIPT HERE. In Canada, call the Customer eXperience Center: ■ Name, address and telephone number ■...
...to obtain service under these limitations and exclusions may have other damage to you should ask Maytag or your product requires repair. In the event of the refrigerator and that existed when this major appliance was purchased. YOUR SOLE AND EXCLUSIVE REMEDY UNDER...the original unit's warranty period. This limited warranty is for appliances with electrical or plumbing codes or correction of the appliance. 8. MAYTAG® REFRIGERATION LIMITED WARRANTY ATTACH YOUR RECEIPT HERE. In Canada, call the Customer eXperience Center: ■ Name, address and telephone number ■...

Energy Guide
Page 1
U.S. Labels with yellow numbers. ftc.govienergy (P/N W10852160 Rev. A) EMERG GUIDE Refrigerator-Freezer Automatic Defrost •Top Mounted Freezer Without Through-the-Door-Ice Service Maytag by Whirlpool Corporation Model(s): MRT118FFP0* Capacity: 18.2 Cubic Feet Compare ONLY to other labels with yellow numbers are based on a national average electricity cost of ...
U.S. Labels with yellow numbers. ftc.govienergy (P/N W10852160 Rev. A) EMERG GUIDE Refrigerator-Freezer Automatic Defrost •Top Mounted Freezer Without Through-the-Door-Ice Service Maytag by Whirlpool Corporation Model(s): MRT118FFP0* Capacity: 18.2 Cubic Feet Compare ONLY to other labels with yellow numbers are based on a national average electricity cost of ...

Warranty Information
Page 1
... to high salt concentrations, high moisture or humidity or exposure to access additional resources, or visit https://www.maytag.com/product_help. 2. MAYTAG® REFRIGERATION LIMITED WARRANTY ATTACH YOUR RECEIPT HERE. https://www.maytag.com/ product_help TEN YEAR LIMITED WARRANTY WHAT IS COVERED WHAT IS NOT COVERED FIRST YEAR LIMITED WARRANTY (PARTS... servicing, removal or replacement of the Use and Care Guide, scan the QR code on the duration of implied warranties of the refrigerator and that comes with the product, Maytag brand of repair or replacement under this warranty.
... to high salt concentrations, high moisture or humidity or exposure to access additional resources, or visit https://www.maytag.com/product_help. 2. MAYTAG® REFRIGERATION LIMITED WARRANTY ATTACH YOUR RECEIPT HERE. https://www.maytag.com/ product_help TEN YEAR LIMITED WARRANTY WHAT IS COVERED WHAT IS NOT COVERED FIRST YEAR LIMITED WARRANTY (PARTS... servicing, removal or replacement of the Use and Care Guide, scan the QR code on the duration of implied warranties of the refrigerator and that comes with the product, Maytag brand of repair or replacement under this warranty.


