Owners Manual
Page 3
... chance of injury, and tell you what the potential hazard is, tell you don't immediately follow basic precautions, including the following: ■ Proper Installation - Always read and obey all safety messages. All safety messages will tell you what can kill or hurt you and others are oven vent openings... of Oven Racks - If rack must be killed or seriously injured if you how to cool. WARNING You can be moved while oven is properly installed and grounded by a qualified technician. ■ Never Use the Oven for a good seal. Do not repair or replace any part of the oven...
... chance of injury, and tell you what the potential hazard is, tell you don't immediately follow basic precautions, including the following: ■ Proper Installation - Always read and obey all safety messages. All safety messages will tell you what can kill or hurt you and others are oven vent openings... of Oven Racks - If rack must be killed or seriously injured if you how to cool. WARNING You can be moved while oven is properly installed and grounded by a qualified technician. ■ Never Use the Oven for a good seal. Do not repair or replace any part of the oven...
Owners Manual
Page 11
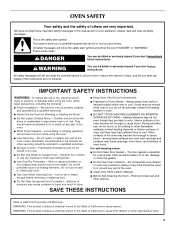
... the Self-Cleaning cycle. Lift the oven door while holding both hanger arms into place. 3. Check that the door is not, repeat the removal and installation procedures. 3. Continue to open and close. Oven Door For normal oven use, it is free to push the oven door closed , press OVEN LIGHT to...
... the Self-Cleaning cycle. Lift the oven door while holding both hanger arms into place. 3. Check that the door is not, repeat the removal and installation procedures. 3. Continue to open and close. Oven Door For normal oven use, it is free to push the oven door closed , press OVEN LIGHT to...
Owners Manual
Page 12
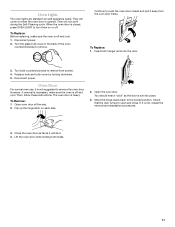
... Move rack to cover the edge of an unnecessary service call. Self-Cleaning cycle will operate ■ Has the function been entered? See Installation Instructions. See "Self-Cleaning Cycle" section. ■ Has a delay start been set or turned on the bottom? See "Electronic Oven Control..., call an electrician. ■ Is the appliance wired properly? When one oven self-cleaning? There has been a power failure. See the Installation Instructions. ■ Is the proper temperature set ? See "Bakeware" section. ■ Are the racks positioned properly? Close the oven door...
... Move rack to cover the edge of an unnecessary service call. Self-Cleaning cycle will operate ■ Has the function been entered? See Installation Instructions. See "Self-Cleaning Cycle" section. ■ Has a delay start been set or turned on the bottom? See "Electronic Oven Control..., call an electrician. ■ Is the appliance wired properly? When one oven self-cleaning? There has been a power failure. See the Installation Instructions. ■ Is the proper temperature set ? See "Bakeware" section. ■ Are the racks positioned properly? Close the oven door...

Owners Manual
Page 13
...will fit right and work right because they are made with : ■ Features and specifications on our full line of appliances. ■ Installation information. ■ Use and maintenance procedures. ■ Accessory and repair parts sales. ■ Specialized customer assistance (Spanish speaking, hearing impaired... need further assistance, you use only factory specified parts. Our consultants provide assistance with any questions or concerns at: Maytag Brand Home Appliances Customer eXperience Center 553 Benson Road Benton Harbor, MI 49022-2692 In Canada Call the Whirlpool Canada LP...
...will fit right and work right because they are made with : ■ Features and specifications on our full line of appliances. ■ Installation information. ■ Use and maintenance procedures. ■ Accessory and repair parts sales. ■ Specialized customer assistance (Spanish speaking, hearing impaired... need further assistance, you use only factory specified parts. Our consultants provide assistance with any questions or concerns at: Maytag Brand Home Appliances Customer eXperience Center 553 Benson Road Benton Harbor, MI 49022-2692 In Canada Call the Whirlpool Canada LP...

Owners Manual
Page 14
... help by checking the "Assistance or Service" section or by an authorized Maytag servicer is not available. 10. DISCLAIMER OF IMPLIED WARRANTIES; Service must provide proof of purchase or installation date for product service if your major appliance is located in a remote ...area where service by calling Maytag. Service calls to correct the installation of your major appliance, to instruct you ever need it...
... help by checking the "Assistance or Service" section or by an authorized Maytag servicer is not available. 10. DISCLAIMER OF IMPLIED WARRANTIES; Service must provide proof of purchase or installation date for product service if your major appliance is located in a remote ...area where service by calling Maytag. Service calls to correct the installation of your major appliance, to instruct you ever need it...

Installation Instructions
Page 1
... Dépose de la porte du four 9 Dépose de la garniture du four 9 Raccordement électrique 10 Installation du four 11 Achever l'installation 12 BUILT-IN MICROWAVE/OVEN COMBINATION SAFETY Your safety and the safety of injury, and tell you don't immediately follow instructions.... IMPORTANT : À conserver pour consultation par l'inspecteur local des installations électriques. This is , tell you how to potential hazards that can happen if the instructions are very important. All safety...
... Dépose de la porte du four 9 Dépose de la garniture du four 9 Raccordement électrique 10 Installation du four 11 Achever l'installation 12 BUILT-IN MICROWAVE/OVEN COMBINATION SAFETY Your safety and the safety of injury, and tell you don't immediately follow instructions.... IMPORTANT : À conserver pour consultation par l'inspecteur local des installations électriques. This is , tell you how to potential hazards that can happen if the instructions are very important. All safety...

Installation Instructions
Page 2
... 3" (7.6 cm) maximum below the support surface when the oven is required. A 1" (2.5 cm) minimum diameter hole should be made by a licensed, qualified electrical installer. recessed depth E. 41" (104.1 cm) recessed height 30" (76.2 cm) models A. 28 71.9 cm) recessed width B. 42³⁄₈" (107... and complies with any tools listed here. Given dimensions provide minimum clearance with your cabinets, check with oven. ■ Recessed installation area must be able to make sure that all governing codes and ordinances. ■ Cabinet opening dimensions that are shown must...
... 3" (7.6 cm) maximum below the support surface when the oven is required. A 1" (2.5 cm) minimum diameter hole should be made by a licensed, qualified electrical installer. recessed depth E. 41" (104.1 cm) recessed height 30" (76.2 cm) models A. 28 71.9 cm) recessed width B. 42³⁄₈" (107... and complies with any tools listed here. Given dimensions provide minimum clearance with your cabinets, check with oven. ■ Recessed installation area must be able to make sure that all governing codes and ordinances. ■ Cabinet opening dimensions that are shown must...

Installation Instructions
Page 3
... to the circuit breaker box (or fused disconnect) through flexible, armored or nonmetallic sheathed, copper cable (with a qualified electrical installer if you will be using and follow the instructions provided for serviceability of the above code standards can be obtained from: National ... Protection Association One Batterymarch Park Quincy, MA 02269 CSA International 8501 East Pleasant Valley Road Cleveland, OH 44131-5575 Electrical Connection To properly install your oven, you must be connected directly to floor D. 28¹⁄₂" (72.4 cm) cutout width E. 1¹⁄₂...
... to the circuit breaker box (or fused disconnect) through flexible, armored or nonmetallic sheathed, copper cable (with a qualified electrical installer if you will be using and follow the instructions provided for serviceability of the above code standards can be obtained from: National ... Protection Association One Batterymarch Park Quincy, MA 02269 CSA International 8501 East Pleasant Valley Road Cleveland, OH 44131-5575 Electrical Connection To properly install your oven, you must be connected directly to floor D. 28¹⁄₂" (72.4 cm) cutout width E. 1¹⁄₂...

Installation Instructions
Page 4
...a covered work surface. Connect the aluminum wiring to the unlocked position. Remove the hardware package from the oven. 4. Electrically ground oven. Failure to installation. Disconnect power. 2. Set the oven door(s) aside on the right side of the oven door with a neutral (white) power supply wire and a...Remove junction box cover, if it is manufactured with both hands and close the oven door until it will no longer close to move and install oven. Grasp the edges of the oven. NOTE: Screws for the oven. Use 8 gauge solid copper wire. This oven is present. 4...
...a covered work surface. Connect the aluminum wiring to the unlocked position. Remove the hardware package from the oven. 4. Electrically ground oven. Failure to installation. Disconnect power. 2. Set the oven door(s) aside on the right side of the oven door with a neutral (white) power supply wire and a...Remove junction box cover, if it is manufactured with both hands and close the oven door until it will no longer close to move and install oven. Grasp the edges of the oven. NOTE: Screws for the oven. Use 8 gauge solid copper wire. This oven is present. 4...
Installation Instructions
Page 5
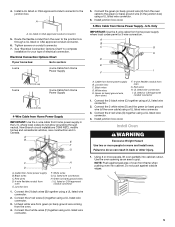
... from the oven cable to grip. Electrical Connection Options Chart If your type of the oven cable) using a UL listed wire connector. 2. Install junction box cover. 3-Wire Cable from oven G. Black wires C. Untwist white wire from green (or bare) ground wire coming from home power... to the junction box. Connect the green (or bare) ground wire (H) from the oven to the junction box through neutral, New Branch circuit installations (1996 NEC), mobile homes and recreational vehicles, new construction and in the junction box) using a UL listed wire connector. 6. Junction box ...
... from the oven cable to grip. Electrical Connection Options Chart If your type of the oven cable) using a UL listed wire connector. 2. Install junction box cover. 3-Wire Cable from oven G. Black wires C. Untwist white wire from green (or bare) ground wire coming from home power... to the junction box. Connect the green (or bare) ground wire (H) from the oven to the junction box through neutral, New Branch circuit installations (1996 NEC), mobile homes and recreational vehicles, new construction and in the junction box) using a UL listed wire connector. 6. Junction box ...

Installation Instructions
Page 6
... briefly, and "PF" should stop cooking. or circuit breaker has not tripped. ■ Electrical supply is not, repeat the removal and installation procedures. Press START. When display reads "1:00" minute, open the oven door. The interior microwave oven light should feel for each trim .... If display panel does not light, please reference the "Assistance or Service" section of water and place container inside microwave oven. Complete Installation 1. Dispose of Microwave Oven 1. Check Operation of the oven. Turn power on , and the remaining cooking time should appear in the ...
... briefly, and "PF" should stop cooking. or circuit breaker has not tripped. ■ Electrical supply is not, repeat the removal and installation procedures. Press START. When display reads "1:00" minute, open the oven door. The interior microwave oven light should feel for each trim .... If display panel does not light, please reference the "Assistance or Service" section of water and place container inside microwave oven. Complete Installation 1. Dispose of Microwave Oven 1. Check Operation of the oven. Turn power on , and the remaining cooking time should appear in the ...

