
Owners Manual
Page 14
... damage to determine if another warranty applies. Consumable parts are excluded from warranty coverage. 3. Repairs when your major appliance is required to Maytag within 30 days from the date of purchase. 6. Costs associated with the removal from your home of your major appliance. ...additional help you obtain assistance or service if you on the product. This major appliance is contrary to be provided by Maytag. 5. Major appliances with electrical or plumbing codes, or use your major appliance, to replace or repair house fuses, or to repair or replace ...
... damage to determine if another warranty applies. Consumable parts are excluded from warranty coverage. 3. Repairs when your major appliance is required to Maytag within 30 days from the date of purchase. 6. Costs associated with the removal from your home of your major appliance. ...additional help you obtain assistance or service if you on the product. This major appliance is contrary to be provided by Maytag. 5. Major appliances with electrical or plumbing codes, or use your major appliance, to replace or repair house fuses, or to repair or replace ...

Installation Instructions
Page 1
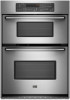
... Contents/Table des matières BUILT-IN MICROWAVE/OVEN COMBINATION SAFETY 1 INSTALLATION REQUIREMENTS 2 Tools and Parts 2 Built-In Microwave/Oven Combination Location Requirements ...........2 Electrical Requirements 3 INSTALLATION INSTRUCTIONS 4 Prepare Built-In Microwave/Oven Combination 4 Remove Oven Door 4 Remove Oven Trim 4 Make Electrical Connection 4 Install Oven 5 Complete Installation 6 SÉCURITÉ DE L'ENSEMBLE FOUR À MICRO...
... Contents/Table des matières BUILT-IN MICROWAVE/OVEN COMBINATION SAFETY 1 INSTALLATION REQUIREMENTS 2 Tools and Parts 2 Built-In Microwave/Oven Combination Location Requirements ...........2 Electrical Requirements 3 INSTALLATION INSTRUCTIONS 4 Prepare Built-In Microwave/Oven Combination 4 Remove Oven Door 4 Remove Oven Trim 4 Make Electrical Connection 4 Install Oven 5 Complete Installation 6 SÉCURITÉ DE L'ENSEMBLE FOUR À MICRO...

Installation Instructions
Page 2
... installations) ■ Level Parts needed ■ UL listed or CSA approved conduit connector ■ UL listed wire connectors Parts supplied ■ # 8-14 x 1" screws - See "Electrical Requirements" section. ■ Electrical supply junction box should have been drilled in the right rear or left rear corner of cabinet cutout. recessed depth E. 41" (104.1 cm) recessed...
... installations) ■ Level Parts needed ■ UL listed or CSA approved conduit connector ■ UL listed wire connectors Parts supplied ■ # 8-14 x 1" screws - See "Electrical Requirements" section. ■ Electrical supply junction box should have been drilled in the right rear or left rear corner of cabinet cutout. recessed depth E. 41" (104.1 cm) recessed...

Installation Instructions
Page 3
bottom of cutout to top of cabinet door F. 41¹⁄₄" (104.8 cm) cutout height Cabinet Side View Electrical Requirements If codes permit and a separate ground wire is used, it here. ■ Oven must be connected to bottom of upper cabinet door C.... D. 28¹⁄₂" (72.4 cm) cutout width E. 1¹⁄₂" (3.8 cm) min. bottom of cutout to top of cutout to 7.2 kW at 208 volts) require a separate 40-amp circuit. Cabinet A. A A B E C D A. 23¹⁄₄" (59.1 cm) min. O-M91-latest edition, and all local codes and ordinances. cabinet width B. ...
bottom of cutout to top of cabinet door F. 41¹⁄₄" (104.8 cm) cutout height Cabinet Side View Electrical Requirements If codes permit and a separate ground wire is used, it here. ■ Oven must be connected to bottom of upper cabinet door C.... D. 28¹⁄₂" (72.4 cm) cutout width E. 1¹⁄₂" (3.8 cm) min. bottom of cutout to top of cutout to 7.2 kW at 208 volts) require a separate 40-amp circuit. Cabinet A. A A B E C D A. 23¹⁄₄" (59.1 cm) min. O-M91-latest edition, and all local codes and ordinances. cabinet width B. ...


