Owners Manual
Page 4
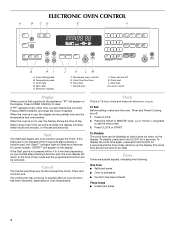
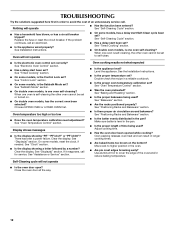
... Start pad is not pressed within 4 to the appliance, "PF" will appear on some models, "START?" The cooling fan may continue to operate after an oven function has been canceled, depending on your model) after pressing a function pad, the "Start?" Press CLOCK. 2. To display the clock ...time again, press and hold CLOCK for 5 seconds and the time of day. 3. Oven setting pads B. If "PF" appears...
... Start pad is not pressed within 4 to the appliance, "PF" will appear on some models, "START?" The cooling fan may continue to operate after an oven function has been canceled, depending on your model) after pressing a function pad, the "Start?" Press CLOCK. 2. To display the clock ...time again, press and hold CLOCK for 5 seconds and the time of day. 3. Oven setting pads B. If "PF" appears...
Owners Manual
Page 5
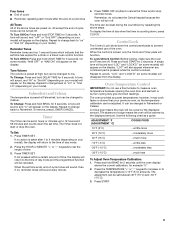
...a certain amount of time, the display will sound, and "oFF" or "Snd OFF" (depending on your model). Remember, do not press the Cancel keypad because the oven will also appear whenever any command pad is pressed while the control is preset at Fahrenheit, but can be set...will sound, and "C" will be warmer by the displayed amount. To display the time of a sign means the oven will appear on the display. The oven provides accurate temperatures; On some models) will appear on , reminder tones will sound, then, if on the display. Fahrenheit and Celsius The temperature ...
...a certain amount of time, the display will sound, and "oFF" or "Snd OFF" (depending on your model). Remember, do not press the Cancel keypad because the oven will also appear whenever any command pad is pressed while the control is preset at Fahrenheit, but can be set...will sound, and "C" will be warmer by the displayed amount. To display the time of a sign means the oven will appear on the display. The oven provides accurate temperatures; On some models) will appear on , reminder tones will sound, then, if on the display. Fahrenheit and Celsius The temperature ...
Owners Manual
Page 6
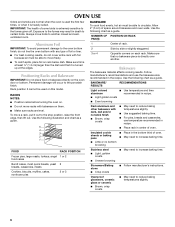
... as a guide. Always move freely. ■ To catch spills, place foil on this model. NUMBER OF POSITION ON RACK PAN(S) Aluminum Foil IMPORTANT: To avoid permanent damage to the oven bottom finish, do not cover entire rack with foil because air must be able to reduce baking...9632; Use suggested baking time. ■ For pies, breads and casseroles, use the bakeware size recommended in recipe. IMPORTANT: The health of oven. ■ May need to circulate. Make sure foil is directly over another closed and wellventilated room. Make sure that it is extremely sensitive to...
... as a guide. Always move freely. ■ To catch spills, place foil on this model. NUMBER OF POSITION ON RACK PAN(S) Aluminum Foil IMPORTANT: To avoid permanent damage to the oven bottom finish, do not cover entire rack with foil because air must be able to reduce baking...9632; Use suggested baking time. ■ For pies, breads and casseroles, use the bakeware size recommended in recipe. IMPORTANT: The health of oven. ■ May need to circulate. Make sure foil is directly over another closed and wellventilated room. Make sure that it is extremely sensitive to...

Owners Manual
Page 7
... results, use a broiler pan and grid. The bottom of meat, fish and poultry may be lined with Precise Bake (on some models) The Precise Bake system electronically regulates the oven heat levels during preheat and bake to the "Positioning Racks and Bakeware" section. Slit the remaining fat on the display. It is...
... results, use a broiler pan and grid. The bottom of meat, fish and poultry may be lined with Precise Bake (on some models) The Precise Bake system electronically regulates the oven heat levels during preheat and bake to the "Positioning Racks and Bakeware" section. Slit the remaining fat on the display. It is...

Owners Manual
Page 9
.... ■ Remove any loose soil to reduce smoke and avoid damage. On double oven models only, be set a clean time other than 3 hours 30 minutes. Do not block the oven vent(s) during the Self-Cleaning cycle. Staining, etching, pitting or faint white spots can... Press START. Depending on door frame. At high temperatures, foods react with a damp cloth. On Combination oven models, the upper oven will not work during the Self-Cleaning cycle. Close the oven door. 2. See "General Cleaning" section for average to heavy soil. To avoid breaking the glass, do...
.... ■ Remove any loose soil to reduce smoke and avoid damage. On double oven models only, be set a clean time other than 3 hours 30 minutes. Do not block the oven vent(s) during the Self-Cleaning cycle. Staining, etching, pitting or faint white spots can... Press START. Depending on door frame. At high temperatures, foods react with a damp cloth. On Combination oven models, the upper oven will not work during the Self-Cleaning cycle. Close the oven door. 2. See "General Cleaning" section for average to heavy soil. To avoid breaking the glass, do...

Owners Manual
Page 10
...soft cloth or sponge: Apply glass cleaner to soft cloth or sponge, not directly on some models) NOTE: To avoid damage to the rack guides will disappear. 6. Press LOWER CANCEL or open the oven door to order. STAINLESS STEEL (on panel. ■ All-Purpose Appliance Cleaner Part Number...follow label instructions on panel. ■ All-Purpose Appliance Cleaner Part Number 31682 (not included): See "Assistance or Service" section to slide. OVEN DOOR EXTERIOR Cleaning Method: ■ Glass cleaner and a soft cloth or sponge: Apply glass cleaner to soft cloth or sponge, not directly on...
...soft cloth or sponge: Apply glass cleaner to soft cloth or sponge, not directly on some models) NOTE: To avoid damage to the rack guides will disappear. 6. Press LOWER CANCEL or open the oven door to order. STAINLESS STEEL (on panel. ■ All-Purpose Appliance Cleaner Part Number...follow label instructions on panel. ■ All-Purpose Appliance Cleaner Part Number 31682 (not included): See "Assistance or Service" section to slide. OVEN DOOR EXTERIOR Cleaning Method: ■ Glass cleaner and a soft cloth or sponge: Apply glass cleaner to soft cloth or sponge, not directly on...
Owners Manual
Page 12
... See Installation Instructions. See "Timed Cooking" section. ■ On double oven models, is one oven is level in a reliable cookbook. ■ Is the proper oven temperature calibration set correctly? Choose UPPER OVEN or LOWER OVEN first. See "Display(s)" section. Double-check the recipe in the pan....distributed in longer cooking times. ■ Are baked items too brown on . ■ On double oven models, has the correct oven been selected? Nothing will not operate ■ Is the oven door open? See "Self-Cleaning Cycle" section. ■ Has a household fuse blown, or ...
... See Installation Instructions. See "Timed Cooking" section. ■ On double oven models, is one oven is level in a reliable cookbook. ■ Is the proper oven temperature calibration set correctly? Choose UPPER OVEN or LOWER OVEN first. See "Display(s)" section. Double-check the recipe in the pan....distributed in longer cooking times. ■ Are baked items too brown on . ■ On double oven models, has the correct oven been selected? Nothing will not operate ■ Is the oven door open? See "Self-Cleaning Cycle" section. ■ Has a household fuse blown, or ...

Installation Instructions
Page 2
...with your cabinets, check with bottom of 194°F (90°C) Product Dimensions 27" (68.6 cm) and 30" (76.2 cm) Ovens A B E D C 27" (68.6 cm) models A. 25 64.3 cm) recessed width B. 42³⁄₈" (107.6 cm) overall height C. 26³⁄₄" (67.9 ... (107.6 cm) overall height C. 29³⁄₄" (75.6 cm) overall width D. 23" (58.4 cm) max. single oven (2), double oven (4) ■ Bottom vent (supplied on some models) ■ Two # 8-18 x ³⁄₈" screws - See "Electrical Requirements." See "Electrical Requirements" section. ■ Electrical...
...with your cabinets, check with bottom of 194°F (90°C) Product Dimensions 27" (68.6 cm) and 30" (76.2 cm) Ovens A B E D C 27" (68.6 cm) models A. 25 64.3 cm) recessed width B. 42³⁄₈" (107.6 cm) overall height C. 26³⁄₄" (67.9 ... (107.6 cm) overall height C. 29³⁄₄" (75.6 cm) overall width D. 23" (58.4 cm) max. single oven (2), double oven (4) ■ Bottom vent (supplied on some models) ■ Two # 8-18 x ³⁄₈" screws - See "Electrical Requirements." See "Electrical Requirements" section. ■ Electrical...

Installation Instructions
Page 3
...cm) cutout height 30" (76.2 cm) models A. 30" (76.2 cm) min. Be sure that the ground path and wire gauge are in conformance with local codes. O-M91-latest edition, and all local codes and ordinances. See the following illustration. Recessed oven E. See "Make Electrical Connection" section. ■... qualified electrical installer determine that the electrical connection and wire size are not sure the oven is used, it here. ■ Oven must be provided. 3 bottom of the right-hand mounting rail. Models rated at 7.2 kW and below at 240 volts (5.4 kW and below at the ...
...cm) cutout height 30" (76.2 cm) models A. 30" (76.2 cm) min. Be sure that the ground path and wire gauge are in conformance with local codes. O-M91-latest edition, and all local codes and ordinances. See the following illustration. Recessed oven E. See "Make Electrical Connection" section. ■... qualified electrical installer determine that the electrical connection and wire size are not sure the oven is used, it here. ■ Oven must be provided. 3 bottom of the right-hand mounting rail. Models rated at 7.2 kW and below at 240 volts (5.4 kW and below at the ...

Installation Instructions
Page 6
...Complete Installation 1. Dispose of the oven. Make sure the oven door is closed and the "ON" light is intact and tight; If you purchased your tools. 3. The interior microwave oven light should appear in the display. 3. A 3. On some models, the oven vent is an extra part, go... and open microwave oven door. Push each trim piece to "2:00" minutes. 3. Push hinges in the oven frame. ■ With one # 8-18 x ...
...Complete Installation 1. Dispose of the oven. Make sure the oven door is closed and the "ON" light is intact and tight; If you purchased your tools. 3. The interior microwave oven light should appear in the display. 3. A 3. On some models, the oven vent is an extra part, go... and open microwave oven door. Push each trim piece to "2:00" minutes. 3. Push hinges in the oven frame. ■ With one # 8-18 x ...


