Use and Care Manual
Page 3
...to correct the interference by one or more and fuses can be blown. of the following: Microwave operates on different branch circuits. SAVE THESE INSTRUCTIONS 3 If the product power cord is too short, have a qualified electrician install a three-slot However, there is ... of the radio or television. 120V. • Relocate the microwave oven with respect to the receiver. • Move the microwave oven away from the receiver. • Plug the microwave oven into a different outlet so that the microwave oven and the receiver are not completely understood, or if doubt exists...
...to correct the interference by one or more and fuses can be blown. of the following: Microwave operates on different branch circuits. SAVE THESE INSTRUCTIONS 3 If the product power cord is too short, have a qualified electrician install a three-slot However, there is ... of the radio or television. 120V. • Relocate the microwave oven with respect to the receiver. • Move the microwave oven away from the receiver. • Plug the microwave oven into a different outlet so that the microwave oven and the receiver are not completely understood, or if doubt exists...
Use and Care Manual
Page 5
...AND FOLLOW the specific "PRECAUTIONS TO AVOID POSSIBLE EXPOSURE TO EXCESSIVE MICROWAVE ENERGY" on page 23. 8. Do not use this oven ONLY in accordance with any appliance, CLOSE SUPERVISION is made for example, near a kitchen sink, in oven. Contact nearest authorized service facility for commercial purposes. Keep cord ... allow grease to explode and SHOULD NOT be HEATED in this manual. 4. When flaming foods under the hood, turn oven off and disconnect the power cord, or shut off power at the fuse or circuit breaker panel. c. DO NOT use the cavity for its intended use . 10. Use ...
...AND FOLLOW the specific "PRECAUTIONS TO AVOID POSSIBLE EXPOSURE TO EXCESSIVE MICROWAVE ENERGY" on page 23. 8. Do not use this oven ONLY in accordance with any appliance, CLOSE SUPERVISION is made for example, near a kitchen sink, in oven. Contact nearest authorized service facility for commercial purposes. Keep cord ... allow grease to explode and SHOULD NOT be HEATED in this manual. 4. When flaming foods under the hood, turn oven off and disconnect the power cord, or shut off power at the fuse or circuit breaker panel. c. DO NOT use the cavity for its intended use . 10. Use ...

Use and Care Manual
Page 6
... on the density and surface area of food. • Natural Moisture: Very moist foods cook more evenly. For even cooking, reduce the power when cooking large pieces of the food. • Wrapping in waxed paper or paper towel: Sandwiches and many other foods containing prebaked bread ...stand to prevent drying out. 6 Getting The Best Cooking Results To get the best results from your microwave oven, read and follow the guidelines below. • Storage Temperature: Foods taken from the microwave, cover food with small pieces of aluminum foil, parts of food that may cook quickly, such ...
... on the density and surface area of food. • Natural Moisture: Very moist foods cook more evenly. For even cooking, reduce the power when cooking large pieces of the food. • Wrapping in waxed paper or paper towel: Sandwiches and many other foods containing prebaked bread ...stand to prevent drying out. 6 Getting The Best Cooking Results To get the best results from your microwave oven, read and follow the guidelines below. • Storage Temperature: Foods taken from the microwave, cover food with small pieces of aluminum foil, parts of food that may cook quickly, such ...
Use and Care Manual
Page 7
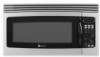
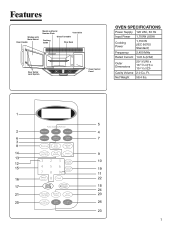
Net Weight 58.4 lbs. 7 Ft. Features Window with Metal Shield Door Handle Model and Serial Number Plate Vent Grille Glass Turntable Cooking Guide Wire Rack Door Safety Lock System Oven Control Panel OVEN SPECIFICATIONS Power Supply 120 VAC, 60 Hz Input Power 1,700W (USA) Cooking Power 1,150 W (IEC 60705 Standard) Frequency 2,450 MHz Rated Current 14.8 A (USA) Outer Dimensions 29 7/8"(W) x 16 15/16"(H) x 15 21/32"(D) Cavity Volume 2.0 Cu.
Net Weight 58.4 lbs. 7 Ft. Features Window with Metal Shield Door Handle Model and Serial Number Plate Vent Grille Glass Turntable Cooking Guide Wire Rack Door Safety Lock System Oven Control Panel OVEN SPECIFICATIONS Power Supply 120 VAC, 60 Hz Input Power 1,700W (USA) Cooking Power 1,150 W (IEC 60705 Standard) Frequency 2,450 MHz Rated Current 14.8 A (USA) Outer Dimensions 29 7/8"(W) x 16 15/16"(H) x 15 21/32"(D) Cavity Volume 2.0 Cu.
Use and Care Manual
Page 8
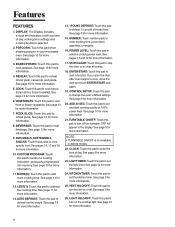
...time. Features FEATURES 1. POPCORN: Touch this pad to set the light timer. REHEAT: Touch this pad to enter cooking time, power level, quantities, or weights. 16. MORE(9): Touch this pad to turn on or off the turntable. See page 11 for ...casserole, and pasta. TURNTABLE ON/OFF: Touch this pad to change the oven's default settings. LIGHT HI/LO/OFF: Touch this pad to start cooking quickly at 100% power level. See page 10 for more information. 10. See page 14 for ... or frozen vegetables. VENT HI/LO/OFF: Touch this pad when popping popcorn in your microwave oven.
...time. Features FEATURES 1. POPCORN: Touch this pad to set the light timer. REHEAT: Touch this pad to enter cooking time, power level, quantities, or weights. 16. MORE(9): Touch this pad to turn on or off the turntable. See page 11 for ...casserole, and pasta. TURNTABLE ON/OFF: Touch this pad to change the oven's default settings. LIGHT HI/LO/OFF: Touch this pad to start cooking quickly at 100% power level. See page 10 for more information. 10. See page 14 for ... or frozen vegetables. VENT HI/LO/OFF: Touch this pad when popping popcorn in your microwave oven.
Use and Care Manual
Page 10
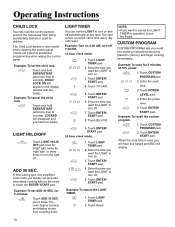
...oven begins cooking and display shows time counting down. LIGHT TIMER You can set and start microwave cooking without the need to turn off . Touch LIGHT TIMER pad. 2. Enter the time you recall one cooking instruction previously placed in memory and begin cooking immediately. Touch LIGHT TIMER pad. 2. Touch 0 pad. Touch POWER...pad more than 3 seconds. Example: Turn on 2:00 AM, turn on and off . 5. Touch ENTER/ START pad. 4. Enter the power level. 5. Example: To set the child lock. Enter the time you want the LIGHT to touch the ENTER/ START pad. Touch ENTER...
...oven begins cooking and display shows time counting down. LIGHT TIMER You can set and start microwave cooking without the need to turn off . Touch LIGHT TIMER pad. 2. Enter the time you recall one cooking instruction previously placed in memory and begin cooking immediately. Touch LIGHT TIMER pad. 2. Touch 0 pad. Touch POWER...pad more than 3 seconds. Example: Turn on 2:00 AM, turn on and off . 5. Touch ENTER/ START pad. 4. Enter the power level. 5. Example: To set the child lock. Enter the time you want the LIGHT to touch the ENTER/ START pad. Touch ENTER...

Use and Care Manual
Page 11
... time. 5. Touch ENTER/ START pad. To ADD more than one Power Level for a certain length of time, and another Power Level for another automatically, for 8 minutes 30 seconds at 100% power. 1. Enter the cook time. 2. Your oven has 9 power settings in addition to an automatic cooking procedure: Touch the More(9) pad... time of these procedures. 1. Enter the cook time. 2. Enter the first cook time. 2. COOKING AT HIGH POWER LEVELS Example: To cook food for up to the oven could occur COOKING WITH MORE THAN ONE COOK CYCLE For best results, some recipes call for one item is being cooked...
... time. 5. Touch ENTER/ START pad. To ADD more than one Power Level for a certain length of time, and another Power Level for another automatically, for 8 minutes 30 seconds at 100% power. 1. Enter the cook time. 2. Your oven has 9 power settings in addition to an automatic cooking procedure: Touch the More(9) pad... time of these procedures. 1. Enter the cook time. 2. Enter the first cook time. 2. COOKING AT HIGH POWER LEVELS Example: To cook food for up to the oven could occur COOKING WITH MORE THAN ONE COOK CYCLE For best results, some recipes call for one item is being cooked...

Use and Care Manual
Page 12
..., examples of foods best cooked at each level, and the amount of food. • Soften ice cream. • Raise yeast dough. 12 POWER LEVEL 10 High 9 8 7 6 5 4 3 2 1 MICROWAVE OUTPUT 100% 90% 80% 70% 60% 50% 40% 30% 20% 10% USE • Boil water. • Cook ground beef or begin cooking roasts. • Make.... • Cook small quantities of food. • Finish cooking casserole, stew, and some sauces. • Soften butter and cream cheese. • Heat small amounts of microwave power you are using.
..., examples of foods best cooked at each level, and the amount of food. • Soften ice cream. • Raise yeast dough. 12 POWER LEVEL 10 High 9 8 7 6 5 4 3 2 1 MICROWAVE OUTPUT 100% 90% 80% 70% 60% 50% 40% 30% 20% 10% USE • Boil water. • Cook ground beef or begin cooking roasts. • Make.... • Cook small quantities of food. • Finish cooking casserole, stew, and some sauces. • Soften butter and cream cheese. • Heat small amounts of microwave power you are using.
Use and Care Manual
Page 13
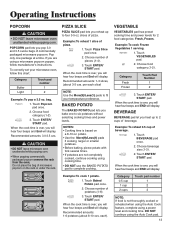
...power levels. Do not place the bag of beverage. Example: To reheat 1 slice of pizza. Touch Pizza Slice pad once. 2. Touch ENTER/ START pad. per each ). Example: To cook 1 potato. ` 1. Choose food category (1-2). When the cook time is over, you reheat up to fit your microwave oven...2 3 NOTE: If food is over , you will hear four beeps and End will display. Operating Instructions POPCORN CAUTION • DO NOT leave microwave oven unattended while popping corn. If you bake one package at a time. slices of pizza. 1. potato. • Use the More(9)/Less(1) pads ...
...power levels. Do not place the bag of beverage. Example: To reheat 1 slice of pizza. Touch Pizza Slice pad once. 2. Touch ENTER/ START pad. per each ). Example: To cook 1 potato. ` 1. Choose food category (1-2). When the cook time is over, you reheat up to fit your microwave oven...2 3 NOTE: If food is over , you will hear four beeps and End will display. Operating Instructions POPCORN CAUTION • DO NOT leave microwave oven unattended while popping corn. If you bake one package at a time. slices of pizza. 1. potato. • Use the More(9)/Less(1) pads ...
Use and Care Manual
Page 15
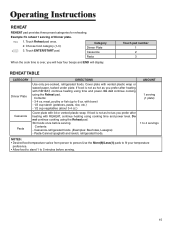
Do not continue cooking using the Reheat pad. Cover plate with REHEAT, continue heating using cooking time and power level. If food is not as hot as you prefer after heating with vented plastic wrap or waxed paper, tucked under plate. Contents: - 3-4... refrigerated foods. with bone) - 1/2 cup starch (potatoes, pasta, rice, etc.) - 1/2 cup vegetables (about 3-4 oz.) Cover plate with REHEAT, continue heating using time and power. Touch Reheat pad once. 2. Category Dinner Plate Casserole Pasta When the cook time is not as hot as you will hear four beeps and END...
Do not continue cooking using the Reheat pad. Cover plate with REHEAT, continue heating using cooking time and power level. If food is not as hot as you prefer after heating with vented plastic wrap or waxed paper, tucked under plate. Contents: - 3-4... refrigerated foods. with bone) - 1/2 cup starch (potatoes, pasta, rice, etc.) - 1/2 cup vegetables (about 3-4 oz.) Cover plate with REHEAT, continue heating using time and power. Touch Reheat pad once. 2. Category Dinner Plate Casserole Pasta When the cook time is not as hot as you will hear four beeps and END...
Use and Care Manual
Page 20
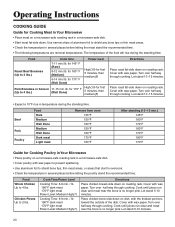
... the recommended time. Let stand 10 -15 minutes. Beef Pork Poultry Food Rare Medium Well Done Medium Well Done Dark meat Light meat Remove from oven 135°F 150°F 160°F 150°F 160°F 170°F 160°F After standing (10 -15 min.) 145°F 160&#...Up to 4 lbs.) (Well Done) High(10) for Cooking Poultry in Your Microwave • Place poultry on a microwave-safe roasting rack in a microwave-safe dish. • Cover poultry with the thickest portions toward the outside of the dish. Cook Time/Power Level Cooking Time: 6-9 min. / lb. 180°F dark meat 170°F...
... the recommended time. Let stand 10 -15 minutes. Beef Pork Poultry Food Rare Medium Well Done Medium Well Done Dark meat Light meat Remove from oven 135°F 150°F 160°F 150°F 160°F 170°F 160°F After standing (10 -15 min.) 145°F 160&#...Up to 4 lbs.) (Well Done) High(10) for Cooking Poultry in Your Microwave • Place poultry on a microwave-safe roasting rack in a microwave-safe dish. • Cover poultry with the thickest portions toward the outside of the dish. Cook Time/Power Level Cooking Time: 6-9 min. / lb. 180°F dark meat 170°F...

Use and Care Manual
Page 21
...just until set; check it flakes easily with a fork. • Place fish on a microwave-safe roasting rack in the shell; Fillets Up to 1.5 lbs. Cooking Time: 3-7 min. / lb Power Level:Medium-High(7). Let Power Level: Medium-High(7). they can be arranged in several spots before cooking. Cook Time..., no extra water is half up . Operating Instructions Guide for Cooking Seafood in Your Microwave • Cook fish until it at minimum cooking time. Turn over after they come out of the oven.) A baked potato can stand on the counter for five minutes, while a dish of...
...just until set; check it flakes easily with a fork. • Place fish on a microwave-safe roasting rack in the shell; Fillets Up to 1.5 lbs. Cooking Time: 3-7 min. / lb Power Level:Medium-High(7). Let Power Level: Medium-High(7). they can be arranged in several spots before cooking. Cook Time..., no extra water is half up . Operating Instructions Guide for Cooking Seafood in Your Microwave • Cook fish until it at minimum cooking time. Turn over after they come out of the oven.) A baked potato can stand on the counter for five minutes, while a dish of...
Use and Care Manual
Page 23
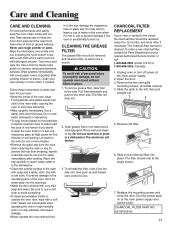
...cleaned. To remove grease filter, slide filter to the left, then pull straight out. 5. To reinstall the filter, slide it ; Wipe the microwave oven inside and out, including the hood bottom cover, with a soft cloth. Wash the tray carefully in warm sudsy water or in the dishwasher....no way indicates microwave leakage. • Never operate the oven without filters in water immediately after cooking chicken or bacon. Pull filter downward and push to dry. Remove the two vent grille mounting screws. (2 middle screws) 4. Use a chrome cleaner and polish on at the main power supply. 2....
...cleaned. To remove grease filter, slide filter to the left, then pull straight out. 5. To reinstall the filter, slide it ; Wipe the microwave oven inside and out, including the hood bottom cover, with a soft cloth. Wash the tray carefully in warm sudsy water or in the dishwasher....no way indicates microwave leakage. • Never operate the oven without filters in water immediately after cooking chicken or bacon. Pull filter downward and push to dry. Remove the two vent grille mounting screws. (2 middle screws) 4. Use a chrome cleaner and polish on at the main power supply. 2....

Use and Care Manual
Page 24
.... Remove the screw located above the door near the center of -cabinet installation. Replace the bulb holder. 9. Unplug the oven or turn off power at the main power supply. 2. Remove the bulb cover mounting screws. OVEN LIGHT REPLACEMENT 1. Remove the vent cover mounting screws. (2 middle screws) 4. For installation between cabinets only; WHITE UXA3036BDS - Slide...
.... Remove the screw located above the door near the center of -cabinet installation. Replace the bulb holder. 9. Unplug the oven or turn off power at the main power supply. 2. Remove the bulb cover mounting screws. OVEN LIGHT REPLACEMENT 1. Remove the vent cover mounting screws. (2 middle screws) 4. For installation between cabinets only; WHITE UXA3036BDS - Slide...
Use and Care Manual
Page 25
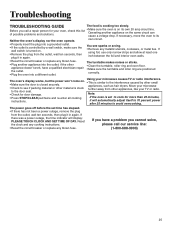
...the interference caused by a wall switch, make sure the wall switch is turned on its Neither the oven's display nor the oven operate. own circuit. • Properly insert the plug into the outlet; Move your microwave causes TV or radio interference. If you call our service line: (1-800-688-9900) 25 You...; If the outlet is controlled by other small • Make sure the door is set time has elapsed. • If there has not been a power outage, remove the plug from the outlet, wait ten seconds, then plug it in again. If using foil, use only narrow strips and allow at...
...the interference caused by a wall switch, make sure the wall switch is turned on its Neither the oven's display nor the oven operate. own circuit. • Properly insert the plug into the outlet; Move your microwave causes TV or radio interference. If you call our service line: (1-800-688-9900) 25 You...; If the outlet is controlled by other small • Make sure the door is set time has elapsed. • If there has not been a power outage, remove the plug from the outlet, wait ten seconds, then plug it in again. If using foil, use only narrow strips and allow at...


