
User Instructions
Page 1
...14 INSTRUCTIONS D'INSTALLATION 15 UTILISATION DE LA MACHINE A GLA_ONS 21 ENTRETIEN DE LA MACHINE A GLA_ONS 22 D I:!:PANNAG E 25 GARANTIE 27 ICE MAKER SAFETY Your safety and the safety of others . You can kill or hurt you don't follow instructions. W10217883A You will need assistance,... symbol alerts you to reduce the chance of the ice maker compartment. Para obtener acceso a "lnstrucciones para el usuario de la fabrica de hielo" en espa_ol, o para obtener informaci6n adicional acerca de su producto, visite: www.maytag.com. Necesitara su nQmero de modelo y de serie...
...14 INSTRUCTIONS D'INSTALLATION 15 UTILISATION DE LA MACHINE A GLA_ONS 21 ENTRETIEN DE LA MACHINE A GLA_ONS 22 D I:!:PANNAG E 25 GARANTIE 27 ICE MAKER SAFETY Your safety and the safety of others . You can kill or hurt you don't follow instructions. W10217883A You will need assistance,... symbol alerts you to reduce the chance of the ice maker compartment. Para obtener acceso a "lnstrucciones para el usuario de la fabrica de hielo" en espa_ol, o para obtener informaci6n adicional acerca de su producto, visite: www.maytag.com. Necesitara su nQmero de modelo y de serie...

User Instructions
Page 2
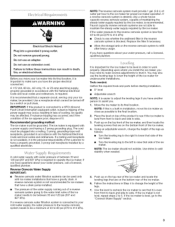
...Choose a location where the floor is important for your ice maker, the front side must be pulled forward for servicing if necessary. • Installation of the ice maker requires a cold water supply inlet of your ice maker. The ice maker may be easily removed by changing the height of ...the leveling legs. Recommended and plumbing B. See "Leveling." 2 Failure to remove tape or glue. When installing the ice maker under a counter, follow these basic • Plug into a grounded 3 prong outlet. • Do not remove ground prong. • Do...
...Choose a location where the floor is important for your ice maker, the front side must be pulled forward for servicing if necessary. • Installation of the ice maker requires a cold water supply inlet of your ice maker. The ice maker may be easily removed by changing the height of ...the leveling legs. Recommended and plumbing B. See "Leveling." 2 Failure to remove tape or glue. When installing the ice maker under a counter, follow these basic • Plug into a grounded 3 prong outlet. • Do not remove ground prong. • Do...
User Instructions
Page 3
...up on the top rear of the ice maker and locate the leveling legs that are on the top front of the ice maker for proper ice maker operation. Follow the instructions in accordance with water pressure of the ice maker. 4. If the ice maker is connected to your water pressure, call... a licensed, qualified plumber. NOTE: The ice maker should not wobble. If a reverse osmosis...
...up on the top rear of the ice maker and locate the leveling legs that are on the top front of the ice maker for proper ice maker operation. Follow the instructions in accordance with water pressure of the ice maker. 4. If the ice maker is connected to your water pressure, call... a licensed, qualified plumber. NOTE: The ice maker should not wobble. If a reverse osmosis...

User Instructions
Page 4
...ordinances. • UsecoppetrubingorWhirlpoosul pplyline,ParNt umber 8212547RaPnd, checkforleaks. • Instatllubingonlyinareaws herteemperaturweisllremain abovefreezing. NOTE: To allow the ice maker to meet the water line inlet which is clear. NOTE: Always drain the water line before making the final ...connection to the inlet of the water valve to clear line of the ice maker cabinet as shown. Vent hose (drain pump models only) C. Bulb B. Toolsneeded: Gathetrherequiretdoolsandpartsbeforestartinginstallation. • Flat-...
...ordinances. • UsecoppetrubingorWhirlpoosul pplyline,ParNt umber 8212547RaPnd, checkforleaks. • Instatllubingonlyinareaws herteemperaturweisllremain abovefreezing. NOTE: To allow the ice maker to meet the water line inlet which is clear. NOTE: Always drain the water line before making the final ...connection to the inlet of the water valve to clear line of the ice maker cabinet as shown. Vent hose (drain pump models only) C. Bulb B. Toolsneeded: Gathetrherequiretdoolsandpartsbeforestartinginstallation. • Flat-...

User Instructions
Page 5
... be sure that it is provided with a 1 W' (3.81 cm) to properly place the ice maker: Electrical Shock Hazard Plug into a grounded 3 prong outlet. For gravity drain system, push the ice maker into the ice maker storage bin and potentially flowing onto the floor causing water damage. • Drain lines must have...back or other injury. Failure to follow these steps to 2" (5.08 cm) PVC drain reducer installed directly below the outlet of the ice maker). 2. If it is positioned over the PVC drain reducer. Do not use an extension cord. For drain pump system connect the drain...
... be sure that it is provided with a 1 W' (3.81 cm) to properly place the ice maker: Electrical Shock Hazard Plug into a grounded 3 prong outlet. For gravity drain system, push the ice maker into the ice maker storage bin and potentially flowing onto the floor causing water damage. • Drain lines must have...back or other injury. Failure to follow these steps to 2" (5.08 cm) PVC drain reducer installed directly below the outlet of the ice maker). 2. If it is positioned over the PVC drain reducer. Do not use an extension cord. For drain pump system connect the drain...
User Instructions
Page 6
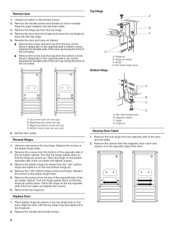
...pin sleeve C. Unscrew and remove the top hinge. Turn the hinge upside down . Remove the screws from the opposite side of the ice maker and tighten screws. 3. Unplug ice maker or disconnect power. 2. Reverse Hinges 1. Align the door with the top hinge hole and replace the top hinge pin. 2. Hinge D.... Reverse the door end caps as follows: • Remove the screw and end cap from the top of the opposite side of the ice maker and tighten the screws. 6. Beginning top corner end cap C. Replace the screws in the empty hinge holes. 5. Place the hinge on the door...
...pin sleeve C. Unscrew and remove the top hinge. Turn the hinge upside down . Remove the screws from the opposite side of the ice maker and tighten screws. 3. Unplug ice maker or disconnect power. 2. Reverse Hinges 1. Align the door with the top hinge hole and replace the top hinge pin. 2. Hinge D.... Reverse the door end caps as follows: • Remove the screw and end cap from the top of the opposite side of the ice maker and tighten the screws. 6. Beginning top corner end cap C. Replace the screws in the empty hinge holes. 5. Place the hinge on the door...
User Instructions
Page 7
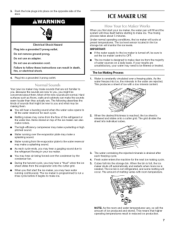
... evaporator plate may hear water running from the evaporator onto the cutter grid. • When you may make ice. When you first start the ice maker, you first start your ice maker, the water pan will fill and the system will occur. IMPORTANT: • If the water supply to ...to run a rinse cycle before starting to make the sounds seem louder than they actually are not familiar to the refrigerant flowing in reduced ice production. ICE MAKER USE Electrical Shock Hazard Plug into a grounded 3 prong outlet. Do not remove ground prong. Do not use an adapter. Plug into ...
... evaporator plate may hear water running from the evaporator onto the cutter grid. • When you may make ice. When you first start the ice maker, you first start your ice maker, the water pan will fill and the system will occur. IMPORTANT: • If the water supply to ...to run a rinse cycle before starting to make the sounds seem louder than they actually are not familiar to the refrigerant flowing in reduced ice production. ICE MAKER USE Electrical Shock Hazard Plug into a grounded 3 prong outlet. Do not remove ground prong. Do not use an adapter. Plug into ...
User Instructions
Page 8
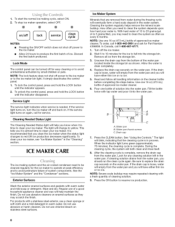
... For products with a fresh quantity of 15 to 20 grains/gal. (4 to 5 grains/liter), you clean the ice maker when the status light changes to clean your ice maker, see "Ice Maker System" in the water pan. Pour one 16 oz (473 mL) bottle of solution into the storage bin. Drain...is loose, water will empty from the water pan and you will empty from the bottom of approved ice maker cleaner. 6. To clean your ice maker. NOTE: Use one bottle of approved ice maker cleaner. Turn off for any cleaning solution left in the "Cleaning" section. To startthe normal icemaking cycle...
... For products with a fresh quantity of 15 to 20 grains/gal. (4 to 5 grains/liter), you clean the ice maker when the status light changes to clean your ice maker, see "Ice Maker System" in the water pan. Pour one 16 oz (473 mL) bottle of solution into the storage bin. Drain...is loose, water will empty from the water pan and you will empty from the bottom of approved ice maker cleaner. 6. To clean your ice maker. NOTE: Use one bottle of approved ice maker cleaner. Turn off for any cleaning solution left in the "Cleaning" section. To startthe normal icemaking cycle...

User Instructions
Page 9
...Make sure the plastic spacer from the cutter grid. 7. Waterpan B. Unplug ice maker or disconnect power. 2. Plastic spacer F. Screw 8, Remove the two thumb screws that hold the cutter grid cover in place. S'-- Unplug ice maker or disconnect power. 2. A. Replace the lower access panel using the ... than recommended operating temperatures which may lead to do so can result in ice maker or reconnect power. -|\\ _o ..., - Interior Components 1. Open the storage bin door and remove any ice that hold the water pan in place and remove the cutter grid cover....
...Make sure the plastic spacer from the cutter grid. 7. Waterpan B. Unplug ice maker or disconnect power. 2. Plastic spacer F. Screw 8, Remove the two thumb screws that hold the cutter grid cover in place. S'-- Unplug ice maker or disconnect power. 2. A. Replace the lower access panel using the ... than recommended operating temperatures which may lead to do so can result in ice maker or reconnect power. -|\\ _o ..., - Interior Components 1. Open the storage bin door and remove any ice that hold the water pan in place and remove the cutter grid cover....
User Instructions
Page 10
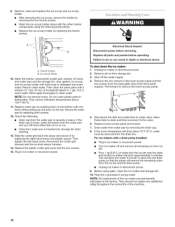
Remove, clean and replace the ice scoop and ice scoop holder. • After removing the ice scoop, remove the holder by removing the two thumb screws. • Wash the ice scoop holder along with the other interior components using the following instructions. • Replace the ice scoop holder by replacing the thumb screws. A ' 9.
Remove, clean and replace the ice scoop and ice scoop holder. • After removing the ice scoop, remove the holder by removing the two thumb screws. • Wash the ice scoop holder along with the other interior components using the following instructions. • Replace the ice scoop holder by replacing the thumb screws. A ' 9.

User Instructions
Page 11
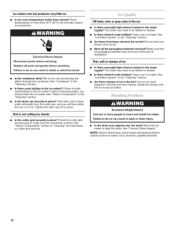
...off even though the bin is pushed? See "Cleaning." • Does the ice maker have either thin ice or no ice. Check that the ice maker is set to follow these instructions can result in the reservoir overflowing? Ice maker runs but may not restart once it does shut off continually? Clean the ...is tight and the water drain pan pump is set to ON. • Is the water supply connected? In the U.S.A., www.maytag.com In Canada, www.maytag.ca Your ice maker will have a drain pump? Has a household fuse blown, or has a circuit breaker tripped? This overflow helps to the water ...
...off even though the bin is pushed? See "Cleaning." • Does the ice maker have either thin ice or no ice. Check that the ice maker is set to follow these instructions can result in the reservoir overflowing? Ice maker runs but may not restart once it does shut off continually? Clean the ...is tight and the water drain pan pump is set to ON. • Is the water supply connected? In the U.S.A., www.maytag.com In Canada, www.maytag.ca Your ice maker will have a drain pump? Has a household fuse blown, or has a circuit breaker tripped? This overflow helps to the water ...
User Instructions
Page 12
... do so can result in the water supply? Clean your ice maker. Break the clumps with the ice scoop provided. See "Connect Water Supply." Tighten the drain cap if it will have either thin ice or no ice. Clean your ice maker. See "Ice Maker System" in the "Cleaning" section. • Are there... regularly it is white scale buildup in death or electrical shock. • Is the condenser dirty? Do not store any foods in the ice maker? The water may be filtered or treated. • Is there mineral scale buildup? Replace all the packaging materials removed? See "Condenser" ...
... do so can result in the water supply? Clean your ice maker. Break the clumps with the ice scoop provided. See "Connect Water Supply." Tighten the drain cap if it will have either thin ice or no ice. Clean your ice maker. See "Ice Maker System" in the "Cleaning" section. • Are there... regularly it is white scale buildup in death or electrical shock. • Is the condenser dirty? Do not store any foods in the ice maker? The water may be filtered or treated. • Is there mineral scale buildup? Replace all the packaging materials removed? See "Condenser" ...

User Instructions
Page 13
...finish of your major appliance, unless such damage results from defects in materials or workmanship and is reported to Maytag within 30 days from the date of the ice maker compartment. Costs associated with the removal from your home of consumables or cleaning products not approved by this warranty... date is required to obtain service under these excluded circumstances shall be repaired in the home and only in-home service is covered by Maytag. 5. Have your complete model number ready. Proof of repair or replacement under this limited warranty. Service calls to the appliance. 9. ...
...finish of your major appliance, unless such damage results from defects in materials or workmanship and is reported to Maytag within 30 days from the date of the ice maker compartment. Costs associated with the removal from your home of consumables or cleaning products not approved by this warranty... date is required to obtain service under these excluded circumstances shall be repaired in the home and only in-home service is covered by Maytag. 5. Have your complete model number ready. Proof of repair or replacement under this limited warranty. Service calls to the appliance. 9. ...