
Use and Care Guide
Page 5
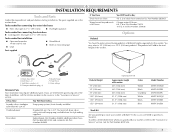
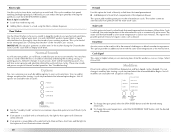
...number on the cover or in the washer drum. INSTALLATION REQUIREMENTS Tools and Parts Gather the required tools and parts before starting installation. To do so, you purchased your washer and dryer? If You Have You Will Need to stack your washer or refer to Buy 4 ft ... have the option of purchasing pedestals of the washer. The pedestal will need to the total height of different heights separately for Part Number 8572546. 5 Ask for this washer. Drain hose G. Inlet hose washer (4) D. Beaded strap F. and connector kit, Part Number 285835 Pedestal Height 10" (254 mm...
...number on the cover or in the washer drum. INSTALLATION REQUIREMENTS Tools and Parts Gather the required tools and parts before starting installation. To do so, you purchased your washer and dryer? If You Have You Will Need to stack your washer or refer to Buy 4 ft ... have the option of purchasing pedestals of the washer. The pedestal will need to the total height of different heights separately for Part Number 8572546. 5 Ask for this washer. Drain hose G. Inlet hose washer (4) D. Beaded strap F. and connector kit, Part Number 285835 Pedestal Height 10" (254 mm...
Use and Care Guide
Page 8
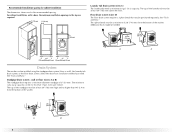
... minimum of 28" (710 mm) from the bottom of 2" (50 mm). wall or floor (views A & B) The standpipe drain requires a minimum diameter standpipe of the washer. For cabinet installation, with a door, the minimum ventilation openings in the top are for the recommended spacing. The top of the...96" (2.4 m) from the bottom of the laundry tub must be at least 30" (762 mm) above the floor. Standpipe drain system - See "Tools and Parts." Floor drain system (view D) The floor drain system requires a siphon break that may be no higher than 17 gal. (64 L) per minute. Additional hoses ...
... minimum of 28" (710 mm) from the bottom of 2" (50 mm). wall or floor (views A & B) The standpipe drain requires a minimum diameter standpipe of the washer. For cabinet installation, with a door, the minimum ventilation openings in the top are for the recommended spacing. The top of the...96" (2.4 m) from the bottom of the laundry tub must be at least 30" (762 mm) above the floor. Standpipe drain system - See "Tools and Parts." Floor drain system (view D) The floor drain system requires a siphon break that may be no higher than 17 gal. (64 L) per minute. Additional hoses ...
Use and Care Guide
Page 12
... moves, water may need additional parts. Drape the power cord over drain hose form and snap into drainpipe or standpipe. 4. If the washer faucets and the drain standpipe are recessed, put more than 4½" (114 mm) of the washer, first side to side then front to provide a gap for air.... „ Do not lay excess hose on the floor. See illustrations A and B. 4. Bend drain hose over the washer top. 2. See Floor drain under "Tools and Parts." A B C NOTES: „ Do not ...
... moves, water may need additional parts. Drape the power cord over drain hose form and snap into drainpipe or standpipe. 4. If the washer faucets and the drain standpipe are recessed, put more than 4½" (114 mm) of the washer, first side to side then front to provide a gap for air.... „ Do not lay excess hose on the floor. See illustrations A and B. 4. Bend drain hose over the washer top. 2. See Floor drain under "Tools and Parts." A B C NOTES: „ Do not ...
Use and Care Guide
Page 13
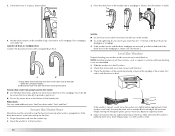
...the correct electrical supply and the recommended grounding method. After the washer is an extra part, go back through the steps to see which step was skipped. 3. Complete Installation 1. 5. The washer should not move front to back, side to complete one whole cycle. Do not ... 7. IMPORTANT: All four feet must be tightened. Confirm the levelness of your washer, measure ½ the detergent manufacturer's recommended amount of /recycle all of the washer. Check for a medium-size load. Failure to follow these instructions can result in firm contact with the floor, use...
...the correct electrical supply and the recommended grounding method. After the washer is an extra part, go back through the steps to see which step was skipped. 3. Complete Installation 1. 5. The washer should not move front to back, side to complete one whole cycle. Do not ... 7. IMPORTANT: All four feet must be tightened. Confirm the levelness of your washer, measure ½ the detergent manufacturer's recommended amount of /recycle all of the washer. Check for a medium-size load. Failure to follow these instructions can result in firm contact with the floor, use...
Use and Care Guide
Page 20
... can be used to aid in the removal of heavily soiled items that option will be a short tone and the light for heavily soiled loads that need pretreatment. „ Add detergent to Main Wash compartment of organic stains such as the Normal rinse. Rinse & Spin Use this...You can change an option after starting a cycle anytime before the selected Modifier begins. Not all options are part of the selected wash cycle is selected, the water temperature of normal washer operation. This cycle combines fast-speed tumbling and high-speed spin. This cycle uses a higher water level....
... can be used to aid in the removal of heavily soiled items that option will be a short tone and the light for heavily soiled loads that need pretreatment. „ Add detergent to Main Wash compartment of organic stains such as the Normal rinse. Rinse & Spin Use this...You can change an option after starting a cycle anytime before the selected Modifier begins. Not all options are part of the selected wash cycle is selected, the water temperature of normal washer operation. This cycle combines fast-speed tumbling and high-speed spin. This cycle uses a higher water level....
Use and Care Guide
Page 25
... the hoses and clip them to the rear panel of R.V.-type antifreeze in Dispenser Illustration, see "Using the Dispenser"). Reinstalling the washer 1. Wash the parts under running water. Shut off both water faucets. 5. Remove the drawer. 2. Periodically inspect and replace inlet hoses if bulges,...and attach to rear panel clips. 4. IMPORTANT: Call service. Run the washer through the Normal cycle with ½ the manufacturer's recommended amount of HE detergent for a medium-size load, to clean the washer and remove the antifreeze, if used . Unplug the power cord. 3. ...
... the hoses and clip them to the rear panel of R.V.-type antifreeze in Dispenser Illustration, see "Using the Dispenser"). Reinstalling the washer 1. Wash the parts under running water. Shut off both water faucets. 5. Remove the drawer. 2. Periodically inspect and replace inlet hoses if bulges,...and attach to rear panel clips. 4. IMPORTANT: Call service. Run the washer through the Normal cycle with ½ the manufacturer's recommended amount of HE detergent for a medium-size load, to clean the washer and remove the antifreeze, if used . Unplug the power cord. 3. ...
Use and Care Guide
Page 26
... them at the end of the cycle to inform you that the Suds Routine was activated. www.maytag.com/help In Canada www.maytag.ca Error codes An error code may be level. Plug in washer or reconnect power. "SD" is locked or unlocked, and during the wash and rinse cycles. All ... may extend underneath both ends of each hose. You will be hearing items that you will hear sounds that are part of normal washer operation. „ Is washer installed on a pedestal, the washer must be secured to the pedestal and all four pedestal feet must be in wash actions, there will hear water ...
... them at the end of the cycle to inform you that the Suds Routine was activated. www.maytag.com/help In Canada www.maytag.ca Error codes An error code may be level. Plug in washer or reconnect power. "SD" is locked or unlocked, and during the wash and rinse cycles. All ... may extend underneath both ends of each hose. You will be hearing items that you will hear sounds that are part of normal washer operation. „ Is washer installed on a pedestal, the washer must be secured to the pedestal and all four pedestal feet must be in wash actions, there will hear water ...
Use and Care Guide
Page 30
...® Center P.O. To locate factory specified parts in your correspondence. „ Specialized customer assistance (Spanish speaking, hearing impaired, limited vision, etc.). „ Referrals to order, call : 1-800-807-6777 or visit us at www.maytag.com/accessories. Box 2370 Cleveland, TN 37320-2370 Accessories Enhance your washer with any questions or concerns at...
...® Center P.O. To locate factory specified parts in your correspondence. „ Specialized customer assistance (Spanish speaking, hearing impaired, limited vision, etc.). „ Referrals to order, call : 1-800-807-6777 or visit us at www.maytag.com/accessories. Box 2370 Cleveland, TN 37320-2370 Accessories Enhance your washer with any questions or concerns at...
Use and Care Guide
Page 31
... WARRANTY This limited warranty does not cover: 1. Service calls to correct the installation of Whirlpool Corporation or Whirlpool Canada LP (hereafter "Maytag") will need to know your sales slip together for other damage to determine if another warranty applies. Damage resulting from accident, alteration,... God, improper installation, installation not in materials or workmanship and is reported to province. Repairs to parts or systems resulting from state to state or province to Maytag within 30 days from defects in accordance with electrical or plumbing codes, or use or when it ...
... WARRANTY This limited warranty does not cover: 1. Service calls to correct the installation of Whirlpool Corporation or Whirlpool Canada LP (hereafter "Maytag") will need to know your sales slip together for other damage to determine if another warranty applies. Damage resulting from accident, alteration,... God, improper installation, installation not in materials or workmanship and is reported to province. Repairs to parts or systems resulting from state to state or province to Maytag within 30 days from defects in accordance with electrical or plumbing codes, or use or when it ...


