
Installation Guide
Page 3
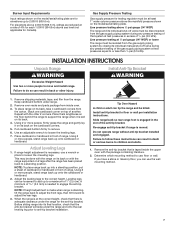
... installations must provide complete enclosure of the sides and rear of the range. ■■ To eliminate the risk of the anti-tip bracket. Parts supplied Check that projects horizontally a minimum of 5" (12.7 cm) beyond the bottom of the cabinets. ■■ All openings in the ...slot of burns or fire by installing a range hood or microwave hood combination that all governing codes and ordinances. Parts needed Check local codes and consult gas supplier. I If using a ball valve, it shall be securely mounted to floor or wall per installation ...
... installations must provide complete enclosure of the sides and rear of the range. ■■ To eliminate the risk of the anti-tip bracket. Parts supplied Check that projects horizontally a minimum of 5" (12.7 cm) beyond the bottom of the cabinets. ■■ All openings in the ...slot of burns or fire by installing a range hood or microwave hood combination that all governing codes and ordinances. Parts needed Check local codes and consult gas supplier. I If using a ball valve, it shall be securely mounted to floor or wall per installation ...
Installation Guide
Page 4
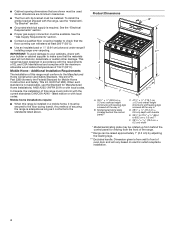
...with local codes. Model/serial/rating plate (located behind the control panel for Mobile Home Construction and Safety, Title 24, HUD Part 280). When such standard is installed in accordance with the requirements of UL and CSA International and complies with the maximum allowable ... with handle E. 261/8" to 27¼" ± 1/8" (66.4 to the Manufactured Home Construction and Safety Standard, Title 24 CFR, Part 3280 (formerly the Federal Standard for viewing from wall to the floor during transit. Additional Installation Requirements The installation of securing the range is ...
...with local codes. Model/serial/rating plate (located behind the control panel for Mobile Home Construction and Safety, Title 24, HUD Part 280). When such standard is installed in accordance with the requirements of UL and CSA International and complies with the maximum allowable ... with handle E. 261/8" to 27¼" ± 1/8" (66.4 to the Manufactured Home Construction and Safety Standard, Title 24 CFR, Part 3280 (formerly the Federal Standard for viewing from wall to the floor during transit. Additional Installation Requirements The installation of securing the range is ...
Installation Guide
Page 7
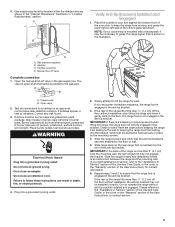
... that system at the correct height, check that there is necessary, use a wrench or pliers to use the wall mounting method. 7 Remove oven racks and parts package from the range. NOTE: To place range back up to do so can result in excess of range. Leveling legs can be done with...
... that system at the correct height, check that there is necessary, use a wrench or pliers to use the wall mounting method. 7 Remove oven racks and parts package from the range. NOTE: To place range back up to do so can result in excess of range. Leveling legs can be done with...
Installation Guide
Page 9
.... C D A. Slide range back so the rear range foot is engaged in the gas supply line. Burner caps should be necessary to keep the range from parts package. Manual shut-off valve in the anti-tip bracket. Closed valve B. Repeat steps 1 and 2 to ensure that the bracket is securely attached to contact...
.... C D A. Slide range back so the rear range foot is engaged in the gas supply line. Burner caps should be necessary to keep the range from parts package. Manual shut-off valve in the anti-tip bracket. Closed valve B. Repeat steps 1 and 2 to ensure that the bracket is securely attached to contact...
Installation Guide
Page 11
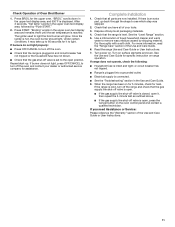
... Broil Burner 1. For more information, read the "Range Care" section of the Use and Care Guide or User Instructions. 11 If you have all parts are now installed. "BROIL" scrolls down in the upper oven text display area, followed by shipping material. Under certain conditions, it may take up ...has been on the oven control panel and contact a qualified technician. The igniter used to light. Complete Installation 1. Once the igniter is an extra part, go back through the steps to the open position. Read the range Use and Care Guide or User Instructions. 7. If there is hot, ...
... Broil Burner 1. For more information, read the "Range Care" section of the Use and Care Guide or User Instructions. 11 If you have all parts are now installed. "BROIL" scrolls down in the upper oven text display area, followed by shipping material. Under certain conditions, it may take up ...has been on the oven control panel and contact a qualified technician. The igniter used to light. Complete Installation 1. Once the igniter is an extra part, go back through the steps to the open position. Read the range Use and Care Guide or User Instructions. 7. If there is hot, ...
Installation Guide
Page 15
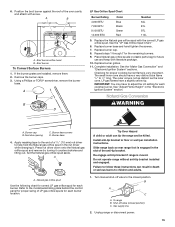
... base screws D. A Tip Over Hazard A child or adult can result in death or serious burns to help hold the Natural gas orifice spud in plastic parts bag for the remaining burners. 9. Do not operate range without anti-tip bracket installed and engaged. Refer to the model/serial/rating plate behind the...
... base screws D. A Tip Over Hazard A child or adult can result in death or serious burns to help hold the Natural gas orifice spud in plastic parts bag for the remaining burners. 9. Do not operate range without anti-tip bracket installed and engaged. Refer to the model/serial/rating plate behind the...
Installation Guide
Page 18
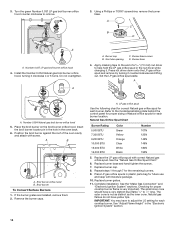
... Use the following chart for correct Natural gas orifice spud for each burner location. Refer to help hold the LP gas orifice spud in plastic parts bag for each cooktop burner. Replace burner base and hand tighten the screws. 7. Place LP gas orifice spuds in the nut driver while changing it...
... Use the following chart for correct Natural gas orifice spud for each burner location. Refer to help hold the LP gas orifice spud in plastic parts bag for each cooktop burner. Replace burner base and hand tighten the screws. 7. Place LP gas orifice spuds in the nut driver while changing it...


