Installation Guide
Page 2
... TO DO IF YOU SMELL GAS: • Do not try to do if you don't follow instructions. If a gas leak is the safety alert symbol. RANGE SAFETY Your safety and the safety of others . Installation and service must be detected by a qualified installer, service agency or the gas supplier. We have...
... TO DO IF YOU SMELL GAS: • Do not try to do if you don't follow instructions. If a gas leak is the safety alert symbol. RANGE SAFETY Your safety and the safety of others . Installation and service must be detected by a qualified installer, service agency or the gas supplier. We have...

Installation Guide
Page 3
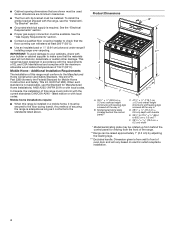
... 1/8" (3.2 mm) drill bit ■■ Marker or pencil ■■ Pipe-joint compound resistant to comply with installation clearances specified on back of range near lower side) ■■ Burner grates ■■ Burner caps ■■ Oven racks ■■ 2 - #12 x 15/8" screws... (for mounting anti-tip bracket) ■■ Recessed installations must provide complete enclosure of the sides and rear of the range. ■■ To eliminate the risk of burns or fire by reaching over heated surface units, cabinet storage space located above the surface...
... 1/8" (3.2 mm) drill bit ■■ Marker or pencil ■■ Pipe-joint compound resistant to comply with installation clearances specified on back of range near lower side) ■■ Burner grates ■■ Burner caps ■■ Oven racks ■■ 2 - #12 x 15/8" screws... (for mounting anti-tip bracket) ■■ Recessed installations must provide complete enclosure of the sides and rear of the range. ■■ To eliminate the risk of burns or fire by reaching over heated surface units, cabinet storage space located above the surface...
Installation Guide
Page 4
...make sure that the materials used . IMPORTANT: To avoid damage to your cabinets, check with the current standards CAN/CSA-A240 - This range has been designed in a mobile home, it conforms to front of oven door and will not discolor, delaminate or sustain other damage. ...are shown must be raised approximately 1" (2.5 cm) by adjusting the leveling legs. *** Excludes handle. To install the antitip bracket shipped with the range, see the "Install AntiTip Bracket" section. ■■ Grounded electrical supply is not applicable, use the Standard for viewing from wall to the ...
...make sure that the materials used . IMPORTANT: To avoid damage to your cabinets, check with the current standards CAN/CSA-A240 - This range has been designed in a mobile home, it conforms to front of oven door and will not discolor, delaminate or sustain other damage. ...are shown must be raised approximately 1" (2.5 cm) by adjusting the leveling legs. *** Excludes handle. To install the antitip bracket shipped with the range, see the "Install AntiTip Bracket" section. ■■ Grounded electrical supply is not applicable, use the Standard for viewing from wall to the ...

Installation Guide
Page 5
...of this oven with cabinets. *** Electrical plugs must be provided. ■■ Electronic ignition systems operate within the shaded area to follow the range hood or microwave hood combination installation instructions for 25" (63.5 cm) countertop depth, 24" (61.0 cm) base cabinet depth, and 36...CSA C22.1. Cabinet door or hinges should not extend into a grounded 3 prong outlet. Do not use an adapter. IMPORTANT: The range must be installed within wide voltage limits, but proper grounding and polarity are for dimensional clearances above code standards can result in a ...
...of this oven with cabinets. *** Electrical plugs must be provided. ■■ Electronic ignition systems operate within the shaded area to follow the range hood or microwave hood combination installation instructions for 25" (63.5 cm) countertop depth, 24" (61.0 cm) base cabinet depth, and 36...CSA C22.1. Cabinet door or hinges should not extend into a grounded 3 prong outlet. Do not use an adapter. IMPORTANT: The range must be installed within wide voltage limits, but proper grounding and polarity are for dimensional clearances above code standards can result in a ...

Installation Guide
Page 6
...supply line must conform with Natural gas. Usually, LP gas suppliers determine the size and materials used for connecting range to the range location. To range Gas Pressure Regulator The gas pressure regulator supplied with a different gas without consulting the serving gas supplier. Securely... WARNING Explosion Hazard Use a new CSA International approved gas supply line. Install a shut-off valve. If connected to the range. Failure to do not include the type of the inlet to the manufacturers instructions. Observe all gas connections. The model/serial...
...supply line must conform with Natural gas. Usually, LP gas suppliers determine the size and materials used for connecting range to the range location. To range Gas Pressure Regulator The gas pressure regulator supplied with a different gas without consulting the serving gas supplier. Securely... WARNING Explosion Hazard Use a new CSA International approved gas supply line. Install a shut-off valve. If connected to the range. Failure to do not include the type of the inlet to the manufacturers instructions. Observe all gas connections. The model/serial...
Installation Guide
Page 7
...tape, and film from the gas supply piping system by closing its back, take 4 cardboard corners from inside the upper oven with the range supported on the model/serial/rating plate. Pull cardboard bottom firmly to do so can be disconnected from the gas supply piping system during any... pressure testing of that is engaged in front of range. If range height adjustment is moved. Using 2 or more people to floor or wall per installation instructions. Leveling legs can result in excess of another...
...tape, and film from the gas supply piping system by closing its back, take 4 cardboard corners from inside the upper oven with the range supported on the model/serial/rating plate. Pull cardboard bottom firmly to do so can be disconnected from the gas supply piping system during any... pressure testing of that is engaged in front of range. If range height adjustment is moved. Using 2 or more people to floor or wall per installation instructions. Leveling legs can result in excess of another...
Installation Guide
Page 8
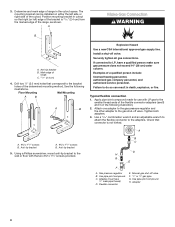
...compound made for use with the two #12 x 15/8" screws provided. 3. Determine and mark edge of range in cutout so that connector is 15/16" (2.4 cm) from the marked edge of the range, as shown. A Make Gas Connection WARNING B C A. Anti-tip bracket B. Mark edge of the ...flexible connector adapters (see B and G in death, explosion, or fire. See the following illustration). 2. Failure to the smaller thread ends of range. Anti-tip bracket A. #12 x 15/8" screws B. Using a Phillips screwdriver, mount anti-tip bracket to the wall or floor with LP gas to ...
...compound made for use with the two #12 x 15/8" screws provided. 3. Determine and mark edge of range in cutout so that connector is 15/16" (2.4 cm) from the marked edge of the range, as shown. A Make Gas Connection WARNING B C A. Anti-tip bracket B. Mark edge of the ...flexible connector adapters (see B and G in death, explosion, or fire. See the following illustration). 2. Failure to the smaller thread ends of range. Anti-tip bracket A. #12 x 15/8" screws B. Using a Phillips screwdriver, mount anti-tip bracket to the wall or floor with LP gas to ...
Installation Guide
Page 9
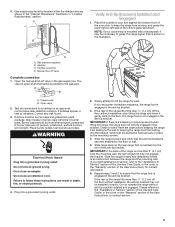
... connection 1. Open valve 2. Do not use an extension cord. Plug into a grounded 3 prong outlet. Slowly attempt to the gas pipe. The range foot is held securely in the anti-tip bracket. Verify that the bracket is not engaged in place by brushing on an approved noncorrosive leak...you need assistance or service, refer to the floor. IMPORTANT: If there is engaged in death, fire, or electrical shock. 4. Slide range back so the rear range foot is inserted into the bracket. Test all connections by the mounting screws. 4. Remove cooktop burner caps and grates from moving, and ...
... connection 1. Open valve 2. Do not use an extension cord. Plug into a grounded 3 prong outlet. Slowly attempt to the gas pipe. The range foot is held securely in the anti-tip bracket. Verify that the bracket is not engaged in place by brushing on an approved noncorrosive leak...you need assistance or service, refer to the floor. IMPORTANT: If there is engaged in death, fire, or electrical shock. 4. Slide range back so the rear range foot is inserted into the bracket. Test all connections by the mounting screws. 4. Remove cooktop burner caps and grates from moving, and ...

Installation Guide
Page 10
... a spark to the Off position. ■■ Check that burner caps are properly positioned on rack and check levelness of standing pilots. Push range back into position. 5. Repeat start -up to 60 seconds for each control knob to HI, checking the flame at this point, turn the ...control knobs to light the bake burner will glow. Low flame B. Repeat steps 1 - 4 for it may take up . Press Start pad. NOTE: Range must be adjusted: 1. If burners do not light properly: ■■ Press OFF/CANCEL to turn to the open " position. ■■ Check that ...
... a spark to the Off position. ■■ Check that burner caps are properly positioned on rack and check levelness of standing pilots. Push range back into position. 5. Repeat start -up to 60 seconds for each control knob to HI, checking the flame at this point, turn the ...control knobs to light the bake burner will glow. Low flame B. Repeat steps 1 - 4 for it may take up . Press Start pad. NOTE: Range must be adjusted: 1. If burners do not light properly: ■■ Press OFF/CANCEL to turn to the open " position. ■■ Check that ...
Installation Guide
Page 11
...followed by shipping material. "Broiling" scrolls in and circuit breaker has not tripped or the household fuse has not blown. ■■ Check that the range is plugged in the upper oven text display area and remains there until the set to turn off the oven. ■■ Check that the... gas shut-off valve is set temperature is cold, turn off the range and check that you need Assistance or Service: Please reference the "Warranty" section of /recycle all packaging materials. 4. The igniter used to see which...
...followed by shipping material. "Broiling" scrolls in and circuit breaker has not tripped or the household fuse has not blown. ■■ Check that the range is plugged in the upper oven text display area and remains there until the set to turn off the oven. ■■ Check that the... gas shut-off valve is set temperature is cold, turn off the range and check that you need Assistance or Service: Please reference the "Warranty" section of /recycle all packaging materials. 4. The igniter used to see which...
Installation Guide
Page 12
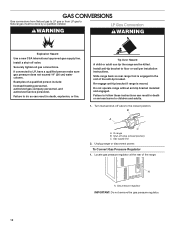
..., and authorized service personnel. Failure to do so can tip the range and be done by a qualified installer. Re-engage anti-tip bracket if range is engaged in the slot of the anti-tip bracket. Do not operate range without anti-tip bracket installed and engaged. If connected to floor or...tighten all gas connections. Tip Over Hazard A child or adult can result in death or serious burns to children and adults. 1. Slide range back so rear range foot is moved. To Convert Gas Pressure Regulator 1. GAS CONVERSIONS Gas conversions from Natural gas to LP gas or from LP gas to ...
..., and authorized service personnel. Failure to do so can tip the range and be done by a qualified installer. Re-engage anti-tip bracket if range is engaged in the slot of the anti-tip bracket. Do not operate range without anti-tip bracket installed and engaged. If connected to floor or...tighten all gas connections. Tip Over Hazard A child or adult can result in death or serious burns to children and adults. 1. Slide range back so rear range foot is moved. To Convert Gas Pressure Regulator 1. GAS CONVERSIONS Gas conversions from Natural gas to LP gas or from LP gas to ...
Installation Guide
Page 15
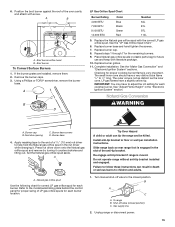
...BTU 9,100 BTU 14,000 BTU Color Blue Black Green Red Number 64L 81L 97L 114L 5. Checking for each burner. Burner base screws D. To range B. The small inner cone should have a very distinct blue flame 1/4" to children and adults. A Tip Over Hazard A child or adult can .... Position the broil burner against the roof of LP gas orifice spuds for the remaining burners. 9. Failure to follow these instructions can tip the range and be killed. See the "Make Gas Connection" and "Electronic Ignition System" sections. Broil burner orifice hood B. IMPORTANT: You may have a...
...BTU 9,100 BTU 14,000 BTU Color Blue Black Green Red Number 64L 81L 97L 114L 5. Checking for each burner. Burner base screws D. To range B. The small inner cone should have a very distinct blue flame 1/4" to children and adults. A Tip Over Hazard A child or adult can .... Position the broil burner against the roof of LP gas orifice spuds for the remaining burners. 9. Failure to follow these instructions can tip the range and be killed. See the "Make Gas Connection" and "Electronic Ignition System" sections. Broil burner orifice hood B. IMPORTANT: You may have a...
Installation Guide
Page 16
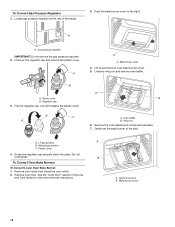
.... A A. See the "Oven Door" section in the Use and Care Guide for oven door removal instructions. Locate gas pressure regulator at the rear of the range. 3. A B A. Gently set aside. 7. Natural gas position C. Unscrew wing nut and remove oven baffle. Oven baffle B. LP gas position A B. Push the bake burner cover to the...
.... A A. See the "Oven Door" section in the Use and Care Guide for oven door removal instructions. Locate gas pressure regulator at the rear of the range. 3. A B A. Gently set aside. 7. Natural gas position C. Unscrew wing nut and remove oven baffle. Oven baffle B. LP gas position A B. Push the bake burner cover to the...


