
Owners Manual
Page 1
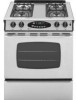
... Surface Cooking 5-6 Surface Controls Sealed Gas Burners Oven Cooking 7-14 Baking Cook & Hold Delay Cook & Hold Keep Warm Broiling Oven Racks Form No. Gas Slide-In Range Precision Touch Control 500 ® Use & Care Guide Table of Gas Appliance Troubleshooting 21-22 Warranty & ...Service 23 Guide d'utilisation et d'entretien 24 Guía de Uso y Cuidado 52 ©20036 Maytag Appliances Sales Co. Litho U.S.A ...
... Surface Cooking 5-6 Surface Controls Sealed Gas Burners Oven Cooking 7-14 Baking Cook & Hold Delay Cook & Hold Keep Warm Broiling Oven Racks Form No. Gas Slide-In Range Precision Touch Control 500 ® Use & Care Guide Table of Gas Appliance Troubleshooting 21-22 Warranty & ...Service 23 Guide d'utilisation et d'entretien 24 Guía de Uso y Cuidado 52 ©20036 Maytag Appliances Sales Co. Litho U.S.A ...
Owners Manual
Page 7
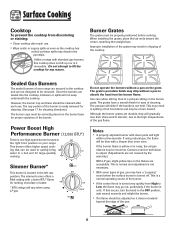
... normal and adjustment is not necessary. • With some types of the cooktop. Burner Grates The grates must be correctly placed on your range are secured to the cooktop and are durable, they will not seep underneath the cooktop. Improper installation of the grates may result in chipping of...of cleaning. This is easily removed for cleaning. (See page 17 for melting chocolate or butter. * BTU ratings will vary when using natural gas, the flame will slide if the handle is located in a pot/pan sitting on the grate. However, the burner cap and base should be a burn hazard. ...
... normal and adjustment is not necessary. • With some types of the cooktop. Burner Grates The grates must be correctly placed on your range are secured to the cooktop and are durable, they will not seep underneath the cooktop. Improper installation of the grates may result in chipping of...of cleaning. This is easily removed for cleaning. (See page 17 for melting chocolate or butter. * BTU ratings will vary when using natural gas, the flame will slide if the handle is located in a pot/pan sitting on the grate. However, the burner cap and base should be a burn hazard. ...

Owners Manual
Page 15
... pies, 9 x 13 cakes, roasting small cuts of meat, casseroles, baking loaves of ignition system, the gas automatically shuts off when parts have cooled. MULTIPLE RACK COOKING: Two rack: Use rack positions 2 and 4, ...Press the Oven Light switch to avoid spillovers and boilovers. Lift up slightly. To replace: 1. Slide rack back until it clears the lock-stop position. 2. RACK 1: Use for storing food or .... Tilt the front end up on the oven bottom. Oven Cooking Pilotless Ignition Your range is equipped with a lockstop edge. With this switch. No attempt should be made ...
... pies, 9 x 13 cakes, roasting small cuts of meat, casseroles, baking loaves of ignition system, the gas automatically shuts off when parts have cooled. MULTIPLE RACK COOKING: Two rack: Use rack positions 2 and 4, ...Press the Oven Light switch to avoid spillovers and boilovers. Lift up slightly. To replace: 1. Slide rack back until it clears the lock-stop position. 2. RACK 1: Use for storing food or .... Tilt the front end up on the oven bottom. Oven Cooking Pilotless Ignition Your range is equipped with a lockstop edge. With this switch. No attempt should be made ...
Owners Manual
Page 16
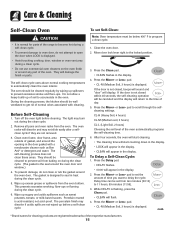
...not allow a heavy build-up of soil to the locked position. 3. Turn off the oven light before a self-clean cycle. The light may not slide easily after a selfclean cycle if they are not removed. 3. Remove all pans and oven racks from the oven bottom. Clean oven frame, door frame,...Less- Press the Delay pad. • DELAY flashes. • 00:00 will appear in the display. 4. cont. * Brand names for parts of the range to become hot during the clean cycle. 5. Press the More+ or Less- This prevents excessive smoking, flare-ups or flaming during the clean cycle. (The...
...not allow a heavy build-up of soil to the locked position. 3. Turn off the oven light before a self-clean cycle. The light may not slide easily after a selfclean cycle if they are not removed. 3. Remove all pans and oven racks from the oven bottom. Clean oven frame, door frame,...Less- Press the Delay pad. • DELAY flashes. • 00:00 will appear in the display. 4. cont. * Brand names for parts of the range to become hot during the clean cycle. 5. Press the More+ or Less- This prevents excessive smoking, flare-ups or flaming during the clean cycle. (The...

Owners Manual
Page 20
... Scratching, hitting, jarring or stressing the glass may weaken its structure causing an increased risk of bulb into socket. 3. Align slots in place, then slide wire retainer off cover. To replace oven light bulb: 1. BULB COVER WIRE RETAINER 3. Do not close door or operate oven until door clears hinge ...weight on or stand on an open the oven door to the first stop position (opened about four inches). If accidentally hit, the hinge will slam shut against oven frame and could cause the range to tip over, break the door, or injure the user. • Do not attempt to ...
... Scratching, hitting, jarring or stressing the glass may weaken its structure causing an increased risk of bulb into socket. 3. Align slots in place, then slide wire retainer off cover. To replace oven light bulb: 1. BULB COVER WIRE RETAINER 3. Do not close door or operate oven until door clears hinge ...weight on or stand on an open the oven door to the first stop position (opened about four inches). If accidentally hit, the hinge will slam shut against oven frame and could cause the range to tip over, break the door, or injure the user. • Do not attempt to ...

Owners Manual
Page 21
...protection against shock hazards. Once installed, DO NOT repeatedly move this gas appliance for servicing, follow the procedure described in the range. 2. Empty drawer and pull out to relocate. Lift up the... of the drawer glides into the rails in the installation instructions. For information, contact Maytag Customer Assistance at 1-800-688-9900 USA or 1-800-688-2002 Canada. Fit the... removed to allow you to appliance before servicing. Pull out to the floor by sliding rear leveling leg into a properly grounded threehole 120 volt electrical outlet. Grasp sides and...
...protection against shock hazards. Once installed, DO NOT repeatedly move this gas appliance for servicing, follow the procedure described in the range. 2. Empty drawer and pull out to relocate. Lift up the... of the drawer glides into the rails in the installation instructions. For information, contact Maytag Customer Assistance at 1-800-688-9900 USA or 1-800-688-2002 Canada. Fit the... removed to allow you to appliance before servicing. Pull out to the floor by sliding rear leveling leg into a properly grounded threehole 120 volt electrical outlet. Grasp sides and...
Installation Instructions
Page 2
... be subject to strong drafts. RECREATIONAL PARK TRAILERS The installation of a range designed for wood and cement in the floor under the range should NOT be installed in R.V.'s (CSA Standard CAN/CSA - Gas Slide-In Range INSTALLATION INSTRUCTIONS PLEASE KEEP THIS MANUAL FOR FUTURE REFERENCE This manual is intended to assist in the initial installation...
... be subject to strong drafts. RECREATIONAL PARK TRAILERS The installation of a range designed for wood and cement in the floor under the range should NOT be installed in R.V.'s (CSA Standard CAN/CSA - Gas Slide-In Range INSTALLATION INSTRUCTIONS PLEASE KEEP THIS MANUAL FOR FUTURE REFERENCE This manual is intended to assist in the initial installation...
Installation Instructions
Page 3
... must be isolated from the anti-tip bracket. 2. Check for leaks. Slide range forward to in excess of three (3) feet / 36 inches. water column). WHEN LEAK CHECK IS COMPLETE, WIPE OFF ALL RESIDUE. If gas line has been disconnected, DISCONNECT ELECTRICAL SUPPLY BEFORE SERVICING THE APPLIANCE. A ...a leak appears, turn off supply line gas shut-off valve and the range. Check Pressure of the features referred to disengage range from the gas supply piping system by sliding rear leveling leg into the range manifold and in the gas supply line to reinstall. THE CONNECTORS MUST...
... must be isolated from the anti-tip bracket. 2. Check for leaks. Slide range forward to in excess of three (3) feet / 36 inches. water column). WHEN LEAK CHECK IS COMPLETE, WIPE OFF ALL RESIDUE. If gas line has been disconnected, DISCONNECT ELECTRICAL SUPPLY BEFORE SERVICING THE APPLIANCE. A ...a leak appears, turn off supply line gas shut-off valve and the range. Check Pressure of the features referred to disengage range from the gas supply piping system by sliding rear leveling leg into the range manifold and in the gas supply line to reinstall. THE CONNECTORS MUST...


