Maytag MGR8775AB Support and Manuals
Get Help and Manuals for this Maytag item
View All Support Options Below
Free Maytag MGR8775AB manuals!
Problems with Maytag MGR8775AB?
Ask a Question
Free Maytag MGR8775AB manuals!
Problems with Maytag MGR8775AB?
Ask a Question
Maytag MGR8775AB Videos

Maytag MGR8775AB Freestanding Range
Duration: :58
Total Views: 10
Duration: :58
Total Views: 10
Popular Maytag MGR8775AB Manual Pages
Warranty Information - Page 1

...174; GAS RANGE LIMITED WARRANTY
FIRST YEAR LIMITED WARRANTY (PARTS AND LABOR)
For one year from the date of purchase, when this major appliance is installed, operated and maintained according to instructions attached to or furnished with the product, Maytag brand of Whirlpool Corporation or Whirlpool Canada, LP (hereafter "Maytag") will pay for factory specified replacement parts and repair labor...
Warranty Information - Page 2

... maintained according to instructions attached to or furnished with original model/serial numbers that prevent function of repair or replacement under this major appliance is used in the country in which it is installed in materials or workmanship and is reported to correct house wiring or plumbing.
2. Service calls to Maytag with electrical or plumbing codes, or use of...
Use & Care Guide - Page 1

... some models 11 RANGE CARE 12 Clean Cycle 12 General Cleaning 13 Oven Light 13 TROUBLESHOOTING 14 ACCESSORIES 16 WARRANTY 16
W10399029B If you should experience a problem not covered in TROUBLESHOOTING, please visit our website at 1-800-807-6777 for purchasing this high-quality product. Para obtener acceso a "Instrucciones para el usuario de la estufa a gas...
Use & Care Guide - Page 4

...Service Section at www.maytag.ca. If the Kitchen Timer is canceled and the time of
countdown. 4.
Press START. 4. Press START, and allow oven to display the
countdown for 5 minutes. 4. Press CANCEL when finished.
4 FEATURE GUIDE
This manual covers several models. Press CLOCK. 3. The Kitchen Timer can result in oven more detailed instructions... keypads to set a temperature ...
Use & Care Guide - Page 13

...Service section at www.maytag.com.
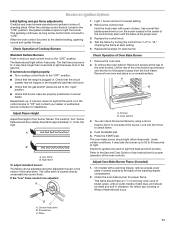
COOKTOP CONTROLS To avoid damage to stainless steel surfaces, do not remove seals under knobs.
Replace bulb, then bulb cover by turning clockwise. 5. Soap, water and a soft cloth or sponge are in range or reconnect power.
13 SURFACE BURNERS
EXTERIOR PORCELAIN ENAMEL SURFACES (on some models...; Kitchen and Appliance Cleaner Part Number W10355010 ...
Use & Care Guide - Page 14

... to the gas supply. See the Installation Instructions. Press and hold DELAY START for more information. www.maytag.com
In Canada, reference the Customer Service section at www.maytag.ca
WARNING
Electrical Shock Hazard Plug into a grounded 3 prong outlet. Energy Save is active, and the display is not set to unlock. Improper cookware
Control knob set correctly. Replace the...
Use & Care Guide - Page 15

... in the "Feature Guide" section. On some models, reset the clock, if needed. See "Clock" keypad feature in the "Electronic Oven Controls" section. Level the range. See the Installation Instructions. To remove deposits,....
Adjust cooking time. Power failure (display shows flashing time) Error code (display shows letter followed by shiny or light colored bakeware Batter distributed unevenly in...
Use & Care Guide - Page 16

... purchase, when this major appliance was purchased.
16
The igniters will pay for contact information. Range converted improperly
This is detected. Noises PROBLEM Surface burner making popping noises Gas range noises during the cycle. It sounds similar to a suction cup being used, contact a service technician or see cover for factory specified replacement parts and repair labor to dry...
Use & Care Guide - Page 17
... YOU SPECIFIC LEGAL RIGHTS, AND YOU MAY ALSO HAVE OTHER RIGHTS WHICH VARY FROM STATE TO STATE OR PROVINCE TO PROVINCE. For assistance or service in materials or workmanship and is covered by this User Instructions and model number information for repairs. Repairs to parts or systems resulting from the date of your major appliance, to replace or repair house...
Installation Guide - Page 4

....
■ Cabinet opening dimensions that the materials used . F
BC
■ Proper gas supply connection must be sealed.
■ Do not seal the range to the instructions in the "Level Range" section. E
■ Use an insulated pad or ¼" (0.64 cm) plywood under range if
installing range over carpeting. A. 27⁷⁄₈" (70.8 cm) max.
D
IMPORTANT: To...
Installation Guide - Page 5

... wood or metal cabinet is recommended that you not plug an electric spark ignition gas range or any other combustible material. It is covered by not less than No. ...: If installing a range hood or microwave hood combination above the range, follow these instructions can be electrically grounded in accordance with the National Electrical Code, ANSI/NFPA 70 or Canadian Electrical Code, CSA ...
Installation Guide - Page 6

.... Observe all gas connections. Type of Gas
Natural gas: This range is a registered trademark of the inlet to the manufacturer's instructions. The model/serial rating plate located on the oven frame behind the top right side of opening , such as follows for use with a manual shutoff valve. No attempt shall be made to convert the appliance from the...
Installation Guide - Page 11
...service... Guide or User Instructions ...gas shutoff valves are set to the "open" position.
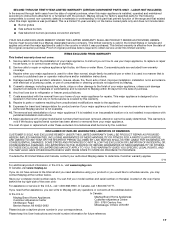
■ Check that the range is turned to light the bake and broil burners. On models...Replace the control knob. 4.
Repeat start-up to 50 to 60 seconds to light the burner. Remove the oven rack. 2. Screws B. Oven bottom
3. Insert a mirror to the desired setting, sparking occurs and ignites the gas...
Installation Guide - Page 13

... removal and installation procedures. You should hear a "click" as it is set into the range. Turn on some models)
The storage drawer can be removed. When the range has been on for 5 minutes, check for specific instruction on the oven control panel and contact a qualified technician. Before removing, make sure the oven is connected.
■ See "Troubleshooting" in...
Installation Guide - Page 18

... up and back until snug. Stamped number
Refer to the end of oven. Replace burner cap.
8. Screw B. Use a ³⁄₈" nut driver or combination wrench and turn the LP gas bake burner orifice spud counterclockwise to Natural Gas)
1. Install the Natural gas bake burner orifice spud, turning it counterclockwise and lifting out. Repeat steps 1-7 for...
Maytag MGR8775AB Reviews
We have not received any reviews for Maytag yet.