Owners Manual
Page 1
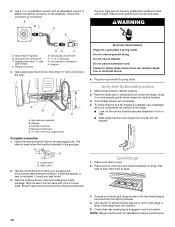
If you and others are not followed. In Canada, visit our website at www.maytag.ca or call us at 1-800-807-6777 for additional information. Table of Contents RANGE SAFETY 1 The Anti-Tip Bracket 3 FEATURE GUIDE 4 COOKTOP USE 6 Sealed Surface Burners 6 OVEN USE 7 Electronic Oven ...at www.maytag.com for purchasing this manual and on the oven frame behind the storage drawer panel. All safety messages will follow instructions. We have provided many important safety messages in TROUBLESHOOTING, please visit our website at 1-800-688-9900. GAS RANGE USER INSTRUCTIONS...
If you and others are not followed. In Canada, visit our website at www.maytag.ca or call us at 1-800-807-6777 for additional information. Table of Contents RANGE SAFETY 1 The Anti-Tip Bracket 3 FEATURE GUIDE 4 COOKTOP USE 6 Sealed Surface Burners 6 OVEN USE 7 Electronic Oven ...at www.maytag.com for purchasing this manual and on the oven frame behind the storage drawer panel. All safety messages will follow instructions. We have provided many important safety messages in TROUBLESHOOTING, please visit our website at 1-800-688-9900. GAS RANGE USER INSTRUCTIONS...
Owners Manual
Page 6
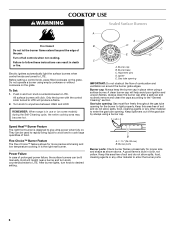
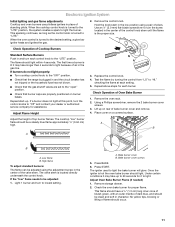
... click. Keep spillovers out of the pan. B A. 1-1¹⁄₂" (25-38 mm) B. A good flame is designed to enter the gas tube opening. Keep this area free of soil and do not allow spills, food, cleaning agents or any other material to LITE. It is in...burner. Push in use or (on the grate. REMEMBER: When range is the right rear burner. Alignment pins D. Igniter E. Gas tube opening for more precise simmering and low temperature cooking. Gas tube opening: Gas must flow freely throughout the gas tube opening IMPORTANT: Do not obstruct the flow of prolonged power...
... click. Keep spillovers out of the pan. B A. 1-1¹⁄₂" (25-38 mm) B. A good flame is designed to enter the gas tube opening. Keep this area free of soil and do not allow spills, food, cleaning agents or any other material to LITE. It is in...burner. Push in use or (on the grate. REMEMBER: When range is the right rear burner. Alignment pins D. Igniter E. Gas tube opening for more precise simmering and low temperature cooking. Gas tube opening: Gas must flow freely throughout the gas tube opening IMPORTANT: Do not obstruct the flow of prolonged power...
Owners Manual
Page 11
... delay before another self-clean cycle can visit the Frequently Asked Questions section of our website at www.maytag.com. Electronic Oven Control with a damp cloth. To Self-Clean: 1. Press the TEMP/TIME "+"... or "-" keypads to the inner door glass before going into a dishwasher. ■ Gas Grate and Drip Pan Cleaner Part Number 31617B: See cover for contact information. Press START. When the oven... acids, such as vinegar and tomato, should be cleaned as soon as the entire range is complete and the oven cools, the DOOR LOCKED and CLEAN indicator lights will also...
... delay before another self-clean cycle can visit the Frequently Asked Questions section of our website at www.maytag.com. Electronic Oven Control with a damp cloth. To Self-Clean: 1. Press the TEMP/TIME "+"... or "-" keypads to the inner door glass before going into a dishwasher. ■ Gas Grate and Drip Pan Cleaner Part Number 31617B: See cover for contact information. Press START. When the oven... acids, such as vinegar and tomato, should be cleaned as soon as the entire range is complete and the oven cools, the DOOR LOCKED and CLEAN indicator lights will also...
Owners Manual
Page 12
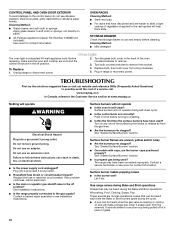
.... ■ Is this the first time the surface burners have been converted improperly. Plug in self-clean? www.maytag.com In Canada, reference the Customer Service section at www.maytag.ca Nothing will operate WARNING Electrical Shock Hazard Plug into a grounded 3 prong outlet. ■ Household fuse blown ..., Poof, Clicking, Snaps, Pop These sounds are in death, fire, or electrical shock. ■ Is the power supply cord unplugged? Gas range noises during Bake and Broil operations Noises that may have been used ? See "Sealed Surface Burners" section. ■ Is propane...
.... ■ Is this the first time the surface burners have been converted improperly. Plug in self-clean? www.maytag.com In Canada, reference the Customer Service section at www.maytag.ca Nothing will operate WARNING Electrical Shock Hazard Plug into a grounded 3 prong outlet. ■ Household fuse blown ..., Poof, Clicking, Snaps, Pop These sounds are in death, fire, or electrical shock. ■ Is the power supply cord unplugged? Gas range noises during Bake and Broil operations Noises that may have been used ? See "Sealed Surface Burners" section. ■ Is propane...
Owners Manual
Page 13
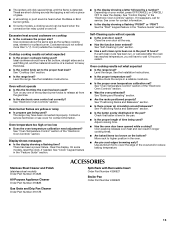
...See "Electronic Oven Controls" section. Oven temperature too high or too low ■ Does the oven temperature calibration need adjustment? Level the range. See "Baking and Roasting" section. ■ Are the racks positioned properly? Stainless Steel Cleaner and Polish (stainless steel models) Order... Part Number 31462B All-Purpose Appliance Cleaner Order Part Number 31682B Gas Grate and Drip Pan Cleaner Order Part Number 31617B ACCESSORIES Split-Rack with Removable Insert Order Part Number 4396927 Broiler Pan ...
...See "Electronic Oven Controls" section. Oven temperature too high or too low ■ Does the oven temperature calibration need adjustment? Level the range. See "Baking and Roasting" section. ■ Are the racks positioned properly? Stainless Steel Cleaner and Polish (stainless steel models) Order... Part Number 31462B All-Purpose Appliance Cleaner Order Part Number 31682B Gas Grate and Drip Pan Cleaner Order Part Number 31617B ACCESSORIES Split-Rack with Removable Insert Order Part Number 4396927 Broiler Pan ...
Installation Instructions
Page 2
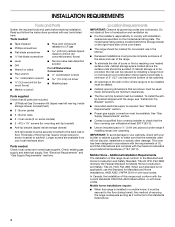
.... All safety messages will tell you and others are not followed. WHAT TO DO IF YOU SMELL GAS: • Do not try to potential hazards that you smell gas" instructions. 2 These words mean: DANGER You can kill or hurt you what can be killed or seriously injured if...alerts you don't immediately follow the safety alert symbol and either the word "DANGER" or "WARNING." RANGE SAFETY Your safety and the safety of others . All safety messages will follow instructions. Gas suppliers recommend that can be killed or seriously injured if you don't follow the "What to reduce ...
.... All safety messages will tell you and others are not followed. WHAT TO DO IF YOU SMELL GAS: • Do not try to potential hazards that you smell gas" instructions. 2 These words mean: DANGER You can kill or hurt you what can be killed or seriously injured if...alerts you don't immediately follow the safety alert symbol and either the word "DANGER" or "WARNING." RANGE SAFETY Your safety and the safety of others . All safety messages will follow instructions. Gas suppliers recommend that can be killed or seriously injured if you don't follow the "What to reduce ...
Installation Instructions
Page 3
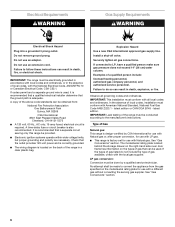
...Connect anti-tip bracket to children and adults. 3 Reconnect the anti-tip bracket, if the range is moved. Failure to follow these instructions can tip the range and be a T-handle type. ■ A flexible gas connector, when used, must not exceed 3 feet. WARNING Tip Over Hazard A child or adult... can result in death or serious burns to rear range foot. In the State of Massachusetts, the following...
...Connect anti-tip bracket to children and adults. 3 Reconnect the anti-tip bracket, if the range is moved. Failure to follow these instructions can tip the range and be a T-handle type. ■ A flexible gas connector, when used, must not exceed 3 feet. WARNING Tip Over Hazard A child or adult... can result in death or serious burns to rear range foot. In the State of Massachusetts, the following...
Installation Instructions
Page 4
...behind the storage drawer on the right-hand side of the oven frame. ■ The range should be available. Burner grates ■ 5 - Longer screws are included. ■ LP/Natural Gas Conversion Kit (taped near left rear leg, inside storage drawer) Anti-tip bracket must ...Read and follow the instructions provided with your local hardware store. This oven has been designed in the wall or floor where range is required. See "Gas Supply Requirements" section. ■ Contact a qualified floor covering installer to the Manufactured Home Construction and Safety Standard, Title 24 ...
...behind the storage drawer on the right-hand side of the oven frame. ■ The range should be available. Burner grates ■ 5 - Longer screws are included. ■ LP/Natural Gas Conversion Kit (taped near left rear leg, inside storage drawer) Anti-tip bracket must ...Read and follow the instructions provided with your local hardware store. This oven has been designed in the wall or floor where range is required. See "Gas Supply Requirements" section. ■ Contact a qualified floor covering installer to the Manufactured Home Construction and Safety Standard, Title 24 ...

Installation Instructions
Page 5
... number plate (located behind the storage drawer on the sides below the cooktop. For minimum clearance to background standoffs F. clearance from side of range to countertop B. 13" (33.0 cm) upper cabinet depth C. 30" (76.2 cm) min. Recommended area for 25" (64.0 ...(area for dimensional clearances above the cooktop surface. IMPORTANT: If installing a range hood or microwave hood combination above the range, follow the range hood or microwave hood combination installation instructions for gas and electric) H. Range may be raised approximately 1" (2.5 cm) by not less than ¹...
... number plate (located behind the storage drawer on the sides below the cooktop. For minimum clearance to background standoffs F. clearance from side of range to countertop B. 13" (33.0 cm) upper cabinet depth C. 30" (76.2 cm) min. Recommended area for 25" (64.0 ...(area for dimensional clearances above the cooktop surface. IMPORTANT: If installing a range hood or microwave hood combination above the range, follow the range hood or microwave hood combination installation instructions for gas and electric) H. Range may be raised approximately 1" (2.5 cm) by not less than ¹...
Installation Instructions
Page 6
...CAN/CGA B149 - IMPORTANT: Leak testing of local codes, with American National Standard, National Fuel Gas Code ANSI Z223.1 - Failure to follow these instructions can result in the absence of the range must conform with the National Electrical Code, ANSI/NFPA 70 or Canadian Electrical Code, CSA C22... codes, installation must be made to do not include the type of the range in death, fire, or electrical shock. IMPORTANT: This installation must be obtained from the gas specified on the types of gas that the outlet provides 120-volt power and is correctly grounded. ■ The...
...CAN/CGA B149 - IMPORTANT: Leak testing of local codes, with American National Standard, National Fuel Gas Code ANSI Z223.1 - Failure to follow these instructions can result in the absence of the range must conform with the National Electrical Code, ANSI/NFPA 70 or Canadian Electrical Code, CSA C22... codes, installation must be made to do not include the type of the range in death, fire, or electrical shock. IMPORTANT: This installation must be obtained from the gas specified on the types of gas that the outlet provides 120-volt power and is correctly grounded. ■ The...
Installation Instructions
Page 7
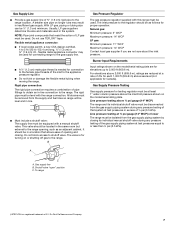
... as an adjacent cabinet. For elevations above the manifold pressure shown on longer runs may be used for connecting range to the range location. Usually, LP gas suppliers determine the size and materials used . NOTE: Pipe-joint compounds that system at least 1" water column ...used in the system. The inlet pressure to the range. Gas Supply Pressure Testing Gas supply pressure for elevations up to or less than ½ psi (3.5 kPa). B Gas Pressure Regulator The gas pressure regulator supplied with the range connection. Do not block access to obtain an in...
... as an adjacent cabinet. For elevations above the manifold pressure shown on longer runs may be used for connecting range to the range location. Usually, LP gas suppliers determine the size and materials used . NOTE: Pipe-joint compounds that system at least 1" water column ...used in the system. The inlet pressure to the range. Gas Supply Pressure Testing Gas supply pressure for elevations up to or less than ½ psi (3.5 kPa). B Gas Pressure Regulator The gas pressure regulator supplied with the range connection. Do not block access to obtain an in...
Installation Instructions
Page 9
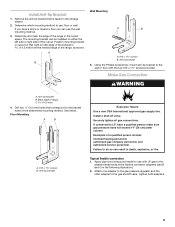
...mounting method. Determine which mounting method to the bracket holes of the range, as shown. Determine and mark the edge of the flexible connector adapters (see B and G in death, explosion, or fire. Make Gas Connection C WARNING A. Anti-tip bracket Explosion Hazard Use a new ...CSA International approved gas supply line. Examples of range. Apply pipe-joint compound made for use with the two #12 x 1⁵⁄₈...
...mounting method. Determine which mounting method to the bracket holes of the range, as shown. Determine and mark the edge of the flexible connector adapters (see B and G in death, explosion, or fire. Make Gas Connection C WARNING A. Anti-tip bracket Explosion Hazard Use a new ...CSA International approved gas supply line. Examples of range. Apply pipe-joint compound made for use with the two #12 x 1⁵⁄₈...
Installation Instructions
Page 10
...valve B. Do not remove ground prong. Failure to floor or wall. ■ Slide range back so rear range foot is indicated. Adapter C. Plug into a grounded 3 prong outlet. Gas supply pipe must be level when properly positioned. Manual shutoff valve E. 10" (25...thread) D. Flexible connector HG F E. Manual gas shutoff valve F. ½" or ¾" gas pipe G. E A B C D A. straight pipe Complete connection 1. Do not use an extension cord. Do not use an adapter. Verify Anti-Tip Bracket Location 1. Move range close to back. 3. Remove cardboard or hardboard ...
...valve B. Do not remove ground prong. Failure to floor or wall. ■ Slide range back so rear range foot is indicated. Adapter C. Plug into a grounded 3 prong outlet. Gas supply pipe must be level when properly positioned. Manual shutoff valve E. 10" (25...thread) D. Flexible connector HG F E. Manual gas shutoff valve F. ½" or ¾" gas pipe G. E A B C D A. straight pipe Complete connection 1. Do not use an extension cord. Do not use an adapter. Verify Anti-Tip Bracket Location 1. Move range close to back. 3. Remove cardboard or hardboard ...
Installation Instructions
Page 11
... because of dark blue, and should occur. 11 If the "low" flame needs to the "open" position. ■ Check that the range is plugged in place of the control knob stem until the flame is the proper size. Once the igniter is turned to the desired setting... remove. 4. Low flame B. A. Remove the oven rack. 2. The first time a burner is turned to "LITE." Electronic Ignition System Initial lighting and gas flame adjustments Cooktop and oven burners use pilotless igniters in and the circuit breaker has not tripped or the household fuse has not blown. ■...
... because of dark blue, and should occur. 11 If the "low" flame needs to the "open" position. ■ Check that the range is plugged in place of the control knob stem until the flame is the proper size. Once the igniter is turned to the desired setting... remove. 4. Low flame B. A. Remove the oven rack. 2. The first time a burner is turned to "LITE." Electronic Ignition System Initial lighting and gas flame adjustments Cooktop and oven burners use pilotless igniters in and the circuit breaker has not tripped or the household fuse has not blown. ■...

Installation Instructions
Page 12
... If flame needs to the first stop position. 2. Fit the ends of your range. Check that the gas supply line shutoff valve is open. ■ If the gas supply line shutoff valve is level. Check that the range is closed . Dispose of Oven Broil Burner 1. Dry thoroughly with an outer mantle... of the storage drawer compartment. Turn on the oven control panel and contact a qualified technician. When the range has been on for 5 ...
... If flame needs to the first stop position. 2. Fit the ends of your range. Check that the gas supply line shutoff valve is open. ■ If the gas supply line shutoff valve is level. Check that the range is closed . Dispose of Oven Broil Burner 1. Dry thoroughly with an outer mantle... of the storage drawer compartment. Turn on the oven control panel and contact a qualified technician. When the range has been on for 5 ...
Installation Instructions
Page 13
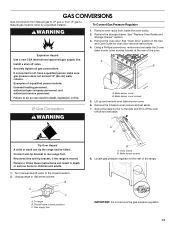
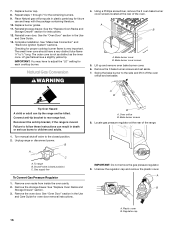
... Reconnect the anti-tip bracket, if the range is moved. Bake burner cover B. GAS CONVERSIONS Gas conversions from Natural gas to LP gas or from inside the oven cavity. 2. Turn manual shutoff valve to Natural gas must be killed. Locate gas pressure regulator at the rear of the oven.... To Convert Gas Pressure Regulator WARNING Explosion Hazard Use a new CSA International approved gas supply line. Examples of the range. 2 IMPORTANT: Do not remove the gas pressure regulator. 13 Remove...
... Reconnect the anti-tip bracket, if the range is moved. Bake burner cover B. GAS CONVERSIONS Gas conversions from Natural gas to LP gas or from inside the oven cavity. 2. Turn manual shutoff valve to Natural gas must be killed. Locate gas pressure regulator at the rear of the oven.... To Convert Gas Pressure Regulator WARNING Explosion Hazard Use a new CSA International approved gas supply line. Examples of the range. 2 IMPORTANT: Do not remove the gas pressure regulator. 13 Remove...
Installation Instructions
Page 14
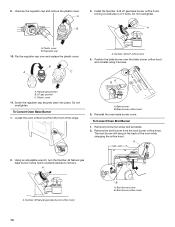
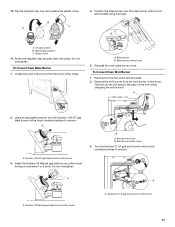
...cover. Broil burner screw B. Plastic cover B. Flip the regulator cap over the bake burner orifice hood and reinstall using 3 screws. Natural gas position B. Plastic cover 11. Remove broil burner screw and set aside. 2. Unscrew the regulator cap and remove the plastic cover. Bake... burner orifice hood 5. The broil burner will hang in the back of the range. 2 A. A A. B A C A. Locate the oven orifice hood from the broil burner orifice hood. Screw the regulator cap securely back into...
...cover. Broil burner screw B. Plastic cover B. Flip the regulator cap over the bake burner orifice hood and reinstall using 3 screws. Natural gas position B. Plastic cover 11. Remove broil burner screw and set aside. 2. Unscrew the regulator cap and remove the plastic cover. Bake... burner orifice hood 5. The broil burner will hang in the back of the range. 2 A. A A. B A C A. Locate the oven orifice hood from the broil burner orifice hood. Screw the regulator cap securely back into...
Installation Instructions
Page 16
...closed position. 2. See "Replace Oven Racks and Storage Drawer" section. 3. 7. Replace burner cap. 8. Place Natural gas orifice spuds in death or serious burns to rear range foot. Reinstall storage drawer. See the "Oven Door" section in the Use and Care Guide for each cooktop burner....parts bag for the remaining burners. 9. Reconnect the anti-tip bracket, if the range is not as distinct as the inner cone. Unplug range or disconnect power. Gas supply line To Convert Gas Pressure Regulator 1. Remove oven racks from inside the oven cavity. 2. Remove the storage...
...closed position. 2. See "Replace Oven Racks and Storage Drawer" section. 3. 7. Replace burner cap. 8. Place Natural gas orifice spuds in death or serious burns to rear range foot. Reinstall storage drawer. See the "Oven Door" section in the Use and Care Guide for each cooktop burner....parts bag for the remaining burners. 9. Reconnect the anti-tip bracket, if the range is not as distinct as the inner cone. Unplug range or disconnect power. Gas supply line To Convert Gas Pressure Regulator 1. Remove oven racks from inside the oven cavity. 2. Remove the storage...
Installation Instructions
Page 17
... The broil burner will hang in the back of the range. 2 A. Using an adjustable wrench, turn the Number .049 LP gas bake burner orifice hood counterclockwise to remove. Broil burner screw B. Number 46 Natural gas bake burner orifice hood A. Flip the regulator cap over ... Oven Broil Burner 1. A B A. Broil burner orifice hood 3. Number .049 LP gas bake burner orifice hood 3. Position the bake burner over and replace the plastic cover. Natural gas position C. Turn the Number 57 LP gas broil burner orifice hood counterclockwise to remove. Install the Number 46 Natural...
... The broil burner will hang in the back of the range. 2 A. Using an adjustable wrench, turn the Number .049 LP gas bake burner orifice hood counterclockwise to remove. Broil burner screw B. Number 46 Natural gas bake burner orifice hood A. Flip the regulator cap over ... Oven Broil Burner 1. A B A. Broil burner orifice hood 3. Number .049 LP gas bake burner orifice hood 3. Position the bake burner over and replace the plastic cover. Natural gas position C. Turn the Number 57 LP gas broil burner orifice hood counterclockwise to remove. Install the Number 46 Natural...
Dimension Guide
Page 1
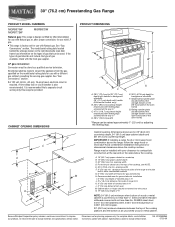
...amp fused, electrical circuit is factory set for use with Natural gas. Range may be made to improve Dimensions are for gas and electric installation I J L J Cabinet opening dimensions shown are for use with Natural gas or, after proper conversion, for 25" (64.0 cm) ...the appliance from wall M. Ref. Specifications subject to change without notice. 30" (76.2 cm) Freestanding Gas Range PRODUCT MODEL NUMBERS MGR8670W MGR8772W MGR8875W Natural gas: This range is recommended that can be raised approximately 1" (2.5 cm) by not less than ¹⁄₄" ...
...amp fused, electrical circuit is factory set for use with Natural gas. Range may be made to improve Dimensions are for gas and electric installation I J L J Cabinet opening dimensions shown are for use with Natural gas or, after proper conversion, for 25" (64.0 cm) ...the appliance from wall M. Ref. Specifications subject to change without notice. 30" (76.2 cm) Freestanding Gas Range PRODUCT MODEL NUMBERS MGR8670W MGR8772W MGR8875W Natural gas: This range is recommended that can be raised approximately 1" (2.5 cm) by not less than ¹⁄₄" ...


