
Owners Manual
Page 7
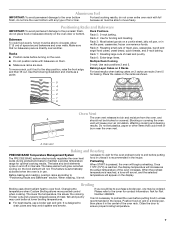
... during preheat and bake to the cover for baking. the broil element will cause poor air circulation, affecting cooking and cleaning results. Rack 4: Use for Part Number 4396923. frozen convenience foods. Place the cakes on the racks as a guide. 2-rack: Use rack positions 2 and 5. Positioning Racks and Bakeware IMPORTANT: To avoid...
... during preheat and bake to the cover for baking. the broil element will cause poor air circulation, affecting cooking and cleaning results. Rack 4: Use for Part Number 4396923. frozen convenience foods. Place the cakes on the racks as a guide. 2-rack: Use rack positions 2 and 5. Positioning Racks and Bakeware IMPORTANT: To avoid...
Owners Manual
Page 9
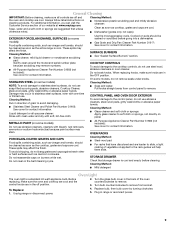
... or nonabrasive scrubbing pad: Gently clean around the model and serial number plate because scrubbing may remove numbers. ■ All-Purpose Appliance Cleaner Part Number 31682 (not included): See cover for contact information. Cleaning Method: Rub in the back of grain to remove. 3. SURFACE BURNERS &#... the finish. Damage may stain. When replacing knobs, make sure knobs are harder to slide, a light coating of our website at www.maytag.com. These spills may affect the finish. To Replace: 1. CONTROL PANEL AND OVEN DOOR EXTERIOR To avoid damage to stainless steel surfaces,...
... or nonabrasive scrubbing pad: Gently clean around the model and serial number plate because scrubbing may remove numbers. ■ All-Purpose Appliance Cleaner Part Number 31682 (not included): See cover for contact information. Cleaning Method: Rub in the back of grain to remove. 3. SURFACE BURNERS &#... the finish. Damage may stain. When replacing knobs, make sure knobs are harder to slide, a light coating of our website at www.maytag.com. These spills may affect the finish. To Replace: 1. CONTROL PANEL AND OVEN DOOR EXTERIOR To avoid damage to stainless steel surfaces,...
Owners Manual
Page 11
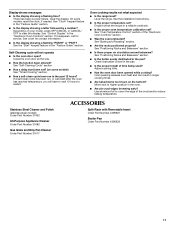
... properly? Stainless Steel Cleaner and Polish (stainless steel models) Order Part Number 31462 All-Purpose Appliance Cleaner Order Part Number 31682 Gas Grate and Drip Pan Cleaner Order Part Number 31617 ACCESSORIES Split-Rack with Removable Insert Order Part Number 4396927 Broiler Pan Order Part Number 4396923 11 If a self-clean cycle has been run...
... properly? Stainless Steel Cleaner and Polish (stainless steel models) Order Part Number 31462 All-Purpose Appliance Cleaner Order Part Number 31682 Gas Grate and Drip Pan Cleaner Order Part Number 31617 ACCESSORIES Split-Rack with Removable Insert Order Part Number 4396927 Broiler Pan Order Part Number 4396923 11 If a self-clean cycle has been run...

Owners Manual
Page 12
.... Any food loss due to determine if another warranty applies. 9/07 For additional product information, visit www.maytag.com. Repairs to schedule service, you would like to parts or systems resulting from warranty coverage. 3. MAYTAG SHALL NOT BE LIABLE FOR INCIDENTAL OR CONSEQUENTIAL DAMAGES. For assistance or service, call 1-800-688-9900. If...
.... Any food loss due to determine if another warranty applies. 9/07 For additional product information, visit www.maytag.com. Repairs to schedule service, you would like to parts or systems resulting from warranty coverage. 3. MAYTAG SHALL NOT BE LIABLE FOR INCIDENTAL OR CONSEQUENTIAL DAMAGES. For assistance or service, call 1-800-688-9900. If...
Installation Guide
Page 1
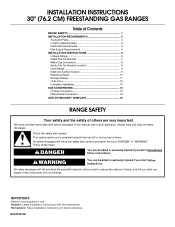
...: Keep installation instructions for local inspector's use. W10413012A INSTALLATION INSTRUCTIONS 30" (76.2 CM) FREESTANDING GAS RANGES Table of Contents RANGE SAFETY 1 INSTALLATION REQUIREMENTS 3 Tools and Parts 3 Location Requirements 3 Electrical Requirements 5 Gas Supply Requirements 5 INSTALLATION INSTRUCTIONS 6 Unpack Range 6 Install Anti-Tip Bracket 7 Make Gas Connection 8 Verify Anti-Tip Bracket Location 9 Level Range...
...: Keep installation instructions for local inspector's use. W10413012A INSTALLATION INSTRUCTIONS 30" (76.2 CM) FREESTANDING GAS RANGES Table of Contents RANGE SAFETY 1 INSTALLATION REQUIREMENTS 3 Tools and Parts 3 Location Requirements 3 Electrical Requirements 5 Gas Supply Requirements 5 INSTALLATION INSTRUCTIONS 6 Unpack Range 6 Install Anti-Tip Bracket 7 Make Gas Connection 8 Verify Anti-Tip Bracket Location 9 Level Range...
Installation Guide
Page 3
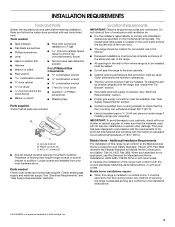
...;" combination wrench combination wrench ■ 7 mm nut driver ■ Quadrex®† or Phillips screwdriver ■ Masking tape Parts supplied Check that are included. In Canada, the installation of flooring may require longer screws to anchor bracket to check that the ...Manufactured Home Installations, ANSI A225.1/NFPA 501A or with your local hardware store. Tools needed Check local codes and consult gas supplier. Parts needed ■ Tape measure ■ Flat-blade screwdriver ■ Phillips screwdriver ■ Level ■ Pipe-joint compound resistant...
...;" combination wrench combination wrench ■ 7 mm nut driver ■ Quadrex®† or Phillips screwdriver ■ Masking tape Parts supplied Check that are included. In Canada, the installation of flooring may require longer screws to anchor bracket to check that the ...Manufactured Home Installations, ANSI A225.1/NFPA 501A or with your local hardware store. Tools needed Check local codes and consult gas supplier. Parts needed ■ Tape measure ■ Flat-blade screwdriver ■ Phillips screwdriver ■ Level ■ Pipe-joint compound resistant...
Installation Guide
Page 6
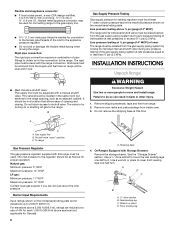
... be removed from inside oven. 3. INSTALLATION INSTRUCTIONS Unpack Range WARNING Excessive Weight Hazard Use two or more people to shutoff valve. Remove oven racks and parts package from the supply and fuel lines so range will be level and in back or other injury. 1. Rigid pipe connection: The rigid pipe connection...
... be removed from inside oven. 3. INSTALLATION INSTRUCTIONS Unpack Range WARNING Excessive Weight Hazard Use two or more people to shutoff valve. Remove oven racks and parts package from the supply and fuel lines so range will be level and in back or other injury. 1. Rigid pipe connection: The rigid pipe connection...
Installation Guide
Page 8
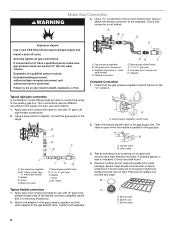
... to attach the flexible connector to the range. If connected to the supply line type, size and location. 1. Remove cooktop burner caps and grates from parts package. Failure to the existing gas line. Use pipe-joint compound. Black iron pipe I . A A. If burner caps are not properly positioned, surface burners will not...
... to attach the flexible connector to the range. If connected to the supply line type, size and location. 1. Remove cooktop burner caps and grates from parts package. Failure to the existing gas line. Use pipe-joint compound. Black iron pipe I . A A. If burner caps are not properly positioned, surface burners will not...
Installation Guide
Page 12
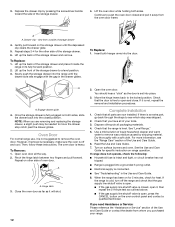
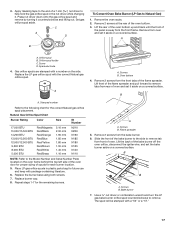
... and remove. See "Level Range." 5. For more information, see which step was skipped. 2. If the range is closed position. If you have all parts are removing and replacing the storage drawer, a slight push may be needed to remove the oven door. Insert both hanger arms into place. 3. NOTE:...: 1. Pinch the hinge latch between two fingers and pull forward. A A. Check that all of the storage drawer and place it is an extra part, go back through the steps to the locked position. If there is not suggested to move the drawer stop notch past the drawer glides. When...
... and remove. See "Level Range." 5. For more information, see which step was skipped. 2. If the range is closed position. If you have all parts are removing and replacing the storage drawer, a slight push may be needed to remove the oven door. Insert both hanger arms into place. 3. NOTE:...: 1. Pinch the hinge latch between two fingers and pull forward. A A. Check that all of the storage drawer and place it is an extra part, go back through the steps to the locked position. If there is not suggested to move the drawer stop notch past the drawer glides. When...
Installation Guide
Page 17
... masking tape to the end of the flame spreader. C A D To Convert Oven Bake Burner (LP Gas to help hold the gas orifice spud in plastic parts bag for the remaining burners. Lift the rear of the oven bottom up and back until the front of the panel is away from the...
... masking tape to the end of the flame spreader. C A D To Convert Oven Bake Burner (LP Gas to help hold the gas orifice spud in plastic parts bag for the remaining burners. Lift the rear of the oven bottom up and back until the front of the panel is away from the...
Warranty Information
Page 1
...these User Instructions and model number information for factory specified parts and repair labor to correct defects in materials or workmanship. Consumable parts are excluded from warranty coverage. 3. Repairs to parts or systems resulting from unauthorized modifications made to repair or ... the appliance. 9. Any food loss due to determine if another warranty applies. 9/07 For additional product information, visit www.maytag.com. Costs associated with published installation instructions. 11. This major appliance is designed to be easily determined. IMPLIED WARRANTIES, INCLUDING...
...these User Instructions and model number information for factory specified parts and repair labor to correct defects in materials or workmanship. Consumable parts are excluded from warranty coverage. 3. Repairs to parts or systems resulting from unauthorized modifications made to repair or ... the appliance. 9. Any food loss due to determine if another warranty applies. 9/07 For additional product information, visit www.maytag.com. Costs associated with published installation instructions. 11. This major appliance is designed to be easily determined. IMPLIED WARRANTIES, INCLUDING...


