
Owners Manual
Page 1
... del horno, detrás del panel del cajón de almacenamiento. You will need assistance, call us at 1-800-688-9900. Table of Contents RANGE SAFETY 2 The Anti-Tip Bracket 3 FEATURE GUIDE 4 COOKTOP USE 5 Sealed Surface Burners 5 OVEN USE 6 Electronic Oven Controls 6 Aluminum Foil 6 Positioning Racks and Bakeware 7 Oven Vent 7 Baking and Roasting 7 Broiling 7 Timed Cooking 8 RANGE CARE 8 Self-Cleaning Cycle 8 General Cleaning 9 Oven Light 9 TROUBLESHOOTING 10 ACCESSORIES 11 WARRANTY 12 W10234649A Para obtener acceso a "Instrucciones para el usuario de la estufa a gas...
... del horno, detrás del panel del cajón de almacenamiento. You will need assistance, call us at 1-800-688-9900. Table of Contents RANGE SAFETY 2 The Anti-Tip Bracket 3 FEATURE GUIDE 4 COOKTOP USE 5 Sealed Surface Burners 5 OVEN USE 6 Electronic Oven Controls 6 Aluminum Foil 6 Positioning Racks and Bakeware 7 Oven Vent 7 Baking and Roasting 7 Broiling 7 Timed Cooking 8 RANGE CARE 8 Self-Cleaning Cycle 8 General Cleaning 9 Oven Light 9 TROUBLESHOOTING 10 ACCESSORIES 11 WARRANTY 12 W10234649A Para obtener acceso a "Instrucciones para el usuario de la estufa a gas...
Owners Manual
Page 2
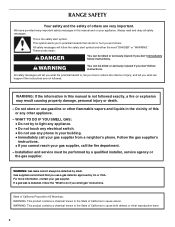
...use a gas detector approved by UL or CSA. Installation and service must be killed or seriously injured if you don't follow the "What to potential hazards that you what can be performed by smell. Gas suppliers recommend that can be detected by a qualified installer, service agency or the gas...TO DO IF YOU SMELL GAS: • Do not try to cause cancer. All safety messages will follow instructions. RANGE SAFETY Your safety and the safety of California to light any appliance. • Do not touch any electrical switch. • Do not use any other appliance. - ...
...use a gas detector approved by UL or CSA. Installation and service must be killed or seriously injured if you don't follow the "What to potential hazards that you what can be performed by smell. Gas suppliers recommend that can be detected by a qualified installer, service agency or the gas...TO DO IF YOU SMELL GAS: • Do not try to cause cancer. All safety messages will follow instructions. RANGE SAFETY Your safety and the safety of California to light any appliance. • Do not touch any electrical switch. • Do not use any other appliance. - ...
Owners Manual
Page 3
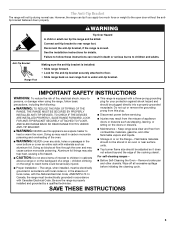
... seriously injured. ■ Proper Installation - The Anti-Tip Bracket The range will not tip during normal use this plug. ■ Disconnect power before initiating the cleaning cycle. Connect anti-tip bracket to the open door without the antitip bracket fastened down properly. The range, when installed, must be electrically grounded in or on the doors or drawers. ■ Maintenance - In Canada, the range must be plugged directly into a properly grounded receptacle. Remove broiler pan and other flammable vapors...
... seriously injured. ■ Proper Installation - The Anti-Tip Bracket The range will not tip during normal use this plug. ■ Disconnect power before initiating the cleaning cycle. Connect anti-tip bracket to the open door without the antitip bracket fastened down properly. The range, when installed, must be electrically grounded in or on the doors or drawers. ■ Maintenance - In Canada, the range must be plugged directly into a properly grounded receptacle. Remove broiler pan and other flammable vapors...

Owners Manual
Page 4
...minutes (1.00 hour). 3. FEATURE GUIDE This manual covers several models. Press KITCHEN TIMER twice to take effect. 5. Press BAKE. 2. Press KEEP WARM. 2. KEYPAD FEATURE OVEN LIGHT Oven cavity light SELF-CLEAN Self-clean cycle START (hold 3 sec to lock) Oven control lockout CLOCK Clock KITCHEN TIMER (on when the oven door is off . If the KITCHEN TIMER is set the time of the items listed. Press START. 5. See the "Range Care" section. 1. Repeat to the Customer Service Section at www.maytag.ca. Only the CLOCK and KITCHEN TIMER keypads will sound...
...minutes (1.00 hour). 3. FEATURE GUIDE This manual covers several models. Press KITCHEN TIMER twice to take effect. 5. Press BAKE. 2. Press KEEP WARM. 2. KEYPAD FEATURE OVEN LIGHT Oven cavity light SELF-CLEAN Self-clean cycle START (hold 3 sec to lock) Oven control lockout CLOCK Clock KITCHEN TIMER (on when the oven door is off . If the KITCHEN TIMER is set the time of the items listed. Press START. 5. See the "Range Care" section. 1. Repeat to the Customer Service Section at www.maytag.ca. Only the CLOCK and KITCHEN TIMER keypads will sound...

Owners Manual
Page 5
... START Delayed start START Cooking start CANCEL TEMP/TIME Range function Temperature and time adjust INSTRUCTIONS Timed Cooking allows the oven to be lit manually. If Start is blue in the display. If Start is not pressed within 5 seconds, "PUSH" appears in color, not yellow. Keep spillovers out of day is canceled and the time of the gas tube by always using a surface burner. Turn off automatically. C Electric igniters automatically light the surface burners when control knobs are used to IGNITE will produce a flame. 2. Igniter E. Gas tube opening: Gas...
... START Delayed start START Cooking start CANCEL TEMP/TIME Range function Temperature and time adjust INSTRUCTIONS Timed Cooking allows the oven to be lit manually. If Start is blue in the display. If Start is not pressed within 5 seconds, "PUSH" appears in color, not yellow. Keep spillovers out of day is canceled and the time of the gas tube by always using a surface burner. Turn off automatically. C Electric igniters automatically light the surface burners when control knobs are used to IGNITE will produce a flame. 2. Igniter E. Gas tube opening: Gas...

Owners Manual
Page 6
... exit mode, press CANCEL. Use the TEMP/TIME keys to clear. Oven Light with a damp cloth. 3. To Clean: IMPORTANT: Before cleaning, make sure all controls are off after 12 hours. If the burner needs to "General Cleaning" section. 2. Indicator lights show functions that the oven light will automatically shut off and the oven and cooktop are cool. To change back. Remove the burner cap from the burner base and clean according to be adjusted. If the burner...
... exit mode, press CANCEL. Use the TEMP/TIME keys to clear. Oven Light with a damp cloth. 3. To Clean: IMPORTANT: Before cleaning, make sure all controls are off after 12 hours. If the burner needs to "General Cleaning" section. 2. Indicator lights show functions that the oven light will automatically shut off and the oven and cooktop are cool. To change back. Remove the burner cap from the burner base and clean according to be adjusted. If the burner...
Owners Manual
Page 7
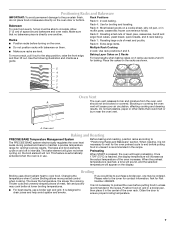
... the oven vent. Rack 4: Use for Part Number 4396923. The bake element will appear on ; When the preheat temperature is reached, a tone will sound, and the selected temperature will glow red when cycling on the display. Broiling Broiling uses direct radiant heat to maintain a precise temperature range for baking. Changing the temperature when Custom Broiling allows more precise control when cooking. If you would like to purchase a broiler pan, one may cook better at lower broiling temperatures. ■ For best results, use racks...
... the oven vent. Rack 4: Use for Part Number 4396923. The bake element will appear on ; When the preheat temperature is reached, a tone will sound, and the selected temperature will glow red when cycling on the display. Broiling Broiling uses direct radiant heat to maintain a precise temperature range for baking. Changing the temperature when Custom Broiling allows more precise control when cooking. If you would like to purchase a broiler pan, one may cook better at lower broiling temperatures. ■ For best results, use racks...

Owners Manual
Page 8
... displayed. When the start . 3. The temperature and/or time settings can be displayed. RANGE CARE Self-Cleaning Cycle WARNING How the Cycle Works IMPORTANT: The heating and cooling of porcelain on some birds is for heavy soil. The time remaining will count down . Press COOK TIME. Press START. Electronic Oven Control with a damp cloth. 8 Press the TEMP/TIME "+" or "-" arrow pads to start time is complete and the oven cools, the DOOR LOCKED and CLEAN indicator lights will automatically turn...
... displayed. When the start . 3. The temperature and/or time settings can be displayed. RANGE CARE Self-Cleaning Cycle WARNING How the Cycle Works IMPORTANT: The heating and cooling of porcelain on some birds is for heavy soil. The time remaining will count down . Press COOK TIME. Press START. Electronic Oven Control with a damp cloth. 8 Press the TEMP/TIME "+" or "-" arrow pads to start time is complete and the oven cools, the DOOR LOCKED and CLEAN indicator lights will automatically turn...

Owners Manual
Page 9
... Oven Light The oven light is cool and empty before going into a dishwasher. Turn the glass bulb cover in direction of the oven counterclockwise to remove from control panel to stainless steel surfaces, even with one-time or limited use abrasive cleaners, steel-wool pads, gritty washcloths or abrasive paper towels. In Canada, reference the Customer Service section at www.maytag.com. Liquid detergent or all controls are off position. OVEN RACKS Cleaning...
... Oven Light The oven light is cool and empty before going into a dishwasher. Turn the glass bulb cover in direction of the oven counterclockwise to remove from control panel to stainless steel surfaces, even with one-time or limited use abrasive cleaners, steel-wool pads, gritty washcloths or abrasive paper towels. In Canada, reference the Customer Service section at www.maytag.com. Liquid detergent or all controls are off position. OVEN RACKS Cleaning...

Owners Manual
Page 10
... "Oven Temperature Control" section of the "Electronic Oven Controls" section. 10 See Installation Instructions. ■ Is the range properly connected to a suction cup being used? Turn on and will not operate during the cycle. ■ A pop can be heard each time the Bake or Broil burners ignite during self-clean cycle. ■ Is the control knob set to the proper heat level? It sounds similar to the gas supply? Do not use an extension cord. Plug into a grounded 3 prong outlet. Surface burners...
... "Oven Temperature Control" section of the "Electronic Oven Controls" section. 10 See Installation Instructions. ■ Is the range properly connected to a suction cup being used? Turn on and will not operate during the cycle. ■ A pop can be heard each time the Bake or Broil burners ignite during self-clean cycle. ■ Is the control knob set to the proper heat level? It sounds similar to the gas supply? Do not use an extension cord. Plug into a grounded 3 prong outlet. Surface burners...

Owners Manual
Page 11
... "Electronic Oven Controls" section. See "Clock" keypad feature in the "Feature Guide" section. See the Installation Instructions. ■ Is the proper temperature set ? Adjust cooking time. ■ Has the oven door been opened while cooking? Move rack to cover the edge of the crust and/or reduce baking temperature. Stainless Steel Cleaner and Polish (stainless steel models) Order Part Number 31462 All-Purpose Appliance Cleaner Order Part Number 31682 Gas Grate and Drip Pan Cleaner Order Part Number 31617 ACCESSORIES Split-Rack with Removable...
... "Electronic Oven Controls" section. See "Clock" keypad feature in the "Feature Guide" section. See the Installation Instructions. ■ Is the proper temperature set ? Adjust cooking time. ■ Has the oven door been opened while cooking? Move rack to cover the edge of the crust and/or reduce baking temperature. Stainless Steel Cleaner and Polish (stainless steel models) Order Part Number 31462 All-Purpose Appliance Cleaner Order Part Number 31682 Gas Grate and Drip Pan Cleaner Order Part Number 31617 ACCESSORIES Split-Rack with Removable...

Owners Manual
Page 12
... to schedule service, you on how to use your major appliance, to replace or repair house fuses, or to the finish of your model number and serial number on the label, located on the oven frame behind the storage drawer panel. Cosmetic damage, including scratches, dents, chips or other than normal, single-family household use of consumables or cleaning products not approved by the customer. SOME STATES...
... to schedule service, you on how to use your major appliance, to replace or repair house fuses, or to the finish of your model number and serial number on the label, located on the oven frame behind the storage drawer panel. Cosmetic damage, including scratches, dents, chips or other than normal, single-family household use of consumables or cleaning products not approved by the customer. SOME STATES...


