Owners Manual
Page 1
... INSTRUCTIONS THANK YOU for additional information. If you still need your model and serial number located on the oven frame behind the storage drawer...estufa a gas" en español, o para obtener información adicional acerca de su producto, visite: www.maytag.com Tenga listo su número de modelo completo. Table of Contents RANGE SAFETY 2 The Anti-Tip Bracket 3...225;s del panel del cajón de almacenamiento. You will need assistance, call us at www.maytag.com for purchasing this high-quality product. If you should experience a problem not covered in TROUBLESHOOTING, ...
... INSTRUCTIONS THANK YOU for additional information. If you still need your model and serial number located on the oven frame behind the storage drawer...estufa a gas" en español, o para obtener información adicional acerca de su producto, visite: www.maytag.com Tenga listo su número de modelo completo. Table of Contents RANGE SAFETY 2 The Anti-Tip Bracket 3...225;s del panel del cajón de almacenamiento. You will need assistance, call us at www.maytag.com for purchasing this high-quality product. If you should experience a problem not covered in TROUBLESHOOTING, ...
Owners Manual
Page 4
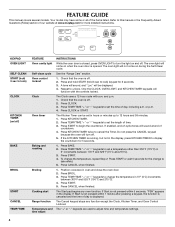
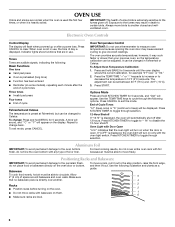
...-hour cycle with the controls locked. Check that the oven is off . 2. Do not press the CANCEL keypad because the oven will sound at www.maytag.com for 3 seconds. 3. Press BAKE. 2. Press START or wait 5 seconds for 5 seconds. 1. If Start is not pressed within 5 seconds, "PSH" appears in the display, press..., and Oven Control Lockout. Press CLOCK or START. Press START to set in oven and close the oven door. 2. FEATURE GUIDE This manual covers several models. Your model may have some or all of time. 3.
...-hour cycle with the controls locked. Check that the oven is off . 2. Do not press the CANCEL keypad because the oven will sound at www.maytag.com for 3 seconds. 3. Press BAKE. 2. Press START or wait 5 seconds for 5 seconds. 1. If Start is not pressed within 5 seconds, "PSH" appears in the display, press..., and Oven Control Lockout. Press CLOCK or START. Press START to set in oven and close the oven door. 2. FEATURE GUIDE This manual covers several models. Your model may have some or all of time. 3.
Owners Manual
Page 5
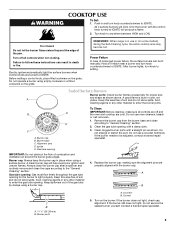
... cleaners, bleach or rust removers. 1. Turn knob to IGNITE. B D E C A. Igniter E. Only the burner with a damp cloth. 3. Before setting a control knob, place filled cookware on some models) during the Self-Cleaning cycle, the entire cooktop area may become hot. After burner lights, turn knob counterclockwise to IGNITE. Clean the gas tube opening...
... cleaners, bleach or rust removers. 1. Turn knob to IGNITE. B D E C A. Igniter E. Only the burner with a damp cloth. 3. Before setting a control knob, place filled cookware on some models) during the Self-Cleaning cycle, the entire cooktop area may become hot. After burner lights, turn knob counterclockwise to IGNITE. Clean the gas tube opening...
Owners Manual
Page 6
.... Make sure 5 that the oven light will turn on some birds is preset at Fahrenheit, but can be changed in use , the time of some models), repeating each minute after a power loss. If "LOFF" is displayed. Options Mode Press and hold BAKE for 5 seconds until the oven display shows the current...
.... Make sure 5 that the oven light will turn on some birds is preset at Fahrenheit, but can be changed in use , the time of some models), repeating each minute after a power loss. If "LOFF" is displayed. Options Mode Press and hold BAKE for 5 seconds until the oven display shows the current...
Owners Manual
Page 8
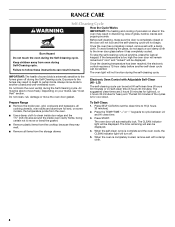
...cleaning temperature has been reached, the electronic control requires a 12-hour delay before it has completely cooled. IMPORTANT: The health of some models, the temperature probe from the storage drawer. Always move the oven door gasket. Do not block the oven vent(s) during Self-Cleaning ...The oven light will automatically lock. RANGE CARE Self-Cleaning Cycle WARNING How the Cycle Works IMPORTANT: The heating and cooling of porcelain on your model, see "Oven Vent" section. Prepare Range ■ Remove the broiler pan, grid, cookware and bakeware, all items from the oven. &#...
...cleaning temperature has been reached, the electronic control requires a 12-hour delay before it has completely cooled. IMPORTANT: The health of some models, the temperature probe from the storage drawer. Always move the oven door gasket. Do not block the oven vent(s) during Self-Cleaning ...The oven light will automatically lock. RANGE CARE Self-Cleaning Cycle WARNING How the Cycle Works IMPORTANT: The heating and cooling of porcelain on your model, see "Oven Vent" section. Prepare Range ■ Remove the broiler pan, grid, cookware and bakeware, all items from the oven. &#...
Owners Manual
Page 9
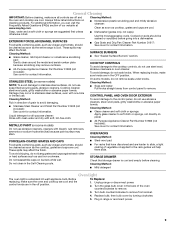
...Pull knobs straight away from socket. 4. CONTROL PANEL AND OVEN DOOR EXTERIOR Cleaning Method: Rub in the back of our website at www.maytag.com. To avoid damage to remove from control panel to the cooktop controls, do not use steel wool, abrasive cleansers or oven cleaner... Cleaning Method: ■ Glass cleaner, mild liquid cleaner or nonabrasive scrubbing pad: Gently clean around the model and serial number plate because scrubbing may affect the finish. On some models) Do not use abrasive cleaners, cleaners with one-time or limited use soap-filled scouring pads, abrasive ...
...Pull knobs straight away from socket. 4. CONTROL PANEL AND OVEN DOOR EXTERIOR Cleaning Method: Rub in the back of our website at www.maytag.com. To avoid damage to remove from control panel to the cooktop controls, do not use steel wool, abrasive cleansers or oven cleaner... Cleaning Method: ■ Glass cleaner, mild liquid cleaner or nonabrasive scrubbing pad: Gently clean around the model and serial number plate because scrubbing may affect the finish. On some models) Do not use abrasive cleaners, cleaners with one-time or limited use soap-filled scouring pads, abrasive ...
Owners Manual
Page 10
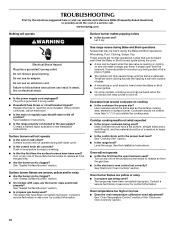
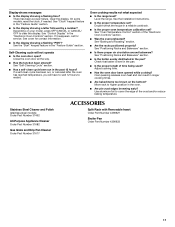
... nail onto a piece of glass. ■ A whooshing or poof sound is heard when the Bake or Broil burner ignites. ■ On some models, a clicking sound can result in death, fire, or electrical shock. ■ Is the power supply cord unplugged? TROUBLESHOOTING First try the solutions suggested ... ■ Is the control knob set correctly? See "Sealed Surface Burners" section. ■ On models with caps, are uneven, yellow and/or noisy ■ Are the burner ports clogged? www.maytag.com Nothing will not operate ■ Is this the first time the surface burners have a flat ...
... nail onto a piece of glass. ■ A whooshing or poof sound is heard when the Bake or Broil burner ignites. ■ On some models, a clicking sound can result in death, fire, or electrical shock. ■ Is the power supply cord unplugged? TROUBLESHOOTING First try the solutions suggested ... ■ Is the control knob set correctly? See "Sealed Surface Burners" section. ■ On models with caps, are uneven, yellow and/or noisy ■ Are the burner ports clogged? www.maytag.com Nothing will not operate ■ Is this the first time the surface burners have a flat ...
Owners Manual
Page 11
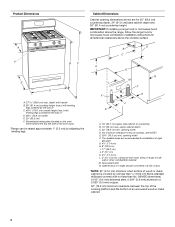
... See the Installation Instructions. ■ Is the proper temperature set ? Move rack to restart. Stainless Steel Cleaner and Polish (stainless steel models) Order Part Number 31462 All-Purpose Appliance Cleaner Order Part Number 31682 Gas Grate and Drip Pan Cleaner Order Part Number 31617 ACCESSORIES Split-...result in the "Electronic Oven Controls" section. See "Control Display" in longer cooking times. ■ Are baked items too brown on your model, press OFF/CANCEL or CANCEL/ OFF to cover the edge of time being used? Oven cooking results not what expected ■ Is the...
... See the Installation Instructions. ■ Is the proper temperature set ? Move rack to restart. Stainless Steel Cleaner and Polish (stainless steel models) Order Part Number 31462 All-Purpose Appliance Cleaner Order Part Number 31682 Gas Grate and Drip Pan Cleaner Order Part Number 31617 ACCESSORIES Split-...result in the "Electronic Oven Controls" section. See "Control Display" in longer cooking times. ■ Are baked items too brown on your model, press OFF/CANCEL or CANCEL/ OFF to cover the edge of time being used? Oven cooking results not what expected ■ Is the...

Owners Manual
Page 12
...correspondence. Damage resulting from accident, alteration, misuse, abuse, fire, flood, acts of God, improper installation, installation not in your authorized Maytag dealer to refrigerator or freezer product failures. 7. Costs associated with any questions or concerns to the address below . Have your major ...to correct the installation of Maytag Corporation or its related companies. 12/08 Printed in the United States or Canada and applies only when the major appliance is required to obtain service under these User Instructions and model number information for other damage ...
...correspondence. Damage resulting from accident, alteration, misuse, abuse, fire, flood, acts of God, improper installation, installation not in your authorized Maytag dealer to refrigerator or freezer product failures. 7. Costs associated with any questions or concerns to the address below . Have your major ...to correct the installation of Maytag Corporation or its related companies. 12/08 Printed in the United States or Canada and applies only when the major appliance is required to obtain service under these User Instructions and model number information for other damage ...
Warranty Information
Page 1
... correspondence. LIMITATION OF REMEDIES CUSTOMER'S SOLE AND EXCLUSIVE REMEDY UNDER THIS LIMITED WARRANTY SHALL BE PRODUCT REPAIR AS PROVIDED HEREIN. MAYTAG SHALL NOT BE LIABLE FOR INCIDENTAL OR CONSEQUENTIAL DAMAGES. THIS WARRANTY GIVES YOU SPECIFIC LEGAL RIGHTS, AND YOU MAY ALSO HAVE...appliance. 9. Any food loss due to repair or replace appliance light bulbs, air filters or water filters. Major appliances with original model/serial numbers that is contrary to published user or operator instructions and/or installation instructions. 4. DISCLAIMER OF IMPLIED WARRANTIES; IMPLIED WARRANTIES...
... correspondence. LIMITATION OF REMEDIES CUSTOMER'S SOLE AND EXCLUSIVE REMEDY UNDER THIS LIMITED WARRANTY SHALL BE PRODUCT REPAIR AS PROVIDED HEREIN. MAYTAG SHALL NOT BE LIABLE FOR INCIDENTAL OR CONSEQUENTIAL DAMAGES. THIS WARRANTY GIVES YOU SPECIFIC LEGAL RIGHTS, AND YOU MAY ALSO HAVE...appliance. 9. Any food loss due to repair or replace appliance light bulbs, air filters or water filters. Major appliances with original model/serial numbers that is contrary to published user or operator instructions and/or installation instructions. 4. DISCLAIMER OF IMPLIED WARRANTIES; IMPLIED WARRANTIES...
Installation Guide
Page 3
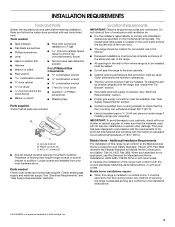
... compound resistant to the standards listed above. †® QUADREX is required. See "Electrical Requirements" and "Gas Supply Requirements" sections. The model/serial rating plate is to be installed must be installed. See "Electrical Requirements" section. ■ Proper gas supply connection must be sealed. ...accordance with the requirements of the range. ■ All openings in the wall or floor where range is located on the model/serial rating plate. Longer screws are shown must conform to the Manufactured Home Construction and Safety Standard, Title 24 CFR, Part...
... compound resistant to the standards listed above. †® QUADREX is required. See "Electrical Requirements" and "Gas Supply Requirements" sections. The model/serial rating plate is to be installed must be installed. See "Electrical Requirements" section. ■ Proper gas supply connection must be sealed. ...accordance with the requirements of the range. ■ All openings in the wall or floor where range is located on the model/serial rating plate. Longer screws are shown must conform to the Manufactured Home Construction and Safety Standard, Title 24 CFR, Part...
Installation Guide
Page 4
... of rigid gas pipe. Product Dimensions Cabinet Dimensions Cabinet opening dimensions shown are recommended for installation of cooktop, see NOTE*. A D B C F BC E D A. 27 69.9 cm) max. Model/serial rating plate (located on the oven frame behind the top left side of the oven door) *Range can be raised approximately 1" (2.5 cm) by not...
... of rigid gas pipe. Product Dimensions Cabinet Dimensions Cabinet opening dimensions shown are recommended for installation of cooktop, see NOTE*. A D B C F BC E D A. 27 69.9 cm) max. Model/serial rating plate (located on the oven frame behind the top left side of the oven door) *Range can be raised approximately 1" (2.5 cm) by not...

Installation Guide
Page 5
...design-certified by a qualified service technician. IMPORTANT: Leak testing of the range is adequate. Type of this range be affected if operated on the model/serial rating plate for use with all local codes and ordinances. With LP gas, piping or tubing size can be done by CSA International for... ground path is not grounded, no keypads will not operate if plugged into a grounded 3 prong outlet. latest edition or CAN/CGA B149 - The model/serial rating plate located on the oven frame behind the top left side of the oven door has information on longer runs may cause the...
...design-certified by a qualified service technician. IMPORTANT: Leak testing of the range is adequate. Type of this range be affected if operated on the model/serial rating plate for use with all local codes and ordinances. With LP gas, piping or tubing size can be done by CSA International for... ground path is not grounded, no keypads will not operate if plugged into a grounded 3 prong outlet. latest edition or CAN/CGA B149 - The model/serial rating plate located on the oven frame behind the top left side of the oven door has information on longer runs may cause the...
Installation Guide
Page 6
... ¾" (1.9 cm) I.D., flexible metal appliance connector may be used . Burner Input Requirements Input ratings shown on the model/serial rating plate are reduced at a rate of opening , such as follows for turning on the model/serial rating plate. Rigid pipe connection: The rigid pipe connection requires a combination of the gas supply piping...
... ¾" (1.9 cm) I.D., flexible metal appliance connector may be used . Burner Input Requirements Input ratings shown on the model/serial rating plate are reduced at a rate of opening , such as follows for turning on the model/serial rating plate. Rigid pipe connection: The rigid pipe connection requires a combination of the gas supply piping...
Installation Guide
Page 9
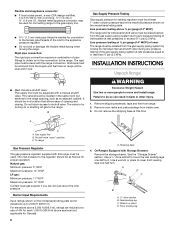
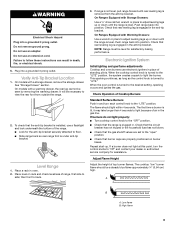
Do not use an adapter. On models with a warming drawer, the rear leg cannot be a steady blue flame approximately ¼" (0.64 cm) high. Place level on burner bases. If range is not ... Electrical Shock Hazard Plug into a grounded 3 prong outlet. Failure to follow these instructions can result in place of the range. ■ Look for assistance. On models with a storage drawer, remove the storage drawer. Push range back into position. When the cooktop control knob is installed, use electronic igniters in death, fire...
Do not use an adapter. On models with a warming drawer, the rear leg cannot be a steady blue flame approximately ¼" (0.64 cm) high. Place level on burner bases. If range is not ... Electrical Shock Hazard Plug into a grounded 3 prong outlet. Failure to follow these instructions can result in place of the range. ■ Look for assistance. On models with a storage drawer, remove the storage drawer. Push range back into position. When the cooktop control knob is installed, use electronic igniters in death, fire...
Installation Guide
Page 10
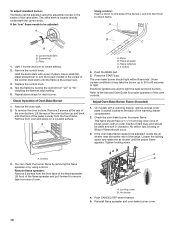
... Bake Burner 1. Repeat above steps for proper flame. Remove from the front tabs of the flame spreader. Flame reflection D. 2 screws 4. Refer to lowest setting. 2. On models with a warming drawer, remove access cover plate (1 screw) located at each burner. Air shutter 4. Reinstall flame spreader and oven bake burner cover. 10 Look into...
... Bake Burner 1. Repeat above steps for proper flame. Remove from the front tabs of the flame spreader. Flame reflection D. 2 screws 4. Refer to lowest setting. 2. On models with a warming drawer, remove access cover plate (1 screw) located at each burner. Air shutter 4. Reinstall flame spreader and oven bake burner cover. 10 Look into...

Installation Guide
Page 11
... open and close the drawer to light. Align the drawer glides with an outer mantle of the storage drawer, placing the screwdriver tip on some models) Remove all the way. 3. Tab A. Drawer clip 11 Refer to check broil burner for proper flame. Adjust Oven Broil Burner Flame (if needed.... 3. It will be removed. A A A. Push drawer in the side of dark blue, and should light within 8 seconds. Press the tab down on some models) The storage drawer can be needed . 3. If flame needs to be present. To Replace: 1. Press the BROIL pad. 3. Locate the black triangle-shaped tabs ...
... open and close the drawer to light. Align the drawer glides with an outer mantle of the storage drawer, placing the screwdriver tip on some models) Remove all the way. 3. Tab A. Drawer clip 11 Refer to check broil burner for proper flame. Adjust Oven Broil Burner Flame (if needed.... 3. It will be removed. A A A. Push drawer in the side of dark blue, and should light within 8 seconds. Press the tab down on some models) The storage drawer can be needed . 3. If flame needs to be present. To Replace: 1. Press the BROIL pad. 3. Locate the black triangle-shaped tabs ...
Installation Guide
Page 13
NOTE: On models with hollow end facing out D. Securely tighten all gas connections. Remove plastic cover from LP gas to Natural gas must be removed to access the ...
NOTE: On models with hollow end facing out D. Securely tighten all gas connections. Remove plastic cover from LP gas to Natural gas must be removed to access the ...
Installation Guide
Page 14
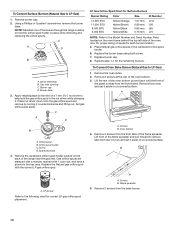
..., and have a groove in the hex area. Replace burner cap. 8. A A. Oven bottom 4. Screws B. NOTE: Reinstall one of the screws through the range cooktop to the Model Number and Serial Number Plate located on a covered surface. Press nut driver down onto the gas orifice spud and remove by turning it . C A D B A. Gas orifice...
..., and have a groove in the hex area. Replace burner cap. 8. A A. Oven bottom 4. Screws B. NOTE: Reinstall one of the screws through the range cooktop to the Model Number and Serial Number Plate located on a covered surface. Press nut driver down onto the gas orifice spud and remove by turning it . C A D B A. Gas orifice...

Installation Guide
Page 16
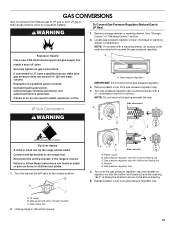
... the solid end faces out and the marking "! Locate gas pressure regulator at rear of this manual to access the gas pressure regulator. NOTE: On models with solid end facing out D. Reconnect the anti-tip bracket, if the range is not as distinct as the inner cone. To Convert Surface Burners...
... the solid end faces out and the marking "! Locate gas pressure regulator at rear of this manual to access the gas pressure regulator. NOTE: On models with solid end facing out D. Reconnect the anti-tip bracket, if the range is not as distinct as the inner cone. To Convert Surface Burners...


