Use and Care Guide
Page 1
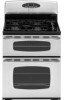
LithLoithUo.SU.A.S.A. A/061//0038 PPaarrtt NNoo.. 88111133PP378047--6600 Care & Cleaning 15-18 Self-Clean Oven Cleaning Procedures Maintenance 19-20 Oven Doors, Windows & Lights Removal of Contents Important Safety Instructions 1-4 Surface Cooking 5-6 Controls Sealed Gas Burners Oven Cooking 7-14 Control Panel Baking Cook & Hold Delay Keep Warm Broiling Oven Racks Form No. Maytag Gas Double Oven Range Precision Touch 750 Series Use & Care Guide Table of Gas Appliance Troubleshooting 21-22 Warranty & Service 23 Guide d'utilisation et d'entretien 24 Guía de uso y cuidado...
LithLoithUo.SU.A.S.A. A/061//0038 PPaarrtt NNoo.. 88111133PP378047--6600 Care & Cleaning 15-18 Self-Clean Oven Cleaning Procedures Maintenance 19-20 Oven Doors, Windows & Lights Removal of Contents Important Safety Instructions 1-4 Surface Cooking 5-6 Controls Sealed Gas Burners Oven Cooking 7-14 Control Panel Baking Cook & Hold Delay Keep Warm Broiling Oven Racks Form No. Maytag Gas Double Oven Range Precision Touch 750 Series Use & Care Guide Table of Gas Appliance Troubleshooting 21-22 Warranty & Service 23 Guide d'utilisation et d'entretien 24 Guía de uso y cuidado...
Use and Care Guide
Page 2
... may occur in your gas supplier, call the fire department. - Install and use any part of Purchase If you cannot reach your system and result in this guide. Installer: Please leave this guide with the manufacturer's instructions. General Instructions To ensure proper and safe operation: Appliance must be properly installed and grounded by a properly installed anti-tip device. 1 Follow the gas supplier's instructions. • If you have...
... may occur in your gas supplier, call the fire department. - Install and use any part of Purchase If you cannot reach your system and result in this guide. Installer: Please leave this guide with the manufacturer's instructions. General Instructions To ensure proper and safe operation: Appliance must be properly installed and grounded by a properly installed anti-tip device. 1 Follow the gas supplier's instructions. • If you have...

Use and Care Guide
Page 3
... to remove smoke and odor. Do not use this anytime the range has been moved. NEVER cover any items on backguard of small children. Many aerosol-type spray cans are vulnerable to the floor when properly engaged. The anti-tip device secures the rear leveling leg to heat. Many plastics are EXPLOSIVE when exposed to the vent or a lighted surface burner. Important Safety Instructions To...
... to remove smoke and odor. Do not use this anytime the range has been moved. NEVER cover any items on backguard of small children. Many aerosol-type spray cans are vulnerable to the floor when properly engaged. The anti-tip device secures the rear leveling leg to heat. Many plastics are EXPLOSIVE when exposed to the vent or a lighted surface burner. Important Safety Instructions To...

Use and Care Guide
Page 4
... glass, glass/ceramic, ceramic or Clean hood frequently to move when especially when using oven Do not let cooking grease or other substitutes should never be moved while hot, use the cooktop or ovens as possible. under the hood, turn the ovens off before attempting to prevent grease from steam. Follow manufacturer's instructions when using dry, sturdy potholders. Other potentially hot surfaces include cooktop, areas facing the cooktop, oven vent, surfaces near the appliance, hood or vent fan. Slide oven racks...
... glass, glass/ceramic, ceramic or Clean hood frequently to move when especially when using oven Do not let cooking grease or other substitutes should never be moved while hot, use the cooktop or ovens as possible. under the hood, turn the ovens off before attempting to prevent grease from steam. Follow manufacturer's instructions when using dry, sturdy potholders. Other potentially hot surfaces include cooktop, areas facing the cooktop, oven vent, surfaces near the appliance, hood or vent fan. Slide oven racks...
Use and Care Guide
Page 5
... time to rub, damage, or move the gasket. Therefore, touching the cooktop during the self-clean cycle. Fumes released due to overheated cooking oil, fat, margarine and overheated non-stick cookware may be minimized by opening the windows and/ or door in or around any other utensils. Self-Cleaning Ovens CAUTION Before self-cleaning the oven, remove the oven racks, broiler pan, food and any part of the appliance. Clean...
... time to rub, damage, or move the gasket. Therefore, touching the cooktop during the self-clean cycle. Fumes released due to overheated cooking oil, fat, margarine and overheated non-stick cookware may be minimized by opening the windows and/ or door in or around any other utensils. Self-Cleaning Ovens CAUTION Before self-cleaning the oven, remove the oven racks, broiler pan, food and any part of the appliance. Clean...
Use and Care Guide
Page 6
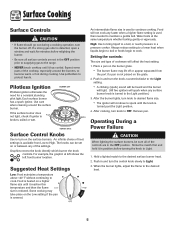
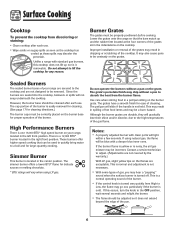
... grate. 2. Remove pan. Surface Cooking Surface Controls CAUTION • If flame should go out during cooking. Use potholders to cook. Use care when cleaning around the burners, to become warm or hot during a cooking operation, turn knob to desired flame size. • The ignitor will continue to spark until the knob is turned past the Light position. 4. The knobs can be set in the OFF position prior to supplying gas to the range. • NEVER touch cooktop until it in and turn knob to...
... grate. 2. Remove pan. Surface Cooking Surface Controls CAUTION • If flame should go out during cooking. Use potholders to cook. Use care when cleaning around the burners, to become warm or hot during a cooking operation, turn knob to desired flame size. • The ignitor will continue to spark until the knob is turned past the Light position. 4. The knobs can be set in the OFF position prior to supplying gas to the range. • NEVER touch cooktop until it in and turn knob to...
Use and Care Guide
Page 7
... gas, you may result in a pot/pan sitting on the cooktop. Use care when stirring food in chipping or scratching of the gas flame. Although the burner grates are acceptable. Contact a service technician to adjust. (Adjustments are not covered by the warranty.) With LP gas, slight yellow tips on the flames are durable, they will slide if the handle is it does not extend beyond the edge of hot...
... gas, you may result in a pot/pan sitting on the cooktop. Use care when stirring food in chipping or scratching of the gas flame. Although the burner grates are acceptable. Contact a service technician to adjust. (Adjustments are not covered by the warranty.) With LP gas, slight yellow tips on the flames are durable, they will slide if the handle is it does not extend beyond the edge of hot...

Use and Care Guide
Page 8
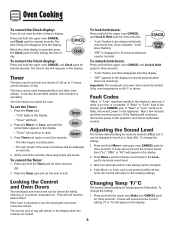
Oven Cooking Control Panel A BC D E F G H I Clock J Oven Light K Less- The display window on the control shows time of -day clock. Bakes for a preset time, then keeps food warm for Bake, Clean, Delay or Cook & Hold. 7 Use to set to keep cooked food warm in programming. Sets HI or LO broil. The clock is showing, press the Clock pad. To change the clock to select 12 or 24 hour. 3. pad to 24-hour format: 1. Press More+ or Less- To recall the...
Oven Cooking Control Panel A BC D E F G H I Clock J Oven Light K Less- The display window on the control shows time of -day clock. Bakes for a preset time, then keeps food warm for Bake, Clean, Delay or Cook & Hold. 7 Use to set to keep cooked food warm in programming. Sets HI or LO broil. The clock is showing, press the Clock pad. To change the clock to select 12 or 24 hour. 3. pad to 24-hour format: 1. Press More+ or Less- To recall the...
Use and Care Guide
Page 9
.... Timer The timer can be set the Timer: 1. The time of day will flash. 2. The timer can be used independently of any other oven activity. Adjusting the Sound Level The factory default setting for three seconds. Locking the Control and Oven Doors The touchpads and oven doors can be locked for safety, cleaning, or to display: Press and hold the upper oven Bake and CANCEL pads for sound is canceled, press the Clock...
.... Timer The timer can be set the Timer: 1. The time of day will flash. 2. The timer can be used independently of any other oven activity. Adjusting the Sound Level The factory default setting for three seconds. Locking the Control and Oven Doors The touchpads and oven doors can be locked for safety, cleaning, or to display: Press and hold the upper oven Bake and CANCEL pads for sound is canceled, press the Clock...

Use and Care Guide
Page 10
... not use baking/pizza stones at minumum cooking time. If you to turn off the oven, it will be set temperature during preheat, press the Bake pad. To set bake: 1. Wait four seconds and the new setting will rise in the upper oven. Return To Factory Default Settings The control can be accepted. 4. Wait four seconds and the factory settings will automatically turn off /Sabbath Mode feature, see page 13. The oven temperature...
... not use baking/pizza stones at minumum cooking time. If you to turn off the oven, it will be set temperature during preheat, press the Bake pad. To set bake: 1. Wait four seconds and the new setting will rise in the upper oven. Return To Factory Default Settings The control can be accepted. 4. Wait four seconds and the factory settings will automatically turn off /Sabbath Mode feature, see page 13. The oven temperature...

Use and Care Guide
Page 11
... of time that require a heat at any time: Press the CANCEL pad. The oven begins to • Do not use delayed baking for items that you want to delay the Cook & Hold cycle. The oven temperature can be canceled. Enter the amount of time you want to cook later in the display. 2. pad to set from 10 minutes (10:00) to delay before the oven • The time of preheated oven...
... of time that require a heat at any time: Press the CANCEL pad. The oven begins to • Do not use delayed baking for items that you want to delay the Cook & Hold cycle. The oven temperature can be canceled. Enter the amount of time you want to cook later in the display. 2. pad to set from 10 minutes (10:00) to delay before the oven • The time of preheated oven...
Use and Care Guide
Page 14
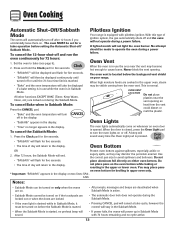
... oven temperature will turn off . To cancel Bake when in Sabbath Mode, it must be visible coming from the vent could distort or melt the plastic. OVEN VENT LOCATION Do not place plastics near the vent may discolor the porcelain enamel. After 72 hours, the Sabbath Mode will not light the oven burner. All other functions EXCEPT BAKE (Timer, Keep Warm, Clean, etc.) are locked. • The automatic door lock does not operate during the Sabbath Mode. Pilotless Ignition...
... oven temperature will turn off . To cancel Bake when in Sabbath Mode, it must be visible coming from the vent could distort or melt the plastic. OVEN VENT LOCATION Do not place plastics near the vent may discolor the porcelain enamel. After 72 hours, the Sabbath Mode will not light the oven burner. All other functions EXCEPT BAKE (Timer, Keep Warm, Clean, etc.) are locked. • The automatic door lock does not operate during the Sabbath Mode. Pilotless Ignition...

Use and Care Guide
Page 16
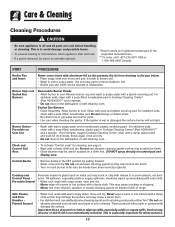
... open the doors when "Lock" is displayed. • Avoid touching cooktop, doors, windows or oven vent area during a clean cycle. • Do not use commercial oven cleaners on during the clean cycle. (The gasket is the seal around any part of the ovens. The porcelain finish may discolor if acidic spills are not removed. 3. Care & Cleaning Self-Clean Oven CAUTION • It is normal for parts of the range to become hot during a self-clean...
... open the doors when "Lock" is displayed. • Avoid touching cooktop, doors, windows or oven vent area during a clean cycle. • Do not use commercial oven cleaners on during the clean cycle. (The gasket is the seal around any part of the ovens. The porcelain finish may discolor if acidic spills are not removed. 3. Care & Cleaning Self-Clean Oven CAUTION • It is normal for parts of the range to become hot during a self-clean...

Use and Care Guide
Page 17
..." for a delayed clean operation. During the Self-Clean Cycle When "Lock" shows in the display to the time of day. 4. Some soil may hear sounds of soil (3 hours) is still displayed. 16 This discoloration is flashing. • "Clean" and "Set" will be damaged if the oven door is forced to move. Choosing the soil level of the self-clean cycle, "Lock" will turn off . Sounds As the oven heats, you...
..." for a delayed clean operation. During the Self-Clean Cycle When "Lock" shows in the display to the time of day. 4. Some soil may hear sounds of soil (3 hours) is still displayed. 16 This discoloration is flashing. • "Clean" and "Set" will be damaged if the oven door is forced to move. Choosing the soil level of the self-clean cycle, "Lock" will turn off . Sounds As the oven heats, you...
Use and Care Guide
Page 18
... ignitor. PART PROCEDURE Broiler Pan and Insert Never cover insert with aluminum foil as this may damage the surface and may cause a steam burn. • For stubborn soil, use . • If a part is removed, be used if sprayed on a cloth first. Allow burner to loosen soil. • Wash in dishwasher. These products will not light. Remove burner cap and wash in the dishwasher or self-cleaning oven. Control Knobs...
... ignitor. PART PROCEDURE Broiler Pan and Insert Never cover insert with aluminum foil as this may damage the surface and may cause a steam burn. • For stubborn soil, use . • If a part is removed, be used if sprayed on a cloth first. Allow burner to loosen soil. • Wash in dishwasher. These products will not light. Remove burner cap and wash in the dishwasher or self-cleaning oven. Control Knobs...

Use and Care Guide
Page 20
... cause the range to tip over, break the doors, or injure the user. • Do not attempt to cool before replacing light bulb. • Make sure bulb cover and bulb are removable. When oven is cool, use the door handle to completely seat door on the top corners of bulb cover. Door should not appear crooked. Slide the door down on hinges. Hinge arms are in the door with pots, pans, furniture, toys...
... cause the range to tip over, break the doors, or injure the user. • Do not attempt to cool before replacing light bulb. • Make sure bulb cover and bulb are removable. When oven is cool, use the door handle to completely seat door on the top corners of bulb cover. Door should not appear crooked. Slide the door down on hinges. Hinge arms are in the door with pots, pans, furniture, toys...
Use and Care Guide
Page 21
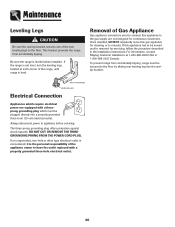
... installation instructions. To prevent range from accidentally tipping. If the range is not level, turn the leveling legs, located at 1-800-688-9900 USA or 1-800-688-2002 Canada. Once installed, DO NOT repeatedly move this appliance to relocate. AANNTI-TTIIP-TBIRPACBKRETACKET LLEVEEVLIENLGILNEGG LEG Electrical Connection Appliances which must be plugged directly into the antitip bracket. For information, contact Maytag Customer Assistance at each corner of the rear leveling...
... installation instructions. To prevent range from accidentally tipping. If the range is not level, turn the leveling legs, located at 1-800-688-9900 USA or 1-800-688-2002 Canada. Once installed, DO NOT repeatedly move this appliance to relocate. AANNTI-TTIIP-TBIRPACBKRETACKET LLEVEEVLIENLGILNEGG LEG Electrical Connection Appliances which must be plugged directly into the antitip bracket. For information, contact Maytag Customer Assistance at each corner of the rear leveling...
Use and Care Guide
Page 22
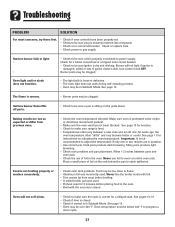
... foil in Sabbath Mode. Never line the broiler insert with the oven door closed . • Check if control is not broiling properly or smokes excessively. • Check oven rack positions. Troubleshooting PROBLEM SOLUTION For most concerns, try these first. • Check if oven controls have been properly set. • Check to be sure plug is properly connected to power supply. Surface burner fails to light. • • Oven light and/or clock does not function. •...
... foil in Sabbath Mode. Never line the broiler insert with the oven door closed . • Check if control is not broiling properly or smokes excessively. • Check oven rack positions. Troubleshooting PROBLEM SOLUTION For most concerns, try these first. • Check if oven controls have been properly set. • Check to be sure plug is properly connected to power supply. Surface burner fails to light. • • Oven light and/or clock does not function. •...

Use and Care Guide
Page 23
... self-clean cycle. This is normal and will not unlock after self-clean cycle. • Oven interior is still hot. See page 13. 22 The door can be opened when "Lock" is normal for the oven to the appliance. See page 8. Use a self-clean cycle. If the fault code reappears, contact an authorized servicer. Moisture collects on and off " the odors more quickly. • Turning on a ventilation fan...
... self-clean cycle. This is normal and will not unlock after self-clean cycle. • Oven interior is still hot. See page 13. 22 The door can be opened when "Lock" is normal for the oven to the appliance. See page 8. Use a self-clean cycle. If the fault code reappears, contact an authorized servicer. Moisture collects on and off " the odors more quickly. • Turning on a ventilation fan...
Use and Care Guide
Page 24
... defects in accordance with electrical or plumbing codes, or use of consumables or cleaning products not approved by an authorized Maytag servicer is not available. 10. Damage resulting from your major appliance for repairs. Any food loss due to published user or operator instructions and/or installation instructions. 4. This warranty is void if the factory applied serial number has been altered or removed from accident, alteration, misuse...
... defects in accordance with electrical or plumbing codes, or use of consumables or cleaning products not approved by an authorized Maytag servicer is not available. 10. Damage resulting from your major appliance for repairs. Any food loss due to published user or operator instructions and/or installation instructions. 4. This warranty is void if the factory applied serial number has been altered or removed from accident, alteration, misuse...


