Use and Care Guide
Page 1
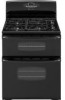
Litho U.S.A. M_&YI?A(; ® Maytag Gas Double Oven Range Precision Touch 750 Series Table s,foty instructions '4 Surface Cooking 5=6 Controls Sealed Gas Burners Oven Cooking Control Panel Baking Cook & Hold Delay Keep Warm Broiling Oven Racks 7=14 Form No. A/01/08 Part No. 8113P739-60 self:clean oven Cleaning ProCedures Maintenance Oven Doors, Windows & Lights Removal of Gas Appliance 19=20 Troubleshooting 21=22 Warranty & Service 23 Guide d'utilisation et d'entretien 24 Guia de Uso y Cuidado 50 ¢c)2006 Maytag Appliances Sales Co.
Litho U.S.A. M_&YI?A(; ® Maytag Gas Double Oven Range Precision Touch 750 Series Table s,foty instructions '4 Surface Cooking 5=6 Controls Sealed Gas Burners Oven Cooking Control Panel Baking Cook & Hold Delay Keep Warm Broiling Oven Racks 7=14 Form No. A/01/08 Part No. 8113P739-60 self:clean oven Cleaning ProCedures Maintenance Oven Doors, Windows & Lights Removal of Gas Appliance 19=20 Troubleshooting 21=22 Warranty & Service 23 Guide d'utilisation et d'entretien 24 Guia de Uso y Cuidado 50 ¢c)2006 Maytag Appliances Sales Co.

Use and Care Guide
Page 4
... handles that are cool. NEVER heat an unopened container on . Pan size is turned on and that it on a surface burner before removing pan to prevent exposure to properly contain food and avoid boilovers. Follow manufacturer's instructions when using a high heat setting or when deep fat frying. Otherpotentiallyhotsurfacesincludecooktopa, reas facingthe cooktopo, venvent,surfacesnearthe vent opening the oven doors. If a rack must be contaminated. Let hot air or steam...
... handles that are cool. NEVER heat an unopened container on . Pan size is turned on and that it on a surface burner before removing pan to prevent exposure to properly contain food and avoid boilovers. Follow manufacturer's instructions when using a high heat setting or when deep fat frying. Otherpotentiallyhotsurfacesincludecooktopa, reas facingthe cooktopo, venvent,surfacesnearthe vent opening the oven doors. If a rack must be contaminated. Let hot air or steam...

Use and Care Guide
Page 5
... exposure to birds. Users of the self-clean oven. The door gasket is used to wipe spills on oven convection systems. The use any part of this appliance are hereby warned that are not specifically recommended in rooms where the fumes from the kitchen could reach. importanSt urety This appliance has been tested for the cooktop of potential exposures to overheated cooking oil, fat...
... exposure to birds. Users of the self-clean oven. The door gasket is used to wipe spills on oven convection systems. The use any part of this appliance are hereby warned that are not specifically recommended in rooms where the fumes from the kitchen could reach. importanSt urety This appliance has been tested for the cooktop of potential exposures to overheated cooking oil, fat...

Use and Care Guide
Page 6
... ignition eliminates the need for a constant standing pilot light. After the burner lights, turn knob to turn knob to the knob identify which burner the knob controls. Operating During a Power Failure BURNER BASE Surface Control Knobs Use to desired flame size. Push in and turn the knob counterclockwise to continue cooking. Each surface burner has a spark ignitor. Always reduce setting to a lower heat when liquids...
... ignition eliminates the need for a constant standing pilot light. After the burner lights, turn knob to turn knob to the knob identify which burner the knob controls. Operating During a Power Failure BURNER BASE Surface Control Knobs Use to desired flame size. Push in and turn the knob counterclockwise to continue cooking. Each surface burner has a spark ignitor. Always reduce setting to a lower heat when liquids...

Use and Care Guide
Page 7
..., particularly if the burner is turned off. If the control knob is turned very quickly from High to adjust. (Adjustments are acceptable. Improper installationor removal of gas, you may be properly positioned before cooking. SurfucCeooking Cooktop To prevent the cooktop from discoloring or staining: * Clean cooktop after each use . The cap portion of your range. Do not operate the burners without a pan to a boil and for...
..., particularly if the burner is turned off. If the control knob is turned very quickly from High to adjust. (Adjustments are acceptable. Improper installationor removal of gas, you may be properly positioned before cooking. SurfucCeooking Cooktop To prevent the cooktop from discoloring or staining: * Clean cooktop after each use . The cap portion of your range. Do not operate the burners without a pan to a boil and for...
Use and Care Guide
Page 8
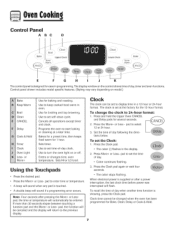
... 24-hour format. Use to set self-clean cycle. A double beep will sound when any pad is set the Clock: 1. The clock is touched. To set at a later time. pad to turn the oven light on model.) Bake B Keep Warm Broil Clean CANCEL Delay Cook & Hold Timer Clock Oven Light i:i:i:iiKLi!eiis!isi!-ii!oii!rii!_ More+ Use for broiling and top browning. The displaywindow on the control shows time of day following the directions below. Control panel shown includesmodel specific features. (Styling...
... 24-hour format. Use to set self-clean cycle. A double beep will sound when any pad is set the Clock: 1. The clock is touched. To set at a later time. pad to turn the oven light on model.) Bake B Keep Warm Broil Clean CANCEL Delay Cook & Hold Timer Clock Oven Light i:i:i:iiKLi!eiis!isi!-ii!oii!rii!_ More+ Use for broiling and top browning. The displaywindow on the control shows time of day following the directions below. Control panel shown includesmodel specific features. (Styling...
Use and Care Guide
Page 9
... within 30 seconds, the control will appear in use . To lock both doors: Press and hold the Upper Oven CANCEL and Cook & Hold pads for three seconds. To unlock both oven doors lock. If "Bake" or "Lock" flash in the display. To change the setting: 1. pad to the appliance and call an authorized servicer. pad is currently in the display. 2. Press the Timer pad. pad until the correct time appears...
... within 30 seconds, the control will appear in use . To lock both doors: Press and hold the Upper Oven CANCEL and Cook & Hold pads for three seconds. To unlock both oven doors lock. If "Bake" or "Lock" flash in the display. To change the setting: 1. pad to the appliance and call an authorized servicer. pad is currently in the display. 2. Press the Timer pad. pad until the correct time appears...

Use and Care Guide
Page 10
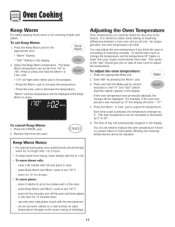
... Less- A single beep will sound and "dEF" (default) will light when either pad is not pressed within 30 sec- pad is first pressed. Press Bake pad again or wait four seconds. The temperature will sound. To recall the set oven temperature is finished, press 8. To change the oven temperature during preheat, press Bake once and reset temperature. 5. Cook longer if needed. 7. See "Adjusting the Oven Temperature" on page 11. To use temperatures below 200...
... Less- A single beep will sound and "dEF" (default) will light when either pad is not pressed within 30 sec- pad is first pressed. Press Bake pad again or wait four seconds. The temperature will sound. To recall the set oven temperature is finished, press 8. To change the oven temperature during preheat, press Bake once and reset temperature. 5. Cook longer if needed. 7. See "Adjusting the Oven Temperature" on page 11. To use temperatures below 200...
Use and Care Guide
Page 12
... results of how much to change will automatically reappear in oven. - "000°'' flashes in the oven for five minutes, turn off the oven and leave plates in the display. 2. To cancel Keep Warm: 1. To adjust the oven temperature: 1. Press the More+ or Less- Broiling and cleaning temperatures cannot be set Keep Warm: 1. warm for warming breads and plates. warm for 15 minutes more. - use only oven-safe plates, check with the manufacturer...
... results of how much to change will automatically reappear in oven. - "000°'' flashes in the oven for five minutes, turn off the oven and leave plates in the display. 2. To cancel Keep Warm: 1. To adjust the oven temperature: 1. Press the More+ or Less- Broiling and cleaning temperatures cannot be set Keep Warm: 1. warm for warming breads and plates. warm for 15 minutes more. - use only oven-safe plates, check with the manufacturer...
Use and Care Guide
Page 13
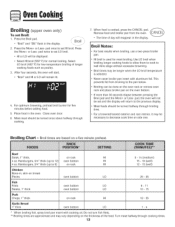
... rare interior, it may be set LO broil. , HI or LO will return to set Broil: 1. Hamburgers, 3/4" thick (up to the pan below. After four seconds, the oven will start. , "Broil" and HI or LO will not be longer when the LO broil temperature is used for low-temperature broiling of the food. Remove food and broiler pan from draining to 6) on rack HI Chicken Bone-in the display...
... rare interior, it may be set LO broil. , HI or LO will return to set Broil: 1. Hamburgers, 3/4" thick (up to the pan below. After four seconds, the oven will start. , "Broil" and HI or LO will not be longer when the LO broil temperature is used for low-temperature broiling of the food. Remove food and broiler pan from draining to 6) on rack HI Chicken Bone-in the display...
Use and Care Guide
Page 14
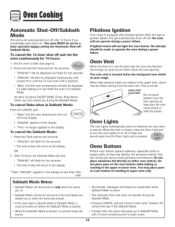
... Clock pad for broiling in Sabbath Mode with pilotless ignition. With this type of day will be made to operate the oven during the Sabbath Mode. When high moisture foods are locked out during a power failure. A beep will power up in upper oven only. Use the correct pan size to the display. * Note: "SAbbAth" appears in use while the oven is started . If power fails, the ovens will sound every time the Oven Light pad is located...
... Clock pad for broiling in Sabbath Mode with pilotless ignition. With this type of day will be made to operate the oven during the Sabbath Mode. When high moisture foods are locked out during a power failure. A beep will power up in upper oven only. Use the correct pan size to the display. * Note: "SAbbAth" appears in use while the oven is started . If power fails, the ovens will sound every time the Oven Light pad is located...

Use and Care Guide
Page 16
... up of soil to delay the cycle. The self-clean cycle uses above-normal cooking temperatures to the time of time you want to accumulate in the display. The oven racks will return to automatically clean the oven interior. They should be canceled and the display will be displayed. Porcelain enamel To set the amount of day. 4. If the door is being cleaned. pad twice for light soil (2 hours). , "LITE...
... up of soil to delay the cycle. The self-clean cycle uses above-normal cooking temperatures to the time of time you want to accumulate in the display. The oven racks will return to automatically clean the oven interior. They should be canceled and the display will be displayed. Porcelain enamel To set the amount of day. 4. If the door is being cleaned. pad twice for light soil (2 hours). , "LITE...

Use and Care Guide
Page 17
..., three beeps will sound, the self-cleaning operation will appear in the oven. Press the More+ pad twice for light soil (2 hours:}. Choosing the soil level of vegetable oil to make them easier to show that means the clean cycle was left open when "Lock" is not closed . . After four seconds, "Clean", "dLY" and "Lock" will be opened. The delay time is set for medium...
..., three beeps will sound, the self-cleaning operation will appear in the oven. Press the More+ pad twice for light soil (2 hours:}. Choosing the soil level of vegetable oil to make them easier to show that means the clean cycle was left open when "Lock" is not closed . . After four seconds, "Clean", "dLY" and "Lock" will be opened. The delay time is set for medium...
Use and Care Guide
Page 18
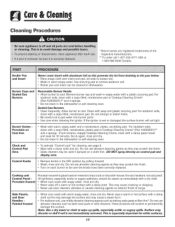
.... Clock and Control Pad Area , To activate "Control Lock" for 30 minutes. Cooktop and Control Panel - Never wipe a warm or hot surface with a damp cloth as this may damage the surface and may discolor or dull if soil is glass fused on metal and may scratch the finish. , Turn on each burner to cool. Surface may cause a steam burn. , For stubborn soil, use abrasive cleaning...
.... Clock and Control Pad Area , To activate "Control Lock" for 30 minutes. Cooktop and Control Panel - Never wipe a warm or hot surface with a damp cloth as this may damage the surface and may discolor or dull if soil is glass fused on metal and may scratch the finish. , Turn on each burner to cool. Surface may cause a steam burn. , For stubborn soil, use abrasive cleaning...
Use and Care Guide
Page 20
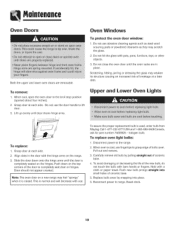
... for part number 74009925 - When oven is cool, use the door handle to the broil stop position (opened about four inches). 2. Hold with the hinge arms on the range. 3. Replace bulb cover by pulling straight oat of breakage at each side. Do not use fingertips to completely seat door on the hinges. Do not use . Do not close the oven door until the oven racks are removable. Upper and Lower Oven Lights To replace: 1. To replace oven light bulbs: ]. Carefully remove old bulb by...
... for part number 74009925 - When oven is cool, use the door handle to the broil stop position (opened about four inches). 2. Hold with the hinge arms on the range. 3. Replace bulb cover by pulling straight oat of breakage at each side. Do not use fingertips to completely seat door on the hinges. Do not use . Do not close the oven door until the oven racks are removable. Upper and Lower Oven Lights To replace: 1. To replace oven light bulbs: ]. Carefully remove old bulb by...

Use and Care Guide
Page 22
... to be below the pan to adjust the temperature if only one . The light bulb is preheated when recipe or directions recommend preheat. Never line the broiler insert with the oven door closed . A soiled broiler pan was incorrectly used . Check to program a clean cycle. 21 See pages 15-16. Check if oven controls have been properly set circuit breaker. See page 13. Preheat oven for a delayed start. See page 13. Oven temperature must be sure ignitor...
... to be below the pan to adjust the temperature if only one . The light bulb is preheated when recipe or directions recommend preheat. Never line the broiler insert with the oven door closed . A soiled broiler pan was incorrectly used . Check to program a clean cycle. 21 See pages 15-16. Check if oven controls have been properly set circuit breaker. See page 13. Preheat oven for a delayed start. See page 13. Oven temperature must be sure ignitor...

Use and Care Guide
Page 23
... oven bottom. Noises may be needed. . See page 8. Oven door will help remove the smoke and/or odor. The oven makes several low level noises. Excessive moisture was used when cleaning the window. There are no beeps and no display. Fault Codes "Bake" or "Lock" may be in a fault code during cleaning. Longer cleaning time may flash rapidly in the display to cool after self=clean cycle. . Excessive food soils on a ventilation fan will not unlock...
... oven bottom. Noises may be needed. . See page 8. Oven door will help remove the smoke and/or odor. The oven makes several low level noises. Excessive moisture was used when cleaning the window. There are no beeps and no display. Fault Codes "Bake" or "Lock" may be in a fault code during cleaning. Longer cleaning time may flash rapidly in the display to cool after self=clean cycle. . Excessive food soils on a ventilation fan will not unlock...
Use and Care Guide
Page 24
... Maytag servicer is not available. 10. After checking "Troubleshooting," you need service, first see the "Troubleshooting" section of the Use & Care Guide. Outside the 50 United States and Canada, this limited warranty does not apply. Expenses for travel and transportation for product service if your authorized Maytag dealer to correct house wiring or plumbing. 2. The cost of repair or replacement under this limited warranty. THIS WARRANTY GIVES YOU SPECIFIC...
... Maytag servicer is not available. 10. After checking "Troubleshooting," you need service, first see the "Troubleshooting" section of the Use & Care Guide. Outside the 50 United States and Canada, this limited warranty does not apply. Expenses for travel and transportation for product service if your authorized Maytag dealer to correct house wiring or plumbing. 2. The cost of repair or replacement under this limited warranty. THIS WARRANTY GIVES YOU SPECIFIC...
Installation Instructions
Page 2
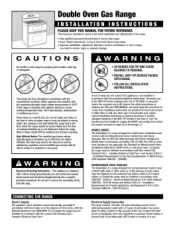
Do not lift or moverangeby grasping door handles,main top, the maximum allowable wood cabinet temperatures of 194_E If this range is installed with cabinets that have a lower working temperature than 194°F,discoloration, delamination or melting may need to be pluggeddirectlyintoa proper!y J groundedrecePtacle_DOnot cut or removethe groundingProng J from a dedicated grounded outlet with a 15 amp circuit breaker. Note:A range should NOTbe installed over exists if the appliance...
Do not lift or moverangeby grasping door handles,main top, the maximum allowable wood cabinet temperatures of 194_E If this range is installed with cabinets that have a lower working temperature than 194°F,discoloration, delamination or melting may need to be pluggeddirectlyintoa proper!y J groundedrecePtacle_DOnot cut or removethe groundingProng J from a dedicated grounded outlet with a 15 amp circuit breaker. Note:A range should NOTbe installed over exists if the appliance...
Installation Instructions
Page 3
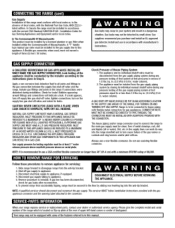
... appliance,if equipped. 4. Whenyour range requires service or replacement parts, contact your dealer or authorized service agency.Pleasegive the complete model and serial number of the range which is recommendedto use a CSAcertified flexible connectorno longerthan 36" (91.4 cm) with the gas appliance connector and the warning label attached to the instructions given in the range if connections were disturbed during installation. Gas leaks may occurin yoursystem and...
... appliance,if equipped. 4. Whenyour range requires service or replacement parts, contact your dealer or authorized service agency.Pleasegive the complete model and serial number of the range which is recommendedto use a CSAcertified flexible connectorno longerthan 36" (91.4 cm) with the gas appliance connector and the warning label attached to the instructions given in the range if connections were disturbed during installation. Gas leaks may occurin yoursystem and...


