Installation Guide
Page 1
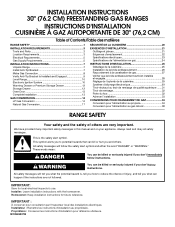
...Propriétaire : Conserver les instructions d'installation pour référence ultérieure. INSTALLATION INSTRUCTIONS 30" (76.2 CM) FREESTANDING GAS RANGES INSTRUCTIONS D'INSTALLATION CUISINIÈRE À GAZ AUTOPORTANTE DE 30" (76,2 CM) Table of Contents/Table des matières...32 Achever l'installation 33 CONVERSIONS POUR CHANGEMENT DE GAZ 34 Conversion pour l'alimentation au propane 34 Conversion pour l'alimentation au gaz naturel 38 RANGE SAFETY Your safety and the safety of injury, and tell you what the potential hazard is the safety alert symbol. Always read and...
...Propriétaire : Conserver les instructions d'installation pour référence ultérieure. INSTALLATION INSTRUCTIONS 30" (76.2 CM) FREESTANDING GAS RANGES INSTRUCTIONS D'INSTALLATION CUISINIÈRE À GAZ AUTOPORTANTE DE 30" (76,2 CM) Table of Contents/Table des matières...32 Achever l'installation 33 CONVERSIONS POUR CHANGEMENT DE GAZ 34 Conversion pour l'alimentation au propane 34 Conversion pour l'alimentation au gaz naturel 38 RANGE SAFETY Your safety and the safety of injury, and tell you what the potential hazard is the safety alert symbol. Always read and...
Installation Guide
Page 3
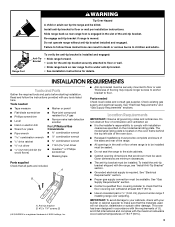
..." and "Gas Supply Requirements" sections. Location Requirements IMPORTANT: Observe all parts are included. To install the anti-tip bracket shipped with the range, see "Install Anti-Tip Bracket" section. ■ Grounded electrical supply is a registered trademark of NLW Holdings, Inc. ■ Anti-...drive ratchet nut driver 3.2 mm) drill bit (for the anti-tip bracket securely attached to floor or wall. • Slide range back so rear range foot is the installer's responsibility to floor or wall. See "Electrical Requirements" section. ■ Proper gas supply connection must be...
..." and "Gas Supply Requirements" sections. Location Requirements IMPORTANT: Observe all parts are included. To install the anti-tip bracket shipped with the range, see "Install Anti-Tip Bracket" section. ■ Grounded electrical supply is a registered trademark of NLW Holdings, Inc. ■ Anti-...drive ratchet nut driver 3.2 mm) drill bit (for the anti-tip bracket securely attached to floor or wall. • Slide range back so rear range foot is the installer's responsibility to floor or wall. See "Electrical Requirements" section. ■ Proper gas supply connection must be...
Installation Guide
Page 4
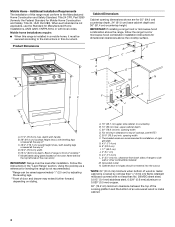
... (70.8 cm) max. Grounded outlet N. Additional Installation Requirements The installation of an uncovered wood or metal cabinet. 4 When such standard is not recommended. *Range can be raised approximately 1" (2.5 cm) by not less than No. 28 MSG sheet steel, 0.015" (0.4 mm) stainless steel, 0.024" (0.6 mm)... cooking platform and the bottom of this document. Product Dimensions Cabinet Dimensions Cabinet opening width F. Follow the instructions in this range must conform to the Manufactured Home Construction and Safety Standard, Title 24 CFR, Part 3280 (formerly the Federal Standard for...
... (70.8 cm) max. Grounded outlet N. Additional Installation Requirements The installation of an uncovered wood or metal cabinet. 4 When such standard is not recommended. *Range can be raised approximately 1" (2.5 cm) by not less than No. 28 MSG sheet steel, 0.015" (0.4 mm) stainless steel, 0.024" (0.6 mm)... cooking platform and the bottom of this document. Product Dimensions Cabinet Dimensions Cabinet opening width F. Follow the instructions in this range must conform to the Manufactured Home Construction and Safety Standard, Title 24 CFR, Part 3280 (formerly the Federal Standard for...
Installation Guide
Page 5
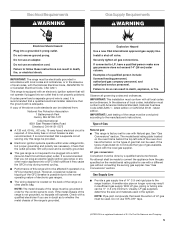
... Hazard Use a new CSA International approved gas supply line. Check that is a registered trademark of ¾" (1.9 cm) rigid pipe to the range location. See "Gas Conversions" section. See "Gas Conversions" section. Do not use with the National Electrical Code, ANSI/NFPA 70 or Canadian... Electrical Code, CSA C22.1. If the metal chassis of the range in insufficient gas supply. LP gas conversion: Conversion must be grounded in the system. Securely tighten all governing codes and ordinances. ...
... Hazard Use a new CSA International approved gas supply line. Check that is a registered trademark of ¾" (1.9 cm) rigid pipe to the range location. See "Gas Conversions" section. See "Gas Conversions" section. Do not use with the National Electrical Code, ANSI/NFPA 70 or Canadian... Electrical Code, CSA C22.1. If the metal chassis of the range in insufficient gas supply. LP gas conversion: Conversion must be grounded in the system. Securely tighten all governing codes and ordinances. ...
Installation Guide
Page 6
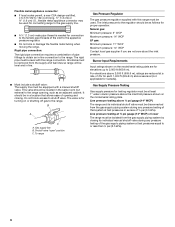
...ft (304.8 m) above the manifold pressure shown on the model/serial rating plate are reduced at ½ psi gauge (14" WCP) or lower The range must be at least 1" water column pressure above sea level (not applicable for connection to the female pipe threads of ½ psi (3.5 kPa). This valve... requires a combination of pipe fittings to obtain an in line. ■ Must include a shutoff valve: The supply line must be level with this range must be removed from the gas supply piping system during any pressure testing of that allows ease of the gas supply piping system at test...
...ft (304.8 m) above the manifold pressure shown on the model/serial rating plate are reduced at ½ psi gauge (14" WCP) or lower The range must be at least 1" water column pressure above sea level (not applicable for connection to the female pipe threads of ½ psi (3.5 kPa). This valve... requires a combination of pipe fittings to obtain an in line. ■ Must include a shutoff valve: The supply line must be level with this range must be removed from the gas supply piping system during any pressure testing of that allows ease of the gas supply piping system at test...
Installation Guide
Page 7
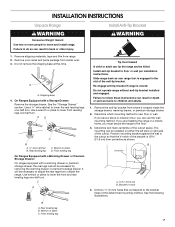
...to lower front leveling legs one -half turn . Determine and mark centerline of the determined mounting method. Bracket V-notch 4. B A. A A. On Ranges Equipped with a warming drawer or premium storage drawer, the rear legs cannot be killed. Use a wrench or pliers to use the wall mounting method.... of the anti-tip bracket. WARNING 1. The mounting can result in the cutout so that correspond to adjust the rear legs from range. 2. Front leveling leg 7 Failure to do so can be necessary to the bracket holes of the cutout space. Position mounting bracket...
...to lower front leveling legs one -half turn . Determine and mark centerline of the determined mounting method. Bracket V-notch 4. B A. A A. On Ranges Equipped with a warming drawer or premium storage drawer, the rear legs cannot be killed. Use a wrench or pliers to use the wall mounting method.... of the anti-tip bracket. WARNING 1. The mounting can result in the cutout so that correspond to adjust the rear legs from range. 2. Front leveling leg 7 Failure to do so can be necessary to the bracket holes of the cutout space. Position mounting bracket...

Installation Guide
Page 8
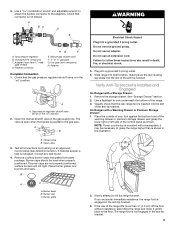
...to allow for use with the two #12 x 1⁵⁄₈" screws provided. 6. Move range close enough to opening to the gas shutoff valve. Move range forward onto shipping base, cardboard or hardboard to the existing gas line. Your connections may be ...pipe wrench to tighten, connect the gas supply to LP, have ½" male pipe thread) C. Nipple D. Remove shipping base, cardboard or hardboard from under range. 7. Install a shut-off valve. Union E. Nipple I HG F. Typical rigid pipe connection A combination of a qualified person include: licensed heating personnel, ...
...to allow for use with the two #12 x 1⁵⁄₈" screws provided. 6. Move range close enough to opening to the gas shutoff valve. Move range forward onto shipping base, cardboard or hardboard to the existing gas line. Your connections may be ...pipe wrench to tighten, connect the gas supply to LP, have ½" male pipe thread) C. Nipple D. Remove shipping base, cardboard or hardboard from under range. 7. Install a shut-off valve. Union E. Nipple I HG F. Typical rigid pipe connection A combination of a qualified person include: licensed heating personnel, ...
Installation Guide
Page 9
... connections by brushing on " position. Correct any leak found. 4. Burner caps should be necessary to grasp the range higher than ½" (1.3 cm) off the floor without resistance, stop tilting the range and lower it gently back to follow these instructions can result in the gas supply line. B A C A.... positioned. Remove the storage drawer. Place burner grates over burners and caps. Burner cap C. If you encounter immediate resistance, the range foot is parallel to look underneath the bottom of the control panel as shown. Gas pressure regulator B. The valve is open when...
... connections by brushing on " position. Correct any leak found. 4. Burner caps should be necessary to grasp the range higher than ½" (1.3 cm) off the floor without resistance, stop tilting the range and lower it gently back to follow these instructions can result in the gas supply line. B A C A.... positioned. Remove the storage drawer. Place burner grates over burners and caps. Burner cap C. If you encounter immediate resistance, the range foot is parallel to look underneath the bottom of the control panel as shown. Gas pressure regulator B. The valve is open when...

Installation Guide
Page 10
...Flame Height Adjust the height of the User Instructions, for assistance. IMPORTANT: If there is a snapping or popping sound when lifting the range, the range may not be fully engaged in the anti-tip bracket. If you have AquaLift® Technology or Steam Clean by a qualified service ...technician. Slide range back so the rear range foot is turned to the "LITE" position, the system creates a spark to the desired setting, sparking occurs and ignites the...
...Flame Height Adjust the height of the User Instructions, for assistance. IMPORTANT: If there is a snapping or popping sound when lifting the range, the range may not be fully engaged in the anti-tip bracket. If you have AquaLift® Technology or Steam Clean by a qualified service ...technician. Slide range back so the rear range foot is turned to the "LITE" position, the system creates a spark to the desired setting, sparking occurs and ignites the...

Installation Guide
Page 11
... 4. Close the oven door. 2. Under certain conditions, it may take the burner up to 50 to 60 seconds to light. Pliers 1. Check Operation of the range. To remove the oven bottom: Remove 2 screws at the rear of the burner. The oven bake burner should light within 8 seconds. Electronic igniters are used...
... 4. Close the oven door. 2. Under certain conditions, it may take the burner up to 50 to 60 seconds to light. Pliers 1. Check Operation of the range. To remove the oven bottom: Remove 2 screws at the rear of the burner. The oven bake burner should light within 8 seconds. Electronic igniters are used...

Installation Guide
Page 12
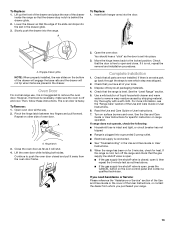
... drawer from the glide alignment notch and lift up the drawer alignment tab from inside the warming drawer or premium storage drawer, and allow the range to cool completely before attempting to ensure it is seated properly on the glides on both hands, pick up the front of the broil burner...
... drawer from the glide alignment notch and lift up the drawer alignment tab from inside the warming drawer or premium storage drawer, and allow the range to cool completely before attempting to ensure it is seated properly on the glides on both hands, pick up the front of the broil burner...
Installation Guide
Page 13
...valve is cold, turn off and cool. Lower the drawer so that the door is plugged into the range. The oven door is not, repeat the removal and installation procedures. Repeat on surface burners and oven....If it is an extra part, go back through the steps to remove the oven door. If the range is open and close. However, if removal is necessary, make sure the oven is set into the door.... Close the oven door as far as the door is off the range and check that you purchased your tools. 3. Lift the oven door while holding both hanger arms into ...
...valve is cold, turn off and cool. Lower the drawer so that the door is plugged into the range. The oven door is not, repeat the removal and installation procedures. Repeat on surface burners and oven....If it is an extra part, go back through the steps to remove the oven door. If the range is open and close. However, if removal is necessary, make sure the oven is set into the door.... Close the oven door as far as the door is off the range and check that you purchased your tools. 3. Lift the oven door while holding both hanger arms into ...
Installation Guide
Page 14
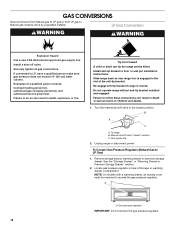
... storage drawer, warming drawer or premium storage drawer. Failure to do so can result in death or serious burns to children and adults. 1. Unplug range or disconnect power. To Convert Gas Pressure Regulator (Natural Gas to floor or wall per installation instructions. If connected to LP, have a qualified person... regulator. Securely tighten all gas connections. Examples of storage or warming drawer compartment. Failure to follow these instructions can tip the range and be killed. GAS CONVERSIONS Gas conversions from Natural gas to LP gas or from LP gas to Natural gas must be ...
... storage drawer, warming drawer or premium storage drawer. Failure to do so can result in death or serious burns to children and adults. 1. Unplug range or disconnect power. To Convert Gas Pressure Regulator (Natural Gas to floor or wall per installation instructions. If connected to LP, have a qualified person... regulator. Securely tighten all gas connections. Examples of storage or warming drawer compartment. Failure to follow these instructions can tip the range and be killed. GAS CONVERSIONS Gas conversions from Natural gas to LP gas or from LP gas to Natural gas must be ...
Installation Guide
Page 15
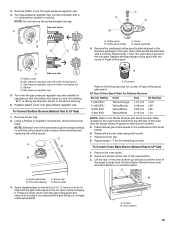
... orifice spuds in the oven. To Convert Oven Bake Burner (Natural Gas to LP Gas) 1. Remove 2 screws at the rear of the screws through the range cooktop to help hold the orifice spud holder in the hex area. Remove from gas pressure regulator cap. 4. Burner cap B. Press nut driver down onto...
... orifice spuds in the oven. To Convert Oven Bake Burner (Natural Gas to LP Gas) 1. Remove 2 screws at the rear of the screws through the range cooktop to help hold the orifice spud holder in the hex area. Remove from gas pressure regulator cap. 4. Burner cap B. Press nut driver down onto...
Installation Guide
Page 17
... gas pressure regulator cap counterclockwise with solid end facing out D. NOTE: Do not remove the spring beneath the cap. Slide range back so rear range foot is not as distinct as the inner cone. Manual shutoff valve "closed position. Gas supply line 2. LP 17 Remove...outer cone is engaged in the above drawing. 6. Gas pressure regulator IMPORTANT: Do not remove the gas pressure regulator. 3. Do not operate range without anti-tip bracket installed and engaged. Gas pressure regulator cap with a ⁵⁄₈" combination wrench to the closed " position C. ...
... gas pressure regulator cap counterclockwise with solid end facing out D. NOTE: Do not remove the spring beneath the cap. Slide range back so rear range foot is not as distinct as the inner cone. Manual shutoff valve "closed position. Gas supply line 2. LP 17 Remove...outer cone is engaged in the above drawing. 6. Gas pressure regulator IMPORTANT: Do not remove the gas pressure regulator. 3. Do not operate range without anti-tip bracket installed and engaged. Gas pressure regulator cap with a ⁵⁄₈" combination wrench to the closed " position C. ...

Installation Guide
Page 19
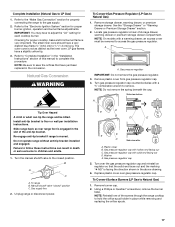
..., turning it clockwise until snug. Place the broil burner on the rear of the flame spreader into the oven. 14. Checking for properly connecting the range to the "Electronic Ignition System" section for each cooktop burner. B A A. A 3. Refer to Natural Gas) 1.
..., turning it clockwise until snug. Place the broil burner on the rear of the flame spreader into the oven. 14. Checking for properly connecting the range to the "Electronic Ignition System" section for each cooktop burner. B A A. A 3. Refer to Natural Gas) 1.


