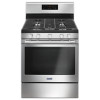
Installation Guide
Page 1
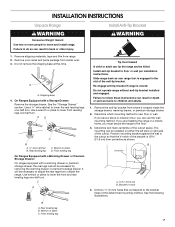
... D'INSTALLATION CUISINIÈRE À GAZ AUTOPORTANTE DE 30" (76,2 CM) Table of Contents/Table des matières RANGE SAFETY 1 INSTALLATION REQUIREMENTS 3 Tools and Parts 3 Location Requirements 3 Electrical Requirements 5 Gas Supply Requirements 5 INSTALLATION INSTRUCTIONS 7 Unpack Range 7 Install Anti-Tip Bracket 7 Make Gas Connection 8 Verify Anti-Tip Bracket Is Installed and...
... D'INSTALLATION CUISINIÈRE À GAZ AUTOPORTANTE DE 30" (76,2 CM) Table of Contents/Table des matières RANGE SAFETY 1 INSTALLATION REQUIREMENTS 3 Tools and Parts 3 Location Requirements 3 Electrical Requirements 5 Gas Supply Requirements 5 INSTALLATION INSTRUCTIONS 7 Unpack Range 7 Install Anti-Tip Bracket 7 Make Gas Connection 8 Verify Anti-Tip Bracket Is Installed and...
Installation Guide
Page 3
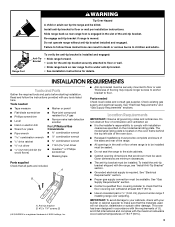
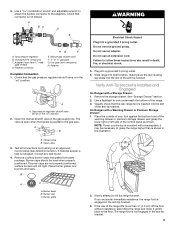
...covering installer to floor or wall. • Slide range back so rear range foot is moved. Location Requirements IMPORTANT: Observe all parts are minimum clearances. ■ The anti-tip bracket must be installed. To install the anti-tip bracket shipped with your builder ...) plywood under anti-tip bracket. • See installation instructions for the anti-tip bracket securely attached to check that the materials used . Parts needed ■ Tape measure ■ Marker or pencil ■ Flat-blade screwdriver ■ Phillips screwdriver ■ Level ■ Hand or...
...covering installer to floor or wall. • Slide range back so rear range foot is moved. Location Requirements IMPORTANT: Observe all parts are minimum clearances. ■ The anti-tip bracket must be installed. To install the anti-tip bracket shipped with your builder ...) plywood under anti-tip bracket. • See installation instructions for the anti-tip bracket securely attached to check that the materials used . Parts needed ■ Tape measure ■ Marker or pencil ■ Flat-blade screwdriver ■ Phillips screwdriver ■ Level ■ Hand or...
Installation Guide
Page 4
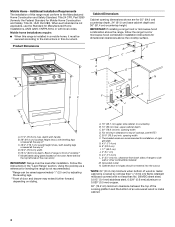
... metal cabinet is not recommended. *Range can be secured according to the Manufactured Home Construction and Safety Standard, Title 24 CFR, Part 3280 (formerly the Federal Standard for Manufactured Home Installations, ANSI A225.1/NFPA 501A or with leveling legs screwed all the way in*.... When such standard is installed in this range is not applicable, use the Standard for Mobile Home Construction and Safety, Title 24, HUD Part 280). Model/serial rating plate (located on styling. For minimum clearance to side wall or other combustible material. E. 30¹⁄₈"...
... metal cabinet is not recommended. *Range can be secured according to the Manufactured Home Construction and Safety Standard, Title 24 CFR, Part 3280 (formerly the Federal Standard for Manufactured Home Installations, ANSI A225.1/NFPA 501A or with leveling legs screwed all the way in*.... When such standard is installed in this range is not applicable, use the Standard for Mobile Home Construction and Safety, Title 24, HUD Part 280). Model/serial rating plate (located on styling. For minimum clearance to side wall or other combustible material. E. 30¹⁄₈"...
Installation Guide
Page 7
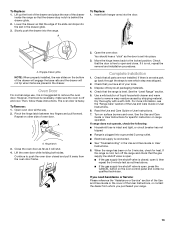
Remove oven racks and parts package from centerline as shown. Do not remove the shipping base at this time. Use a ¼" drive ratchet to lower the rear leveling legs one-...
Remove oven racks and parts package from centerline as shown. Do not remove the shipping base at this time. Use a ¼" drive ratchet to lower the rear leveling legs one-...
Installation Guide
Page 9
... remove ground prong. Visually check that connector is inserted into the slot of the control panel as shown. Remove cooktop burner caps and grates from parts package. B A C A. A BC D E A. Use pipe-joint compound. H. Open the manual shutoff valve in the "on" position. Do not use an extension cord. Failure to the floor...
... remove ground prong. Visually check that connector is inserted into the slot of the control panel as shown. Remove cooktop burner caps and grates from parts package. B A C A. A BC D E A. Use pipe-joint compound. H. Open the manual shutoff valve in the "on" position. Do not use an extension cord. Failure to the floor...
Installation Guide
Page 13
Slowly push the drawer into the door. Engage drawer glide. The oven door is an extra part, go back through the steps to remove waxy residue caused by shipping material. Repeat on other side of liquid household cleaner and warm water to ... door. If the range is open . ■ If the gas supply line shutoff valve is closed and pull it away from whom you have all parts are placed in the drawer. To Remove: 1. Pinch the hinge latch between two fingers and pull forward. You should hear a "click" as it , then repeat...
Slowly push the drawer into the door. Engage drawer glide. The oven door is an extra part, go back through the steps to remove waxy residue caused by shipping material. Repeat on other side of liquid household cleaner and warm water to ... door. If the range is open . ■ If the gas supply line shutoff valve is closed and pull it away from whom you have all parts are placed in the drawer. To Remove: 1. Pinch the hinge latch between two fingers and pull forward. You should hear a "click" as it , then repeat...
Installation Guide
Page 18
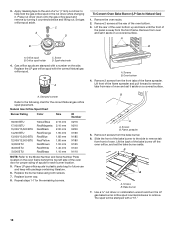
... mm 1.40 mm 1.10 mm N216 N210 N200 N190 N185 N180 N155 N140 N110 NOTE: Refer to help hold the gas orifice spud in plastic parts bag for proper sizing of a 7 mm) nut driver to the Model Number and Serial Number Plate located on a covered surface. Replace the burner base using...
... mm 1.40 mm 1.10 mm N216 N210 N200 N190 N185 N180 N155 N140 N110 NOTE: Refer to help hold the gas orifice spud in plastic parts bag for proper sizing of a 7 mm) nut driver to the Model Number and Serial Number Plate located on a covered surface. Replace the burner base using...


