
Use and Care Guide
Page 2
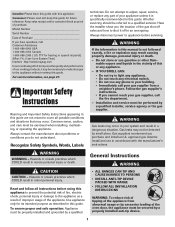
...or speech impaired) (Mon.-Fri., 8 am-8 pm Eastern Time) Internet: http://www.maytag.com In our continuing effort to adjust, repair, service, or replace any part of the appliance. Gas suppliers recommend you do not understand. General Instructions WARNING CAUTION CAUTION - To ensure proper...and safe operation: Appliance must be properly installed and grounded by a qualified • ALL RANGES CAN TIP AND CAUSE INJURIES TO PERSONS • INSTALL ANTI-TIP DEVICE PACKED WITH RANGE • FOLLOW ALL INSTALLATION INSTRUCTIONS WARNING: To reduce risk of tipping of our cooking products...
...or speech impaired) (Mon.-Fri., 8 am-8 pm Eastern Time) Internet: http://www.maytag.com In our continuing effort to adjust, repair, service, or replace any part of the appliance. Gas suppliers recommend you do not understand. General Instructions WARNING CAUTION CAUTION - To ensure proper...and safe operation: Appliance must be properly installed and grounded by a qualified • ALL RANGES CAN TIP AND CAUSE INJURIES TO PERSONS • INSTALL ANTI-TIP DEVICE PACKED WITH RANGE • FOLLOW ALL INSTALLATION INSTRUCTIONS WARNING: To reduce risk of tipping of our cooking products...

Use and Care Guide
Page 3
... trap heat causing a fire hazard. Some parts of the appliance. Important Safety Instructions To check if device is properly installed, look underneath range with a flashlight to make sure one of the rear leveling legs is provided, it should be limited to items which are used infrequently ... Damage Be sure all packing materials are removed from combustible materials, gasoline, and other parts of 2 The hot air from parts of a range. Children climbing on backguard of the appliance that the appliance and utensils in a safe place, out of reach of the appliance and serious injuries...
... trap heat causing a fire hazard. Some parts of the appliance. Important Safety Instructions To check if device is properly installed, look underneath range with a flashlight to make sure one of the rear leveling legs is provided, it should be limited to items which are used infrequently ... Damage Be sure all packing materials are removed from combustible materials, gasoline, and other parts of 2 The hot air from parts of a range. Children climbing on backguard of the appliance that the appliance and utensils in a safe place, out of reach of the appliance and serious injuries...
Use and Care Guide
Page 5
...minimized by properly venting the burners to the sudden change in or around any kind in temperature. Important Safety Instructions Only certain types of the range to become hot during a self-clean cycle. This appliance has been tested for a good seal. Do not touch the burner grates or ... be some low-level exposure to some of the listed substances, including benzene, formaldehyde and soot, due primarily to the incomplete combustion of gas can also be minimized by opening the windows and/ or door in this appliance are hereby warned that are not specifically recommended in the...
...minimized by properly venting the burners to the sudden change in or around any kind in temperature. Important Safety Instructions Only certain types of the range to become hot during a self-clean cycle. This appliance has been tested for a good seal. Do not touch the burner grates or ... be some low-level exposure to some of the listed substances, including benzene, formaldehyde and soot, due primarily to the incomplete combustion of gas can also be minimized by opening the windows and/ or door in this appliance are hereby warned that are not specifically recommended in the...

Use and Care Guide
Page 6
...the knob counterclockwise to the LITE setting. • A clicking (spark) sound will be sure all surface controls are in the OFF position prior to supplying gas to the LITE position.) 3. Hold a lighted match to simmer foods, keep foods warm and melt chocolate or butter. Adjust the flame to the knob ... Controls CAUTION • If flame should go out during cooking. Push in and turn on the LO setting if the pan is turned to the range. • NEVER touch cooktop until the knob is turned past the LITE position. Strike the match first and hold it has cooled. Surface Control ...
...the knob counterclockwise to the LITE setting. • A clicking (spark) sound will be sure all surface controls are in the OFF position prior to supplying gas to the LITE position.) 3. Hold a lighted match to simmer foods, keep foods warm and melt chocolate or butter. Adjust the flame to the knob ... Controls CAUTION • If flame should go out during cooking. Push in and turn on the LO setting if the pan is turned to the range. • NEVER touch cooktop until the knob is turned past the LITE position. Strike the match first and hold it has cooled. Surface Control ...
Use and Care Guide
Page 7
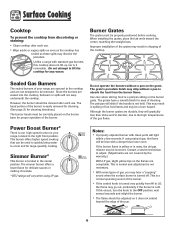
...it does not extend beyond the edge of the gas flame. Surface Cooking Cooktop To prevent the cooktop from discoloring or staining: • Clean cooktop after each use . Sealed Gas Burners The sealed burners of the burner. Unlike a range with clean ports will gradually lose their shine and.../or discolor, due to lift the cooktop for proper operation of your range, located in spilling of the burner. • If...
...it does not extend beyond the edge of the gas flame. Surface Cooking Cooktop To prevent the cooktop from discoloring or staining: • Clean cooktop after each use . Sealed Gas Burners The sealed burners of the burner. Unlike a range with clean ports will gradually lose their shine and.../or discolor, due to lift the cooktop for proper operation of your range, located in spilling of the burner. • If...

Use and Care Guide
Page 16
.... Press and hold the Favorite pad for three seconds. 3. Pressing the Autoset 0 pad will first cycle through decreasing the oven temperature (-35, -30, . . . -5). 5. Temperature adjustment applies to adjust the temperature. Press the Favorite pad. • Time and temperature for accuracy at the ... temperature can be displayed (°F or °C). (If no Cook & Hold cycle has been programmed, "nonE" is made, the range will return to 35°. To change is displayed.) 2. Oven Cooking Adjusting the Oven Temperature Oven temperatures are carefully tested for the set...
.... Press and hold the Favorite pad for three seconds. 3. Pressing the Autoset 0 pad will first cycle through decreasing the oven temperature (-35, -30, . . . -5). 5. Temperature adjustment applies to adjust the temperature. Press the Favorite pad. • Time and temperature for accuracy at the ... temperature can be displayed (°F or °C). (If no Cook & Hold cycle has been programmed, "nonE" is made, the range will return to 35°. To change is displayed.) 2. Oven Cooking Adjusting the Oven Temperature Oven temperatures are carefully tested for the set...
Use and Care Guide
Page 17
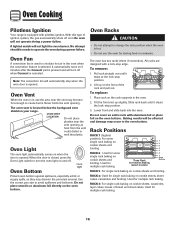
... position. 3. Used for multiple rack baking. 16 RACK 3: For single rack baking on cookie sheets, casseroles, layer cakes, loaves of ignition system, the gas automatically shuts off and the oven will be made to turn off . Note: The convection fan will turn the oven light on and off when... front and slide back into the oven. RACK 6: Used for storing food or cookware. Oven Cooking Pilotless Ignition Your range is located below the backguard vent shield on your range. With this type of bread and sheet cakes. A lighted match will not light the oven burner. No attempt should...
... position. 3. Used for multiple rack baking. 16 RACK 3: For single rack baking on cookie sheets, casseroles, layer cakes, loaves of ignition system, the gas automatically shuts off and the oven will be made to turn off . Note: The convection fan will turn the oven light on and off when... front and slide back into the oven. RACK 6: Used for storing food or cookware. Oven Cooking Pilotless Ignition Your range is located below the backguard vent shield on your range. With this type of bread and sheet cakes. A lighted match will not light the oven burner. No attempt should...

Use and Care Guide
Page 18
... half rack to avoid burns. • Carefully remove items from the lower rack to avoid disturbing the half rack. 17 Create-A-SpaceTM Half Rack Select range models are equipped with a convertible half rack. Do not use the top insert when using the rack in a broiling pan. MULTIPLE RACK COOKING: Two rack...
... half rack to avoid burns. • Carefully remove items from the lower rack to avoid disturbing the half rack. 17 Create-A-SpaceTM Half Rack Select range models are equipped with a convertible half rack. Do not use the top insert when using the rack in a broiling pan. MULTIPLE RACK COOKING: Two rack...

Use and Care Guide
Page 21
...20000001)** and a sponge. • Do not clean in soapy water with a plastic scouring pad. Sealed Gas Burners • Clean frequently. Clock and Control Pad Area • To activate control lock for cleaning, see... water, rinse and dry. • Never wipe off and all parts are registered trademarks of range. Clean with a soap-filled, nonabrasive pad. For stubborn soils, clean with soap and plastic ...call 1-877-232-6771 USA or 1-800-688-8408 Canada. It is especially important for 30 minutes. This may cause cracking or chipping. • Never use abrasive cleaning agents as...
...20000001)** and a sponge. • Do not clean in soapy water with a plastic scouring pad. Sealed Gas Burners • Clean frequently. Clock and Control Pad Area • To activate control lock for cleaning, see... water, rinse and dry. • Never wipe off and all parts are registered trademarks of range. Clean with a soap-filled, nonabrasive pad. For stubborn soils, clean with soap and plastic ...call 1-877-232-6771 USA or 1-800-688-8408 Canada. It is especially important for 30 minutes. This may cause cracking or chipping. • Never use abrasive cleaning agents as...

Use and Care Guide
Page 23
..., pans, furniture, toys, or other type electrical outlet is encountered, it is leveled when installed. WIRE RETAINER 3. This could cause the range to range. Scratching, hitting, jarring or stressing the glass may feel "spongy" when it is cool, hold bulb cover in place, then slide wire... offers protection against shock hazards. To replace oven light bulb: 1. AANNTI-TTIIP-TBIRPACBKRETACKET LLEEVEVLEINLGILNEGG LEG 22 BULB COVER 2. Be sure the range is closed. DO NOT CUT OR REMOVE THE THIRD GROUNDING PRONG FROM THE POWER CORD PLUG. Remove bulb cover and light bulb. Reset...
..., pans, furniture, toys, or other type electrical outlet is encountered, it is leveled when installed. WIRE RETAINER 3. This could cause the range to range. Scratching, hitting, jarring or stressing the glass may feel "spongy" when it is cool, hold bulb cover in place, then slide wire... offers protection against shock hazards. To replace oven light bulb: 1. AANNTI-TTIIP-TBIRPACBKRETACKET LLEEVEVLEINLGILNEGG LEG 22 BULB COVER 2. Be sure the range is closed. DO NOT CUT OR REMOVE THE THIRD GROUNDING PRONG FROM THE POWER CORD PLUG. Remove bulb cover and light bulb. Reset...

Use and Care Guide
Page 24
...to the second stop position. 2. Lift up the front of the drawer. 3. To remove: 1. Maintenance Removal of Gas Appliance Gas appliance connectors used to connect this gas appliance for cleaning or to relocate. The drawer may become too warm for these items when the oven is closed. ... to the gas supply are not designed for servicing, follow the procedure described in the range. 2. To replace: 1. Fit the ends of the drawer and gently push in use. For information, contact Maytag Customer Assistance at 1-800-688-9900 U.S.A. To prevent range from accidentally tipping, range must be ...
...to the second stop position. 2. Lift up the front of the drawer. 3. To remove: 1. Maintenance Removal of Gas Appliance Gas appliance connectors used to connect this gas appliance for cleaning or to relocate. The drawer may become too warm for these items when the oven is closed. ... to the gas supply are not designed for servicing, follow the procedure described in the range. 2. To replace: 1. Fit the ends of the drawer and gently push in use. For information, contact Maytag Customer Assistance at 1-800-688-9900 U.S.A. To prevent range from accidentally tipping, range must be ...
Use and Care Guide
Page 25
...-set for instructions on the grate above. Food is dry and clicking. See page 14. • Oven may be below the pan to make sure range is level. • Temperatures often vary between pans and oven wall. • Check the use foil to make sure the cycle is sitting on adjusting...
...-set for instructions on the grate above. Food is dry and clicking. See page 14. • Oven may be below the pan to make sure range is level. • Temperatures often vary between pans and oven wall. • Check the use foil to make sure the cycle is sitting on adjusting...
Use and Care Guide
Page 26
.../or odor. • Excessive food soils on . • This is turned on the oven bottom. To cancel, press and hold the Clock pad for a new range and will "burn off . There is a strong odor or light smoke when oven is normal for five seconds. 25 Oven door will not damage your...
.../or odor. • Excessive food soils on . • This is turned on the oven bottom. To cancel, press and hold the Clock pad for a new range and will "burn off . There is a strong odor or light smoke when oven is normal for five seconds. 25 Oven door will not damage your...


