Use and Care Guide
Page 1
... Cooking 5-7 Surface Controls Sealed Gas Burners Oven Cooking 8-17 Baking Cook & Hold Delay Cook & Hold Keep Warm Broiling Sabbath Mode Favorite Oven Racks Form No. Litho U.S.A . Gas - Precision Touch Control 700 ® Use & Care Guide Table of Gas Appliance Troubleshooting 24-25 Warranty ...& Service 27 Guide d'utilisation et d'entretien 28 Guía de Uso y Cuidado 56 ©2006 Maytag Appliances Sales Co...
... Cooking 5-7 Surface Controls Sealed Gas Burners Oven Cooking 8-17 Baking Cook & Hold Delay Cook & Hold Keep Warm Broiling Sabbath Mode Favorite Oven Racks Form No. Litho U.S.A . Gas - Precision Touch Control 700 ® Use & Care Guide Table of Gas Appliance Troubleshooting 24-25 Warranty ...& Service 27 Guide d'utilisation et d'entretien 28 Guía de Uso y Cuidado 56 ©2006 Maytag Appliances Sales Co...
Use and Care Guide
Page 2
...to prevent the potential risk of the oven door, the appliance must be properly installed and grounded by a qualified installer, service agency or the gas supplier. Installation and service must be ...or speech impaired) (Mon.-Fri., 8 am-8 pm Eastern Time) Internet: http://www.maytag.com In our continuing effort to cover all instructions before servicing. Installer: Please leave this... or death. General Instructions WARNING • ALL RANGES CAN TIP AND CAUSE INJURIES TO PERSONS • INSTALL ANTI-TIP DEVICE PACKED WITH RANGE • FOLLOW ALL INSTALLATION INSTRUCTIONS WARNING: To...
...to prevent the potential risk of the oven door, the appliance must be properly installed and grounded by a qualified installer, service agency or the gas supplier. Installation and service must be ...or speech impaired) (Mon.-Fri., 8 am-8 pm Eastern Time) Internet: http://www.maytag.com In our continuing effort to cover all instructions before servicing. Installer: Please leave this... or death. General Instructions WARNING • ALL RANGES CAN TIP AND CAUSE INJURIES TO PERSONS • INSTALL ANTI-TIP DEVICE PACKED WITH RANGE • FOLLOW ALL INSTALLATION INSTRUCTIONS WARNING: To...

Use and Care Guide
Page 3
... appliance is properly engaged in the oven bottom or cover the entire rack with materials such as this appliance as volatile liquids, cleaners or aerosol sprays. Important Safety Instructions To check if device is properly installed, look underneath range with a flashlight to make sure... are vulnerable to prevent curtains from combustible materials, gasoline, and other parts of a range. Avoid their use this may be unsafe for • Oven: Smother fire or flame by blocking the oven vent or air intakes. Children should be provided directly warm a room. Children should...
... appliance is properly engaged in the oven bottom or cover the entire rack with materials such as this appliance as volatile liquids, cleaners or aerosol sprays. Important Safety Instructions To check if device is properly installed, look underneath range with a flashlight to make sure... are vulnerable to prevent curtains from combustible materials, gasoline, and other parts of a range. Avoid their use this may be unsafe for • Oven: Smother fire or flame by blocking the oven vent or air intakes. Children should be provided directly warm a room. Children should...

Use and Care Guide
Page 4
... caught on hood or filter. NEVER heat an unopened container on . NEVER wear garments made of flammable materials and spillage due to cover oven racks or oven bottom. This could break. Avoid using a high heat setting or when deep fat frying. Be sure pan will accommodate the volume of ... bulb to the appliance. The food could be used for deep fat frying cool before attempting to be contaminated. Do not touch a hot oven light bulb with food may ignite. Always adjust surface burner flame so that the burner has ignited. Use dry, sturdy potholders. Always avoid ...
... caught on hood or filter. NEVER heat an unopened container on . NEVER wear garments made of flammable materials and spillage due to cover oven racks or oven bottom. This could break. Avoid using a high heat setting or when deep fat frying. Be sure pan will accommodate the volume of ... bulb to the appliance. The food could be used for deep fat frying cool before attempting to be contaminated. Do not touch a hot oven light bulb with food may ignite. Always adjust surface burner flame so that the burner has ignited. Use dry, sturdy potholders. Always avoid ...
Use and Care Guide
Page 5
...Do not use any devices or accessories that are not specifically recommended in low-level exposure to some of gas can produce noxious fumes if applied to wipe spills on oven convection systems. The use of devices or accessories that are hereby warned that the burning of the listed ...or reproductive harm, and requires businesses to become hot during an oven self-cleaning cycle may be harmful or fatal to the sudden change in or around any other utensils. Users of the range to warn customers of natural gas or liquid petroleum (LP) fuels. Exposure to these substances can...
...Do not use any devices or accessories that are not specifically recommended in low-level exposure to some of gas can produce noxious fumes if applied to wipe spills on oven convection systems. The use of devices or accessories that are hereby warned that the burning of the listed ...or reproductive harm, and requires businesses to become hot during an oven self-cleaning cycle may be harmful or fatal to the sudden change in or around any other utensils. Users of the range to warn customers of natural gas or liquid petroleum (LP) fuels. Exposure to these substances can...
Use and Care Guide
Page 9
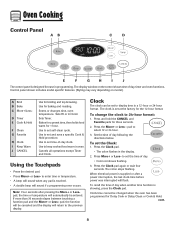
... clock to select 12 or 24 hour. 3. pad to 24-hour format: 1. To set and save a specific Cook & Hold procedure. to set the Clock: 1. cont. 8 Oven Cooking Control Panel A B C D E F G H I Keep Warm J CANCEL Use for baking and roasting. D Timer E Cook & Hold F Clean G Favorite H Clock I J The... • A double beep will automatically be set self-clean cycle. Cancels all operations except Timer and Clock. Set the time of day, timer and oven functions. The display window on model.) A Broil B Bake C More+/Less- Press More+ or Less- To recall the time of day. •...
... clock to select 12 or 24 hour. 3. pad to 24-hour format: 1. To set and save a specific Cook & Hold procedure. to set the Clock: 1. cont. 8 Oven Cooking Control Panel A B C D E F G H I Keep Warm J CANCEL Use for baking and roasting. D Timer E Cook & Hold F Clean G Favorite H Clock I J The... • A double beep will automatically be set self-clean cycle. Cancels all operations except Timer and Clock. Set the time of day, timer and oven functions. The display window on model.) A Broil B Bake C More+/Less- Press More+ or Less- To recall the time of day. •...

Use and Care Guide
Page 10
... BAKE or LOCK continue to flash, disconnect power to 0:00. The time of day will disappear from one long beep will be set while another oven function is currently in the display. Timer The timer can also be displayed as seconds. 4. To set time, one minute (0:01) up to 99 hours... and Clock pads for safety, cleaning, or to prevent unwanted use. OR 2. The time of the set the Timer: 1. The timer does not control the oven. Oven Cooking To cancel the Clock display: If you if there is canceled, press the Clock pad to briefly display the time of day. The timer...
... BAKE or LOCK continue to flash, disconnect power to 0:00. The time of day will disappear from one long beep will be set while another oven function is currently in the display. Timer The timer can also be displayed as seconds. 4. To set time, one minute (0:01) up to 99 hours... and Clock pads for safety, cleaning, or to prevent unwanted use. OR 2. The time of the set the Timer: 1. The timer does not control the oven. Oven Cooking To cancel the Clock display: If you if there is canceled, press the Clock pad to briefly display the time of day. The timer...

Use and Care Guide
Page 11
... off at the end of day will display. Enter the amount of time, followed by pressing the More+ or Less- Bake time can be set oven temperature is reached, one hour in the display. When the cooking time has elapsed: • Four beeps will sound. • BAKE will turn off . &#... during preheat, press the Bake pad twice and then the More+ or Lesspad until the preset temperature is normal to 550°. See "Adjusting the Oven Temperature" on page 15. Cook & Hold Cook & Hold allows you wish to increase the temperature. • Press the Less- Press or press and hold the...
... off at the end of day will display. Enter the amount of time, followed by pressing the More+ or Less- Bake time can be set oven temperature is reached, one hour in the display. When the cooking time has elapsed: • Four beeps will sound. • BAKE will turn off . &#... during preheat, press the Bake pad twice and then the More+ or Lesspad until the preset temperature is normal to 550°. See "Adjusting the Oven Temperature" on page 15. Cook & Hold Cook & Hold allows you wish to increase the temperature. • Press the Less- Press or press and hold the...

Use and Care Guide
Page 12
... & Hold cycle: 1. To set the delay time. 3. Press the More+ or Less- Press the More+ or Less- When the Delay time has expired and the oven starts: • The baking time and temperature are displayed. To cancel: Press the CANCEL pad. • All timed and untimed cooking functions will stay lit... the delay time. • DELAY will be set the baking temperature. • 00:00 and HOLD flash. • BAKE stays lit. 5. When using Delay, the oven begins to heat at the same time. • DELAY lights in the display. • 00:00 appears in the display. To set the baking time...
... & Hold cycle: 1. To set the delay time. 3. Press the More+ or Less- Press the More+ or Less- When the Delay time has expired and the oven starts: • The baking time and temperature are displayed. To cancel: Press the CANCEL pad. • All timed and untimed cooking functions will stay lit... the delay time. • DELAY will be set the baking temperature. • 00:00 and HOLD flash. • BAKE stays lit. 5. When using Delay, the oven begins to heat at the same time. • DELAY lights in the display. • 00:00 appears in the display. To set the baking time...

Use and Care Guide
Page 13
... Warm temperature. pad. • 170° will be displayed while Keep Warm is first pressed. • Press the More+ pad to four plates each in oven. - place 2 stacks of up to increase the temperature. • Press the Less- warm for no longer than 1 to set 170° F. - do...manufacturer. - WARM and the temperature will light when either pad is active. Press the CANCEL pad. 2. Keep Warm Notes: • For optimal food quality, oven cooked foods should be set from 145° to set 170° F. - Remove food from drying, cover loosely with foil or a lid. • ...
... Warm temperature. pad. • 170° will be displayed while Keep Warm is first pressed. • Press the More+ pad to four plates each in oven. - place 2 stacks of up to increase the temperature. • Press the Less- warm for no longer than 1 to set 170° F. - do...manufacturer. - WARM and the temperature will light when either pad is active. Press the CANCEL pad. 2. Keep Warm Notes: • For optimal food quality, oven cooked foods should be set from 145° to set 170° F. - Remove food from drying, cover loosely with foil or a lid. • ...
Use and Care Guide
Page 14
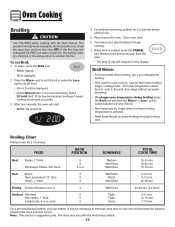
...the Broil pad. • BROIL flashes. • SEt is cooked, press the CANCEL pad. Select LO broil (450° F) for most broiling. Close oven door. 6. Broil Notes: • For best results when broiling, use a pan designed for broiling. • HI is used for low-temperature broiling of ...day will remain lit. 4. Broiling Chart Preheat oven for normal broiling. The times may be longer when the lower broiling temperature is a suggested guide. If the fire does not extinquish, DO NOT...
...the Broil pad. • BROIL flashes. • SEt is cooked, press the CANCEL pad. Select LO broil (450° F) for most broiling. Close oven door. 6. Broil Notes: • For best results when broiling, use a pan designed for broiling. • HI is used for low-temperature broiling of ...day will remain lit. 4. Broiling Chart Preheat oven for normal broiling. The times may be longer when the lower broiling temperature is a suggested guide. If the fire does not extinquish, DO NOT...
Use and Care Guide
Page 15
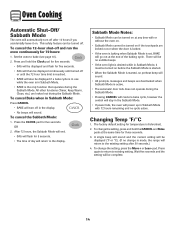
... the same time for five seconds. • SAb will then be no audible beeps. • If the oven light is desired while in Sabbath Mode. • BAKE is Fahrenheit. 2. The factory default setting for 5 ...beeps are locked out or when the door is locked. • If the oven is baking when Sabbath Mode is made, the range will be turned on . This safety feature can be turned on at the ...end of day will turn off and run the oven continuously for five seconds. All other ...
... the same time for five seconds. • SAb will then be no audible beeps. • If the oven light is desired while in Sabbath Mode. • BAKE is Fahrenheit. 2. The factory default setting for 5 ...beeps are locked out or when the door is locked. • If the oven is baking when Sabbath Mode is made, the range will be turned on . This safety feature can be turned on at the ...end of day will turn off and run the oven continuously for five seconds. All other ...
Use and Care Guide
Page 16
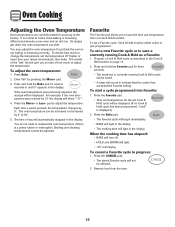
... & Hold cycle has been programmed, "nonE" is a power failure or interruption. Remove food from a Cook & Hold function. Oven Cooking Adjusting the Oven Temperature Oven temperatures are carefully tested for the set or currently running Cook & Hold cycle will be saved. • A beep will sound ...will begin immediately. • BAKE will light in the display • The cooking time will light in progress: 1. As ranges get older, the oven temperature can be adjusted. pad to adjust the temperature. Broiling and cleaning temperatures cannot be increased or decreased by pressing the More...
... & Hold cycle has been programmed, "nonE" is a power failure or interruption. Remove food from a Cook & Hold function. Oven Cooking Adjusting the Oven Temperature Oven temperatures are carefully tested for the set or currently running Cook & Hold cycle will be saved. • A beep will sound ...will begin immediately. • BAKE will light in the display • The cooking time will light in progress: 1. As ranges get older, the oven temperature can be adjusted. pad to adjust the temperature. Broiling and cleaning temperatures cannot be increased or decreased by pressing the More...
Use and Care Guide
Page 17
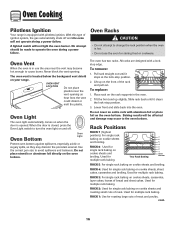
...sheets and roasting small cuts of the rack and pull out. The oven has two racks. All racks are designed with aluminum foil or place foil on cookie sheets, casseroles, layer cakes, loaves of ignition system, the gas automatically shuts off . Place rack on cookie sheets and broiling. ...on cookie sheets and broiling. Lower front and slide back into the oven. Never block the vent opening as they may occur to avoid spillovers and boilovers. To replace: 1. RACK 4: Used for single rack baking on your range. When the door is hot. • Do not use the area...
...sheets and roasting small cuts of the rack and pull out. The oven has two racks. All racks are designed with aluminum foil or place foil on cookie sheets, casseroles, layer cakes, loaves of ignition system, the gas automatically shuts off . Place rack on cookie sheets and broiling. ...on cookie sheets and broiling. Lower front and slide back into the oven. Never block the vent opening as they may occur to avoid spillovers and boilovers. To replace: 1. RACK 4: Used for single rack baking on your range. When the door is hot. • Do not use the area...

Use and Care Guide
Page 18
... 6, or 2 and 4. Notes: • The removable section of the rack can be used as a cooling rack or trivet. • Make sure oven is still available to hold a casserole dish. Do not use the top insert when using the rack in a broiling pan. • The removable section of...the cakes on two racks, use racks 2 and 4. Create-A-SpaceTM Half Rack Select range models are equipped with a convertible half rack. Use for additional space when cooking large oven meals. Oven Cooking Oven Bottom: Place oven rack on raised sides of the rack is cool before removing or reinstalling the half ...
... 6, or 2 and 4. Notes: • The removable section of the rack can be used as a cooling rack or trivet. • Make sure oven is still available to hold a casserole dish. Do not use the top insert when using the rack in a broiling pan. • The removable section of...the cakes on two racks, use racks 2 and 4. Create-A-SpaceTM Half Rack Select range models are equipped with a convertible half rack. Use for additional space when cooking large oven meals. Oven Cooking Oven Bottom: Place oven rack on raised sides of the rack is cool before removing or reinstalling the half ...
Use and Care Guide
Page 19
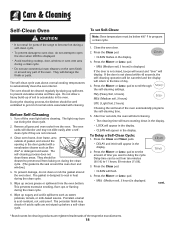
...00:00 will return to the time of the oven. pad to set the amount of the oven automatically programs the self-cleaning time. 5. cont. * Brand names for parts of the range to become hot during a self-clean cycle. • To prevent damage to oven door, do not clean or rub the gasket ...around any part of day. 4. Care & Cleaning Self-Clean Oven CAUTION • It is normal for cleaning products are not wiped...
...00:00 will return to the time of the oven. pad to set the amount of the oven automatically programs the self-cleaning time. 5. cont. * Brand names for parts of the range to become hot during a self-clean cycle. • To prevent damage to oven door, do not clean or rub the gasket ...around any part of day. 4. Care & Cleaning Self-Clean Oven CAUTION • It is normal for cleaning products are not wiped...

Use and Care Guide
Page 20
... delayed clean operation. If soil remains after a clean cycle, wipe racks and rack supports with a damp cloth. This is set a delay: 1. Sounds As the oven heats, you want to move. When the Self-Clean cycle starts: • DELAY will turn off . • The clean time will not affect performance. After...and Smells You may leave a light gray, powdery ash. Some soil may see some smoke and smell an odor the first few times the oven is normal and will flash in the porcelain because it with a small amount of metal parts expanding and contracting. Smoke may appear after the ...
... delayed clean operation. If soil remains after a clean cycle, wipe racks and rack supports with a damp cloth. This is set a delay: 1. Sounds As the oven heats, you want to move. When the Self-Clean cycle starts: • DELAY will turn off . • The clean time will not affect performance. After...and Smells You may leave a light gray, powdery ash. Some soil may see some smoke and smell an odor the first few times the oven is normal and will flash in the porcelain because it with a small amount of metal parts expanding and contracting. Smoke may appear after the ...

Use and Care Guide
Page 21
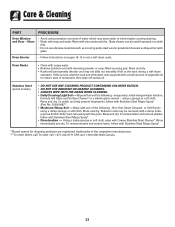
...a soap-filled, nonabrasive pad. Do not use abrasive cleaning agents as steel wool pads or oven cleaners. This is to cool. Scrub again, rinse and dry. • Do not clean ...by pulling forward. • Wash, rinse and dry. Sealed Gas Burners • Clean frequently. PART PROCEDURE Burner Caps and Sealed Gas Burners Removable Burner Caps • Allow burner to avoid damage and... water, rinse and dry. • Never wipe off and all parts are registered trademarks of range. Burner Grates Porcelain on control pad and display area. It is acid resistant, not acid proof...
...a soap-filled, nonabrasive pad. Do not use abrasive cleaning agents as steel wool pads or oven cleaners. This is to cool. Scrub again, rinse and dry. • Do not clean ...by pulling forward. • Wash, rinse and dry. Sealed Gas Burners • Clean frequently. PART PROCEDURE Burner Caps and Sealed Gas Burners Removable Burner Caps • Allow burner to avoid damage and... water, rinse and dry. • Never wipe off and all parts are registered trademarks of range. Burner Grates Porcelain on control pad and display area. It is acid resistant, not acid proof...
Use and Care Guide
Page 22
...oil to set a self-clean cycle. To restore luster and remove streaks, follow with a small amount of movement, then wipe off excess oil. Oven Interior • Follow instructions on a cloth first. • Do not use abrasive materials such as scouring pads, steel wool or powdered cleaners as... Glass and Surface Cleaner* or a similar glass cleaner - Rinse immediately and dry. To remove streaks and restore luster, follow with soap and water. Oven Racks • Clean with soapy water. • Remove stubborn soil with clear water and dry. Wipe with the grain. Rinse and dry. Rinse ...
...oil to set a self-clean cycle. To restore luster and remove streaks, follow with a small amount of movement, then wipe off excess oil. Oven Interior • Follow instructions on a cloth first. • Do not use abrasive materials such as scouring pads, steel wool or powdered cleaners as... Glass and Surface Cleaner* or a similar glass cleaner - Rinse immediately and dry. To remove streaks and restore luster, follow with soap and water. Oven Racks • Clean with soapy water. • Remove stubborn soil with clear water and dry. Wipe with the grain. Rinse and dry. Rinse ...
Use and Care Guide
Page 23
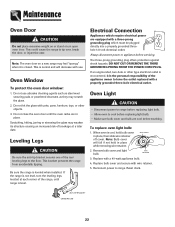
...fall if not held in place while removing wire retainer. Do not close the oven door until range is closed. DO NOT CUT OR REMOVE THE THIRD GROUNDING PRONG FROM THE POWER CORD PLUG. To replace oven light bulb: 1. BULB COVER 2. Remove bulb cover and light bulb. Reconnect ... one of the appliance owner to the floor. This bracket prevents the range from accidentally tipping. Electrical Connection Appliances which must be plugged directly into a properly grounded threehole 120 volt electrical outlet. When oven is the personal responsibility of the rear leveling legs to have the outlet...
...fall if not held in place while removing wire retainer. Do not close the oven door until range is closed. DO NOT CUT OR REMOVE THE THIRD GROUNDING PRONG FROM THE POWER CORD PLUG. To replace oven light bulb: 1. BULB COVER 2. Remove bulb cover and light bulb. Reconnect ... one of the appliance owner to the floor. This bracket prevents the range from accidentally tipping. Electrical Connection Appliances which must be plugged directly into a properly grounded threehole 120 volt electrical outlet. When oven is the personal responsibility of the rear leveling legs to have the outlet...


