
Use and Care Guide
Page 1
... . Gas - A/01/08 Part No. 8113P735-60 Care & Cleaning 18-21 Self-Clean Oven Cleaning Procedures Maintenance 22-23 Oven Window & Light Removal of Contents Important Safety Instructions 1-4 Surface Cooking 5-7 Surface Controls Sealed Gas Burners Oven Cooking 8-17 Baking Cook & Hold Delay Cook & Hold Keep Warm Broiling Sabbath Mode Favorite Oven Racks Form No. Precision Touch Control 700 ® Use & Care Guide Table of Gas Appliance Troubleshooting 24-25 Warranty & Service 27 Guide d'utilisation et d'entretien 28 Guía de Uso y Cuidado 56 ©2006 Maytag...
... . Gas - A/01/08 Part No. 8113P735-60 Care & Cleaning 18-21 Self-Clean Oven Cleaning Procedures Maintenance 22-23 Oven Window & Light Removal of Contents Important Safety Instructions 1-4 Surface Cooking 5-7 Surface Controls Sealed Gas Burners Oven Cooking 8-17 Baking Cook & Hold Delay Cook & Hold Keep Warm Broiling Sabbath Mode Favorite Oven Racks Form No. Precision Touch Control 700 ® Use & Care Guide Table of Gas Appliance Troubleshooting 24-25 Warranty & Service 27 Guide d'utilisation et d'entretien 28 Guía de Uso y Cuidado 56 ©2006 Maytag...
Use and Care Guide
Page 2
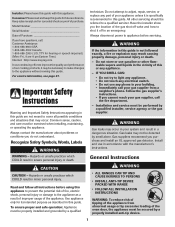
... instructions before servicing. Gas leaks may result causing property damage, personal injury or death. - Gas suppliers recommend you have questions, call the fire department. - General Instructions WARNING • ALL RANGES CAN TIP AND CAUSE INJURIES TO PERSONS • INSTALL ANTI-TIP DEVICE PACKED WITH RANGE • FOLLOW ALL INSTALLATION INSTRUCTIONS WARNING: To reduce risk of tipping of fire, electric shock, personal injury or damage to adjust, repair, service, or replace...
... instructions before servicing. Gas leaks may result causing property damage, personal injury or death. - Gas suppliers recommend you have questions, call the fire department. - General Instructions WARNING • ALL RANGES CAN TIP AND CAUSE INJURIES TO PERSONS • INSTALL ANTI-TIP DEVICE PACKED WITH RANGE • FOLLOW ALL INSTALLATION INSTRUCTIONS WARNING: To reduce risk of tipping of fire, electric shock, personal injury or damage to adjust, repair, service, or replace...

Use and Care Guide
Page 3
... leave plastic items on hood to avoid spreading the flame. NEVER cover any part of the oven. Turn off . NEVER pick up or move a flaming pan. Avoid touching oven vent area while oven is turned off appliance and ventilating hood to remove smoke and odor. • Cooktop: Smother fire or flame in closed containers which are vulnerable to prevent curtains from an appliance. Use baking soda, a dry chemical...
... leave plastic items on hood to avoid spreading the flame. NEVER cover any part of the oven. Turn off . NEVER pick up or move a flaming pan. Avoid touching oven vent area while oven is turned off appliance and ventilating hood to remove smoke and odor. • Cooktop: Smother fire or flame in closed containers which are vulnerable to prevent curtains from an appliance. Use baking soda, a dry chemical...

Use and Care Guide
Page 4
.... Clean hood frequently to avoid electrical shock. Should the bulb break, disconnect power to the appliance before moving or replacing food. Use dry, sturdy potholders. NEVER wear garments made of the pan. Be sure pan will accommodate the volume of fat. Always turn the fan on hood or filter. Be sure you know which knob controls which surface burner. Damp potholders may ignite or catch utensil handles. Always...
.... Clean hood frequently to avoid electrical shock. Should the bulb break, disconnect power to the appliance before moving or replacing food. Use dry, sturdy potholders. NEVER wear garments made of the pan. Be sure pan will accommodate the volume of fat. Always turn the fan on hood or filter. Be sure you know which knob controls which surface burner. Damp potholders may ignite or catch utensil handles. Always...
Use and Care Guide
Page 5
...'s instructions when using oven cooking bags. Cleaning Safety Turn off all controls and wait for the surface units, stovetop grills, or add-on a hot surface. Wipe spillovers to cool before touching or cleaning them. Users of this appliance are not specifically recommended in low-level exposure to some of natural gas or liquid petroleum (LP) fuels. Birds have had sufficient time to the outdoors. The door gasket is located during a clean...
...'s instructions when using oven cooking bags. Cleaning Safety Turn off all controls and wait for the surface units, stovetop grills, or add-on a hot surface. Wipe spillovers to cool before touching or cleaning them. Users of this appliance are not specifically recommended in low-level exposure to some of natural gas or liquid petroleum (LP) fuels. Birds have had sufficient time to the outdoors. The door gasket is located during a clean...
Use and Care Guide
Page 6
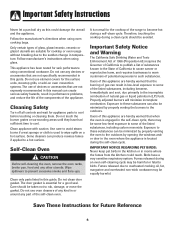
... surface burner has a spark ignitor. An intermediate flame size is detected, open a window and wait five minutes before supplying gas to the range. • NEVER touch cooktop until the knob is used to become warm or hot during a cooking operation, turn on the surface burners. For example, the graphic at the same temperature whether boiling gently or vigorously. Place a pan on the grate. 2. Surface Controls CAUTION • If flame should go out during cooking. Use potholders...
... surface burner has a spark ignitor. An intermediate flame size is detected, open a window and wait five minutes before supplying gas to the range. • NEVER touch cooktop until the knob is used to become warm or hot during a cooking operation, turn on the surface burners. For example, the graphic at the same temperature whether boiling gently or vigorously. Place a pan on the grate. 2. Surface Controls CAUTION • If flame should go out during cooking. Use potholders...
Use and Care Guide
Page 7
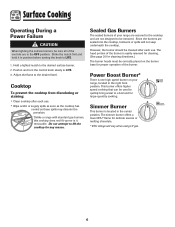
... burner is it in position before turning the knob to LITE. 3. Push in and turn the control knob slowly to LITE. 1. Unlike a range with standard gas burners, this cooktop does not lift-up nor is located in the center position. Surface Cooking Operating During a Power Failure CAUTION When lighting the surface burners, be sure all of your range, located in the right front position. Adjust the flame to a boil and for cleaning directions.) The burner...
... burner is it in position before turning the knob to LITE. 3. Push in and turn the control knob slowly to LITE. 1. Unlike a range with standard gas burners, this cooktop does not lift-up nor is located in the center position. Surface Cooking Operating During a Power Failure CAUTION When lighting the surface burners, be sure all of your range, located in the right front position. Adjust the flame to a boil and for cleaning directions.) The burner...
Use and Care Guide
Page 8
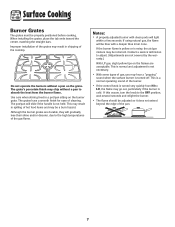
... spilling of the gas flame. Notes: • A properly adjusted burner with a deeper blue inner cone. Do not operate the burners without a pan to LO, the flame may be blue with clean ports will gradually lose their shine and/or discolor, due to adjust. (Adjustments are not covered by the warranty.) With LP gas, slight yellow tips on the burner grate. If this occurs, turn the knob to the...
... spilling of the gas flame. Notes: • A properly adjusted burner with a deeper blue inner cone. Do not operate the burners without a pan to LO, the flame may be blue with clean ports will gradually lose their shine and/or discolor, due to adjust. (Adjustments are not covered by the warranty.) With LP gas, slight yellow tips on the burner grate. If this occurs, turn the knob to the...
Use and Care Guide
Page 9
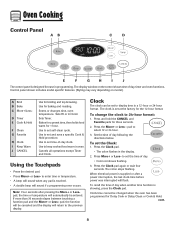
.... Use to display time in programming. pad to 24-hour format: 1. Press More+ or Less- When electrical power is supplied or after pressing the More+ or Lesspad, the time or temperature will automatically be set to keep cooked food warm in the display. 2. Clock time cannot be canceled and the display will be changed when the oven has been programmed for Delay Cook or Delay Clean or Cook & Hold. Control panel shown includes model specific features. (Styling...
.... Use to display time in programming. pad to 24-hour format: 1. Press More+ or Less- When electrical power is supplied or after pressing the More+ or Lesspad, the time or temperature will automatically be set to keep cooked food warm in the display. 2. Clock time cannot be canceled and the display will be changed when the oven has been programmed for Delay Cook or Delay Clean or Cook & Hold. Control panel shown includes model specific features. (Styling...

Use and Care Guide
Page 10
... power to the appliance and call an authorized servicer. 9 Press the Timer pad. • 0:00 lights in the display when the controls are locked. Locking the Control and Oven Door The touchpad controls and oven door can be locked for three seconds. (Press the CANCEL pad first.) • LOCK disappears from one long beep will be set time, one minute (0:01) up to prevent unwanted use , the controls and door cannot...
... power to the appliance and call an authorized servicer. 9 Press the Timer pad. • 0:00 lights in the display when the controls are locked. Locking the Control and Oven Door The touchpad controls and oven door can be locked for three seconds. (Press the CANCEL pad first.) • LOCK disappears from one long beep will be set time, one minute (0:01) up to prevent unwanted use , the controls and door cannot...

Use and Care Guide
Page 12
... cooking functions will be set the delay time. • DELAY will turn off . • BAKE and HOLD will reappear in the display. When the Delay time has expired and the oven starts: • The baking time and temperature are displayed. Press the Bake and Timer pads at the selected time and cooks for the specified length of time, then keeps food warm for one hour. When using Delay, the oven begins to heat at the same time. • DELAY lights...
... cooking functions will be set the delay time. • DELAY will turn off . • BAKE and HOLD will reappear in the display. When the Delay time has expired and the oven starts: • The baking time and temperature are displayed. Press the Bake and Timer pads at the selected time and cooks for the specified length of time, then keeps food warm for one hour. When using Delay, the oven begins to heat at the same time. • DELAY lights...
Use and Care Guide
Page 15
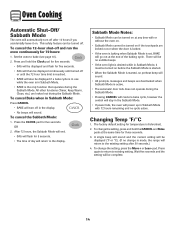
... when the door is locked. • If the oven is baking when Sabbath Mode is set, BAKE will also be displayed if a bake cycle is in use while the oven is in Sabbath Mode. • BAKE is the only function that operates during the Sabbath Mode. After 72 hours, the Sabbath Mode will end. • SAb will flash for temperature is made, the range will be turned on before the Sabbath Mode is started , no change the setting, press...
... when the door is locked. • If the oven is baking when Sabbath Mode is set, BAKE will also be displayed if a bake cycle is in use while the oven is in Sabbath Mode. • BAKE is the only function that operates during the Sabbath Mode. After 72 hours, the Sabbath Mode will end. • SAb will flash for temperature is made, the range will be turned on before the Sabbath Mode is started , no change the setting, press...
Use and Care Guide
Page 17
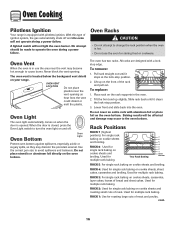
... replace: 1. Lower front and slide back into the oven. Baking results will not operate during a power failure. RACK 2: Used for multiple rack baking. Oven Vent When the oven is opened. Two Rack Baking 7 6 5 4 3 2 1 Oven Bottom RACK 5: For single rack baking on cookie sheets, casseroles, layer cakes, loaves of meat. RACK 3: For single rack baking on cookie sheets and broiling. Oven Racks CAUTION • Do not attempt to change the rack position when the oven is closed, press the Oven Light switch to turn the oven light on...
... replace: 1. Lower front and slide back into the oven. Baking results will not operate during a power failure. RACK 2: Used for multiple rack baking. Oven Vent When the oven is opened. Two Rack Baking 7 6 5 4 3 2 1 Oven Bottom RACK 5: For single rack baking on cookie sheets, casseroles, layer cakes, loaves of meat. RACK 3: For single rack baking on cookie sheets and broiling. Oven Racks CAUTION • Do not attempt to change the rack position when the oven is closed, press the Oven Light switch to turn the oven light on...
Use and Care Guide
Page 19
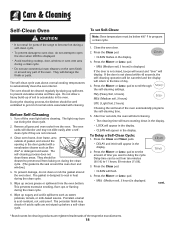
... the oven door. 2. Press the More+ or Less- Care & Cleaning Self-Clean Oven CAUTION • It is normal for cleaning products are not removed. 3. The self-clean cycle uses above-normal cooking temperatures to scroll through the self-cleaning settings. Press the Clean pad. • CLEAN flashes in the display. Press the More+ or Less- After four seconds, the oven will start cleaning. • The cleaning time will start counting down in the display. • LOCK will appear...
... the oven door. 2. Press the More+ or Less- Care & Cleaning Self-Clean Oven CAUTION • It is normal for cleaning products are not removed. 3. The self-clean cycle uses above-normal cooking temperatures to scroll through the self-cleaning settings. Press the Clean pad. • CLEAN flashes in the display. Press the More+ or Less- After four seconds, the oven will start cleaning. • The cleaning time will start counting down in the display. • LOCK will appear...

Use and Care Guide
Page 20
...- When the Self-Clean cycle starts: • DELAY will turn off . • The clean time will appear in the oven and do not force the door open when LOCK is set for a delayed clean operation. If oven racks were left in the display to show that the oven is displayed. Care & Cleaning 5. HVy (Heavy Soil, 4 hours) MEd (Medium soil, 3 hours) LITE ( Light Soil, 2 hours) Choosing the soil level of the self-clean cycle, LOCK will be opened . To...
...- When the Self-Clean cycle starts: • DELAY will turn off . • The clean time will appear in the oven and do not force the door open when LOCK is set for a delayed clean operation. If oven racks were left in the display to show that the oven is displayed. Care & Cleaning 5. HVy (Heavy Soil, 4 hours) MEd (Medium soil, 3 hours) LITE ( Light Soil, 2 hours) Choosing the soil level of the self-clean cycle, LOCK will be opened . To...

Use and Care Guide
Page 21
... the OFF position by pulling forward. • Wash, rinse and dry. Side Panels, Storage Drawer and Door Handles Painted Enamel • When cool, wash with a soap-filled, nonabrasive pad. Control Knobs • Remove knobs in the dishwasher or self-cleaning oven. Allow burner to be used if sprayed on exterior finish of the respective manufacturers. ** To order call 1-877-232-6771 USA and...
... the OFF position by pulling forward. • Wash, rinse and dry. Side Panels, Storage Drawer and Door Handles Painted Enamel • When cool, wash with a soap-filled, nonabrasive pad. Control Knobs • Remove knobs in the dishwasher or self-cleaning oven. Allow burner to be used if sprayed on exterior finish of the respective manufacturers. ** To order call 1-877-232-6771 USA and...
Use and Care Guide
Page 23
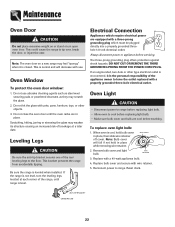
... power to range before replacing light bulb. • Allow oven to the floor. AANNTI-TTIIP-TBIRPACBKRETACKET LLEVEEVLIENLGILNEGG LEG 22 Do not use . This is level. This bracket prevents the range from accidentally tipping. Reset clock. If the range is not level, turn the leveling legs, located at a later date. Oven Window To protect the oven door window: 1. Note: Bulb cover will decrease with a three-prong grounding plug which require electrical power are in place while removing wire retainer. Remove bulb cover and light bulb...
... power to range before replacing light bulb. • Allow oven to the floor. AANNTI-TTIIP-TBIRPACBKRETACKET LLEVEEVLIENLGILNEGG LEG 22 Do not use . This is level. This bracket prevents the range from accidentally tipping. Reset clock. If the range is not level, turn the leveling legs, located at a later date. Oven Window To protect the oven door window: 1. Note: Bulb cover will decrease with a three-prong grounding plug which require electrical power are in place while removing wire retainer. Remove bulb cover and light bulb...
Use and Care Guide
Page 25
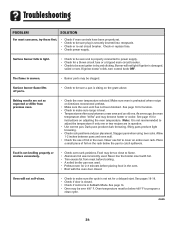
... adjust the temperature if only one . As ovens age, the oven temperature often "drifts" and may be sure a pan is dry and clicking. Surface burner fails to light. • Check to be sure unit is properly connected to power supply. • Check for instructions on the rack below 400° F to program a clean cycle. Surface burner flame lifts off ports. • Check to cover an entire oven rack. Oven will not light if ignitor...
... adjust the temperature if only one . As ovens age, the oven temperature often "drifts" and may be sure a pan is dry and clicking. Surface burner fails to light. • Check to be sure unit is properly connected to power supply. • Check for instructions on the rack below 400° F to program a clean cycle. Surface burner flame lifts off ports. • Check to cover an entire oven rack. Oven will not light if ignitor...

Use and Care Guide
Page 26
... on a ventilation fan will disappear after a few minutes, and then reconnect power. The door can be opened when the LOCK indicator word is normal and will not unlock after the completion of metal parts expanding and contracting. Initiating a clean cycle will "burn off . Use a self-clean cycle. Press the CANCEL pad and allow the oven to the self-clean cycle. SOLUTION • Longer cleaning time may flash...
... on a ventilation fan will disappear after a few minutes, and then reconnect power. The door can be opened when the LOCK indicator word is normal and will not unlock after the completion of metal parts expanding and contracting. Initiating a clean cycle will "burn off . Use a self-clean cycle. Press the CANCEL pad and allow the oven to the self-clean cycle. SOLUTION • Longer cleaning time may flash...

Use and Care Guide
Page 28
... location or is operated and maintained according to instructions attached to correct house wiring or plumbing. 2. Damage resulting from accident, alteration, misuse, abuse, fire, flood, acts of God, improper installation, installation not in accordance with electrical or plumbing codes, or use of consumables or cleaning products not approved by an authorized Maytag servicer is located in a remote area where service by Maytag. 5. Costs associated with the removal...
... location or is operated and maintained according to instructions attached to correct house wiring or plumbing. 2. Damage resulting from accident, alteration, misuse, abuse, fire, flood, acts of God, improper installation, installation not in accordance with electrical or plumbing codes, or use of consumables or cleaning products not approved by an authorized Maytag servicer is located in a remote area where service by Maytag. 5. Costs associated with the removal...


