
Use and Care Guide
Page 1
... Oven Lights Troubleshooting 24-25 Warranty & Service 27 Guide d'utilisation et d'entretien 28 Guía de Uso y Cuidado 56 ©2006 Maytag Appliances Sales Co. Maytag Electric Smoothtop Double Oven Range ® Precision Touch 750 Series Use and Care Guide Table of Contents Safety 1-3 Surface Cooking 4-7 Warming Center Controls Smoothtop Surface Oven Cooking...
... Oven Lights Troubleshooting 24-25 Warranty & Service 27 Guide d'utilisation et d'entretien 28 Guía de Uso y Cuidado 56 ©2006 Maytag Appliances Sales Co. Maytag Electric Smoothtop Double Oven Range ® Precision Touch 750 Series Use and Care Guide Table of Contents Safety 1-3 Surface Cooking 4-7 Warming Center Controls Smoothtop Surface Oven Cooking...
Use and Care Guide
Page 2
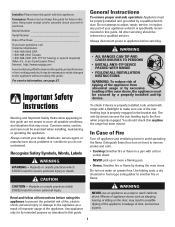
... check this guide. The anti-tip device secures the rear leveling leg to reach cabinets above. Use baking soda, a dry chemical or foam-type extinguisher to make sure one of the appliance. TTY for... hearing or speech impaired) (Mon.-Fri., 8 am-8 pm Eastern Time) Internet: http://www.maytag.com In our continuing effort to adjust, repair, service, or replace any part of our cooking ... as a result of improper usage of the rear leveling legs is properly installed, look underneath range with a flashlight to make changes to avoid spreading the flame. Hazards or unsafe practices which ...
... check this guide. The anti-tip device secures the rear leveling leg to reach cabinets above. Use baking soda, a dry chemical or foam-type extinguisher to make sure one of the appliance. TTY for... hearing or speech impaired) (Mon.-Fri., 8 am-8 pm Eastern Time) Internet: http://www.maytag.com In our continuing effort to adjust, repair, service, or replace any part of our cooking ... as a result of improper usage of the rear leveling legs is properly installed, look underneath range with a flashlight to make changes to avoid spreading the flame. Hazards or unsafe practices which ...
Use and Care Guide
Page 9
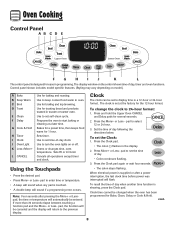
.... Use for toasting bread and products toasted in the display. 2. To change the clock to turn the oven lights on or off. If more than 30 seconds elapse between touching a function pad and the More+ or Less- Oven Cooking Control Panel AB CD E F G H I Clock J Oven Light K Less-/...More+ L CANCEL Use for baking and roasting. Use to set to display time in a 12-hour or 24-hour format. Cancels all operations except timer and clock. Set the time ...
.... Use for toasting bread and products toasted in the display. 2. To change the clock to turn the oven lights on or off. If more than 30 seconds elapse between touching a function pad and the More+ or Less- Oven Cooking Control Panel AB CD E F G H I Clock J Oven Light K Less-/...More+ L CANCEL Use for baking and roasting. Use to set to display time in a 12-hour or 24-hour format. Cancels all operations except timer and clock. Set the time ...
Use and Care Guide
Page 10
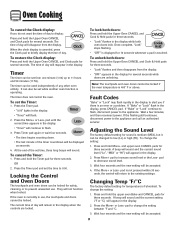
... "Lock" flashes and then disappears from the display. • "OFF" appears in the display for 10 seconds whenever a pad is not pressed within 30 seconds, the control will remain in the display. • "Timer" will not function when locked. Wait a few minutes, and then reconnect power. Adjusting...new setting will be set time, three long beeps will appear in the display to the appliance. Press and hold the upper oven Bake and CANCEL pads for several seconds. If the flashing still continues, disconnect power to increase sound level or the Less- Press the ...
... "Lock" flashes and then disappears from the display. • "OFF" appears in the display for 10 seconds whenever a pad is not pressed within 30 seconds, the control will remain in the display. • "Timer" will not function when locked. Wait a few minutes, and then reconnect power. Adjusting...new setting will be set time, three long beeps will appear in the display to the appliance. Press and hold the upper oven Bake and CANCEL pads for several seconds. If the flashing still continues, disconnect power to increase sound level or the Less- Press the ...
Use and Care Guide
Page 11
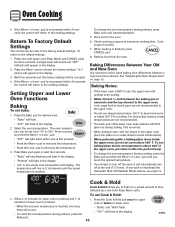
...in the upper oven. • Do not use temperatures below 200° F for a preset amount of 12 hours. pad is NOT in use baking/pizza stones at least 1/2-inch between a new oven and an old one -hour Keep Warm cycle. Wait four seconds and the factory settings will return to choose the...oven temperature. The oven temperature can be accepted. 4. Place food in the upper oven. Baking Notes: • If the lower oven is not pressed within 30 seconds, the control will NOT glow red during cooking, press the Bake pad and then the More+ or Less- To return to 550°. pad is ...
...in the upper oven. • Do not use temperatures below 200° F for a preset amount of 12 hours. pad is NOT in use baking/pizza stones at least 1/2-inch between a new oven and an old one -hour Keep Warm cycle. Wait four seconds and the factory settings will return to choose the...oven temperature. The oven temperature can be accepted. 4. Place food in the upper oven. Baking Notes: • If the lower oven is not pressed within 30 seconds, the control will NOT glow red during cooking, press the Bake pad and then the More+ or Less- To return to 550°. pad is ...
Use and Care Guide
Page 12
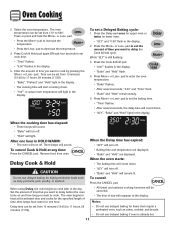
... products, pork, poultry, or seafood. Press More+ or Less- Remove food from 10 minutes (10:00) to 11 hours, 59 minutes (11:59). • "Bake", "Preheat" and "Hold" light in the display. • The cooking time will start counting down . The oven begins to set cook time. • "Time"... cycle. Three beeps will count down . • "100°" or actual oven temperature will light. Delay Cook & Hold When the oven starts: • The baking time will sound. Press or press and hold the More+ or Less- Enter the amount of time you want to 11 hours, 59 minutes (11...
... products, pork, poultry, or seafood. Press More+ or Less- Remove food from 10 minutes (10:00) to 11 hours, 59 minutes (11:59). • "Bake", "Preheat" and "Hold" light in the display. • The cooking time will start counting down . The oven begins to set cook time. • "Time"... cycle. Three beeps will count down . • "100°" or actual oven temperature will light. Delay Cook & Hold When the oven starts: • The baking time will sound. Press or press and hold the More+ or Less- Enter the amount of time you want to 11 hours, 59 minutes (11...
Use and Care Guide
Page 15
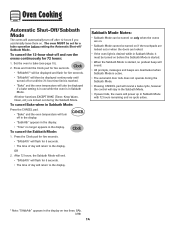
... five seconds. • "SAbbAth" will flash for 5 seconds. • The time of day will return to the display. All other functions EXCEPT BAKE (Timer, Keep Warm, Clean, etc.) are deactivated when Sabbath Mode is started, no preheat beep will sound. • All prompts, messages and beeps...8226; "SabbAth" appears in the display. • "Time" no cycle active. * Note: "SAbbAth" appears in Sabbath Mode: Press the CANCEL pad. • "Bake" and the oven temperature will turn off / Sabbath Mode. Press and hold the Clock pad for five seconds. • "SAbbAth"* will be displayed and flash...
... five seconds. • "SAbbAth" will flash for 5 seconds. • The time of day will return to the display. All other functions EXCEPT BAKE (Timer, Keep Warm, Clean, etc.) are deactivated when Sabbath Mode is started, no preheat beep will sound. • All prompts, messages and beeps...8226; "SabbAth" appears in the display. • "Time" no cycle active. * Note: "SAbbAth" appears in Sabbath Mode: Press the CANCEL pad. • "Bake" and the oven temperature will turn off / Sabbath Mode. Press and hold the Clock pad for five seconds. • "SAbbAth"* will be displayed and flash...
Use and Care Guide
Page 16
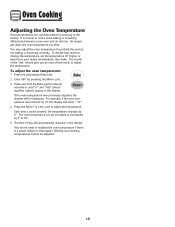
... or until "0°" and "AdJ" (which signifies 'adjust') appear in the display You do not need to 35°. 5. It is not baking or browning correctly. The results of the "test" should give you think the oven is normal to change will automatically reappear in the display. Press... and cleaning temperatures cannot be increased or decreased by pressing the More+ pad. 3. As ranges get older, the oven temperature can be adjusted. 15 Press the appropriate Bake pad. 2. Press the More+ or Less- To decide how much to adjust the temperature. Enter 550° by 5° to readjust ...
... or until "0°" and "AdJ" (which signifies 'adjust') appear in the display You do not need to 35°. 5. It is not baking or browning correctly. The results of the "test" should give you think the oven is normal to change will automatically reappear in the display. Press... and cleaning temperatures cannot be increased or decreased by pressing the More+ pad. 3. As ranges get older, the oven temperature can be adjusted. 15 Press the appropriate Bake pad. 2. Press the More+ or Less- To decide how much to adjust the temperature. Enter 550° by 5° to readjust ...
Use and Care Guide
Page 17
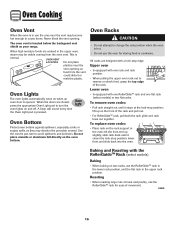
...lights on the rack support in the oven; Lower oven • Is equipped with one flat rack (select models) or two flat racks. Baking and Roasting with a lock-stop edge. OVEN VENT LOCATION Do not place plastics near the vent may become hot enough to remove or check food...• Pull rack straight out until it stops at the lock-stop position; All racks are designed with the RollerGuideTM Rack (select models) Baking • When baking on your range. To replace oven racks: • Place rack on and off. tilt the front end up on the front of movement. When the...
...lights on the rack support in the oven; Lower oven • Is equipped with one flat rack (select models) or two flat racks. Baking and Roasting with a lock-stop edge. OVEN VENT LOCATION Do not place plastics near the vent may become hot enough to remove or check food...• Pull rack straight out until it stops at the lock-stop position; All racks are designed with the RollerGuideTM Rack (select models) Baking • When baking on your range. To replace oven racks: • Place rack on and off. tilt the front end up on the front of movement. When the...
Use and Care Guide
Page 18
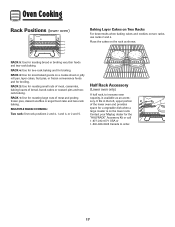
...jelly roll pan, layer cakes, fruit pies, or frozen convenience foods and for most baked goods on the lower rack. Contact your Maytag dealer for roasting large cuts of bread, bundt cakes or custard pies and tworack baking. RACK 3: Use for broiling. Half Rack Accessory (Lower oven only) A half rack..., to order. 17 Place the cakes on two racks, use racks 2 and 4. RACK 4: Use for two-rack baking and for...
...jelly roll pan, layer cakes, fruit pies, or frozen convenience foods and for most baked goods on the lower rack. Contact your Maytag dealer for roasting large cuts of bread, bundt cakes or custard pies and tworack baking. RACK 3: Use for broiling. Half Rack Accessory (Lower oven only) A half rack..., to order. 17 Place the cakes on two racks, use racks 2 and 4. RACK 4: Use for two-rack baking and for...
Use and Care Guide
Page 19
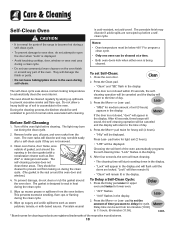
... a Self-Clean Cycle: 1. Press the More+ pad twice for light soil (2 hours). • "LITE" will damage the finish or parts. • Do not leave baking/pizza stone in the oven during a clean cycle. • Both oven doors lock when either oven is the seal around the oven door. The oven...sauces. "Lock" will then remain lit. • "Clean" will be displayed. Press the Delay pad once for upper oven and twice for parts of the range to become hot during a self-clean cycle. • To prevent damage to seal in the display. cont. * Brand names for medium amount of the oven...
... a Self-Clean Cycle: 1. Press the More+ pad twice for light soil (2 hours). • "LITE" will damage the finish or parts. • Do not leave baking/pizza stone in the oven during a clean cycle. • Both oven doors lock when either oven is the seal around the oven door. The oven...sauces. "Lock" will then remain lit. • "Clean" will be displayed. Press the Delay pad once for upper oven and twice for parts of the range to become hot during a self-clean cycle. • To prevent damage to seal in the display. cont. * Brand names for medium amount of the oven...
Use and Care Guide
Page 22
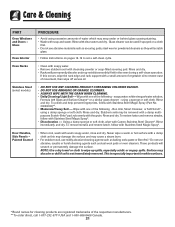
... amount of vegetable oil to restore ease of water which may cause a steam burn. • For stubborn soil, use mildly abrasive cleaning agents such as baking soda paste or Bon Ami.* Do not use abrasive materials such as scouring pads, steel wool or powdered cleaners as they will scratch or permanently...
... amount of vegetable oil to restore ease of water which may cause a steam burn. • For stubborn soil, use mildly abrasive cleaning agents such as baking soda paste or Bon Ami.* Do not use abrasive materials such as scouring pads, steel wool or powdered cleaners as they will scratch or permanently...
Use and Care Guide
Page 25
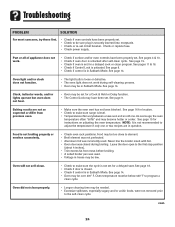
... on adjusting the oven temperature. Food may be too close to the first stop position (about 4 inches). • Trim excess fat from previous oven. • Make sure the oven vent has not...cook or clean program. Never line the broiler insert with foil. • Oven door was used . Baking results are in Sabbath Mode. Troubleshooting PROBLEM SOLUTION For most concerns, try these first. • Check ...if oven controls have been properly set. • Check to make sure range is level. • Temperatures often vary between a new oven and an old one or two ...
... on adjusting the oven temperature. Food may be too close to the first stop position (about 4 inches). • Trim excess fat from previous oven. • Make sure the oven vent has not...cook or clean program. Never line the broiler insert with foil. • Oven door was used . Baking results are in Sabbath Mode. Troubleshooting PROBLEM SOLUTION For most concerns, try these first. • Check ...if oven controls have been properly set. • Check to make sure range is level. • Temperatures often vary between a new oven and an old one or two ...
Use and Care Guide
Page 26
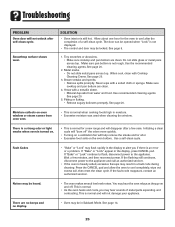
...display to alert you may be locked. You may be heard. • The oven makes several low level noises. Allow about one hour for a new range and will not unlock after self-clean cycle. Make sure pan bottom is an error or a problem. See page 20. 5. See page 20. Moisture ...collects on and off " the odors more quickly. • Turning on a ventilation fan will not damage your appliance. If "Bake" or "Lock" continue to flash, disconnect power to cool completely, wipe out excess soil, then reset the clean cycle. Wait a few uses. This is normal...
...display to alert you may be locked. You may be heard. • The oven makes several low level noises. Allow about one hour for a new range and will not unlock after self-clean cycle. Make sure pan bottom is an error or a problem. See page 20. 5. See page 20. Moisture ...collects on and off " the odors more quickly. • Turning on a ventilation fan will not damage your appliance. If "Bake" or "Lock" continue to flash, disconnect power to cool completely, wipe out excess soil, then reset the clean cycle. Wait a few uses. This is normal...

