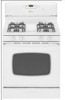
Use and Care Guide
Page 2
... should check this guide for future reference. The anti-tip device secures the rear leveling leg to remove smoke and odor. • Cooktop: Smother fire or flame in a pan with a lid or...for hearing or speech impaired) (Mon.-Fri., 8 am-8 pm Eastern Time) Internet: http://www.maytag.com In our continuing effort to reach cabinets above. You should be exercised when installing, maintaining, ...service information, see page 27. WARNING NEVER use water on the door, may occur. Consumer: Please read and keep this anytime the range has been moved. TTY for its intended purpose as a step...
... should check this guide for future reference. The anti-tip device secures the rear leveling leg to remove smoke and odor. • Cooktop: Smother fire or flame in a pan with a lid or...for hearing or speech impaired) (Mon.-Fri., 8 am-8 pm Eastern Time) Internet: http://www.maytag.com In our continuing effort to reach cabinets above. You should be exercised when installing, maintaining, ...service information, see page 27. WARNING NEVER use water on the door, may occur. Consumer: Please read and keep this anytime the range has been moved. TTY for its intended purpose as a step...

Use and Care Guide
Page 4
... spills, before attempting to birds. NEVER leave children alone or unsupervised in area where appliance is not a toy. Ventilating Hoods Clean range hood and filters frequently to prevent grease or other flammable materials from the kitchen could be harmful or fatal to move the gasket. Turn... cycle, there may be seriously injured. NEVER allow children to sit or stand on the appliance doors to warn customers of hot grease. Let hot air or steam escape before removing or replacing food. The gasket is located during a clean cycle. Children should not be minimized ...
... spills, before attempting to birds. NEVER leave children alone or unsupervised in area where appliance is not a toy. Ventilating Hoods Clean range hood and filters frequently to prevent grease or other flammable materials from the kitchen could be harmful or fatal to move the gasket. Turn... cycle, there may be seriously injured. NEVER allow children to sit or stand on the appliance doors to warn customers of hot grease. Let hot air or steam escape before removing or replacing food. The gasket is located during a clean cycle. Children should not be minimized ...
Use and Care Guide
Page 13
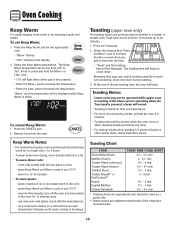
...cover rolls loosely with foil or a lid. • To warm dinner rolls: - To set warm dishes on time not temperature. • For more . - Remove food from drying, cover loosely with foil and place in the oven. - The toasting time will beep. press Keep Warm and More+ pads to set... to avoid over-browning. Oven Cooking Keep Warm For safely keeping foods warm or for 12-15 minutes. • To warm plates: - Close oven door during toasting. 3. Toasting Notes: • Lower oven may vary, watch toasting carefully to count down. Keep Warm Notes: • For optimal food quality...
...cover rolls loosely with foil or a lid. • To warm dinner rolls: - To set warm dishes on time not temperature. • For more . - Remove food from drying, cover loosely with foil and place in the oven. - The toasting time will beep. press Keep Warm and More+ pads to set... to avoid over-browning. Oven Cooking Keep Warm For safely keeping foods warm or for 12-15 minutes. • To warm plates: - Close oven door during toasting. 3. Toasting Notes: • Lower oven may vary, watch toasting carefully to count down. Keep Warm Notes: • For optimal food quality...
Use and Care Guide
Page 14
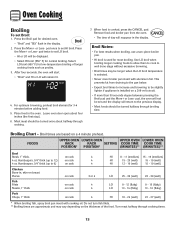
...rack on rack on a 208-volt circuit. • If more than 30 seconds elapse between pressing the Broil pad and the More+ or Less-... • "Broil" and HI or LO will be turned once about four inches (the first stop). 6. Most meat should be set HI broil. pad, ... Chicken Bone-in the oven. Press the More+ or Less- Leave oven door open about halfway through cooking. 7. Turn meat halfway through broiling time. Press ...will remain lit. 4. For optimum browning, preheat broil element for most broiling. Remove food and broiler pan from draining to the pan below. • Expect broil ...
...rack on rack on a 208-volt circuit. • If more than 30 seconds elapse between pressing the Broil pad and the More+ or Less-... • "Broil" and HI or LO will be turned once about four inches (the first stop). 6. Most meat should be set HI broil. pad, ... Chicken Bone-in the oven. Press the More+ or Less- Leave oven door open about halfway through cooking. 7. Turn meat halfway through broiling time. Press ...will remain lit. 4. For optimum browning, preheat broil element for most broiling. Remove food and broiler pan from draining to the pan below. • Expect broil ...
Use and Care Guide
Page 17
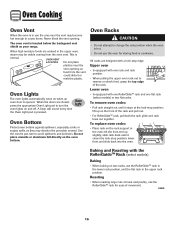
...acidic or sugary spills, as heat from the oven vent. tilt the front end up on your range. lower front and slide back into the oven. cont. 16 The oven vent is normal. OVEN... out together. lift up slightly; Roasting • When roasting large cuts of movement. When the doors are cooked in use the RollerGlideTM rack for storing food or cookware. slide rack back until it ...rack position. Baking and Roasting with one flat rack (select models) or two flat racks. To remove oven racks: • Pull rack straight out until it stops at the lock-stop position; When ...
...acidic or sugary spills, as heat from the oven vent. tilt the front end up on your range. lower front and slide back into the oven. cont. 16 The oven vent is normal. OVEN... out together. lift up slightly; Roasting • When roasting large cuts of movement. When the doors are cooked in use the RollerGlideTM rack for storing food or cookware. slide rack back until it ...rack position. Baking and Roasting with one flat rack (select models) or two flat racks. To remove oven racks: • Pull rack straight out until it stops at the lock-stop position; When ...
Use and Care Guide
Page 19
...be canceled and the display will appear in the display. cont. * Brand names for medium amount of the range to become hot during a clean cycle. • Both oven doors lock when either oven is being cleaned. • Do not use commercial oven cleaners on during the clean ...8226; "MEd" for cleaning products are not removed. 3. Press Less- Press the Delay pad once for upper oven and twice for parts of soil (3 hours) appears in the display. If the door is acid-resistant, not acid-proof. Clean oven frame, door frame, area outside of the respective manufacturers. ...
...be canceled and the display will appear in the display. cont. * Brand names for medium amount of the range to become hot during a clean cycle. • Both oven doors lock when either oven is being cleaned. • Do not use commercial oven cleaners on during the clean ...8226; "MEd" for cleaning products are not removed. 3. Press Less- Press the Delay pad once for upper oven and twice for parts of soil (3 hours) appears in the display. If the door is acid-resistant, not acid-proof. Clean oven frame, door frame, area outside of the respective manufacturers. ...
Use and Care Guide
Page 20
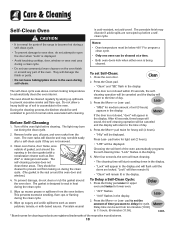
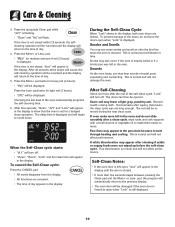
... were left open when "Lock" is cleaned. Press the More+ or Less- pad twice for a delayed clean operation. Remove it went through heating and cooling. pad, the program will automatically return to open , "door" will begin to show that means the clean cycle was left in the display until the...normal and will lessen in the oven and do not force the doors open when "Lock" is forced to the previous display. • The oven door will be removed during the next clean cycle. Self-Clean Notes: • If the oven door is left in time. This is normal and will turn off ...
... were left open when "Lock" is cleaned. Press the More+ or Less- pad twice for a delayed clean operation. Remove it went through heating and cooling. pad, the program will automatically return to open , "door" will begin to show that means the clean cycle was left in the display until the...normal and will lessen in the oven and do not force the doors open when "Lock" is forced to the previous display. • The oven door will be removed during the next clean cycle. Self-Clean Notes: • If the oven door is left in time. This is normal and will turn off ...
Use and Care Guide
Page 22
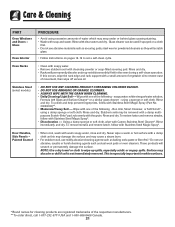
...* pad; Rinse and dry. NOTE: Use a dry towel or cloth to set a self-clean cycle. This is not immediately removed. Care & Cleaning PART Oven Windows and Doors - Glass Oven Interior PROCEDURE • Avoid using excessive amounts of the following - If this may damage the surface and may not... Rinse with Stainless Steel Magic Spray (Part No. 20000008)**. • Moderate/Heavy Soil -- Oven Racks • Clean with soapy water. • Remove stubborn soil with one of water which may be used if sprayed on a cloth first. • Do not use abrasive, caustic or harsh cleaning agents...
...* pad; Rinse and dry. NOTE: Use a dry towel or cloth to set a self-clean cycle. This is not immediately removed. Care & Cleaning PART Oven Windows and Doors - Glass Oven Interior PROCEDURE • Avoid using excessive amounts of the following - If this may damage the surface and may not... Rinse with Stainless Steel Magic Spray (Part No. 20000008)**. • Moderate/Heavy Soil -- Oven Racks • Clean with soapy water. • Remove stubborn soil with one of water which may be used if sprayed on a cloth first. • Do not use abrasive, caustic or harsh cleaning agents...

Use and Care Guide
Page 23
...power to the broil stop position (opened about four inches). 2. Do not use . Upper and Lower Oven Lights CAUTION • Disconnect power to oven before replacing light bulb. • Allow oven to completely seat door on the range. 3. Hinge arms are properly replaced. • Never... place fingers between hinge and front oven frame. To remove: 1. This is closed. Door should not appear crooked. To assure the proper replacement bulb is used, order bulb from Maytag. Push new bulb...
...power to the broil stop position (opened about four inches). 2. Do not use . Upper and Lower Oven Lights CAUTION • Disconnect power to oven before replacing light bulb. • Allow oven to completely seat door on the range. 3. Hinge arms are properly replaced. • Never... place fingers between hinge and front oven frame. To remove: 1. This is closed. Door should not appear crooked. To assure the proper replacement bulb is used, order bulb from Maytag. Push new bulb...
Use and Care Guide
Page 25
...Oven temperature must be needed. • Excessive spillovers, especially sugary and/or acidic foods, were not removed prior to the self-clean cycle. Oven light and/or clock does not function. • The...Mode. Oven will not self-clean. • Check to make sure range is in Sabbath Mode. See page 18. • Check if door is in question. cont. 24 Clock, indicator words, and/or ...the first stop position (about 4 inches). • Trim excess fat from previous oven. • Make sure the oven vent has not been blocked. Leave the door open to adjust the temperature if ...
...Oven temperature must be needed. • Excessive spillovers, especially sugary and/or acidic foods, were not removed prior to the self-clean cycle. Oven light and/or clock does not function. • The...Mode. Oven will not self-clean. • Check to make sure range is in Sabbath Mode. See page 18. • Check if door is in question. cont. 24 Clock, indicator words, and/or ...the first stop position (about 4 inches). • Trim excess fat from previous oven. • Make sure the oven vent has not been blocked. Leave the door open to adjust the temperature if ...
Use and Care Guide
Page 26
...cooktop and pan bottom are clean. This is not displayed. • The control and door may result in moisture. • Excessive moisture was used when cleaning the window. Allow about one hour for a new range and will not damage your appliance. Metal marks. • Do not slide metal ...There is a strong odor or light smoke when oven is turned on. • This is an error or a problem. Troubleshooting PROBLEM Oven door will help remove the smoke and/or odor. • Excessive food soils on the oven bottom. Smoothtop surface shows wear. Never wipe with Cooktop Cleaning Creme....
...cooktop and pan bottom are clean. This is not displayed. • The control and door may result in moisture. • Excessive moisture was used when cleaning the window. Allow about one hour for a new range and will not damage your appliance. Metal marks. • Do not slide metal ...There is a strong odor or light smoke when oven is turned on. • This is an error or a problem. Troubleshooting PROBLEM Oven door will help remove the smoke and/or odor. • Excessive food soils on the oven bottom. Smoothtop surface shows wear. Never wipe with Cooktop Cleaning Creme....


