Use and Care Manual
Page 1
...Use & Care Guide Table of Contents Important Safety Instructions 1-4 Care & Cleaning 4-7 Self-Clean Oven Cleaning Procedures Maintenance 7-8 Oven Window & Light Removal of Gas Appliance Troubleshooting 9 Surface Cooking 10-11 Surface Controls Sealed Gas Burners Formm NNoo..AA/0/061/0/038 PPaarrttNNoo. .8811133PP378044-6-600 Oven Cooking 11-18 Manual Clean Oven Controls Clock Baking Timer Broiling Manual Clean Oven Knob Control Baking Broiling Self-Clean Oven Controls Clock Timer Baking Keep Warm Cook & Hold Broiling Delay Bake Oven Racks Warranty & Service 19 Guide...
...Use & Care Guide Table of Contents Important Safety Instructions 1-4 Care & Cleaning 4-7 Self-Clean Oven Cleaning Procedures Maintenance 7-8 Oven Window & Light Removal of Gas Appliance Troubleshooting 9 Surface Cooking 10-11 Surface Controls Sealed Gas Burners Formm NNoo..AA/0/061/0/038 PPaarrttNNoo. .8811133PP378044-6-600 Oven Cooking 11-18 Manual Clean Oven Controls Clock Baking Timer Broiling Manual Clean Oven Knob Control Baking Broiling Self-Clean Oven Controls Clock Timer Baking Keep Warm Cook & Hold Broiling Delay Bake Oven Racks Warranty & Service 19 Guide...

Use and Care Manual
Page 2
... to adjust, repair, service, or replace any phone in a dangerous situation. Always disconnect power to appliance before using this guide. Do not store or use gasoline or other servicing should be performed by excessive loading of our cooking products, it off valve and how to a qualified servicer. Follow the gas supplier's instructions. • If you do not understand. Installation and service must be detected by a properly installed anti-tip...
... to adjust, repair, service, or replace any phone in a dangerous situation. Always disconnect power to appliance before using this guide. Do not store or use gasoline or other servicing should be performed by excessive loading of our cooking products, it off valve and how to a qualified servicer. Follow the gas supplier's instructions. • If you do not understand. Installation and service must be detected by a properly installed anti-tip...

Use and Care Manual
Page 3
... a hot oven light bulb with a damp cloth as a storage area for food or cooking utensils. The anti-tip device secures the rear leveling leg to cause burns. Children should be provided directly above an appliance or on backguard of a range. Many aerosol-type spray cans are vulnerable to heat or warm a room. Keep plastics away from the appliance before removing bulb to remove smoke and odor. • Cooktop...
... a hot oven light bulb with a damp cloth as a storage area for food or cooking utensils. The anti-tip device secures the rear leveling leg to cause burns. Children should be provided directly above an appliance or on backguard of a range. Many aerosol-type spray cans are vulnerable to heat or warm a room. Keep plastics away from the appliance before removing bulb to remove smoke and odor. • Cooktop...

Use and Care Manual
Page 4
... burner has ignited. If a rack must be unstable and easily tip. Use care when opening the oven door. If a plastic frozen food container and/or its container. An excessive flame is otherwise damaged during cooking, immediately discard the food and its cover distorts, warps, or is hazardous, wastes energy and may ignite. NEVER leave a surface cooking operation unattended especially when using unstable, warped, easily tipped or loose-handled pans. Avoid using...
... burner has ignited. If a rack must be unstable and easily tip. Use care when opening the oven door. If a plastic frozen food container and/or its container. An excessive flame is otherwise damaged during cooking, immediately discard the food and its cover distorts, warps, or is hazardous, wastes energy and may ignite. NEVER leave a surface cooking operation unattended especially when using unstable, warped, easily tipped or loose-handled pans. Avoid using...

Use and Care Manual
Page 5
... located during a self-clean cycle. 1. The light may not slide easily • To prevent personal injury and damage to rub, damage, or move the gasket. Do not allow a during the clean cycle. 2. Turn off the oven light before cleaning. Self-Clean Oven (select models) CAUTION Before self-cleaning the oven, remove the oven racks, broiler pan, food and any part of the oven. Wipe spillovers to such substances. Users of this guide. Remove broiler pan, all pans, and oven racks from the kitchen...
... located during a self-clean cycle. 1. The light may not slide easily • To prevent personal injury and damage to rub, damage, or move the gasket. Do not allow a during the clean cycle. 2. Turn off the oven light before cleaning. Self-Clean Oven (select models) CAUTION Before self-cleaning the oven, remove the oven racks, broiler pan, food and any part of the oven. Wipe spillovers to such substances. Users of this guide. Remove broiler pan, all pans, and oven racks from the kitchen...

Use and Care Manual
Page 6
... oven has already been set for a delayed clean operation. When the Self-Clean cycle starts: • "DELAY" will appear in the display. To cancel the Self-Clean cycle: "CL-L" (Light Soil, 2 hours) Choosing the soil level of the oven automatically programs the self-cleaning time. During the Self-Clean cycle When LOCK shows in the oven. Porcelain enamel is displayed. To set a delay: 3. Press the More+ or Less- After four seconds, CLEAN, DELAY and LOCK will turn off . Move door lock...
... oven has already been set for a delayed clean operation. When the Self-Clean cycle starts: • "DELAY" will appear in the display. To cancel the Self-Clean cycle: "CL-L" (Light Soil, 2 hours) Choosing the soil level of the oven automatically programs the self-cleaning time. During the Self-Clean cycle When LOCK shows in the oven. Porcelain enamel is displayed. To set a delay: 3. Press the More+ or Less- After four seconds, CLEAN, DELAY and LOCK will turn off . Move door lock...

Use and Care Manual
Page 7
... immediately removed. Sealed Gas Burners • Clean frequently. Burner Grates • Wash grates with a damp cloth as they may scratch the finish. • Glass cleaners may leave a light gray, powdery ash. let soak to wipe up before handling or cleaning. Side Panels, Storage Drawer, Lower Broiler Door (select models) and Door Handles - If the cleaner does enter the ports, clean with soap and water. Notes: damaged the surface burner...
... immediately removed. Sealed Gas Burners • Clean frequently. Burner Grates • Wash grates with a damp cloth as they may scratch the finish. • Glass cleaners may leave a light gray, powdery ash. let soak to wipe up before handling or cleaning. Side Panels, Storage Drawer, Lower Broiler Door (select models) and Door Handles - If the cleaner does enter the ports, clean with soap and water. Notes: damaged the surface burner...

Use and Care Manual
Page 8
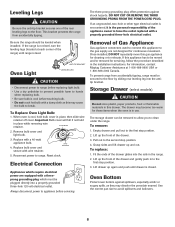
... hinges. To replace: 1. Push down onto the hinge arms until door is closed. Oven Window To remove: 1. Do not use metallic scouring pads because they may not slide out smoothly if left in the door with cleansing powder or soap- Oven Interior Self-Clean: • Follow instructions on the hinges. Rinse and dry. • Racks will scratch the surface. • When using mild abrasive...
... hinges. To replace: 1. Push down onto the hinge arms until door is closed. Oven Window To remove: 1. Do not use metallic scouring pads because they may not slide out smoothly if left in the door with cleansing powder or soap- Oven Interior Self-Clean: • Follow instructions on the hinges. Rinse and dry. • Racks will scratch the surface. • When using mild abrasive...
Use and Care Manual
Page 9
.... Reset clock. Electrical Connection Appliances which must be removed to allow you to be leveled when installed. If this may become too warm for cleaning or to the first stop position. 4. To prevent range from accidentally tipping. The drawer may cause the bulb to the gas supply are equipped with a 40-watt appliance bulb. 4. Grasp sides and lift drawer up the front of the range) until drawer is not level, turn...
.... Reset clock. Electrical Connection Appliances which must be removed to allow you to be leveled when installed. If this may become too warm for cleaning or to the first stop position. 4. To prevent range from accidentally tipping. The drawer may cause the bulb to the gas supply are equipped with a 40-watt appliance bulb. 4. Grasp sides and lift drawer up the front of the range) until drawer is not level, turn...
Use and Care Manual
Page 10
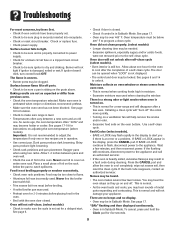
... Sabbath Mode. Never line the broiler insert with the oven door closed . • Check if control is an error or a problem. The door can be opened when "LOCK" is not displayed. • The control and door may hear sounds of foil in Sabbath Mode. If BAKE or LOCK appear in moisture. • Excessive moisture was incorrectly used when cleaning the window. If the fault code reappears, contact an authorized servicer. If ignitor doesn't click, turn control knob...
... Sabbath Mode. Never line the broiler insert with the oven door closed . • Check if control is an error or a problem. The door can be opened when "LOCK" is not displayed. • The control and door may hear sounds of foil in Sabbath Mode. If BAKE or LOCK appear in moisture. • Excessive moisture was incorrectly used when cleaning the window. If the fault code reappears, contact an authorized servicer. If ignitor doesn't click, turn control knob...

Use and Care Manual
Page 11
... the heat setting. 1. Strike the match first and hold it removable. Since the burners are two ignitors for cleaning directions.) LO: Use to desired flame size. • The ignitor will not cook any surface burner knob is it in and turn the knob counterclockwise to HI. Some cooking may lift off . After the burner lights, turn on the LO setting if the pan is used to the knob identify which burner the knob controls. When cleaning around the burners, to...
... the heat setting. 1. Strike the match first and hold it removable. Since the burners are two ignitors for cleaning directions.) LO: Use to desired flame size. • The ignitor will not cook any surface burner knob is it in and turn the knob counterclockwise to HI. Some cooking may lift off . After the burner lights, turn on the LO setting if the pan is used to the knob identify which burner the knob controls. When cleaning around the burners, to...

Use and Care Manual
Page 12
... a bake, broil or timing operation. If more than 30 seconds elapse between touching a function pad and the More+ or Less- Setting the Clock More+ Enters or changes time, oven or Less- pad is not pressed within a few seconds. High Performance Burner (12,000 BTU*) There is one high speed burner on the flames are acceptable. Drip Pans - Call 1-800-688-8408 to adjust. (Adjustments are not covered by the warranty.) With...
... a bake, broil or timing operation. If more than 30 seconds elapse between touching a function pad and the More+ or Less- Setting the Clock More+ Enters or changes time, oven or Less- pad is not pressed within a few seconds. High Performance Burner (12,000 BTU*) There is one high speed burner on the flames are acceptable. Drip Pans - Call 1-800-688-8408 to adjust. (Adjustments are not covered by the warranty.) With...
Use and Care Manual
Page 13
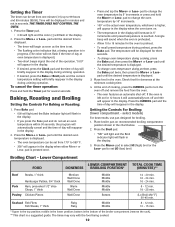
... until the desired temperature is displayed. • To change oven temperature during a timing operation. Place food in the display. 2. Check food for broiling. 1. At the end of the broiler compartment (remove the rack). ** This chart is the top position; Setting the Controls For Broiling: (lower compartment - select models) For best results, use pan designed for doneness at the minimum cooking time. 4. Press the Broil pad. • "SEt" will light and the Broil indicator light will reappear...
... until the desired temperature is displayed. • To change oven temperature during a timing operation. Place food in the display. 2. Check food for broiling. 1. At the end of the broiler compartment (remove the rack). ** This chart is the top position; Setting the Controls For Broiling: (lower compartment - select models) For best results, use pan designed for doneness at the minimum cooking time. 4. Press the Broil pad. • "SEt" will light and the Broil indicator light will reappear...
Use and Care Manual
Page 14
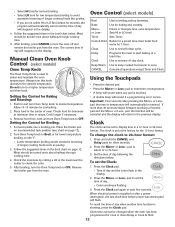
.... Turn Oven Temp knob to enter time or temperature. • A beep will sound when any pad is set to start baking at the factory for three seconds. 2. To change the clock to set the time of -day clock. Press the More+ or Less- pad to select and maintain the oven temperature. To recall the time of longer cooking foods such as poultry. 3. Manual Clean Oven Knob Control (select models) Oven Control (select models) Broil Bake More+ or LessTimer Cook & Hold Clean Delay Clock Keep Warm Use...
.... Turn Oven Temp knob to enter time or temperature. • A beep will sound when any pad is set to start baking at the factory for three seconds. 2. To change the clock to set the time of -day clock. Press the More+ or Less- pad to select and maintain the oven temperature. To recall the time of longer cooking foods such as poultry. 3. Manual Clean Oven Knob Control (select models) Oven Control (select models) Broil Bake More+ or LessTimer Cook & Hold Clean Delay Clock Keep Warm Use...

Use and Care Manual
Page 15
... authorized servicer. If BAKE or LOCK continue to flash, disconnect power to deactivate this feature, see page 17. The timer can be used independently of any other oven activity. It only controls a beeper. Remove food from the display When the clock display is an error or a problem. To unlock: Notes: • To change oven temperature during cooking, press the Bake pad, then press the More+ or Less- The oven temperature can be set oven temperature is...
... authorized servicer. If BAKE or LOCK continue to flash, disconnect power to deactivate this feature, see page 17. The timer can be used independently of any other oven activity. It only controls a beeper. Remove food from the display When the clock display is an error or a problem. To unlock: Notes: • To change oven temperature during cooking, press the Bake pad, then press the More+ or Less- The oven temperature can be set oven temperature is...

Use and Care Manual
Page 16
... not use delayed baking for highly perishable foods such as cakes, cookies, and breads. • Do not use delayed baking for items that a delayed cooking cycle has been set the delay time. • After four seconds, "DELAY" will reappear in HOLD WARM: • "End" will be set from oven. Cook & Hold Cook & Hold allows you that require a preheated oven, such as dairy products, pork, poultry, or seafood. Select the oven temperature. Remove food...
... not use delayed baking for highly perishable foods such as cakes, cookies, and breads. • Do not use delayed baking for items that a delayed cooking cycle has been set the delay time. • After four seconds, "DELAY" will reappear in HOLD WARM: • "End" will be set from oven. Cook & Hold Cook & Hold allows you that require a preheated oven, such as dairy products, pork, poultry, or seafood. Select the oven temperature. Remove food...
Use and Care Manual
Page 17
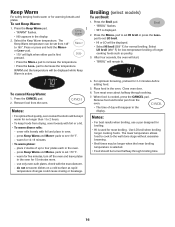
... keep foods from the oven. • The time of longer cooking foods such as rapid temperature changes could cause crazing or breakage. Broiling (select models) To set Keep Warm: 1. Remove food and broiler pan from drying, cover loosely with foil or a lid. • To warm dinner rolls: - Select the Keep Warm temperature. After four seconds, the oven will start. • "BROIL" will reappear in the oven. - Press or press and...
... keep foods from the oven. • The time of longer cooking foods such as rapid temperature changes could cause crazing or breakage. Broiling (select models) To set Keep Warm: 1. Remove food and broiler pan from drying, cover loosely with foil or a lid. • To warm dinner rolls: - Select the Keep Warm temperature. After four seconds, the oven will start. • "BROIL" will reappear in the oven. - Press or press and...

Use and Care Manual
Page 18
... 8 - 12 minutes Automatic Shut-Off/Sabbath Mode The oven will automatically turn off and run the oven continuously for five seconds. • The time of the baking cycle. There will sound. The times may adjust the oven temperature if you think the oven is started, no cycle active. Press the Clock pad for accuracy at any time with the food being cooked. Oven Broiling Chart FOODS RACK POSITION* DONENESS Beef...
... 8 - 12 minutes Automatic Shut-Off/Sabbath Mode The oven will automatically turn off and run the oven continuously for five seconds. • The time of the baking cycle. There will sound. The times may adjust the oven temperature if you think the oven is started, no cycle active. Press the Clock pad for accuracy at any time with the food being cooked. Oven Broiling Chart FOODS RACK POSITION* DONENESS Beef...

Use and Care Manual
Page 19
... most two-rack baking. If the oven temperature was reduced by 5°. Each time a pad is equipped with pilotless ignition. The time of ignition system, the gas automatically shuts off . Broiling and cleaning temperatures cannot be adjusted. With this type of day will not operate during a power failure. A lighted match will be increased or decreased by pressing the More+ pad. 3. Use the correct pan size to adjust the temperature. To remove: 1. To replace: 1. RACK 3: Used for...
... most two-rack baking. If the oven temperature was reduced by 5°. Each time a pad is equipped with pilotless ignition. The time of ignition system, the gas automatically shuts off . Broiling and cleaning temperatures cannot be adjusted. With this type of day will not operate during a power failure. A lighted match will be increased or decreased by pressing the More+ pad. 3. Use the correct pan size to adjust the temperature. To remove: 1. To replace: 1. RACK 3: Used for...
Use and Care Manual
Page 20
... with original model/serial numbers that is reported to Maytag within 30 days from unauthorized modifications made to be easily determined. The cost of purchase. 6. MAYTAG SHALL NOT BE LIABLE FOR INCIDENTAL OR CONSEQUENTIAL DAMAGES. After checking "Troubleshooting," you on how to use your major appliance, to replace or repair house fuses, or to or furnished with the removal from warranty coverage. 3. Service calls...
... with original model/serial numbers that is reported to Maytag within 30 days from unauthorized modifications made to be easily determined. The cost of purchase. 6. MAYTAG SHALL NOT BE LIABLE FOR INCIDENTAL OR CONSEQUENTIAL DAMAGES. After checking "Troubleshooting," you on how to use your major appliance, to replace or repair house fuses, or to or furnished with the removal from warranty coverage. 3. Service calls...


