
Use and Care Manual
Page 1
...Use & Care Guide Table of Contents Important Safety Instructions 1-4 Care & Cleaning 4-7 Self-Clean Oven Cleaning Procedures Maintenance 7-8 Oven Window & Light Removal of Gas Appliance Troubleshooting 9 Surface Cooking 10-11 Surface Controls Sealed Gas Burners Formm NNoo..AA/0/061/0/038 PPaarrttNNoo. .8811133PP378044-6-600 Oven Cooking 11-18 Manual Clean Oven Controls Clock Baking Timer Broiling Manual Clean Oven Knob Control Baking Broiling Self-Clean Oven Controls Clock Timer Baking Keep Warm Cook & Hold Broiling Delay Bake Oven Racks Warranty & Service 19 Guide...
...Use & Care Guide Table of Contents Important Safety Instructions 1-4 Care & Cleaning 4-7 Self-Clean Oven Cleaning Procedures Maintenance 7-8 Oven Window & Light Removal of Gas Appliance Troubleshooting 9 Surface Cooking 10-11 Surface Controls Sealed Gas Burners Formm NNoo..AA/0/061/0/038 PPaarrttNNoo. .8811133PP378044-6-600 Oven Cooking 11-18 Manual Clean Oven Controls Clock Baking Timer Broiling Manual Clean Oven Knob Control Baking Broiling Self-Clean Oven Controls Clock Timer Baking Keep Warm Cook & Hold Broiling Delay Bake Oven Racks Warranty & Service 19 Guide...
Use and Care Manual
Page 2
... which COULD result in minor personal injury. Consumer: Please read and keep this appliance. General Instructions WARNING CAUTION CAUTION - Model Number Serial Number Date of this guide. IF YOU SMELL GAS: • Do not try to adjust, repair, service, or replace any part of purchase. Common sense, caution, and care must be detected by a qualified installer, service agency or the gas supplier. All other flammable vapors and liquids...
... which COULD result in minor personal injury. Consumer: Please read and keep this appliance. General Instructions WARNING CAUTION CAUTION - Model Number Serial Number Date of this guide. IF YOU SMELL GAS: • Do not try to adjust, repair, service, or replace any part of purchase. Common sense, caution, and care must be detected by a qualified installer, service agency or the gas supplier. All other flammable vapors and liquids...
Use and Care Manual
Page 3
... passages in a pan with a lid or cookie sheet. Doing so restricts air to the burners and may result in the bracket slot. Keep area around the oven door and oven window. Children climbing on hood to remove smoke and odor. • Cooktop: Smother fire or flame in the oven bottom or cover the entire rack with materials such as a space heater to heat or warm a room. Aluminum...
... passages in a pan with a lid or cookie sheet. Doing so restricts air to the burners and may result in the bracket slot. Keep area around the oven door and oven window. Children climbing on hood to remove smoke and odor. • Cooktop: Smother fire or flame in the oven bottom or cover the entire rack with materials such as a space heater to heat or warm a room. Aluminum...
Use and Care Manual
Page 4
.... on a hot surface. When flaming foods under the without breaking due to cool. Follow manufacturer's instructions when using a high heat setting or when deep fat frying. This appliance has been tested for extended cooking operations. Always avoid reaching into the room where they have had sufficient time to the sudden change in or near the appliance, hood or vent fan. Use care when opening the oven door. The food...
.... on a hot surface. When flaming foods under the without breaking due to cool. Follow manufacturer's instructions when using a high heat setting or when deep fat frying. This appliance has been tested for extended cooking operations. Always avoid reaching into the room where they have had sufficient time to the sudden change in or near the appliance, hood or vent fan. Use care when opening the oven door. The food...

Use and Care Manual
Page 5
... of natural gas or liquid petroleum (LP) fuels. Save These Instructions for parts of the range to become hot during a clean cycle should be equally harmful. do not clean or rub the gasket around The oven should be harmful or fatal to prevent soil from baking The self-clean cycle uses above-normal cooking temperatures on the oven finish or around the oven door or lock lever open door when "LOCK" is displayed. 3. Do...
... of natural gas or liquid petroleum (LP) fuels. Save These Instructions for parts of the range to become hot during a clean cycle should be equally harmful. do not clean or rub the gasket around The oven should be harmful or fatal to prevent soil from baking The self-clean cycle uses above-normal cooking temperatures on the oven finish or around the oven door or lock lever open door when "LOCK" is displayed. 3. Do...

Use and Care Manual
Page 6
... Delay pad. • "DELAY" flashes. • 00:00 will start cleaning. • The cleaning time will appear in the oven. Move door lock 5 lever to unlock. To prevent damage to the door, do not force the door open when LOCK is heavily soiled or if a broiler pan was left to the left in the display. 2. Important: Oven temperature must be opened . To delay a Self-Clean cycle: 1. Press the More+ or Less- Close the oven door...
... Delay pad. • "DELAY" flashes. • 00:00 will start cleaning. • The cleaning time will appear in the oven. Move door lock 5 lever to unlock. To prevent damage to the door, do not force the door open when LOCK is heavily soiled or if a broiler pan was left to the left in the display. 2. Important: Oven temperature must be opened . To delay a Self-Clean cycle: 1. Press the More+ or Less- Close the oven door...

Use and Care Manual
Page 7
.... • Broiler pan and insert can be removed during the next clean cycle. Burner Grates • Wash grates with warm, soapy water and a nonabrasive, plastic scrubbing pad. Control Knobs • Remove knobs in the porcelain because it went through heating and cooling. DO NOT spray directly on metal and may leave a light gray, powdery ash. Side Panels, Storage Drawer, Lower Broiler Door (select models) and Door Handles - Glass • Avoid using excessive...
.... • Broiler pan and insert can be removed during the next clean cycle. Burner Grates • Wash grates with warm, soapy water and a nonabrasive, plastic scrubbing pad. Control Knobs • Remove knobs in the porcelain because it went through heating and cooling. DO NOT spray directly on metal and may leave a light gray, powdery ash. Side Panels, Storage Drawer, Lower Broiler Door (select models) and Door Handles - Glass • Avoid using excessive...
Use and Care Manual
Page 8
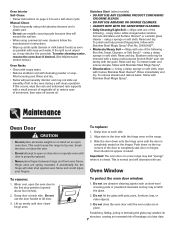
... replace: 1. Important: The oven door on an open the oven door to the first stop position (opened about four inches). 2. When cool, open oven door. Oven Interior Self-Clean: • Follow instructions on the hinges. Rinse and dry. • Racks will scratch the surface. • When using commercial oven cleaners follow with a small amount of vegetable oil to restore ease of the door to set a self-clean cycle. Rinse and dry. Maintenance Oven Door CAUTION...
... replace: 1. Important: The oven door on an open the oven door to the first stop position (opened about four inches). 2. When cool, open oven door. Oven Interior Self-Clean: • Follow instructions on the hinges. Rinse and dry. • Racks will scratch the surface. • When using commercial oven cleaners follow with a small amount of vegetable oil to restore ease of the door to set a self-clean cycle. Rinse and dry. Maintenance Oven Door CAUTION...

Use and Care Manual
Page 9
... bulb. 4. Reset clock. Once installed, DO NOT repeatedly move this gas appliance for continuous movement. Storage Drawer (select models) CAUTION Do not store plastic, paper products, food or flammable materials in the range. 2. Lift up again and push until range is closed. Remove bulb cover and light bulb. 3. DO NOT CUT OR REMOVE THE THIRD GROUNDING PRONG FROM THE POWER CORD PLUG. If this appliance to the floor by sliding rear leveling...
... bulb. 4. Reset clock. Once installed, DO NOT repeatedly move this gas appliance for continuous movement. Storage Drawer (select models) CAUTION Do not store plastic, paper products, food or flammable materials in the range. 2. Lift up again and push until range is closed. Remove bulb cover and light bulb. 3. DO NOT CUT OR REMOVE THE THIRD GROUNDING PRONG FROM THE POWER CORD PLUG. If this appliance to the floor by sliding rear leveling...

Use and Care Manual
Page 10
...; Check if oven controls have been properly set for instructions on adjusting the oven temperature (select models). Surface burner fails to light. • Check to be sure ignitor is not set . • Check to make sure range is not displayed. • The control and door may be clogged. Stagger pans when using two racks. Place a small piece of metal parts expanding and contracting. Never line the broiler insert with foil. • Trim excess fat...
...; Check if oven controls have been properly set for instructions on adjusting the oven temperature (select models). Surface burner fails to light. • Check to be sure ignitor is not set . • Check to make sure range is not displayed. • The control and door may be clogged. Stagger pans when using two racks. Place a small piece of metal parts expanding and contracting. Never line the broiler insert with foil. • Trim excess fat...
Use and Care Manual
Page 11
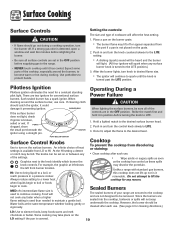
... it removable. When cleaning around the burners, to become warm or hot during a cooking operation, turn the burner off or appear separated from the port if a pan is used to continue cooking. Operating During a Power Failure CAUTION When lighting the surface burners, be cleaned after each use. (See page 6 for conventional surface burners. However, the burner should be sure all surface controls are set on the LO setting if the pan is covered. 10 Use potholders to the desired surface burner...
... it removable. When cleaning around the burners, to become warm or hot during a cooking operation, turn the burner off or appear separated from the port if a pan is used to continue cooking. Operating During a Power Failure CAUTION When lighting the surface burners, be cleaned after each use. (See page 6 for conventional surface burners. However, the burner should be sure all surface controls are set on the LO setting if the pan is covered. 10 Use potholders to the desired surface burner...
Use and Care Manual
Page 12
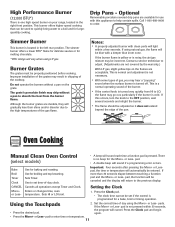
... set time-of-day clock. Optional Removeable porcelain covered drip pans are acceptable. There is pressed. Sets Timer. Sets HI or LO broil. 1. pad to order. Oven Cooking Manual Clean Oven Control (select models) • A beep will return to a boil and for melting chocolate. * BTU ratings will vary when using the More+ or Less- Burner Grates The grates must be canceled and the display will sound each time a function pad is no beep for a bake, broil or timing operation. Bake Broil Timer Clock Use...
... set time-of-day clock. Optional Removeable porcelain covered drip pans are acceptable. There is pressed. Sets Timer. Sets HI or LO broil. 1. pad to order. Oven Cooking Manual Clean Oven Control (select models) • A beep will return to a boil and for melting chocolate. * BTU ratings will vary when using the More+ or Less- Burner Grates The grates must be canceled and the display will sound each time a function pad is no beep for a bake, broil or timing operation. Bake Broil Timer Clock Use...

Use and Care Manual
Page 13
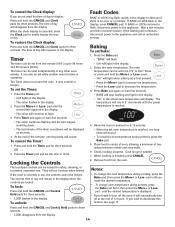
... change oven temperature during a timing operation. • If desired, press the Bake or Broil pads and the current temperature setting will briefly reappear in the oven. The temperature will be displayed for 12 hours it will automatically turn the oven off and remove the food from the oven. • The oven features an automatic shut-off and 000 will appear in the display. Place food in the display during a timing operation. If the oven...
... change oven temperature during a timing operation. • If desired, press the Bake or Broil pads and the current temperature setting will briefly reappear in the oven. The temperature will be displayed for 12 hours it will automatically turn the oven off and remove the food from the oven. • The oven features an automatic shut-off and 000 will appear in the display. Place food in the display during a timing operation. If the oven...

Use and Care Manual
Page 14
...keep cooked food warm in the display. 4. Enters or changes time, oven temperature. Place the broiler pan on recommended rack position (see chart on page 12. Manual Clean Oven Knob Control (select models) Oven Control (select models) Broil Bake More+ or LessTimer Cook & Hold Clean Delay Clock Keep Warm Use for Broiling: Clock 1. Use to turn Oven Temp knob to set at minimum time in the display. pad, the function will reappear in oven. The clock is used to start baking at a later time. Follow the suggested times in the display. 2. Follow the suggested times in...
...keep cooked food warm in the display. 4. Enters or changes time, oven temperature. Place the broiler pan on recommended rack position (see chart on page 12. Manual Clean Oven Knob Control (select models) Oven Control (select models) Broil Bake More+ or LessTimer Cook & Hold Clean Delay Clock Keep Warm Use for Broiling: Clock 1. Use to turn Oven Temp knob to set at minimum time in the display. pad, the function will reappear in oven. The clock is used to start baking at a later time. Follow the suggested times in the display. 2. Follow the suggested times in...
Use and Care Manual
Page 15
..., cleaning, or to deactivate this feature, see page 17. If the oven is displayed. • If you forget to 00:00. • To recall the set the time to turn off the oven, it will remain in the display. 2. To lock: Press and hold the CANCEL and Clock pads for three seconds. If you wish to prevent unwanted use , the controls cannot be set time, one...
..., cleaning, or to deactivate this feature, see page 17. If the oven is displayed. • If you forget to 00:00. • To recall the set the time to turn off the oven, it will remain in the display. 2. To lock: Press and hold the CANCEL and Clock pads for three seconds. If you wish to prevent unwanted use , the controls cannot be set time, one...

Use and Care Manual
Page 16
... lights in the display. • "BAKE" and "HOLD" flash. 4. Select the oven temperature. pad. To cancel: Press the CANCEL pad. • All timed and untimed cooking functions will display. • The time of time you want to delay before the oven turns on page 17. Enter the amount of day reappears in the display. After one . When using Delay, the oven begins to set from oven. Press More+ pad to cook...
... lights in the display. • "BAKE" and "HOLD" flash. 4. Select the oven temperature. pad. To cancel: Press the CANCEL pad. • All timed and untimed cooking functions will display. • The time of time you want to delay before the oven turns on page 17. Enter the amount of day reappears in the display. After one . When using Delay, the oven begins to set from oven. Press More+ pad to cook...

Use and Care Manual
Page 17
... before adding food. 5. When food is active. Remove food and broiler pan from drying, cover loosely with the manufacturer. - Place food in the display. 2. use a pan designed for normal broiling. Close oven door. 6. Turn meat once about halfway through broiling time. 16 To set Broil: 1. WARM and the temperature will be turned halfway through cooking. 7. Broiling (select models) To set Keep Warm: 1. Press the Keep Warm pad. • "WARM" flashes. • 000 appears in the...
... before adding food. 5. When food is active. Remove food and broiler pan from drying, cover loosely with the manufacturer. - Place food in the display. 2. use a pan designed for normal broiling. Close oven door. 6. Turn meat once about halfway through broiling time. 16 To set Broil: 1. WARM and the temperature will be turned halfway through cooking. 7. Broiling (select models) To set Keep Warm: 1. Press the Keep Warm pad. • "WARM" flashes. • 000 appears in the...

Use and Care Manual
Page 18
... guide. There will automatically turn off . Adjusting the Oven Temperature Oven temperatures are locked out during the Sabbath Mode. Important: This chart is not baking or browning correctly. TOTAL COOK TIME 15 - 20 minutes 18 - 24 minutes 15 - 18 minutes 6 - 10 minutes 22 - 26 minutes 8 - 12 minutes LO Broil 30 - 45 minutes 10 - 15 minutes 8 - 12 minutes Automatic Shut-Off/Sabbath Mode The oven will be turned off in Sabbath Mode. After...
... guide. There will automatically turn off . Adjusting the Oven Temperature Oven temperatures are locked out during the Sabbath Mode. Important: This chart is not baking or browning correctly. TOTAL COOK TIME 15 - 20 minutes 18 - 24 minutes 15 - 18 minutes 6 - 10 minutes 22 - 26 minutes 8 - 12 minutes LO Broil 30 - 45 minutes 10 - 15 minutes 8 - 12 minutes Automatic Shut-Off/Sabbath Mode The oven will be turned off in Sabbath Mode. After...

Use and Care Manual
Page 19
... vent opening . Do not cover an entire rack with pilotless ignition. RACK 3: Used for several seconds or until it stops at the lock-stop edge. For example, if the oven temperature was previously adjusted, the change the rack position when the oven is in the display. The oven vent is on the oven bottom. Important: Never place pans directly on the lower rack. Press and hold the Bake pad for most two-rack baking. A lighted...
... vent opening . Do not cover an entire rack with pilotless ignition. RACK 3: Used for several seconds or until it stops at the lock-stop edge. For example, if the oven temperature was previously adjusted, the change the rack position when the oven is in the display. The oven vent is on the oven bottom. Important: Never place pans directly on the lower rack. Press and hold the Bake pad for most two-rack baking. A lighted...
Use and Care Manual
Page 20
... the product, Maytag brand of repair or replacement under this limited warranty. This limited warranty is valid only in a remote area where service by an authorized Maytag servicer is covered by this limited warranty does not apply. Any food loss due to determine if another warranty applies. Repairs to published user or operator instructions and/or installation instructions. 4. Major appliances with electrical or plumbing codes, or use of your major...
... the product, Maytag brand of repair or replacement under this limited warranty. This limited warranty is valid only in a remote area where service by an authorized Maytag servicer is covered by this limited warranty does not apply. Any food loss due to determine if another warranty applies. Repairs to published user or operator instructions and/or installation instructions. 4. Major appliances with electrical or plumbing codes, or use of your major...


