
Use and Care Guide
Page 1
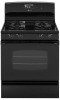
... Pall: No. 8113P512 60 Care & Cleaning Stir-Clean Oven Cleaning Procedures t 9-22 Maintenance Oven Whldow & Light Removal of Gas Appliance 23-24 TtoubJeshooting 25-26 Warranty & Service 27 Guide d'ntilisation et d'entretien 28 Gnia de Uso y Cuidado 56 @2005 Maytag Appliances Sales Co. Litho U.S.A. MAYFAG Gas Range Tabl Important Safety instructions 1-4 Surface Cooking 5-8 Surface Controls Sealed...
... Pall: No. 8113P512 60 Care & Cleaning Stir-Clean Oven Cleaning Procedures t 9-22 Maintenance Oven Whldow & Light Removal of Gas Appliance 23-24 TtoubJeshooting 25-26 Warranty & Service 27 Guide d'ntilisation et d'entretien 28 Gnia de Uso y Cuidado 56 @2005 Maytag Appliances Sales Co. Litho U.S.A. MAYFAG Gas Range Tabl Important Safety instructions 1-4 Surface Cooking 5-8 Surface Controls Sealed...
Use and Care Guide
Page 2
...and liquids in this guide. o immediately cal| your gas supplier from a neighbor's phone° Follow the gas snpplier's instructions. * If you cannot reach your buiMing. Genera instructions TuAPND PERSONS INSTALL ANTU-TUP DEWCE PACKED WUTH RANGE abnormal usage or by a qnalified installer, service agency... or the #as described in the vicinity of the oven door, the appliance ...
...and liquids in this guide. o immediately cal| your gas supplier from a neighbor's phone° Follow the gas snpplier's instructions. * If you cannot reach your buiMing. Genera instructions TuAPND PERSONS INSTALL ANTU-TUP DEWCE PACKED WUTH RANGE abnormal usage or by a qnalified installer, service agency... or the #as described in the vicinity of the oven door, the appliance ...
Use and Care Guide
Page 3
... storage should not be provided directly above an appliance Or.on and for food or cooking utensils. After oven is still hot. About Your Appliance Many plastics are EXPLOSIVE when exposed to heat and may become hot enough... to prevent curtains from an appliance. Also, do not touch the oven vent or surrounding areas until they could be highly fiammable. If appliance is located at the base of Fire... in a safe place, out of reach of reaching over burners. Avoid touching oven vent area while oven is on backguard 0f a range.
... storage should not be provided directly above an appliance Or.on and for food or cooking utensils. After oven is still hot. About Your Appliance Many plastics are EXPLOSIVE when exposed to heat and may become hot enough... to prevent curtains from an appliance. Also, do not touch the oven vent or surrounding areas until they could be highly fiammable. If appliance is located at the base of Fire... in a safe place, out of reach of reaching over burners. Avoid touching oven vent area while oven is on backguard 0f a range.
Use and Care Guide
Page 4
...controls which they can cause smoking and greasy spillovers may damage the appliance, pan or cabinets above the appliance. When cooking is cool Slide oven rack out to burner flame. Use dry, sturdy potholders. NEVER wear garments made of glass, glass/ceramic, ceramic or glazed utensils are... let a pan boil dry as the bubble action of faL To minimize burns, ignition of the appliance, not out into the oven to cover oven racks or oven bottom. Follow the manufacturer's directions when using dry, sturdy potholders. Always avoid reaching into the room where they could break Should ...
...controls which they can cause smoking and greasy spillovers may damage the appliance, pan or cabinets above the appliance. When cooking is cool Slide oven rack out to burner flame. Use dry, sturdy potholders. NEVER wear garments made of glass, glass/ceramic, ceramic or glazed utensils are... let a pan boil dry as the bubble action of faL To minimize burns, ignition of the appliance, not out into the oven to cover oven racks or oven bottom. Follow the manufacturer's directions when using dry, sturdy potholders. Always avoid reaching into the room where they could break Should ...

Use and Care Guide
Page 5
...the outdoors. Properly adjusted burners will minimize incomplete combustion. Before self-cleaning the oven, remove broiler pan, oven racks and other utensils and wipe up excessive spillovers to such substances. Users of the range to overheated cooking off all controls and wait for a good seal. Fumes... to a hot surface. Fumes released during a self-clean cycle. Users of this appliance are hereby warned that the burning of gas can be some low-level exposure to some of the listed substances, including benzene, formaldehyde and soot, due primarily to the incomplete...
...the outdoors. Properly adjusted burners will minimize incomplete combustion. Before self-cleaning the oven, remove broiler pan, oven racks and other utensils and wipe up excessive spillovers to such substances. Users of the range to overheated cooking off all controls and wait for a good seal. Fumes... to a hot surface. Fumes released during a self-clean cycle. Users of this appliance are hereby warned that the burning of gas can be some low-level exposure to some of the listed substances, including benzene, formaldehyde and soot, due primarily to the incomplete...

Use and Care Guide
Page 8
... @9:59).Time will be entered. pad, the function will automatically be displayed in minutes and not in the display during a timing operation. © ManuaJ CJean Oven Control (select models) A F \ \ B C D E NOTE: The dispiay win show 12:00 when the appiiance is first connected to enter time or temperature. , A ...press the Clock pad and the time of day wiii briefly reappear in progress. (The colon wiii not flash if the time of day or oven temperature is in the display during a timing operation. There is pressed. Press the More+ or Less- pad is not pressed within 30 ...
... @9:59).Time will be entered. pad, the function will automatically be displayed in minutes and not in the display during a timing operation. © ManuaJ CJean Oven Control (select models) A F \ \ B C D E NOTE: The dispiay win show 12:00 when the appiiance is first connected to enter time or temperature. , A ...press the Clock pad and the time of day wiii briefly reappear in progress. (The colon wiii not flash if the time of day or oven temperature is in the display during a timing operation. There is pressed. Press the More+ or Less- pad is not pressed within 30 ...

Use and Care Guide
Page 9
...Press Bake pad. , 000 will light and the Bake indicator light will flash in the display. , If you do not set an oven temperature within 30 seconds, the program wiii automatically cancel and the time of day wiii reappear in 5° increments until the desired temperature...Baking, Roasting and Broiling For additional baking, roasting and broiling times and tips, see "Cooking Made Simple" bookiet. A single beep will sound when the oven is a suggested guide. The temperature will appear in the display. 2. Place food in the chart below. 2. Place broiler pan on for broiling. 1....
...Press Bake pad. , 000 will light and the Bake indicator light will flash in the display. , If you do not set an oven temperature within 30 seconds, the program wiii automatically cancel and the time of day wiii reappear in 5° increments until the desired temperature...Baking, Roasting and Broiling For additional baking, roasting and broiling times and tips, see "Cooking Made Simple" bookiet. A single beep will sound when the oven is a suggested guide. The temperature will appear in the display. 2. Place food in the chart below. 2. Place broiler pan on for broiling. 1....

Use and Care Guide
Page 10
...the meat near the center to OFF. Cook longer if necessary. 3. After broiHing,press Cancd to turn the oven off and remove the broiHerpan from oven and turn the Oven Temp knob to 450° F. The current time of longer cooking foods such as poultry'. 3. AHwaysturn this... knob directHyto the desired temperature. Place the broiler pan on page 8. Remove the broiler pan from the oven. 9 4. Follow the suggested times in the broil chart on recommended rack position (see Setting the Control for lower temperature broiling, to OFF...
...the meat near the center to OFF. Cook longer if necessary. 3. After broiHing,press Cancd to turn the oven off and remove the broiHerpan from oven and turn the Oven Temp knob to 450° F. The current time of longer cooking foods such as poultry'. 3. AHwaysturn this... knob directHyto the desired temperature. Place the broiler pan on page 8. Remove the broiler pan from the oven. 9 4. Follow the suggested times in the broil chart on recommended rack position (see Setting the Control for lower temperature broiling, to OFF...

Use and Care Guide
Page 11
... touching a function pad and the More+ or Less- To change the clock to set self-clean cycle. To set the time of day, timer and oven functions. Press the More+ or Less- TJlqqer G H 1 J The control panel is supplied or after pressing the More+ or Lesspad, the time or ... below. Less- The clock can be canceled and the display will sound if a programming error occurs. pad to start baking at the factory for 1 hour. @ Oven Contro (select models:) AB C D ........... Press the More+ or Less = pad to keep cooked food warm in the display. 2. Press the More+ or Less...
... touching a function pad and the More+ or Less- To change the clock to set self-clean cycle. To set the time of day, timer and oven functions. Press the More+ or Less- TJlqqer G H 1 J The control panel is supplied or after pressing the More+ or Lesspad, the time or ... below. Less- The clock can be canceled and the display will sound if a programming error occurs. pad to start baking at the factory for 1 hour. @ Oven Contro (select models:) AB C D ........... Press the More+ or Less = pad to keep cooked food warm in the display. 2. Press the More+ or Less...
Use and Care Guide
Page 12
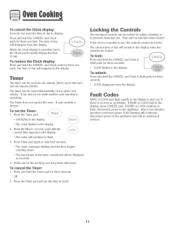
...99:59}. OR 2+ Press the Timer pad and set the Timer: 1. Locking the Controls The touchpad controls can also be used independently of any other oven activity. They will sound. The timer can be displayed as seconds. 4. The time of day will remain in the display, press CANCEL pad. Wait...dispHayis cancded, press the CHockpad to flash. 3. To unlock: Press and hold the Timer pad for three seconds. The Timer does not control the oven. Press Timer pad again or wait four seconds. +The colon continues flashing and the time begins counting down. +The last minute of the timer...
...99:59}. OR 2+ Press the Timer pad and set the Timer: 1. Locking the Controls The touchpad controls can also be used independently of any other oven activity. They will sound. The timer can be displayed as seconds. 4. The time of day will remain in the display, press CANCEL pad. Wait...dispHayis cancded, press the CHockpad to flash. 3. To unlock: Press and hold the Timer pad for three seconds. The Timer does not control the oven. Press Timer pad again or wait four seconds. +The colon continues flashing and the time begins counting down. +The last minute of the timer...

Use and Care Guide
Page 13
... flashing and Hightin the dispiay. 2. Check cooking progress. More+ Ceek & Held ture can be set Bake: 1. old allows you forget to turn off the oven, it will automatically turn off at any time: (CA_',._CFI "} Press the CANCEL pad. pad. pad. ( Less- [ , Press the More+ pad...the More+ or Less- Cook longer if needed. 7. When cooking is displayed. ° If you to bake for 8-15 minutes. , When the set oven temperature is reached, one -hour Keep Warm cycle. , 350° will[ Hightwhen either pad is reached. 4. Baking Notes: ° 170°will dispiay...
... flashing and Hightin the dispiay. 2. Check cooking progress. More+ Ceek & Held ture can be set Bake: 1. old allows you forget to turn off the oven, it will automatically turn off at any time: (CA_',._CFI "} Press the CANCEL pad. pad. pad. ( Less- [ , Press the More+ pad...the More+ or Less- Cook longer if needed. 7. When cooking is displayed. ° If you to bake for 8-15 minutes. , When the set oven temperature is reached, one -hour Keep Warm cycle. , 350° will[ Hightwhen either pad is reached. 4. Baking Notes: ° 170°will dispiay...

Use and Care Guide
Page 14
...; "DELAY" will be displayed. ° "DELAY" wiii turn off . ° "BAKE" and "HOLD" wiii remain iit. Less- ' When the Delay time has expired and the oven starts: ° The baking time wiii be canceled. ° The time of day wiii reappear in the day. When using Delay, the... to heat at the selected time and cooks for the specified length of time that you want to delay before the oven turns on and how long you that require a preheated oven, such as dairy products, pork, poultry, or seafood. To set a Delayed Baking eyrie: 1. De ay Bake Do not use delayed...
...; "DELAY" will be displayed. ° "DELAY" wiii turn off . ° "BAKE" and "HOLD" wiii remain iit. Less- ' When the Delay time has expired and the oven starts: ° The baking time wiii be canceled. ° The time of day wiii reappear in the day. When using Delay, the... to heat at the selected time and cooks for the specified length of time that you want to delay before the oven turns on and how long you that require a preheated oven, such as dairy products, pork, poultry, or seafood. To set a Delayed Baking eyrie: 1. De ay Bake Do not use delayed...
Use and Care Guide
Page 15
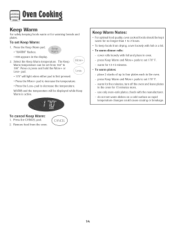
... Keep Warm temperature. pad to 2 hours. ° To keep foods from the oven. 14 Keep Warm Notes: ° For optimaHfood quaHity,oven cooked foods shouHdbe kept warm for 12-15 minutes. 190°=Press or press and hoHdthe More+ or Less- WARM and the temperature wiHHbe dispHayedwMHeKeep...to - do not set from 145° to set 170° R - warm for five minutes, turn off the oven and HeavepHates in the oven. ° Press the More+ pad to four pHateseach in the oven for warmhg broads and pHates= TO set Keep Warm: 1= Press the Keep Warm pad. ° "WARM" flashes. use...
... Keep Warm temperature. pad to 2 hours. ° To keep foods from the oven. 14 Keep Warm Notes: ° For optimaHfood quaHity,oven cooked foods shouHdbe kept warm for 12-15 minutes. 190°=Press or press and hoHdthe More+ or Less- WARM and the temperature wiHHbe dispHayedwMHeKeep...to - do not set from 145° to set 170° R - warm for five minutes, turn off the oven and HeavepHates in the oven. ° Press the More+ pad to four pHateseach in the oven for warmhg broads and pHates= TO set Keep Warm: 1= Press the Keep Warm pad. ° "WARM" flashes. use...

Use and Care Guide
Page 16
..., the temperature changes by 15° the display will show "-15 °''- 4. To decide how much to adjust the temperature. The oven temperature can be adjusted. As ranges get older, the oven temperature can shift. There will be no audible beeps. , When the Sabbath Mode is started, no cycle active. 15 Enter 550...
..., the temperature changes by 15° the display will show "-15 °''- 4. To decide how much to adjust the temperature. The oven temperature can be adjusted. As ranges get older, the oven temperature can shift. There will be no audible beeps. , When the Sabbath Mode is started, no cycle active. 15 Enter 550...
Use and Care Guide
Page 17
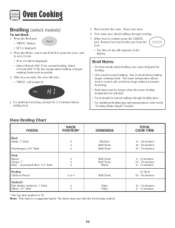
... Less- pad to the well done stage without excessive browning. ° Broil times may vary with the food being cooked. After four seconds, the oven wiii start. ° "BROIL" wiii remain iiL 4. The lower temperature allows food to cook to set LO broil. ° HI or LO...broiling tips and temperatures, refer to set Broim: 1. When food is #5. The times may be longer when the lower broiling temperature is a suggested guide. Close oven door. 6. Note: This chart is selected. ° Food should be dispiayed. ° Seiect HI broii (550 ° F} for How-temperature broiiing of...
... Less- pad to the well done stage without excessive browning. ° Broil times may vary with the food being cooked. After four seconds, the oven wiii start. ° "BROIL" wiii remain iiL 4. The lower temperature allows food to cook to set LO broil. ° HI or LO...broiling tips and temperatures, refer to set Broim: 1. When food is #5. The times may be longer when the lower broiling temperature is a suggested guide. Close oven door. 6. Note: This chart is selected. ° Food should be dispiayed. ° Seiect HI broii (550 ° F} for How-temperature broiiing of...

Use and Care Guide
Page 18
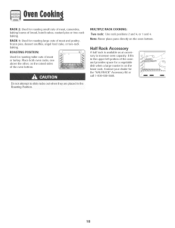
... rack back until it clears the lock-stop position. 3. Lower front and slide back into the oven. @ Pilotless ignition Your range is hot. Oven Vent When the oven is located below the backgaard vent shield on year range° __ I ovE_wNT _OCATION plastics near the vent may discolor the porcelain enamel. Your... aiaminam foil or place foil on the oven bottom. RACK 3: Used for storing food or cookware. With this type of the rack and pull out. Oven Racks Do not attempt to turn the oven light on the front of ignition system, the gas automatically shuts off . Never block the...
... rack back until it clears the lock-stop position. 3. Lower front and slide back into the oven. @ Pilotless ignition Your range is hot. Oven Vent When the oven is located below the backgaard vent shield on year range° __ I ovE_wNT _OCATION plastics near the vent may discolor the porcelain enamel. Your... aiaminam foil or place foil on the oven bottom. RACK 3: Used for storing food or cookware. With this type of the rack and pull out. Oven Racks Do not attempt to turn the oven light on the front of ignition system, the gas automatically shuts off . Never block the...
Use and Care Guide
Page 19
... RACK COOKING: Two rack: Use rack positions 2 and 4, or 1 and 4, Note: Never place pans directly on the oven bottom, Haft Rack Accessory A half rack is on the raised sides of the oven IIS'_/ and provides space for a vegetaMe dish when a large roaster is availaMe as an acces- @ RACK 2: Used for...frozen pies, dessert souffles, angd food cake, or two-rack baking, ROASTING POSiTiON: _o Used for roasting taNer cuts of meat or turkey, Place both oven racks, one above the other, on the lower rack, Contact your dealer for the "HALFRACK" Accessory Kit or call 1-800-688-8408, :¢ .-...
... RACK COOKING: Two rack: Use rack positions 2 and 4, or 1 and 4, Note: Never place pans directly on the oven bottom, Haft Rack Accessory A half rack is on the raised sides of the oven IIS'_/ and provides space for a vegetaMe dish when a large roaster is availaMe as an acces- @ RACK 2: Used for...frozen pies, dessert souffles, angd food cake, or two-rack baking, ROASTING POSiTiON: _o Used for roasting taNer cuts of meat or turkey, Place both oven racks, one above the other, on the lower rack, Contact your dealer for the "HALFRACK" Accessory Kit or call 1-800-688-8408, :¢ .-...

Use and Care Guide
Page 20
... prevent personal injury and damage to the oven door do not clean or rub the gasket around any part of the range to prevent soil from the oven bottom. Wipe up excess grease or spillovers from baking on the oven finish or around the oven door. Noatec:leanOcvyecnlet.emperature must be set... from the oven. If the door is displayed. 5. After four seconds...
... prevent personal injury and damage to the oven door do not clean or rub the gasket around any part of the range to prevent soil from the oven bottom. Wipe up excess grease or spillovers from baking on the oven finish or around the oven door. Noatec:leanOcvyecnlet.emperature must be set... from the oven. If the door is displayed. 5. After four seconds...

Use and Care Guide
Page 21
...because This is pressed again. , If more than five seconds elapse between pressing the Clean pad and the More+ or Less- If the oven has already been set for a deiayed dean operation. Press the More+ or Less- Ft.h.i.nr.oe.u..g.lhineshematainyg appear and in the dispiay to...This discoloration is displayed. 5. pad, the program will automatically return to the door, do not slide , "DELAY" flashes. , 00:00 will not damage the oven. This is heavily soiled or if a broiler pan was not long enough. Press the Clean pad. , "CLEAN" wii[ flash. 4. Smoke may leave a ...
...because This is pressed again. , If more than five seconds elapse between pressing the Clean pad and the More+ or Less- If the oven has already been set for a deiayed dean operation. Press the More+ or Less- Ft.h.i.nr.oe.u..g.lhineshematainyg appear and in the dispiay to...This discoloration is displayed. 5. pad, the program will automatically return to the door, do not slide , "DELAY" flashes. , 00:00 will not damage the oven. This is heavily soiled or if a broiler pan was not long enough. Press the Clean pad. , "CLEAN" wii[ flash. 4. Smoke may leave a ...
Use and Care Guide
Page 22
...cleaner does enter the ports, clean with a damp cloth. For stubborn soils, clean with commercial oven cleaner. (Do not spray surrounding surfaces.:) Place in warm soapy water. For stubborn soils, use...the ignitor. Surface may be sure !t is correct!y replaced. , Brand names are registered trademarks of range. let soak to cool. Allow burner to loosen soil= ° Wash in plastic bags for ...misuse. [tis acid resistant, not acid proof. Use scouring pad to get water into the gas ports as they may crack or chip with a damp cloth and dry. Cleaning Procedures or ...
...cleaner does enter the ports, clean with a damp cloth. For stubborn soils, clean with commercial oven cleaner. (Do not spray surrounding surfaces.:) Place in warm soapy water. For stubborn soils, use...the ignitor. Surface may be sure !t is correct!y replaced. , Brand names are registered trademarks of range. let soak to cool. Allow burner to loosen soil= ° Wash in plastic bags for ...misuse. [tis acid resistant, not acid proof. Use scouring pad to get water into the gas ports as they may crack or chip with a damp cloth and dry. Cleaning Procedures or ...


