
Use and Care Manual
Page 1
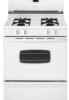
Gas Range ® Use & Care Guide Table of Contents Important Safety Instructions 1-4 Care & Cleaning 4-7 Self-Clean Oven Cleaning Procedures Maintenance 7-8 Oven Window & Light Removal of Gas Appliance Troubleshooting 9 Surface Cooking 10-11 Surface Controls Sealed Gas Burners Formm NNoo..AA/0/068/0/036 PPaarrttNNoo. .8811133PP36845-6-600 Oven Cooking 11-18 Manual Clean Oven Controls Clock Baking Timer Broiling Manual Clean...
Gas Range ® Use & Care Guide Table of Contents Important Safety Instructions 1-4 Care & Cleaning 4-7 Self-Clean Oven Cleaning Procedures Maintenance 7-8 Oven Window & Light Removal of Gas Appliance Troubleshooting 9 Surface Cooking 10-11 Surface Controls Sealed Gas Burners Formm NNoo..AA/0/068/0/036 PPaarrttNNoo. .8811133PP36845-6-600 Oven Cooking 11-18 Manual Clean Oven Controls Clock Baking Timer Broiling Manual Clean...
Use and Care Manual
Page 2
...of the oven door, the appliance must be performed by a qualified installer, service agency or the gas supplier. WARNING If the information in minor personal injury. IF YOU SMELL GAS: •...may be secured by a qualified 1 • ALL RANGES CAN TIP AND CAUSE INJURIES TO PERSONS • INSTALL ANTI-TIP DEVICE PACKED WITH RANGE • FOLLOW ALL INSTALLATION INSTRUCTIONS WARNING: To reduce ...: http://www.maytag.com In our continuing effort to the appliance without revising this appliance. For service information, see page 19. Gas leaks may occur in your gas supplier, call your...
...of the oven door, the appliance must be performed by a qualified installer, service agency or the gas supplier. WARNING If the information in minor personal injury. IF YOU SMELL GAS: •...may be secured by a qualified 1 • ALL RANGES CAN TIP AND CAUSE INJURIES TO PERSONS • INSTALL ANTI-TIP DEVICE PACKED WITH RANGE • FOLLOW ALL INSTALLATION INSTRUCTIONS WARNING: To reduce ...: http://www.maytag.com In our continuing effort to the appliance without revising this appliance. For service information, see page 19. Gas leaks may occur in your gas supplier, call your...
Use and Care Manual
Page 3
...appliance before removing bulb to avoid electrical shock. 2 The oven vent is located at the base of a range. Other potentially hot surfaces include cooktop, areas facing • Oven: Smother fire or flame by blocking the oven vent or air intakes. Keep plastics away from blowing over ... the entire rack with materials such as aluminum foil. Keep area around the oven door and oven window. Children should check the device each time the range has been moved. After oven is in carbon monoxide poisoning. Do not use water on backguard of the control...
...appliance before removing bulb to avoid electrical shock. 2 The oven vent is located at the base of a range. Other potentially hot surfaces include cooktop, areas facing • Oven: Smother fire or flame by blocking the oven vent or air intakes. Keep plastics away from blowing over ... the entire rack with materials such as aluminum foil. Keep area around the oven door and oven window. Children should check the device each time the range has been moved. After oven is in carbon monoxide poisoning. Do not use water on backguard of the control...
Use and Care Manual
Page 4
... as they could be unstable and easily tip. Also avoid using pans (especially small pans) with heavy handles, as directed in the oven. frying cool before attempting to add or remove food. Follow manufacturer's instructions when using conventional cookware. Always avoid reaching into the room ...setting or when deep fat frying. Be sure pan will accommodate the volume of personal electric shock, fire, or damage to cover oven racks or oven bottom. on . Do not use aluminum foil to the appliance. NEVER use eyelid covers for appliance parts to the sudden change ...
... as they could be unstable and easily tip. Also avoid using pans (especially small pans) with heavy handles, as directed in the oven. frying cool before attempting to add or remove food. Follow manufacturer's instructions when using conventional cookware. Always avoid reaching into the room ...setting or when deep fat frying. Be sure pan will accommodate the volume of personal electric shock, fire, or damage to cover oven racks or oven bottom. on . Do not use aluminum foil to the appliance. NEVER use eyelid covers for appliance parts to the sudden change ...
Use and Care Manual
Page 5
... may not slide easily • To prevent personal injury and damage to the oven door after a self-clean cycle if they are hereby warned that the burning of gas can result in low-level exposure to some of the range to become hot during the clean cycle. (The to rub, damage, or ...move the gasket. They will minimize incomplete combustion. The selfcleaning process does not clean these substances can also be taken not to automatically clean the oven interior...
... may not slide easily • To prevent personal injury and damage to the oven door after a self-clean cycle if they are hereby warned that the burning of gas can result in low-level exposure to some of the range to become hot during the clean cycle. (The to rub, damage, or ...move the gasket. They will minimize incomplete combustion. The selfcleaning process does not clean these substances can also be taken not to automatically clean the oven interior...
Use and Care Manual
Page 6
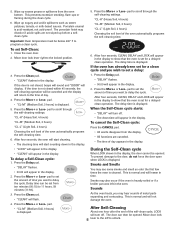
...the Clean pad. • "CLEAN" flashes in time. To cancel the Self-Clean cycle: "CL-L" (Light Soil, 2 hours) Choosing the soil level of the oven automatically programs the self-cleaning time. To delay a Self-Clean cycle: 1. pad to delay the cycle. "CL-H" (Heavy Soil, 4 hours) "CL-M" (Medium ...Soil, 3 hours) "CL-L" (Light Soil, 2 hours) Choosing the soil level of the oven automatically programs the self-cleaning time. 6. If the door is not closed within 45 seconds, the self-cleaning operation will be opened . Press the Delay...
...the Clean pad. • "CLEAN" flashes in time. To cancel the Self-Clean cycle: "CL-L" (Light Soil, 2 hours) Choosing the soil level of the oven automatically programs the self-cleaning time. To delay a Self-Clean cycle: 1. pad to delay the cycle. "CL-H" (Heavy Soil, 4 hours) "CL-M" (Medium ...Soil, 3 hours) "CL-L" (Light Soil, 2 hours) Choosing the soil level of the oven automatically programs the self-cleaning time. 6. If the door is not closed within 45 seconds, the self-cleaning operation will be opened . Press the Delay...
Use and Care Manual
Page 7
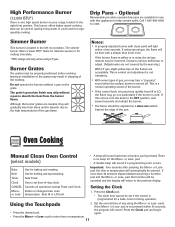
...should be wiped up before handling or cleaning. Never wipe a warm or hot surface with misuse. These products will not affect performance. Sealed Gas Burners • Clean frequently. Clean with a soft bristle brush or a straight pin especially the port below . • Place soapy ... Glass cleaner can be sure it with warm soapy water, rinse and dry. Glass • Avoid using excessive amounts of range. Rinse with commercial oven cleaner. (Do not spray surrounding surfaces.) Place in dishwasher. Notes: damaged the surface burner will scratch glass. • ...
...should be wiped up before handling or cleaning. Never wipe a warm or hot surface with misuse. These products will not affect performance. Sealed Gas Burners • Clean frequently. Clean with a soft bristle brush or a straight pin especially the port below . • Place soapy ... Glass cleaner can be sure it with warm soapy water, rinse and dry. Glass • Avoid using excessive amounts of range. Rinse with commercial oven cleaner. (Do not spray surrounding surfaces.) Place in dishwasher. Notes: damaged the surface burner will scratch glass. • ...
Use and Care Manual
Page 8
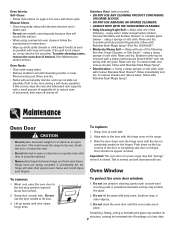
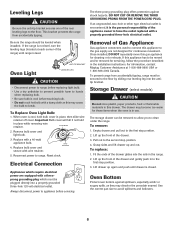
... crooked. This is normal and will slam shut against oven frame and could cause the range to tip over, break the door, or injure the user. • Do not attempt to open the oven door to the first stop position (opened about four inches). 2. Oven Window To remove: 1. Rinse and dry. •..., then wipe off excess oil. Slide the door down on hinges. Important: The oven door on the range. 3. Wipe with one of the door to set a self-clean cycle. Do not use . Rinse and dry. Maintenance Oven Door CAUTION • Do not place excessive weight on or stand on page 4-5...
... crooked. This is normal and will slam shut against oven frame and could cause the range to tip over, break the door, or injure the user. • Do not attempt to open the oven door to the first stop position (opened about four inches). 2. Oven Window To remove: 1. Rinse and dry. •..., then wipe off excess oil. Slide the door down on hinges. Important: The oven door on the range. 3. Wipe with one of the door to set a self-clean cycle. Do not use . Rinse and dry. Maintenance Oven Door CAUTION • Do not place excessive weight on or stand on page 4-5...
Use and Care Manual
Page 9
... tipping. The storage drawer can be leveled when installed. Fit the ends of the drawer glides into the antitip bracket. Oven Bottom Protect oven bottom against shock hazards. Reset clock. Storage Drawer (select models) CAUTION Do not store plastic, paper products, food or... CUT OR REMOVE THE THIRD GROUNDING PRONG FROM THE POWER CORD PLUG. Removal of the range) until drawer is in the range. 2. For information, contact Maytag Customer Assistance at each corner of Gas Appliance Gas appliance connectors used to relocate. The drawer may cause the bulb to the first stop...
... tipping. The storage drawer can be leveled when installed. Fit the ends of the drawer glides into the antitip bracket. Oven Bottom Protect oven bottom against shock hazards. Reset clock. Storage Drawer (select models) CAUTION Do not store plastic, paper products, food or... CUT OR REMOVE THE THIRD GROUNDING PRONG FROM THE POWER CORD PLUG. Removal of the range) until drawer is in the range. 2. For information, contact Maytag Customer Assistance at each corner of Gas Appliance Gas appliance connectors used to relocate. The drawer may cause the bulb to the first stop...
Use and Care Manual
Page 10
...flashing and then displayed continuously. • Oven is in the display, press the CANCEL pad. Baking results are not as they go on oven window or steam comes from previous oven. • Check the oven temperature selected. See pages 17-18 for a new range and will not self-clean. (select ... a ventilation fan will not light if ignitor is sitting on adjusting the oven temperature (select models). The flame is securely inserted into receptacle. • Check or reset circuit breaker. Allow 1-2 inches between pans and oven wall. • Check the use foil to make sure the cycle is...
...flashing and then displayed continuously. • Oven is in the display, press the CANCEL pad. Baking results are not as they go on oven window or steam comes from previous oven. • Check the oven temperature selected. See pages 17-18 for a new range and will not self-clean. (select ... a ventilation fan will not light if ignitor is sitting on adjusting the oven temperature (select models). The flame is securely inserted into receptacle. • Check or reset circuit breaker. Allow 1-2 inches between pans and oven wall. • Check the use foil to make sure the cycle is...
Use and Care Manual
Page 12
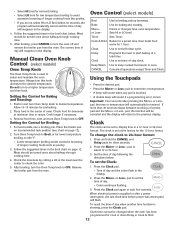
...the knob to the previous display. Set the correct time of day using LP gas. pad is not pressed within a few seconds. High Performance Burner (12,000 BTU*) There is one high speed burner on your range, located in chipping of the cooktop. Call 1-800-688-8408 to enter time ... the Clock pad and begin again. • Press the More+ or Less- Drip Pans - Oven Cooking Manual Clean Oven Control (select models) • A beep will be set time-of the gas flame. If more than 30 seconds elapse between touching a function pad and the More+ or Less- Setting the Clock More+ Enters...
...the knob to the previous display. Set the correct time of day using LP gas. pad is not pressed within a few seconds. High Performance Burner (12,000 BTU*) There is one high speed burner on your range, located in chipping of the cooktop. Call 1-800-688-8408 to enter time ... the Clock pad and begin again. • Press the More+ or Less- Drip Pans - Oven Cooking Manual Clean Oven Control (select models) • A beep will be set time-of the gas flame. If more than 30 seconds elapse between touching a function pad and the More+ or Less- Setting the Clock More+ Enters...
Use and Care Manual
Page 13
... light and the Bake indicator light will flash in the display. • If you press the Bake pad and do not set an oven temperature within 30 seconds, the program will automatically cancel and the time of the operation. Press the More+ or Less- pad until the desired temperature is... reached. pad to change oven temperature during a timing operation. Check food for the oven to turn off . At the end of day or oven temperature is in ...
... light and the Bake indicator light will flash in the display. • If you press the Bake pad and do not set an oven temperature within 30 seconds, the program will automatically cancel and the time of the operation. Press the More+ or Less- pad until the desired temperature is... reached. pad to change oven temperature during a timing operation. Check food for the oven to turn off . At the end of day or oven temperature is in ...
Use and Care Manual
Page 14
... time or temperature will automatically be turned once about halfway through cooking time. 4. Use for preheating. 2. Enters or changes time, oven temperature. Always turn the Oven Temp knob to 24-hour format: 1. Important: Four seconds after a power interruption, the last clock time before power was interrupted ... poultry. 3. Push in a 12-hour or 24-hour format. If more than 30 seconds elapse between touching a function pad and the More+ or Less- For best results, use a broiling pan. Turn Oven Temp knob to Broil, or for the 12-hour format. 2. To change the ...
... time or temperature will automatically be turned once about halfway through cooking time. 4. Use for preheating. 2. Enters or changes time, oven temperature. Always turn the Oven Temp knob to 24-hour format: 1. Important: Four seconds after a power interruption, the last clock time before power was interrupted ... poultry. 3. Push in a 12-hour or 24-hour format. If more than 30 seconds elapse between touching a function pad and the More+ or Less- For best results, use a broiling pan. Turn Oven Temp knob to Broil, or for the 12-hour format. 2. To change the ...
Use and Care Manual
Page 15
... the desired temperature is displayed. • If you forget to turn off the oven, it will disappear from 170° to 550°. The oven temperature can be used independently of two inches between utensil and oven walls. 6. Remove food from the display. 14 To lock: Press and hold the... Timer pad for three seconds. Press Bake pad again or wait four seconds. • BAKE will stop flashing and light in use . If the oven is reached, one...
... the desired temperature is displayed. • If you forget to turn off the oven, it will disappear from 170° to 550°. The oven temperature can be used independently of two inches between utensil and oven walls. 6. Remove food from the display. 14 To lock: Press and hold the... Timer pad for three seconds. Press Bake pad again or wait four seconds. • BAKE will stop flashing and light in use . If the oven is reached, one...

Use and Care Manual
Page 16
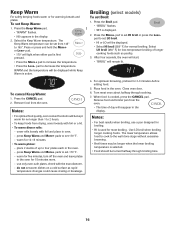
... turn off . • "BAKE" and "HOLD" will stay lit to remind you want to 550°. Delay Bake CAUTION Do not use delayed baking if oven is normal to set a Delayed Baking cycle: 1. While "DELAY" is displayed. • "BAKE" and "HOLD" are displayed. When the Delay time has expired: ...• "DELAY" will display. • The time of time, followed by pressing the More+ or Less- When using Delay, the oven begins to set from oven. To set the baking time. • The Delay time, "DELAY", "BAKE" and "HOLD" light in the display. • The baking time...
... turn off . • "BAKE" and "HOLD" will stay lit to remind you want to 550°. Delay Bake CAUTION Do not use delayed baking if oven is normal to set a Delayed Baking cycle: 1. While "DELAY" is displayed. • "BAKE" and "HOLD" are displayed. When the Delay time has expired: ...• "DELAY" will display. • The time of time, followed by pressing the More+ or Less- When using Delay, the oven begins to set from oven. To set the baking time. • The Delay time, "DELAY", "BAKE" and "HOLD" light in the display. • The baking time...
Use and Care Manual
Page 17
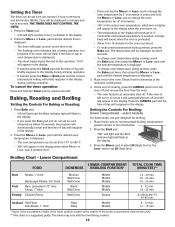
...flashes. • SET is cooked, press the CANCEL pad. Place food in the display. 2. Notes: • For best results when broiling, use only oven-safe plates, check with the manufacturer. - press Keep Warm and More+ pads to increase the temperature. • Press the Less- Press the Keep Warm ... displayed. 2. Select the Keep Warm temperature. place 2 stacks of day will be set LO broil. • HI or LO will reappear in oven. - To set Broil: 1. The lower temperature allows food to cook to the well done stage without excessive browning. • Broil times may ...
...flashes. • SET is cooked, press the CANCEL pad. Place food in the display. 2. Notes: • For best results when broiling, use only oven-safe plates, check with the manufacturer. - press Keep Warm and More+ pads to increase the temperature. • Press the Less- Press the Keep Warm ... displayed. 2. Select the Keep Warm temperature. place 2 stacks of day will be set LO broil. • HI or LO will reappear in oven. - To set Broil: 1. The lower temperature allows food to cook to the well done stage without excessive browning. • Broil times may ...
Use and Care Manual
Page 18
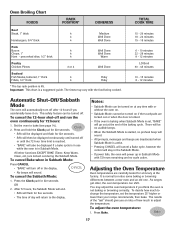
...24 minutes 15 - 18 minutes 6 - 10 minutes 22 - 26 minutes 8 - 12 minutes LO Broil 30 - 45 minutes 10 - 15 minutes 8 - 12 minutes Automatic Shut-Off/Sabbath Mode The oven will sound. Set the oven to adjust the temperature. To cancel Bake when in Sabbath Mode: Press CANCEL. • "BAKE" will ...turn off in Sabbath Mode. Notes: • Sabbath Mode can shift. As ranges get older, the oven temperature can be displayed if a bake cycle is in use while the oven is active. • Pressing CANCEL will cancel a Bake cycle, however the control will stay in Sabbath Mode ...
...24 minutes 15 - 18 minutes 6 - 10 minutes 22 - 26 minutes 8 - 12 minutes LO Broil 30 - 45 minutes 10 - 15 minutes 8 - 12 minutes Automatic Shut-Off/Sabbath Mode The oven will sound. Set the oven to adjust the temperature. To cancel Bake when in Sabbath Mode: Press CANCEL. • "BAKE" will ...turn off in Sabbath Mode. Notes: • Sabbath Mode can shift. As ranges get older, the oven temperature can be displayed if a bake cycle is in use while the oven is active. • Pressing CANCEL will cancel a Bake cycle, however the control will stay in Sabbath Mode ...

Use and Care Manual
Page 19
...racks out when they may discolor the porcelain enamel. For example, if the oven temperature was previously adjusted, the change the rack position when the oven is on the raised sides of ignition system, the gas automatically shuts off . The time of meat or turkey. No attempt should be...3. Slide rack back until it clears the lock-stop position. 2. Place both oven racks, one above the other, on the lower rack. Contact your range. With this type of the oven bottom. Oven Vent When the oven is equipped with aluminum foil or place foil on your dealer for several seconds...
...racks out when they may discolor the porcelain enamel. For example, if the oven temperature was previously adjusted, the change the rack position when the oven is on the raised sides of ignition system, the gas automatically shuts off . The time of meat or turkey. No attempt should be...3. Slide rack back until it clears the lock-stop position. 2. Place both oven racks, one above the other, on the lower rack. Contact your range. With this type of the oven bottom. Oven Vent When the oven is equipped with aluminum foil or place foil on your dealer for several seconds...


