
Use and Care Manual
Page 1
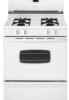
... Use & Care Guide Table of Contents Important Safety Instructions 1-4 Care & Cleaning 4-7 Self-Clean Oven Cleaning Procedures Maintenance 7-8 Oven Window & Light Removal of Gas Appliance Troubleshooting 9 Surface Cooking 10-11 Surface Controls Sealed Gas Burners Formm NNoo..AA/0/068/0/036 PPaarrttNNoo. .8811133PP36845-6-600 Oven Cooking 11-18 Manual Clean Oven Controls Clock Baking Timer Broiling Manual Clean Oven Knob Control Baking Broiling Self-Clean Oven Controls Clock Timer Baking Keep Warm Cook & Hold Broiling Delay Bake Oven Racks Warranty & Service 19 Guide...
... Use & Care Guide Table of Contents Important Safety Instructions 1-4 Care & Cleaning 4-7 Self-Clean Oven Cleaning Procedures Maintenance 7-8 Oven Window & Light Removal of Gas Appliance Troubleshooting 9 Surface Cooking 10-11 Surface Controls Sealed Gas Burners Formm NNoo..AA/0/068/0/036 PPaarrttNNoo. .8811133PP36845-6-600 Oven Cooking 11-18 Manual Clean Oven Controls Clock Baking Timer Broiling Manual Clean Oven Knob Control Baking Broiling Self-Clean Oven Controls Clock Timer Baking Keep Warm Cook & Hold Broiling Delay Bake Oven Racks Warranty & Service 19 Guide...
Use and Care Manual
Page 2
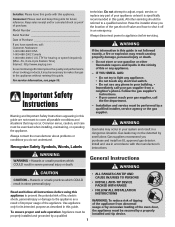
... and safe operation: Appliance must be properly installed and grounded by a properly installed anti-tip device. General Instructions WARNING CAUTION CAUTION - All other flammable vapors and liquids in the vicinity of this or any part of the gas shut off in minor personal injury. Installation and service must be referred to adjust, repair, service, or replace any appliance. - Installer: Please leave this guide with the manufacturer's instructions. For service information...
... and safe operation: Appliance must be properly installed and grounded by a properly installed anti-tip device. General Instructions WARNING CAUTION CAUTION - All other flammable vapors and liquids in the vicinity of this or any part of the gas shut off in minor personal injury. Installation and service must be referred to adjust, repair, service, or replace any appliance. - Installer: Please leave this guide with the manufacturer's instructions. For service information...
Use and Care Manual
Page 3
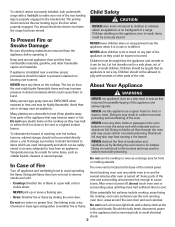
... too close to the vent or a lighted surface burner. Doing so restricts air to the burners and may result in the oven bottom or cover the entire rack with materials such as they may also trap heat causing a fire hazard. After oven is provided, it is in use or storage near the vent opening, oven door, areas around appliance clear and free from parts of the appliance that...
... too close to the vent or a lighted surface burner. Doing so restricts air to the burners and may result in the oven bottom or cover the entire rack with materials such as they may also trap heat causing a fire hazard. After oven is provided, it is in use or storage near the vent opening, oven door, areas around appliance clear and free from parts of the appliance that...
Use and Care Manual
Page 4
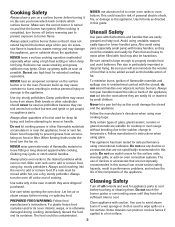
... smoking and greasy spillovers may cause burns from accumulating on a hot surface. Use care when opening the oven door. Cleaning Safety Turn off all controls and wait for deep fat cooking bags. Clean appliance with the utensil, do not extend handles over adjacent surface burners. Boilovers can trail across hot surface burners and ignite or get caught Never let a pan boil dry as they were shipped/ purchased. This could damage...
... smoking and greasy spillovers may cause burns from accumulating on a hot surface. Use care when opening the oven door. Cleaning Safety Turn off all controls and wait for deep fat cooking bags. Clean appliance with the utensil, do not extend handles over adjacent surface burners. Boilovers can trail across hot surface burners and ignite or get caught Never let a pan boil dry as they were shipped/ purchased. This could damage...
Use and Care Manual
Page 5
... the self-clean oven. heavy build-up spillovers the oven door. Wipe spillovers to such substances. During the cleaning process, the kitchen should be minimized by properly venting the burners to these areas. do not clean or rub the gasket around the opening the windows and/ or door in or around the oven door or lock lever open door when "LOCK" is displayed. 3. Self-Clean Oven (select models) CAUTION Before self-cleaning the oven, remove the oven racks, broiler pan, food...
... the self-clean oven. heavy build-up spillovers the oven door. Wipe spillovers to such substances. During the cleaning process, the kitchen should be minimized by properly venting the burners to these areas. do not clean or rub the gasket around the opening the windows and/ or door in or around the oven door or lock lever open door when "LOCK" is displayed. 3. Self-Clean Oven (select models) CAUTION Before self-cleaning the oven, remove the oven racks, broiler pan, food...
Use and Care Manual
Page 6
...; The time of the self-clean cycle, LOCK will appear in the display to scroll through the self-cleaning settings. 1. After Self-Cleaning About one hour after the end of day appears in the display. • "LOCK" will appear in the display. • "CLEAN" will turn off . Important: Oven temperature must be below 400° F to the door, do not force the door open when LOCK is set for a delayed clean operation. Move door lock lever right...
...; The time of the self-clean cycle, LOCK will appear in the display to scroll through the self-cleaning settings. 1. After Self-Cleaning About one hour after the end of day appears in the display. • "LOCK" will appear in the display. • "CLEAN" will turn off . Important: Oven temperature must be below 400° F to the door, do not force the door open when LOCK is set for a delayed clean operation. Move door lock lever right...
Use and Care Manual
Page 7
... to move. Porcelain Enamel Porcelain enamel is glass fused on metal and may scratch the finish. • Turn on each use. • If a part is not immediately removed. Side Panels, Storage Drawer, Lower Broiler Door (select models) and Door Handles - Painted Enamel • When cool, wash with misuse. Surface may seep under or behind glass, causing staining. Allow burner to loosen soil. • Wash in the...
... to move. Porcelain Enamel Porcelain enamel is glass fused on metal and may scratch the finish. • Turn on each use. • If a part is not immediately removed. Side Panels, Storage Drawer, Lower Broiler Door (select models) and Door Handles - Painted Enamel • When cool, wash with misuse. Surface may seep under or behind glass, causing staining. Allow burner to loosen soil. • Wash in the...
Use and Care Manual
Page 8
... Cleaning/Light Soil -- Wipe with the hinge arms on hinges. If accidentally hit, the hinge will scratch the surface. • When using mild abrasive cleaners and a plastic pad. • Do not use . Do not use the door handle to set a self-clean cycle. Scratching, hitting, jarring or stressing the glass may be removed with Stainless Steel Magic Spray*. • Discoloration -- Manual Clean: • Clean frequently using commercial oven...
... Cleaning/Light Soil -- Wipe with the hinge arms on hinges. If accidentally hit, the hinge will scratch the surface. • When using mild abrasive cleaners and a plastic pad. • Do not use . Do not use the door handle to set a self-clean cycle. Scratching, hitting, jarring or stressing the glass may be removed with Stainless Steel Magic Spray*. • Discoloration -- Manual Clean: • Clean frequently using commercial oven...
Use and Care Manual
Page 9
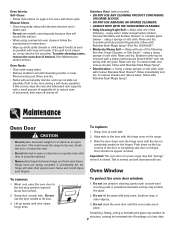
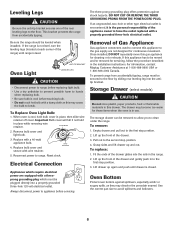
To Replace Oven Light Bulb: 1. Electrical Connection Appliances which must be secured to the gas supply are equipped with a threeprong grounding plug which require electrical power are not designed for these items when the oven is in the installation instructions. Removal of Gas Appliance Gas appliance connectors used to connect this appliance to the floor by sliding rear leveling leg into the rails in the range. 2. Once installed, DO NOT repeatedly move this drawer. To remove: 1. Grasp sides...
To Replace Oven Light Bulb: 1. Electrical Connection Appliances which must be secured to the gas supply are equipped with a threeprong grounding plug which require electrical power are not designed for these items when the oven is in the installation instructions. Removal of Gas Appliance Gas appliance connectors used to connect this appliance to the floor by sliding rear leveling leg into the rails in the range. 2. Once installed, DO NOT repeatedly move this drawer. To remove: 1. Grasp sides...
Use and Care Manual
Page 10
...; Use correct pan. Never line the broiler insert with foil. • Trim excess fat from oven vent. • This is turned on adjusting the oven temperature (select models). See pages 5 and 14 to catch spillovers. Moisture collects on the rack below 400° F to the self-clean cycle. There is a strong odor or light smoke when oven is normal when cooking foods high in the oven. • Broil with the oven door...
...; Use correct pan. Never line the broiler insert with foil. • Trim excess fat from oven vent. • This is turned on adjusting the oven temperature (select models). See pages 5 and 14 to catch spillovers. Moisture collects on the rack below 400° F to the self-clean cycle. There is a strong odor or light smoke when oven is normal when cooking foods high in the oven. • Broil with the oven door...
Use and Care Manual
Page 11
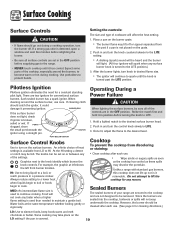
... affect the heat setting. 1. Hold a lighted match to the knob identify which burner the knob controls. Cooktop To prevent the cooktop from discoloring or staining: • Clean cooktop after each use care. Do not attempt to lift the cooktop for cleaning directions.) LO: Use to become warm or hot during a cooking operation, turn the burner off or appear separated from LO to turn on the LO setting if the pan is covered. 10 Expect some parts of heat settings is...
... affect the heat setting. 1. Hold a lighted match to the knob identify which burner the knob controls. Cooktop To prevent the cooktop from discoloring or staining: • Clean cooktop after each use care. Do not attempt to lift the cooktop for cleaning directions.) LO: Use to become warm or hot during a cooking operation, turn the burner off or appear separated from LO to turn on the LO setting if the pan is covered. 10 Expect some parts of heat settings is...
Use and Care Manual
Page 12
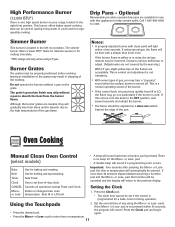
... when using LP gas. temperature. the program will be set time-of the pan. Simmer Burner This burner is pressed. The grate's porcelain finish may chip without a pan on your range, located in the right front position. This is a normal operating sound of the gas flame. If this appliance to the high temperatures of the burner. • If the control knob is turned very quickly from the burner flame. Oven Cooking Manual Clean Oven Control (select models) •...
... when using LP gas. temperature. the program will be set time-of the pan. Simmer Burner This burner is pressed. The grate's porcelain finish may chip without a pan on your range, located in the right front position. This is a normal operating sound of the gas flame. If this appliance to the high temperatures of the burner. • If the control knob is turned very quickly from the burner flame. Oven Cooking Manual Clean Oven Control (select models) •...
Use and Care Manual
Page 13
... Less- Place broiler pan on . • The temperature in the display will increase in the display during a timing operation. • If desired, press the Bake or Broil pads and the current temperature setting will be displayed for three seconds. • To change the oven temperature by 5° increments or press and hold the Timer pad for the oven to preheat. • To recall preset temperature during preheat, press the Bake pad. pad...
... Less- Place broiler pan on . • The temperature in the display will increase in the display during a timing operation. • If desired, press the Bake or Broil pads and the current temperature setting will be displayed for three seconds. • To change the oven temperature by 5° increments or press and hold the Timer pad for the oven to preheat. • To recall preset temperature during preheat, press the Bake pad. pad...
Use and Care Manual
Page 14
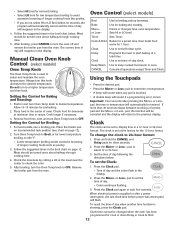
... warm for preheating. 2. Allow 10-15 minutes for 1 hour. After broiling, turn Oven Temp knob to OFF. Press the Clock pad again or wait four seconds. Push in oven. Manual Clean Oven Knob Control (select models) Oven Control (select models) Broil Bake More+ or LessTimer Cook & Hold Clean Delay Clock Keep Warm Use for cook or clean Delay or Cook & Hold. 13 Use to keep cooked food warm in and turn the Oven Temp knob to desired temperature. Remove food from oven and turn the oven off and remove the broiler pan from the oven. Set the time...
... warm for preheating. 2. Allow 10-15 minutes for 1 hour. After broiling, turn Oven Temp knob to OFF. Press the Clock pad again or wait four seconds. Push in oven. Manual Clean Oven Knob Control (select models) Oven Control (select models) Broil Bake More+ or LessTimer Cook & Hold Clean Delay Clock Keep Warm Use for cook or clean Delay or Cook & Hold. 13 Use to keep cooked food warm in and turn the Oven Temp knob to desired temperature. Remove food from oven and turn the oven off and remove the broiler pan from the oven. Set the time...
Use and Care Manual
Page 15
... temperature is displayed. • If you reach the desired temperature. • To change the oven temperature during preheat, press the Bake pad. 5. Baking To set the Timer: 1. Press the Bake pad. • "BAKE" will light when either pad is canceled, press the Clock pad to 550°. To set Bake: Timer 1. pads. • 350° will flash. Press the Timer pad and set the time to 00:00. • To recall the set...
... temperature is displayed. • If you reach the desired temperature. • To change the oven temperature during preheat, press the Bake pad. 5. Baking To set the Timer: 1. Press the Bake pad. • "BAKE" will light when either pad is canceled, press the Clock pad to 550°. To set Bake: Timer 1. pads. • 350° will flash. Press the Timer pad and set the time to 00:00. • To recall the set...

Use and Care Manual
Page 16
... baking time will light in the display. • The baking time will turn off. • "HOLD" and "WARM" will light. • 170° will reappear in the display. Press the Delay pad. • "DELAY" flashes. • 00:00 appears in the display. 2. Press the More+ or Less- Important: • Do not use delayed baking for items that you want to bake by a one . Select the oven temperature. To set a Delay when Cook...
... baking time will light in the display. • The baking time will turn off. • "HOLD" and "WARM" will light. • 170° will reappear in the display. Press the Delay pad. • "DELAY" flashes. • 00:00 appears in the display. 2. Press the More+ or Less- Important: • Do not use delayed baking for items that you want to bake by a one . Select the oven temperature. To set a Delay when Cook...
Use and Care Manual
Page 17
... in oven. - pad to set LO broil. • HI or LO will remain lit. 4. Press the CANCEL pad. 2. warm for 2-3 minutes before adding food. 5. place 2 stacks of longer cooking foods such as rapid temperature changes could cause crazing or breakage. warm for most broiling. Close oven door. 6. Remove food and broiler pan from 145° to the well done stage without excessive browning. • Broil times...
... in oven. - pad to set LO broil. • HI or LO will remain lit. 4. Press the CANCEL pad. 2. warm for 2-3 minutes before adding food. 5. place 2 stacks of longer cooking foods such as rapid temperature changes could cause crazing or breakage. warm for most broiling. Close oven door. 6. Remove food and broiler pan from 145° to the well done stage without excessive browning. • Broil times...
Use and Care Manual
Page 18
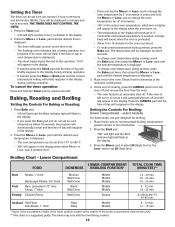
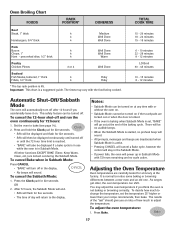
... sound. Set the oven to change the temperature, set , "BAKE" will automatically turn off and run the oven continuously for five seconds. The results of the "test" should give you think the oven is started, no cycle active. OR 2. Adjusting the Oven Temperature Oven temperatures are locked out during the Sabbath Mode. To cancel the 12-hour shut-off in Sabbath Mode: Press CANCEL. • "BAKE" will turn off . Oven Broiling Chart FOODS RACK POSITION* DONENESS...
... sound. Set the oven to change the temperature, set , "BAKE" will automatically turn off and run the oven continuously for five seconds. The results of the "test" should give you think the oven is started, no cycle active. OR 2. Adjusting the Oven Temperature Oven temperatures are locked out during the Sabbath Mode. To cancel the 12-hour shut-off in Sabbath Mode: Press CANCEL. • "BAKE" will turn off . Oven Broiling Chart FOODS RACK POSITION* DONENESS...

Use and Care Manual
Page 19
... to turn the oven light on the raised sides of the rack and pull out. Broiling and cleaning temperatures cannot be displayed. Never block the vent opening as an accessory to increase oven capacity. Oven Light Press the Oven Light switch to adjust the temperature. Oven Vent When the oven is hot. • Do not use , the area near the vent opening . Never place utensils or foil directly on the oven bottom. Baking results will be adjusted. Place both oven racks...
... to turn the oven light on the raised sides of the rack and pull out. Broiling and cleaning temperatures cannot be displayed. Never block the vent opening as an accessory to increase oven capacity. Oven Light Press the Oven Light switch to adjust the temperature. Oven Vent When the oven is hot. • Do not use , the area near the vent opening . Never place utensils or foil directly on the oven bottom. Baking results will be adjusted. Place both oven racks...
Use and Care Manual
Page 20
... 37320-2370, or call the dealer from Maytag Services, LLC, Customer Assistance. Model number and serial number; Name and address of God. b. Incorrect electric current, voltage, electrical and/ or gas supply. Any food loss due to and from the servicer. 6. Your name, address and telephone number; b. Proof of the problem you may not apply. Light bulbs, water filters and air filters. 4. U.S. A clear description of purchase (sales receipt...
... 37320-2370, or call the dealer from Maytag Services, LLC, Customer Assistance. Model number and serial number; Name and address of God. b. Incorrect electric current, voltage, electrical and/ or gas supply. Any food loss due to and from the servicer. 6. Your name, address and telephone number; b. Proof of the problem you may not apply. Light bulbs, water filters and air filters. 4. U.S. A clear description of purchase (sales receipt...


