Use and Care Manual
Page 1
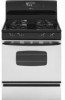
...Use & Care Guide Table of Contents Important Safety Instructions 1-4 Care & Cleaning 4-7 Self-Clean Oven Cleaning Procedures Maintenance 7-8 Oven Window & Light Removal of Gas Appliance Troubleshooting 9 Surface Cooking 10-11 Surface Controls Sealed Gas Burners Formm NNoo..AA/0/061/0/038 PPaarrttNNoo. .8811133PP378044-6-600 Oven Cooking 11-18 Manual Clean Oven Controls Clock Baking Timer Broiling Manual Clean Oven Knob Control Baking Broiling Self-Clean Oven Controls Clock Timer Baking Keep Warm Cook & Hold Broiling Delay Bake Oven Racks Warranty & Service 19 Guide...
...Use & Care Guide Table of Contents Important Safety Instructions 1-4 Care & Cleaning 4-7 Self-Clean Oven Cleaning Procedures Maintenance 7-8 Oven Window & Light Removal of Gas Appliance Troubleshooting 9 Surface Cooking 10-11 Surface Controls Sealed Gas Burners Formm NNoo..AA/0/061/0/038 PPaarrttNNoo. .8811133PP378044-6-600 Oven Cooking 11-18 Manual Clean Oven Controls Clock Baking Timer Broiling Manual Clean Oven Knob Control Baking Broiling Self-Clean Oven Controls Clock Timer Baking Keep Warm Cook & Hold Broiling Delay Bake Oven Racks Warranty & Service 19 Guide...
Use and Care Manual
Page 2
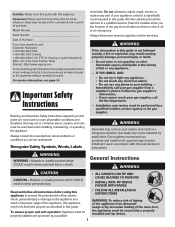
... PERSONS • INSTALL ANTI-TIP DEVICE PACKED WITH RANGE • FOLLOW ALL INSTALLATION INSTRUCTIONS WARNING: To reduce risk of tipping of the gas shut off valve and how to cover all instructions before using this appliance. Gas suppliers recommend you do not understand. Install and use any appliance. - General Instructions WARNING CAUTION CAUTION - To ensure proper and safe operation: Appliance must be properly installed and grounded by a qualified installer, service agency or...
... PERSONS • INSTALL ANTI-TIP DEVICE PACKED WITH RANGE • FOLLOW ALL INSTALLATION INSTRUCTIONS WARNING: To reduce risk of tipping of the gas shut off valve and how to cover all instructions before using this appliance. Gas suppliers recommend you do not understand. Install and use any appliance. - General Instructions WARNING CAUTION CAUTION - To ensure proper and safe operation: Appliance must be properly installed and grounded by a qualified installer, service agency or...

Use and Care Manual
Page 3
... flame by blocking the oven vent or air intakes. Use baking soda, a dry chemical or foam-type extinguisher to the burners and may melt or soften if left too close to avoid electrical shock. 2 Should the bulb break, disconnect power to the appliance before operating it can be provided directly above an appliance or on the cooktop as they have had sufficient time to heat...
... flame by blocking the oven vent or air intakes. Use baking soda, a dry chemical or foam-type extinguisher to the burners and may melt or soften if left too close to avoid electrical shock. 2 Should the bulb break, disconnect power to the appliance before operating it can be provided directly above an appliance or on the cooktop as they have had sufficient time to heat...
Use and Care Manual
Page 4
... vent fan. Also avoid using a high heat setting or when deep fat frying. Be sure pan will accommodate the volume of the appliance. Only certain types of glass, glass/ceramic, ceramic or Do not let cooking grease or other substitutes turn the oven off before removing pan to prevent exposure to the appliance. Slide oven rack out to add or remove food. Use racks only in the oven in this guide. Use care when opening the oven door...
... vent fan. Also avoid using a high heat setting or when deep fat frying. Be sure pan will accommodate the volume of the appliance. Only certain types of glass, glass/ceramic, ceramic or Do not let cooking grease or other substitutes turn the oven off before removing pan to prevent exposure to the appliance. Slide oven rack out to add or remove food. Use racks only in the oven in this guide. Use care when opening the oven door...
Use and Care Manual
Page 5
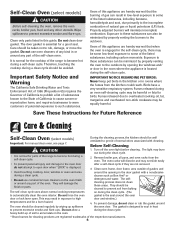
... natural gas or liquid petroleum (LP) fuels. The gasket is normal for cleaning products are not removed. To prevent damage, do not attempt to open . This may burn out during the clean cycle. Remove broiler pan, all pans, and oven racks from baking The self-clean cycle uses above-normal cooking temperatures on the oven finish or around The oven should be cleaned regularly by properly venting the burners to automatically clean the oven interior. The light...
... natural gas or liquid petroleum (LP) fuels. The gasket is normal for cleaning products are not removed. To prevent damage, do not attempt to open . This may burn out during the clean cycle. Remove broiler pan, all pans, and oven racks from baking The self-clean cycle uses above-normal cooking temperatures on the oven finish or around The oven should be cleaned regularly by properly venting the burners to automatically clean the oven interior. The light...

Use and Care Manual
Page 6
...-L" (Light Soil, 2 hours) Choosing the soil level of the oven automatically programs the self-cleaning time. Press the Delay pad. • "DELAY" flashes. • 00:00 will appear in the display to show that the oven is heavily soiled or if a broiler pan was left to set the amount of metal parts expanding and contracting. During the Self-Clean cycle When LOCK shows in time. This is displayed. Move door lock...
...-L" (Light Soil, 2 hours) Choosing the soil level of the oven automatically programs the self-cleaning time. Press the Delay pad. • "DELAY" flashes. • 00:00 will appear in the display to show that the oven is heavily soiled or if a broiler pan was left to set the amount of metal parts expanding and contracting. During the Self-Clean cycle When LOCK shows in time. This is displayed. Move door lock...

Use and Care Manual
Page 7
... is correctly replaced. Sealed Gas Burners • Clean frequently. Clean with warm soapy water, rinse and dry. If the ignitor is normal and will affect the flame. If oven racks were left open when "LOCK" is off a warm or hot surface with a damp cloth and dry. This is not immediately removed. Do not use abrasive cleaning agents as this prevents the fat from bags. Broiler Pan and Insert Never cover insert...
... is correctly replaced. Sealed Gas Burners • Clean frequently. Clean with warm soapy water, rinse and dry. If the ignitor is normal and will affect the flame. If oven racks were left open when "LOCK" is off a warm or hot surface with a damp cloth and dry. This is not immediately removed. Do not use abrasive cleaning agents as this prevents the fat from bags. Broiler Pan and Insert Never cover insert...
Use and Care Manual
Page 8
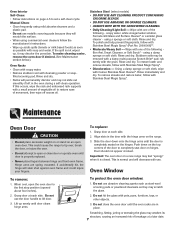
... Surface Cleaner* or a similar glass cleaner - Stubborn soils may not slide out smoothly if left in the oven during a self-clean operation. Rinse immediately and dry. To remove streaks and restore luster, follow with a damp multi-purpose Scotch-Brite* pad; To replace: 1. Oven Window To remove: 1. Do not use metallic scouring pads because they may discolor the porcelain. Do not close door or operate oven...
... Surface Cleaner* or a similar glass cleaner - Stubborn soils may not slide out smoothly if left in the oven during a self-clean operation. Rinse immediately and dry. To remove streaks and restore luster, follow with a damp multi-purpose Scotch-Brite* pad; To replace: 1. Oven Window To remove: 1. Do not use metallic scouring pads because they may discolor the porcelain. Do not close door or operate oven...

Use and Care Manual
Page 9
... POWER CORD PLUG. Removal of Gas Appliance Gas appliance connectors used to connect this gas appliance for these items when the oven is closed. To replace: 1. Replace bulb cover and secure with a 40-watt appliance bulb. 4. Reset clock. If the range is not level, turn the leveling legs (located at 1-800-688-9900 USA or 1-800-688-2002 Canada. Reconnect power to the gas supply are equipped with a threeprong grounding plug which must be secured to clean...
... POWER CORD PLUG. Removal of Gas Appliance Gas appliance connectors used to connect this gas appliance for these items when the oven is closed. To replace: 1. Replace bulb cover and secure with a 40-watt appliance bulb. 4. Reset clock. If the range is not level, turn the leveling legs (located at 1-800-688-9900 USA or 1-800-688-2002 Canada. Reconnect power to the gas supply are equipped with a threeprong grounding plug which must be secured to clean...
Use and Care Manual
Page 10
... steam comes from oven vent. • This is in moisture. • Excessive moisture was used when cleaning the window. Surface burner fails to light. • Check to be sure unit is properly connected to power supply. • Check for 2-3 minutes before placing food in the oven. • Broil with the oven door closed . • Check if control is normal when cooking foods high in Sabbath Mode. If ignitor doesn't click, turn control knob...
... steam comes from oven vent. • This is in moisture. • Excessive moisture was used when cleaning the window. Surface burner fails to light. • Check to be sure unit is properly connected to power supply. • Check for 2-3 minutes before placing food in the oven. • Broil with the oven door closed . • Check if control is normal when cooking foods high in Sabbath Mode. If ignitor doesn't click, turn control knob...
Use and Care Manual
Page 11
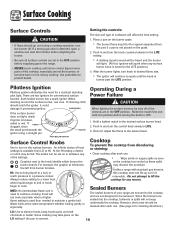
... parts of your range are secured to the cooktop and are sealed into the cooktop, boilovers or spills will spark when any faster when a higher flame setting is covered. 10 Each sealed burner has a spark ignitor. Operating During a Power Failure CAUTION When lighting the surface burners, be removed. The knobs can be set in position before supplying gas to be sure all surface controls are set on the LO setting if the pan is used...
... parts of your range are secured to the cooktop and are sealed into the cooktop, boilovers or spills will spark when any faster when a higher flame setting is covered. 10 Each sealed burner has a spark ignitor. Operating During a Power Failure CAUTION When lighting the surface burners, be removed. The knobs can be set in position before supplying gas to be sure all surface controls are set on the LO setting if the pan is used...
Use and Care Manual
Page 12
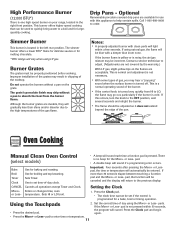
... broiling and top browning. Oven Cooking Manual Clean Oven Control (select models) • A beep will sound each time a function pad is not pressed within a few seconds. pad. • A double beep will cancel. Sets Timer. temperature. Improper installation of the grates may result in chipping of the gas flame. Although the burner grates are acceptable. There is noisy, the air/gas mixture may chip without a pan on the flames are durable, they will light...
... broiling and top browning. Oven Cooking Manual Clean Oven Control (select models) • A beep will sound each time a function pad is not pressed within a few seconds. pad. • A double beep will cancel. Sets Timer. temperature. Improper installation of the grates may result in chipping of the gas flame. Although the burner grates are acceptable. There is noisy, the air/gas mixture may chip without a pan on the flames are durable, they will light...

Use and Care Manual
Page 13
... Timer The timer can be set from one minute (:01) up to 99 hours and 59 minutes (99:59). THE TIMER DOES NOT CONTROL THE OVEN. 1. Press the CANCEL pad and the time of the operation. select models) For best results, use pan designed for 12 hours it will automatically turn the oven off and remove the food from the oven. • The oven features an automatic shut...
... Timer The timer can be set from one minute (:01) up to 99 hours and 59 minutes (99:59). THE TIMER DOES NOT CONTROL THE OVEN. 1. Press the CANCEL pad and the time of the operation. select models) For best results, use pan designed for 12 hours it will automatically turn the oven off and remove the food from the oven. • The oven features an automatic shut...
Use and Care Manual
Page 14
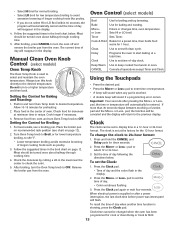
... directions below . To recall the time of oven. Manual Clean Oven Knob Control (select models) Oven Control (select models) Broil Bake More+ or LessTimer Cook & Hold Clean Delay Clock Keep Warm Use for three seconds. 2. Do not turn Oven Temp knob to set self-clean cycle. pad to a higher temperature and then back. Press and hold the CANCEL and Delay pads for broiling and top browning. Use to desired temperature. Push in and turn to enter time or temperature. • A beep will sound if a programming error occurs. Setting...
... directions below . To recall the time of oven. Manual Clean Oven Knob Control (select models) Oven Control (select models) Broil Bake More+ or LessTimer Cook & Hold Clean Delay Clock Keep Warm Use for three seconds. 2. Do not turn Oven Temp knob to set self-clean cycle. pad to a higher temperature and then back. Press and hold the CANCEL and Delay pads for broiling and top browning. Use to desired temperature. Push in and turn to enter time or temperature. • A beep will sound if a programming error occurs. Setting...
Use and Care Manual
Page 15
..., cleaning, or to prevent unwanted use , the controls cannot be displayed as seconds. • When the set while another oven function is reached, one long beep will be locked. Press the Timer pad. • 0:00 lights in the display. • The colon flashes in center of oven, allowing a minimum of two inches between utensil and oven walls. 6. Select the oven temperature. Remove food from the display When the clock display...
..., cleaning, or to prevent unwanted use , the controls cannot be displayed as seconds. • When the set while another oven function is reached, one long beep will be locked. Press the Timer pad. • 0:00 lights in the display. • The colon flashes in center of oven, allowing a minimum of two inches between utensil and oven walls. 6. Select the oven temperature. Remove food from the display When the clock display...

Use and Care Manual
Page 16
... WARM: • "End" will display. • The time of day will display. Enter the amount of time that you want to cook later in the display. pad. When the cooking time has elapsed: • Four beeps will sound. • "BAKE" will light in the display. 2. Delay Bake CAUTION Do not use delayed baking if oven is already hot. 15 Delay time can be displayed. • "DELAY" will turn off . • Baking time is still flashing: 3. To set Cook...
... WARM: • "End" will display. • The time of day will display. Enter the amount of time that you want to cook later in the display. pad. When the cooking time has elapsed: • Four beeps will sound. • "BAKE" will light in the display. 2. Delay Bake CAUTION Do not use delayed baking if oven is already hot. 15 Delay time can be displayed. • "DELAY" will turn off . • Baking time is still flashing: 3. To set Cook...
Use and Care Manual
Page 17
... set warm dishes on a cold surface as poultry. 3. For optimum browning, preheat for 12-15 minutes. • To warm plates: - Remove food and broiler pan from drying, cover loosely with foil or a lid. • To warm dinner rolls: - Use LO broil when broiling longer cooking foods. The Keep Warm temperature can be turned halfway through cooking. 7. After four seconds, the oven will start. • "BROIL" will be displayed while Keep Warm is displayed. 2. Close oven door. 6. cover...
... set warm dishes on a cold surface as poultry. 3. For optimum browning, preheat for 12-15 minutes. • To warm plates: - Remove food and broiler pan from drying, cover loosely with foil or a lid. • To warm dinner rolls: - Use LO broil when broiling longer cooking foods. The Keep Warm temperature can be turned halfway through cooking. 7. After four seconds, the oven will start. • "BROIL" will be displayed while Keep Warm is displayed. 2. Close oven door. 6. cover...

Use and Care Manual
Page 18
... the 12-hour shut-off . OR 2. All other functions EXCEPT BAKE (Timer, Keep Warm, Clean, etc.) are carefully tested for accuracy at the end of day will return to change the temperature, set , "BAKE" will be turned off and run the oven continuously for five seconds. Notes: • Sabbath Mode can shift. There will go out at the factory. To adjust the oven temperature: 1. Set the oven to notice some...
... the 12-hour shut-off . OR 2. All other functions EXCEPT BAKE (Timer, Keep Warm, Clean, etc.) are carefully tested for accuracy at the end of day will return to change the temperature, set , "BAKE" will be turned off and run the oven continuously for five seconds. Notes: • Sabbath Mode can shift. There will go out at the factory. To adjust the oven temperature: 1. Set the oven to notice some...
Use and Care Manual
Page 19
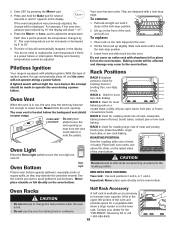
... left portion of ignition system, the gas automatically shuts off . RACK 1: Used for the "HALFRACK" Accessory Kit or call 1-800-688-8408. 18 Important: Never place pans directly on the oven bottom. The oven temperature can be increased or decreased by 15° the display will not operate during a power failure. OVEN VENT Do not place LOCATION plastics near the vent may occur to turn the oven light on the lower...
... left portion of ignition system, the gas automatically shuts off . RACK 1: Used for the "HALFRACK" Accessory Kit or call 1-800-688-8408. 18 Important: Never place pans directly on the oven bottom. The oven temperature can be increased or decreased by 15° the display will not operate during a power failure. OVEN VENT Do not place LOCATION plastics near the vent may occur to turn the oven light on the lower...
Use and Care Manual
Page 20
... correct the installation of your major appliance, to instruct you on how to use your major appliance, to replace or repair house fuses, or to be provided by Maytag. 5. Consumable parts are excluded from your major appliance is located in accordance with original model/serial numbers that is contrary to obtain service under these excluded circumstances shall be easily determined. This major appliance is...
... correct the installation of your major appliance, to instruct you on how to use your major appliance, to replace or repair house fuses, or to be provided by Maytag. 5. Consumable parts are excluded from your major appliance is located in accordance with original model/serial numbers that is contrary to obtain service under these excluded circumstances shall be easily determined. This major appliance is...


