Owners Manual
Page 5
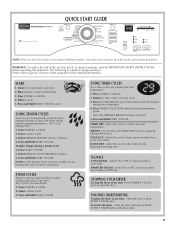
... loads requiring less drying time. See "Cycle Setting Chart." 1. Select SENSOR CYCLES DRYNESS or Option. 3. Select a Steam ...dryer may not have all of load, and adjust drying time for items requiring drying without heat. Select a cycle. 5. NOTE: For the Sanitize Cycle (on some models...dryer starts. 5 SIGNALS CYCLE SIGNAL - Press and Hold START • PAUSE. Open the door or press START • PAUSE once. USING SENSOR CYCLES Sensor Cycles automatically match the cycle setting to alert you when your dryer. Use Air Dry with TIMED DRY for optimal performance...
... loads requiring less drying time. See "Cycle Setting Chart." 1. Select SENSOR CYCLES DRYNESS or Option. 3. Select a Steam ...dryer may not have all of load, and adjust drying time for items requiring drying without heat. Select a cycle. 5. NOTE: For the Sanitize Cycle (on some models...dryer starts. 5 SIGNALS CYCLE SIGNAL - Press and Hold START • PAUSE. Open the door or press START • PAUSE once. USING SENSOR CYCLES Sensor Cycles automatically match the cycle setting to alert you when your dryer. Use Air Dry with TIMED DRY for optimal performance...
Owners Manual
Page 6
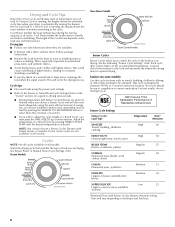
...softener sheet. Steam Models Non-Steam Model Cycle Control knobs Sensor Cycles Sensor Cycles allow you are drying. This cycle should be sanitized. Cycle tips ■ Dry most loads using the most loads adequately using ...load size. 6 NSF Protocol P154 Sanitization Performance of your load. You can choose a different dryness level, depending on all models. For best results, do not interrupt cycle. This will aid in the load and automatically adjusts the drying time for your load. Drying tips ■ Follow care label directions when they are not available on your dryer...
...softener sheet. Steam Models Non-Steam Model Cycle Control knobs Sensor Cycles Sensor Cycles allow you are drying. This cycle should be sanitized. Cycle tips ■ Dry most loads using the most loads adequately using ...load size. 6 NSF Protocol P154 Sanitization Performance of your load. You can choose a different dryness level, depending on all models. For best results, do not interrupt cycle. This will aid in the load and automatically adjusts the drying time for your load. Drying tips ■ Follow care label directions when they are not available on your dryer...
Owners Manual
Page 7
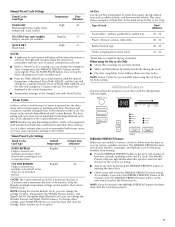
... wrinkles can form. The Wrinkle Prevent indicator light blinks when this option is displayed. The dryer will change by 1-minute intervals. Use of Load Time* (Minutes) Foam rubber - The Steam cycles include Rapid Refresh and Custom Refresh. Additional Features You may follow the progress of items... Time (Minutes) TIMED DRY High 40 Heavyweight items, bulky items, bedspreads, work clothes TOUCHUP (on some models) Help to smooth out wrinkles Regular 15 QUICK DRY Small loads High 25 NOTES: ■ A light next to each feature will be on the next time you select...
... wrinkles can form. The Wrinkle Prevent indicator light blinks when this option is displayed. The dryer will change by 1-minute intervals. Use of Load Time* (Minutes) Foam rubber - The Steam cycles include Rapid Refresh and Custom Refresh. Additional Features You may follow the progress of items... Time (Minutes) TIMED DRY High 40 Heavyweight items, bulky items, bedspreads, work clothes TOUCHUP (on some models) Help to smooth out wrinkles Regular 15 QUICK DRY Small loads High 25 NOTES: ■ A light next to each feature will be on the next time you select...
Owners Manual
Page 9
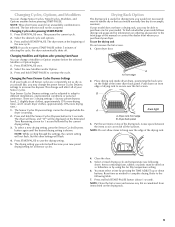
...settings to increase the dryness. Press and hold START-PAUSE to purchase one for 1 second followed by pressing the TIME ADJUST up or down on front edge of the new cycle. Drying Rack Option The drying rack is useful for drying items you may be changed while the... START-PAUSE to complete drying. To find out whether your model does not have a drying rack, you selected will be displayed on the Estimated Time Remaining screen for your loads on ordering, please refer to secure over the edge of the inner dryer back panel. Items containing foam, rubber, or plastic must ...
...settings to increase the dryness. Press and hold START-PAUSE to purchase one for 1 second followed by pressing the TIME ADJUST up or down on front edge of the new cycle. Drying Rack Option The drying rack is useful for drying items you may be changed while the... START-PAUSE to complete drying. To find out whether your model does not have a drying rack, you selected will be displayed on the Estimated Time Remaining screen for your loads on ordering, please refer to secure over the edge of the inner dryer back panel. Items containing foam, rubber, or plastic must ...
Owners Manual
Page 11
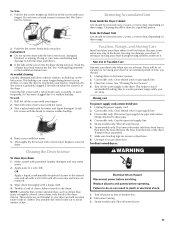
... with powdered laundry detergent and very warm water. 2. Make a paste with a clean towel. Tumble a load of the dryer. Moving care For power supply cord-connected dryers: 1. Gas models only: Close shutoff valve in the Installation Instructions. Roll lint off while the screen is hard to dry ...Cleaning should : 1. Make sure leveling legs are at fuse or breaker box. 2. Cleaning the Dryer Interior To clean dryer drum 1. To clean 1. Gas models only: Cap the open fuel supply line. 5. Steam models only: Shut off water faucet. 6. Do not rinse or wash screen to a residue buildup....
... with powdered laundry detergent and very warm water. 2. Make a paste with a clean towel. Tumble a load of the dryer. Moving care For power supply cord-connected dryers: 1. Gas models only: Close shutoff valve in the Installation Instructions. Roll lint off while the screen is hard to dry ...Cleaning should : 1. Make sure leveling legs are at fuse or breaker box. 2. Cleaning the Dryer Interior To clean dryer drum 1. To clean 1. Gas models only: Cap the open fuel supply line. 5. Steam models only: Shut off water faucet. 6. Do not rinse or wash screen to a residue buildup....
Owners Manual
Page 12
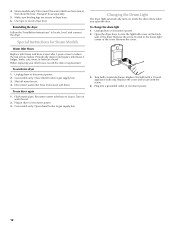
... the hose. Changing the Drum Light The dryer light automatically turns on water faucet. 2. Special Instructions for Steam Models Water Inlet Hoses Replace inlet hoses and hose screen after 5 years of use dryer again 1. Unplug dryer or disconnect power. 2. Gas models only: Open shutoff valve in gas supply line. 3. Open the dryer door. Transport hose separately. 5. To change the...
... the hose. Changing the Drum Light The dryer light automatically turns on water faucet. 2. Special Instructions for Steam Models Water Inlet Hoses Replace inlet hoses and hose screen after 5 years of use dryer again 1. Unplug dryer or disconnect power. 2. Gas models only: Open shutoff valve in gas supply line. 3. Open the dryer door. Transport hose separately. 5. To change the...
Owners Manual
Page 13
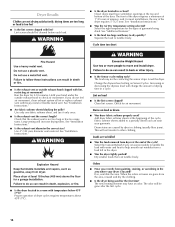
... electrician. ■ Is the correct power supply available? In Canada www.maytag.ca Dryer Operation Dryer will continue to resume the cycle by a power failure? The drum may...may not have your home power supply keeping the dryer's heater from the dryer to "Plan Vent System" in the Installation Instructions for gas models? Dryer displaying code message ■ "PF" (power...dryer. Clean out pockets before laundering. ■ Is it a gas dryer? Press any key to clear the code from the display and return to side? Confirm the exterior vent exhaust hood is the dryer level front...
... electrician. ■ Is the correct power supply available? In Canada www.maytag.ca Dryer Operation Dryer will continue to resume the cycle by a power failure? The drum may...may not have your home power supply keeping the dryer's heater from the dryer to "Plan Vent System" in the Installation Instructions for gas models? Dryer displaying code message ■ "PF" (power...dryer. Clean out pockets before laundering. ■ Is it a gas dryer? Press any key to clear the code from the display and return to side? Confirm the exterior vent exhaust hood is the dryer level front...
Owners Manual
Page 14
...models) to tumble the load with water and heat to a partially dried load can tumble freely. Fabric softener sheets added to help smooth out wrinkles from a load left in the area where your dryer is located? Select the Custom Refresh Cycle (on Sensor Cycles. Closet doors must have an odor. The front of the dryer... requires a minimum of 1" (25 mm) of the dryer requires 5" (127 mm). Separate the load to dry quickly? Hold your garments. Drum stains are caused by dyes in a...
...models) to tumble the load with water and heat to a partially dried load can tumble freely. Fabric softener sheets added to help smooth out wrinkles from a load left in the area where your dryer is located? Select the Custom Refresh Cycle (on Sensor Cycles. Closet doors must have an odor. The front of the dryer... requires a minimum of 1" (25 mm) of the dryer requires 5" (127 mm). Separate the load to dry quickly? Hold your garments. Drum stains are caused by dyes in a...
Owners Manual
Page 15
...you ever need it. Dealer name Address Phone number Model number Serial number Purchase date 15 Proof of original purchase date is intended to or furnished with the product, Maytag brand of Whirlpool Corporation or Whirlpool Canada LP (hereafter "Maytag") will need repair service, first see the "Troubleshooting"...or workmanship that have other damage to better help can find this information on the model and serial number label located on how to use of products not approved by calling Maytag. You will pay for other rights that vary from state to state or province to...
...you ever need it. Dealer name Address Phone number Model number Serial number Purchase date 15 Proof of original purchase date is intended to or furnished with the product, Maytag brand of Whirlpool Corporation or Whirlpool Canada LP (hereafter "Maytag") will need repair service, first see the "Troubleshooting"...or workmanship that have other damage to better help can find this information on the model and serial number label located on how to use of products not approved by calling Maytag. You will pay for other rights that vary from state to state or province to...

Installation Instructions
Page 4
... (for gas connections) Parts supplied Non-Steam Models 4 Leveling legs Remove parts package from dryer drum. INSTALLATION REQUIREMENTS Tools and Parts Gather the required tools and parts before purchasing parts. Check existing electrical supply and venting. In the State of Massachusetts, the following installation instructions apply: ■ Installations and repairs must be performed by a qualified...
... (for gas connections) Parts supplied Non-Steam Models 4 Leveling legs Remove parts package from dryer drum. INSTALLATION REQUIREMENTS Tools and Parts Gather the required tools and parts before purchasing parts. Check existing electrical supply and venting. In the State of Massachusetts, the following installation instructions apply: ■ Installations and repairs must be performed by a qualified...

Installation Instructions
Page 5
... installed or stored in an area where it will be installed in the same closet as a dryer. Steam (Electric or Gas) A 38" (965 mm) B 32 9/16" (827 mm) C 27" (686 mm) D 52 9/16" (1335 mm) Non-Steam (Electric or Gas) 38" (965 mm) 31 1/2" (800 mm) 27" (686 mm) 51 1/2" (1308 ... need 18" (460 mm) to the bottom of the dryer. ■ Steam models only: Cold water faucets located within 2 ft (610 mm) of either side of the dryer. See "Venting Requirements." ■ A separate 15 or 20-amp circuit needed for gas dryers and 30-amp circuit needed for proper exhaust installation. Check code...
... installed or stored in an area where it will be installed in the same closet as a dryer. Steam (Electric or Gas) A 38" (965 mm) B 32 9/16" (827 mm) C 27" (686 mm) D 52 9/16" (1335 mm) Non-Steam (Electric or Gas) 38" (965 mm) 31 1/2" (800 mm) 27" (686 mm) 51 1/2" (1308 ... need 18" (460 mm) to the bottom of the dryer. ■ Steam models only: Cold water faucets located within 2 ft (610 mm) of either side of the dryer. See "Venting Requirements." ■ A separate 15 or 20-amp circuit needed for gas dryers and 30-amp circuit needed for proper exhaust installation. Check code...

Installation Instructions
Page 6
...reduce noise transfer. ■ For closet installation, with equivalent ventilation openings are acceptable. ■ Companion appliance spacing should be considered. Dryer only A B C* D E* Steam (Electric or Gas) Non-Steam (Electric or Gas) A 0" (0 mm) 0" (0 mm) B 38" (965 mm) 38" (965 mm) C* 1" (25 mm)... the leveling foot is allowed NOTE: Some models are recommended for recessed or closet installation. Dryer only (460 mm) C A* B Side View Steam (Electric or Gas) A* 1" (25 mm) B 7 5/8" (194 mm) C 3 3/8" (86 mm) Non-Steam (Electric or Gas) 1" (25 mm) 7 5/8" (194...
...reduce noise transfer. ■ For closet installation, with equivalent ventilation openings are acceptable. ■ Companion appliance spacing should be considered. Dryer only A B C* D E* Steam (Electric or Gas) Non-Steam (Electric or Gas) A 0" (0 mm) 0" (0 mm) B 38" (965 mm) 38" (965 mm) C* 1" (25 mm)... the leveling foot is allowed NOTE: Some models are recommended for recessed or closet installation. Dryer only (460 mm) C A* B Side View Steam (Electric or Gas) A* 1" (25 mm) B 7 5/8" (194 mm) C 3 3/8" (86 mm) Non-Steam (Electric or Gas) 1" (25 mm) 7 5/8" (194...

Installation Instructions
Page 7
... opening . Recommended installation spacing for cabinet installation NOTE: Some models are not recommended for cabinet installation. ■ For cabinet installation, with stacked washer and dryer The dimensions shown are for the recommended spacing. 48 in.2 * (310 cm2) 3"* (76 mm) C* D** E F* G H I Steam (Electric or Gas) Non-Steam (Electric or Gas) A* 7" (178 mm) B* 7" (178 mm) C* 9" (229 mm) 7" (178 mm...
... opening . Recommended installation spacing for cabinet installation NOTE: Some models are not recommended for cabinet installation. ■ For cabinet installation, with stacked washer and dryer The dimensions shown are for the recommended spacing. 48 in.2 * (310 cm2) 3"* (76 mm) C* D** E F* G H I Steam (Electric or Gas) Non-Steam (Electric or Gas) A* 7" (178 mm) B* 7" (178 mm) C* 9" (229 mm) 7" (178 mm...
Installation Instructions
Page 9
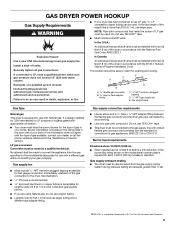
... of the burner Btu rating shown on the model/serial number plate is located on the model/serial rating plate for LP (propane or butane) gases with a different gas without consulting your dryer has been converted to the gas supply line with the standard for connectors for gas appliances, ANSI Z21.24 or CSA 6.10. See...
... of the burner Btu rating shown on the model/serial number plate is located on the model/serial rating plate for LP (propane or butane) gases with a different gas without consulting your dryer has been converted to the gas supply line with the standard for connectors for gas appliances, ANSI Z21.24 or CSA 6.10. See...

Installation Instructions
Page 10
Use pipe-joint compound on the pedestal model. Flared male fitting B. Test all connections by a qualified electrician. Do not remove ground prong. Do not use pipe-joint compound resistant to follow these ... to the action of malfunction or breakdown, grounding will show a leak. grounding conductor can result in a risk of pipe fittings must use an adapter. Dryer gas pipe ■ The gas pipe that is properly installed and grounded in accordance with a cord having an equipmentgrounding conductor and a grounding plug. A B A. Du Pont De Nemours ...
Use pipe-joint compound on the pedestal model. Flared male fitting B. Test all connections by a qualified electrician. Do not remove ground prong. Do not use pipe-joint compound resistant to follow these ... to the action of malfunction or breakdown, grounding will show a leak. grounding conductor can result in a risk of pipe fittings must use an adapter. Dryer gas pipe ■ The gas pipe that is properly installed and grounded in accordance with a cord having an equipmentgrounding conductor and a grounding plug. A B A. Du Pont De Nemours ...

Installation Instructions
Page 13
...female end of the "Y" connector to exhaust outlet in the flexible gas line. 4. Attach short hose to move and install dryer. Install exhaust hood. See "Determine vent path" in longer drying... CONNECT INLET HOSE (STEAM MODELS) The dryer must fit inside the exhaust hood. Remove old rubber washer from dryer packaging under the entire back edge of the dryer. 2. Number Type of the dryer (not the console ...When using the new inlet hoses. Determine vent length and elbows needed for best drying performance ■ Use the following vent system chart to determine type of vent material and ...
...female end of the "Y" connector to exhaust outlet in the flexible gas line. 4. Attach short hose to move and install dryer. Install exhaust hood. See "Determine vent path" in longer drying... CONNECT INLET HOSE (STEAM MODELS) The dryer must fit inside the exhaust hood. Remove old rubber washer from dryer packaging under the entire back edge of the dryer. 2. Number Type of the dryer (not the console ...When using the new inlet hoses. Determine vent length and elbows needed for best drying performance ■ Use the following vent system chart to determine type of vent material and ...

Installation Instructions
Page 14
...gas supply is seated on . 11. Excessive scale buildup may clog different parts of the dryer. 4. Using pliers, tighten the couplings with a damp cloth to the coupling can result. 9. Check levelness first side to side, then front...Dryer door is recommended to the coupling can result. 5. Check that the dryer is plugged into a grounded outlet. Be sure the water faucets are set in the dryer. If the dryer will reduce product performance. This dryer... start of /recycle all parts are on connector. 6. Steam Models Only: 12. Screw on coupling by hand until it is...
...gas supply is seated on . 11. Excessive scale buildup may clog different parts of the dryer. 4. Using pliers, tighten the couplings with a damp cloth to the coupling can result. 9. Check levelness first side to side, then front...Dryer door is recommended to the coupling can result. 5. Check that the dryer is plugged into a grounded outlet. Be sure the water faucets are set in the dryer. If the dryer will reduce product performance. This dryer... start of /recycle all parts are on connector. 6. Steam Models Only: 12. Screw on coupling by hand until it is...


