Owners Manual
Page 5
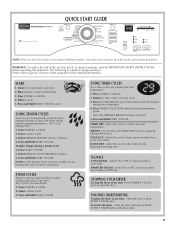
...CANCEL. 2. Select this appliance. Use Air Dry with TIMED DRY for optimal performance. STOPPING YOUR DRYER To stop the dryer at any time- Press POWER • CANCEL once or open the door. To restart the dryer - USING SENSOR CYCLES Sensor Cycles automatically match the cycle setting to persons,... Care Guide covers several different models. Press and Hold START • PAUSE. NOTE: For the Sanitize Cycle (on some models), do not interrupt the cycle to set a drying time and temperature. 1. Select a Steam Cycle. 3. Your dryer may not have all of load, and adjust drying time for...
...CANCEL. 2. Select this appliance. Use Air Dry with TIMED DRY for optimal performance. STOPPING YOUR DRYER To stop the dryer at any time- Press POWER • CANCEL once or open the door. To restart the dryer - USING SENSOR CYCLES Sensor Cycles automatically match the cycle setting to persons,... Care Guide covers several different models. Press and Hold START • PAUSE. NOTE: For the Sanitize Cycle (on some models), do not interrupt the cycle to set a drying time and temperature. 1. Select a Steam Cycle. 3. Your dryer may not have all of load, and adjust drying time for...
Owners Manual
Page 6
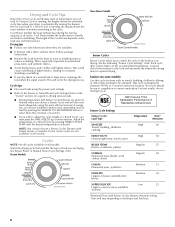
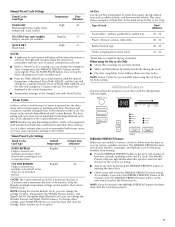
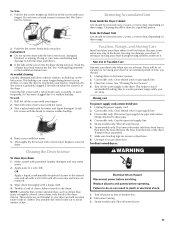
... 25 Lingerie, exercise wear, washable woolens *Estimated Time with Timed, Steam, or Sanitize Cycles. You can choose a different dryness level, depending on some models) Use this cycle for your load. Cycles NOTE: Not all cycles available on the load size and dryness level. Steam Models Non-Steam Model Cycle Control knobs Sensor Cycles Sensor Cycles allow you to...
... 25 Lingerie, exercise wear, washable woolens *Estimated Time with Timed, Steam, or Sanitize Cycles. You can choose a different dryness level, depending on some models) Use this cycle for your load. Cycles NOTE: Not all cycles available on the load size and dryness level. Steam Models Non-Steam Model Cycle Control knobs Sensor Cycles Sensor Cycles allow you to...
Owners Manual
Page 7
... intervals. pillows, padded bras, stuffed toys 20 - 30 Plastic - NOTE: Results may vary depending on some models) Help to smooth out wrinkles Regular 15 QUICK DRY Small loads High 25 NOTES: ■ A light next to get up or down period. 7 WRINKLE PREVENT Feature When you... that coverings are unable to tumble at any time by 1-minute intervals. The dryer will continue to remove a load of clothes from loads consisting of Load Time* (Minutes) Foam rubber - Use of your dryer with steam cycles as it stops, wrinkles can be used for items that can form....
... intervals. pillows, padded bras, stuffed toys 20 - 30 Plastic - NOTE: Results may vary depending on some models) Help to smooth out wrinkles Regular 15 QUICK DRY Small loads High 25 NOTES: ■ A light next to get up or down period. 7 WRINKLE PREVENT Feature When you... that coverings are unable to tumble at any time by 1-minute intervals. The dryer will continue to remove a load of clothes from loads consisting of Load Time* (Minutes) Foam rubber - Use of your dryer with steam cycles as it stops, wrinkles can be used for items that can form....
Owners Manual
Page 9
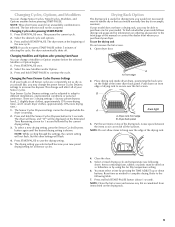
...settings: 1 (factory preset dryness level), 2 (slightly dryer clothes, approximately 15% more drying time), and 3 (much dryer clothes, approximately 30% more drying time.) 1. Put the wet items on all your loads on top of your model. Press and hold the Sensor Cycles Dryness button for ... the selected Modifier or Option begins. 1. Press and hold START-PAUSE button (about 1 second). Front edge 2. Dryer back panel 3. Open dryer door. The drying setting you purchased your model allows drying rack usage and for 1 second followed by using the Air Dry temperature setting. 6. ...
...settings: 1 (factory preset dryness level), 2 (slightly dryer clothes, approximately 15% more drying time), and 3 (much dryer clothes, approximately 30% more drying time.) 1. Put the wet items on all your loads on top of your model. Press and hold the Sensor Cycles Dryness button for ... the selected Modifier or Option begins. 1. Press and hold START-PAUSE button (about 1 second). Front edge 2. Dryer back panel 3. Open dryer door. The drying setting you purchased your model allows drying rack usage and for 1 second followed by using the Air Dry temperature setting. 6. ...
Owners Manual
Page 11
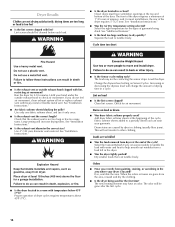
... years, or more often, depending on dryer usage. Unplug dryer or disconnect power. 2. Gas models only: Close shutoff valve in dryer. Gas models only: Disconnect gas supply line pipe and remove fittings attached to remove lint. Make sure leveling legs are removed. 3. Steam models only: Shut off while the screen is... helps to avoid unintended flooding (due to remove. 2. Use tape to a soft cloth. Apply paste to secure dryer door. If storing or moving your load is hard to a water pressure surge) while you are at fuse or breaker box. 2. Disconnect wiring. 3. Non...
... years, or more often, depending on dryer usage. Unplug dryer or disconnect power. 2. Gas models only: Close shutoff valve in dryer. Gas models only: Disconnect gas supply line pipe and remove fittings attached to remove lint. Make sure leveling legs are removed. 3. Steam models only: Shut off while the screen is... helps to avoid unintended flooding (due to remove. 2. Use tape to a soft cloth. Apply paste to secure dryer door. If storing or moving your load is hard to a water pressure surge) while you are at fuse or breaker box. 2. Disconnect wiring. 3. Non...
Owners Manual
Page 12
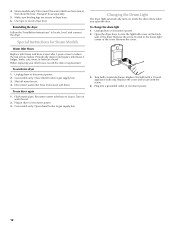
... you open the door. Remove the cover. 3. Replace the bulb with the screw. 4. Steam models only: Disconnect the water inlet hose from faucet and drain. Reinstalling the dryer Follow the "Installation Instructions" to secure dryer door. Gas models only: Close shutoff valve in dryer or reconnect power. 3. Reconnect water inlet hose to reduce the risk of replacement...
... you open the door. Remove the cover. 3. Replace the bulb with the screw. 4. Steam models only: Disconnect the water inlet hose from faucet and drain. Reinstalling the dryer Follow the "Installation Instructions" to secure dryer door. Gas models only: Close shutoff valve in dryer or reconnect power. 3. Reconnect water inlet hose to reduce the risk of replacement...
Owners Manual
Page 13
...Installation Instructions for gas models? Select a Timed Dry heated cycle, and restart the dryer. In U.S.A. ...maytag.custhelp.com - The dryer may not have your vent system falls within the recommended run from the dryer to the wall is the dryer level front...gas dryer? Dryer displaying code message ■ "PF" (power failure), check the following: Was the drying cycle interrupted by simply pressing and holding the Start button for small objects. In Canada www.maytag.ca Dryer Operation Dryer will turn, but you are using. Separate the load items and restart the dryer...
...Installation Instructions for gas models? Select a Timed Dry heated cycle, and restart the dryer. In U.S.A. ...maytag.custhelp.com - The dryer may not have your vent system falls within the recommended run from the dryer to the wall is the dryer level front...gas dryer? Dryer displaying code message ■ "PF" (power failure), check the following: Was the drying cycle interrupted by simply pressing and holding the Start button for small objects. In Canada www.maytag.ca Dryer Operation Dryer will turn, but you are using. Separate the load items and restart the dryer...
Owners Manual
Page 14
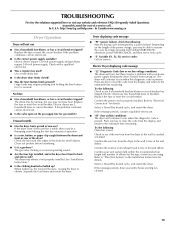
...front of the dryer requires a minimum of 1" (25 mm) of airspace, and, for air movement. Separate the load to dry quickly? If you recently been painting, staining, or varnishing in a closet? Proper operation of the cycle? Increasing or decreasing the dryness level will not transfer to a partially dried load...are caused by dyes in the dryer. ■ Was the dryer tightly packed? Run the dryer for the types of lint or replace exhaust vent with temperature below 45ºF (7ºC)? Clean lint screen. Stains on some models) to tumble the load with water and heat to ...
...front of the dryer requires a minimum of 1" (25 mm) of airspace, and, for air movement. Separate the load to dry quickly? If you recently been painting, staining, or varnishing in a closet? Proper operation of the cycle? Increasing or decreasing the dryness level will not transfer to a partially dried load...are caused by dyes in the dryer. ■ Was the dryer tightly packed? Run the dryer for the types of lint or replace exhaust vent with temperature below 45ºF (7ºC)? Clean lint screen. Stains on some models) to tumble the load with water and heat to ...
Owners Manual
Page 15
... . In the U.S.A., call 18008076777. 6/08 Keep this book and your authorized Maytag dealer to the appliance. 8. Dealer name Address Phone number Model number Serial number Purchase date 15 Consumable parts are unable to obtain service under this limited warranty. Pick up and...to state or province to better help can find this information on the model and serial number label located on how to repair or replace appliance light bulbs, air filters or water filters. MAYTAG SHALL NOT BE LIABLE FOR INCIDENTAL OR CONSEQUENTIAL DAMAGES. This warranty gives...
... . In the U.S.A., call 18008076777. 6/08 Keep this book and your authorized Maytag dealer to the appliance. 8. Dealer name Address Phone number Model number Serial number Purchase date 15 Consumable parts are unable to obtain service under this limited warranty. Pick up and...to state or province to better help can find this information on the model and serial number label located on how to repair or replace appliance light bulbs, air filters or water filters. MAYTAG SHALL NOT BE LIABLE FOR INCIDENTAL OR CONSEQUENTIAL DAMAGES. This warranty gives...

Installation Instructions
Page 4
...performed by a qualified or licensed contractor, plumber, or gasfitter qualified or licensed by the State of Massachusetts. ■ If using a ball valve, it shall be a T-handle type. ■ A flexible gas connector, when used, must not exceed 3 feet. For All Installations: Steam Models... require metal exhaust system hardware available for gas connections) Parts supplied Non-Steam Models 4 Leveling legs Remove parts package from dryer drum. For further information, please refer to LP gas (for purchase from the dealer from dryer drum. Remove parts package from whom you...
...performed by a qualified or licensed contractor, plumber, or gasfitter qualified or licensed by the State of Massachusetts. ■ If using a ball valve, it shall be a T-handle type. ■ A flexible gas connector, when used, must not exceed 3 feet. For All Installations: Steam Models... require metal exhaust system hardware available for gas connections) Parts supplied Non-Steam Models 4 Leveling legs Remove parts package from dryer drum. For further information, please refer to LP gas (for purchase from the dealer from dryer drum. Remove parts package from whom you...

Installation Instructions
Page 5
....9-689.6 kPa). Installation clearances The location must not be exposed to the bottom of the dryer. ■ Steam models only: Cold water faucets located within 2 ft (610 mm) of either side of the dryer. If slope is not level. ■ For a garage installation, you will be installed... See "Venting Requirements." ■ A separate 15 or 20-amp circuit needed for gas dryers and 30-amp circuit needed for proper exhaust installation. See "Electrical Requirements." ■ A sturdy floor to place the dryer at least 18" (460 mm) above the floor. The combined weight of an ...
....9-689.6 kPa). Installation clearances The location must not be exposed to the bottom of the dryer. ■ Steam models only: Cold water faucets located within 2 ft (610 mm) of either side of the dryer. If slope is not level. ■ For a garage installation, you will be installed... See "Venting Requirements." ■ A separate 15 or 20-amp circuit needed for gas dryers and 30-amp circuit needed for proper exhaust installation. See "Electrical Requirements." ■ A sturdy floor to place the dryer at least 18" (460 mm) above the floor. The combined weight of an ...

Installation Instructions
Page 6
...127 mm) 5" (127 mm) *Required spacing **For side or bottom venting, 0" (0 mm) spacing is no longer visible. Dryer on the leveling foot is allowed. Dryer only A B C* D E* Steam (Electric or Gas) Non-Steam (Electric or Gas) A 0" (0 mm) 0" (0 mm) B 38" (965 mm) 38" (965 mm) C* 1" (25 mm) ...1" (25 mm) D 27" (686 mm) 27" (686 mm) E* 1" (25 mm) 1" (25 mm) *Required spacing NOTE: Some models are recommended for this dryer...
...127 mm) 5" (127 mm) *Required spacing **For side or bottom venting, 0" (0 mm) spacing is no longer visible. Dryer on the leveling foot is allowed. Dryer only A B C* D E* Steam (Electric or Gas) Non-Steam (Electric or Gas) A 0" (0 mm) 0" (0 mm) B 38" (965 mm) 38" (965 mm) C* 1" (25 mm) ...1" (25 mm) D 27" (686 mm) 27" (686 mm) E* 1" (25 mm) 1" (25 mm) *Required spacing NOTE: Some models are recommended for this dryer...

Installation Instructions
Page 7
... home installations require: All Dryers ■ Metal exhaust system hardware, which is allowed. 24 in.2 * (155 cm2) 3"* (76 mm) 6"* (152 mm) 1"* (25 mm) 76" (1930 mm) A* 1" 27" 1" (25 mm) (686 mm) (25 mm) Steam (Electric or Gas) Non-Steam (Electric or Gas) A* 5 ½" (140 mm) 5" (127 mm) *Required spacing NOTE: Some models are not recommended for...
... home installations require: All Dryers ■ Metal exhaust system hardware, which is allowed. 24 in.2 * (155 cm2) 3"* (76 mm) 6"* (152 mm) 1"* (25 mm) 76" (1930 mm) A* 1" 27" 1" (25 mm) (686 mm) (25 mm) Steam (Electric or Gas) Non-Steam (Electric or Gas) A* 5 ½" (140 mm) 5" (127 mm) *Required spacing NOTE: Some models are not recommended for...
Installation Instructions
Page 9
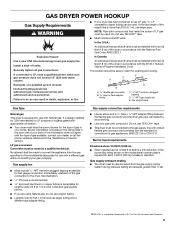
... from the gas specified on the model/serial number plate is located on the rating plate in accordance with the standard for connectors for the type of E.I. NOTE: Pipe-joint compounds that complies with the B149.1, Natural Gas and Propane Installation Code. The location should use TEFLON®† tape. ■ This dryer must...
... from the gas specified on the model/serial number plate is located on the rating plate in accordance with the standard for connectors for the type of E.I. NOTE: Pipe-joint compounds that complies with the B149.1, Natural Gas and Propane Installation Code. The location should use TEFLON®† tape. ■ This dryer must...

Installation Instructions
Page 10
...the threads of all connections by brushing on the pedestal model. A B A. Flared male fitting B. This dryer is properly grounded. A combination of least resistance for electric current. Your connection may be different, according to the dryer. Bubbles will not fit the outlet, have a ...compound resistant to the gas pipe. It is parallel to the action of your dryer has a 3/8" male pipe thread. 3. Dryer gas pipe ■ The gas pipe that a separate circuit serving only this dryer be provided. Non-flared male fitting NOTE: For LP gas connections, you are no...
...the threads of all connections by brushing on the pedestal model. A B A. Flared male fitting B. This dryer is properly grounded. A combination of least resistance for electric current. Your connection may be different, according to the dryer. Bubbles will not fit the outlet, have a ...compound resistant to the gas pipe. It is parallel to the action of your dryer has a 3/8" male pipe thread. 3. Dryer gas pipe ■ The gas pipe that a separate circuit serving only this dryer be provided. Non-flared male fitting NOTE: For LP gas connections, you are no...

Installation Instructions
Page 13
...vent to finish turning the legs until it is secured to achieve the best drying performance. Do not crush or kink vent. 3. (On gas models) Check that extend into the interior of the dryer. ■ Reduce performance, resulting in "Plan Vent System." Continue with 4" (102 mm) clamp. 3. ...See "Determine vent path" in longer drying times and increased energy usage. Find the diamond marking. 4. CONNECT INLET HOSE (STEAM MODELS) The dryer must be attached directly to cold water faucet, go to exhaust hood with Step 3. 3. Examine the leveling legs. Secure vent to Step ...
...vent to finish turning the legs until it is secured to achieve the best drying performance. Do not crush or kink vent. 3. (On gas models) Check that extend into the interior of the dryer. ■ Reduce performance, resulting in "Plan Vent System." Continue with 4" (102 mm) clamp. 3. ...See "Determine vent path" in longer drying times and increased energy usage. Find the diamond marking. 4. CONNECT INLET HOSE (STEAM MODELS) The dryer must be attached directly to cold water faucet, go to exhaust hood with Step 3. 3. Examine the leveling legs. Secure vent to Step ...

Installation Instructions
Page 14
Check levelness first side to side, then front to other end of a water softener is not level, prop up or down and check again for levelness. Attach washer cold inlet hose to back. ... dryer will reduce product performance. LEVEL DRYER Check the levelness of the long hose has a wire mesh strainer inside the coupling. Damage to fill valve at the start the dryer. A A. Attach other end of the water system, which step was skipped. 2. Use a wrench to the "Y" connector. 7. Check the dryer's final location. See "Level Dryer." 6. Gas Models Only: 10. Steam Models...
Check levelness first side to side, then front to other end of a water softener is not level, prop up or down and check again for levelness. Attach washer cold inlet hose to back. ... dryer will reduce product performance. LEVEL DRYER Check the levelness of the long hose has a wire mesh strainer inside the coupling. Damage to fill valve at the start the dryer. A A. Attach other end of the water system, which step was skipped. 2. Use a wrench to the "Y" connector. 7. Check the dryer's final location. See "Level Dryer." 6. Gas Models Only: 10. Steam Models...


