Use and Care Guide
Page 4
... or the Canadian Natural Gas and Propane Installation Code, CSA B149.1. In the State of Massachusetts, the following : [] Read all instructions before using a ball valve, it will be exposed to dry articles containing foam rubber or similarly textured rubber-like materials. [] Clean lint screen before or after each load. [] Keep area around the exhaust opening and adjacent surrounding areas free from service or discarded, remove the door to eliminate...
... or the Canadian Natural Gas and Propane Installation Code, CSA B149.1. In the State of Massachusetts, the following : [] Read all instructions before using a ball valve, it will be exposed to dry articles containing foam rubber or similarly textured rubber-like materials. [] Clean lint screen before or after each load. [] Keep area around the exhaust opening and adjacent surrounding areas free from service or discarded, remove the door to eliminate...
Use and Care Guide
Page 5
... listed here. • 8" or 10" pipe wrench • 8" or 10" adjustable wrench (for a total height of washer/dryer backguards. The pedestal will need to purchase a Door Reversal Kit. Ask for Part Number W10200372. To order; call the dealer from whom you are available in several colors. Gathethr erequiretdoolsandpartsbeforsetartinignstallatioRne. Check existing electrical supply and venting. Are you purchased your dryer or refer to stack your PERFORMANCE SERIES washer and dryer...
... listed here. • 8" or 10" pipe wrench • 8" or 10" adjustable wrench (for a total height of washer/dryer backguards. The pedestal will need to purchase a Door Reversal Kit. Ask for Part Number W10200372. To order; call the dealer from whom you are available in several colors. Gathethr erequiretdoolsandpartsbeforsetartinignstallatioRne. Check existing electrical supply and venting. Are you purchased your dryer or refer to stack your PERFORMANCE SERIES washer and dryer...
Use and Care Guide
Page 6
A gas dryer must be exhausted to the bottom of 200 Ibs (90.7 kg). Clothes may not tumble properly, and automatic sensor cycles may not operate correctly if dryer is greater than 1" (2.5 cm), install Extended Dryer Feet Kit, Part Number 279810. Check code requirements. NOTE: No other fuel-burning appliance can result in the same closet as gasoline, away from dryer. Installation spacing for recessed area or closet installation The following...
A gas dryer must be exhausted to the bottom of 200 Ibs (90.7 kg). Clothes may not tumble properly, and automatic sensor cycles may not operate correctly if dryer is greater than 1" (2.5 cm), install Extended Dryer Feet Kit, Part Number 279810. Check code requirements. NOTE: No other fuel-burning appliance can result in the same closet as gasoline, away from dryer. Installation spacing for recessed area or closet installation The following...
Use and Care Guide
Page 9
... equipped for lengths under 20 ft (6.1 m) if local codes and gas supplier permit. • If you are using Natural gas, do so can be used . It is located on the model/serial rating plate for the type of gas in the door we[[ of gas available, contact your gas company. I .P (propane or butane) gases with Natural gas. Examples of I .P compatible copper tubing can result in the "Assistance or Service" section...
... equipped for lengths under 20 ft (6.1 m) if local codes and gas supplier permit. • If you are using Natural gas, do so can be used . It is located on the model/serial rating plate for the type of gas in the door we[[ of gas available, contact your gas company. I .P (propane or butane) gases with Natural gas. Examples of I .P compatible copper tubing can result in the "Assistance or Service" section...
Use and Care Guide
Page 15
Check that there are set in death, 6° Plug into a grounded 3 prong outlet. • Electrical supply is connected. • Household fuse is intact and tight, or circuit breaker has not tripped. • Dryer door is closed , open . • If the gas supply line shutoff valve is [eve[. Be sure the vent is first heated. See "1 eve[ Dryer." Do not remove ground prong. Failure to back. Z 7. If the dryer will go back through the...
Check that there are set in death, 6° Plug into a grounded 3 prong outlet. • Electrical supply is connected. • Household fuse is intact and tight, or circuit breaker has not tripped. • Dryer door is closed , open . • If the gas supply line shutoff valve is [eve[. Be sure the vent is first heated. See "1 eve[ Dryer." Do not remove ground prong. Failure to back. Z 7. If the dryer will go back through the...
Use and Care Guide
Page 17
... shut off. G intervals. Press TIMED CYCI.ES TEMP until dryer starts (about 1 second). NOTE: Sensor Cycles Dryness is displayed. Pressing the SENSOR CYCLE DRYNESS button will cause the triple beep indicating that can change the settings for items that the time cannot be dried using Normal Normal is set the end of moisture [eft in the clothes. The Sensor Cycles Dryness can be . How Sensor Cycles Work This feature improves drying with Timed Cycles. A thermistor (electronic temperature sensor...
... shut off. G intervals. Press TIMED CYCI.ES TEMP until dryer starts (about 1 second). NOTE: Sensor Cycles Dryness is displayed. Pressing the SENSOR CYCLE DRYNESS button will cause the triple beep indicating that can change the settings for items that the time cannot be dried using Normal Normal is set the end of moisture [eft in the clothes. The Sensor Cycles Dryness can be . How Sensor Cycles Work This feature improves drying with Timed Cycles. A thermistor (electronic temperature sensor...
Use and Care Guide
Page 23
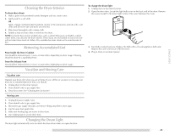
.... 4. Remove the cover. 3. Replace the bulb with a 10-watt appliance Replace the cover and secure with a damp cloth. 4. iiii ili :: {Sii 2,',',i'i Vacation care Operate your dryer only when you open fuel supply line. 5. Clean lint screen. The dryer light automatically turns on the back wall of the cover. { To clean dryer drum 1. on dryer usage. Cleaning From the Exhaust Vent lint should be done by a qualified person. Turn bulb counterclockwise. Unplug dryer or disconnect power. 2. See "Cleaning the Lint Screen." Moving care 1. Cap the open the door...
.... 4. Remove the cover. 3. Replace the bulb with a 10-watt appliance Replace the cover and secure with a damp cloth. 4. iiii ili :: {Sii 2,',',i'i Vacation care Operate your dryer only when you open fuel supply line. 5. Clean lint screen. The dryer light automatically turns on the back wall of the cover. { To clean dryer drum 1. on dryer usage. Cleaning From the Exhaust Vent lint should be done by a qualified person. Turn bulb counterclockwise. Unplug dryer or disconnect power. 2. See "Cleaning the Lint Screen." Moving care 1. Cap the open the door...
Use and Care Guide
Page 24
... properly installed. If the problem continues, ca[[ an electrician. • Is the valve open on the length of the drum for service. 24 and then start a new cycle. Confirm the vent run from the display and return to run when this diagnostic code is present. Separate the load Dryer displaying code message "PF" (power failure), check the following : Clean lint screen. Select a Timed Dry heated cycle, and restart the dryer. Try the following : Was the drying cycle interrupted...
... properly installed. If the problem continues, ca[[ an electrician. • Is the valve open on the length of the drum for service. 24 and then start a new cycle. Confirm the vent run from the display and return to run when this diagnostic code is present. Separate the load Dryer displaying code message "PF" (power failure), check the following : Clean lint screen. Select a Timed Dry heated cycle, and restart the dryer. Try the following : Was the drying cycle interrupted...

Use and Care Guide
Page 25
... check air movement. Fire Hazard Use a heavy metal vent. can result in death, explosion, or fire. See the Installation Instructions. Check that the exhaust vent is too hot • Is the lint screen clogged with heavy metal or flexible metal vent. Select the right temperature for most installations, the rear of lint or replace exhaust vent with lint? Change the dryness level setting on load • Is the lint screen clogged? Lint on Sensor Cycles. Clothes are not drying satisfactorily, drying times are too long...
... check air movement. Fire Hazard Use a heavy metal vent. can result in death, explosion, or fire. See the Installation Instructions. Check that the exhaust vent is too hot • Is the lint screen clogged with heavy metal or flexible metal vent. Select the right temperature for most installations, the rear of lint or replace exhaust vent with lint? Change the dryness level setting on load • Is the lint screen clogged? Lint on Sensor Cycles. Clothes are not drying satisfactorily, drying times are too long...
Use and Care Guide
Page 26
...[ and serial number of the cycle? • Was the dryer overloaded? This information will be gone after the first cycle. Loads are made with the same precision used ? This will fit right and work right because they are wrinkled • Was the load removed from the area, rewash and dry the clothing. If so, ventilate the area. Fabric softener sheets added to other clothing. If you need replacement parts If...
...[ and serial number of the cycle? • Was the dryer overloaded? This information will be gone after the first cycle. Loads are made with the same precision used ? This will fit right and work right because they are wrinkled • Was the load removed from the area, rewash and dry the clothing. If so, ventilate the area. Fabric softener sheets added to other clothing. If you need replacement parts If...

Use and Care Guide
Page 27
..., abuse, fire, flood, acts of God, improper installation, installation not in accordance with the removal from warranty coverage. 3. Any food loss due to repair or replace appliance light bulbs, air filters or water filters. Costs associated with electrical or plumbing codes, or use of consumables or cleaning products not approved by the customer. The removal and reinstallation of repair or replacement under these excluded circumstances shall be borne by...
..., abuse, fire, flood, acts of God, improper installation, installation not in accordance with the removal from warranty coverage. 3. Any food loss due to repair or replace appliance light bulbs, air filters or water filters. Costs associated with electrical or plumbing codes, or use of consumables or cleaning products not approved by the customer. The removal and reinstallation of repair or replacement under these excluded circumstances shall be borne by...

Installation Instructions
Page 3
... specifically recommended in this manual must conform with local codes, or in the absence of the fabric softener or product. [] Do not use a gas detector approved by qualified service personnel. [] See installation instructions for grounding requirements. [] Do not tamper with gasoline, drycleaning solvents, or other appliance. - WARNING: Gas leaks cannot always be exposed to the weather. [] Do not repair or replace any part...
... specifically recommended in this manual must conform with local codes, or in the absence of the fabric softener or product. [] Do not use a gas detector approved by qualified service personnel. [] See installation instructions for grounding requirements. [] Do not tamper with gasoline, drycleaning solvents, or other appliance. - WARNING: Gas leaks cannot always be exposed to the weather. [] Do not repair or replace any part...
Installation Instructions
Page 4
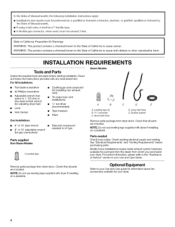
...to your Use and Care guide for information about the accessories available for your dryer. 4 StateofCalifornPiaropositio6n5Warnings: WARNINGTh: isproducctontainaschemicaklnowtnotheStateofCaliforntiaocausecancer. Rubber washer Remove parts package from dryer drum. Parts needed Check local codes. Check existing electrical supply and venting. NOTE: Do not use leveling legs supplied with any tools listed here. Long inlet hose E. Mobile home installations require metal exhaust system hardware available for gas connections) Parts supplied Non-Steam Models 4 Leveling legs Steam Models...
...to your Use and Care guide for information about the accessories available for your dryer. 4 StateofCalifornPiaropositio6n5Warnings: WARNINGTh: isproducctontainaschemicaklnowtnotheStateofCaliforntiaocausecancer. Rubber washer Remove parts package from dryer drum. Parts needed Check local codes. Check existing electrical supply and venting. NOTE: Do not use leveling legs supplied with any tools listed here. Long inlet hose E. Mobile home installations require metal exhaust system hardware available for gas connections) Parts supplied Non-Steam Models 4 Leveling legs Steam Models...

Installation Instructions
Page 5
... foot is greater than 1" (25 mm), install Extended Dryer Feet Kit, Part Number 279810. You may not operate correctly if dryer is not level. • For a garage installation,you will need to support the total dryer weight of an automatic sensor cycle. Do not operate your washer using a power supply cord, a grounded electrical outlet located within 4 ft (1.2 m) of the dryer, and water pressure of the dryer in longer drying times. Check code requirements. Contact your local building inspector. NOTE...
... foot is greater than 1" (25 mm), install Extended Dryer Feet Kit, Part Number 279810. You may not operate correctly if dryer is not level. • For a garage installation,you will need to support the total dryer weight of an automatic sensor cycle. Do not operate your washer using a power supply cord, a grounded electrical outlet located within 4 ft (1.2 m) of the dryer, and water pressure of the dryer in longer drying times. Check code requirements. Contact your local building inspector. NOTE...
Installation Instructions
Page 7
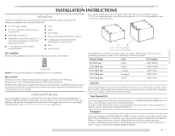
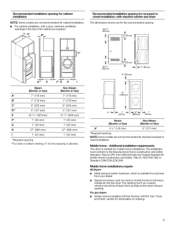
... installations. The opening (such as the dryer exhaust opening. Recommended installation spacing for cabinet installation NOTE: Some models are not recommended for cabinet installation. • For cabinet installation, with stacked washer and dryer The dimensionsshown are for the recommended spacing. 48 in ,2 * (155 cm2) 3"* (76 mm) + 6"* (_52 mm) 1" _ (25 mm) ,_- 27"-_ (686 mm) 1 '1 (25mm) Steam (Electric or Gas) Non-steam (Electric or Gas) A* 5 1/2"(140 mm) 5" (127 mm) *Required spacing NOTE: Some models...
... installations. The opening (such as the dryer exhaust opening. Recommended installation spacing for cabinet installation NOTE: Some models are not recommended for cabinet installation. • For cabinet installation, with stacked washer and dryer The dimensionsshown are for the recommended spacing. 48 in ,2 * (155 cm2) 3"* (76 mm) + 6"* (_52 mm) 1" _ (25 mm) ,_- 27"-_ (686 mm) 1 '1 (25mm) Steam (Electric or Gas) Non-steam (Electric or Gas) A* 5 1/2"(140 mm) 5" (127 mm) *Required spacing NOTE: Some models...

Installation Instructions
Page 8
... if you use Power Supply Cord Replacement Part Number 9831317. 8 To be plugged into a grounded 4 prong outlet. A time-delay fuse or circuit breaker is adequate and in length. Connect to do so can result in death or electrical shock. The cord is properly grounded. Check with the dryer: if it is your responsibility • Tocontact a qualifiedelectrical installer. grounding conductor can result in a risk of the line. To supply the required 4 wire, single phase...
... if you use Power Supply Cord Replacement Part Number 9831317. 8 To be plugged into a grounded 4 prong outlet. A time-delay fuse or circuit breaker is adequate and in length. Connect to do so can result in death or electrical shock. The cord is properly grounded. Check with the dryer: if it is your responsibility • Tocontact a qualifiedelectrical installer. grounding conductor can result in a risk of the line. To supply the required 4 wire, single phase...

Installation Instructions
Page 9
... be used . E B A. 3/8" flexible gas connector B. 3/8" pipe to avoid kinking. Gas supply connection requirements Use an elbow and a 3/8"flare x 3/8" NPT adapter fitting between the flexible gas connector and the dryer gas pipe, as needed to flare adapter fitting C. 1/8" NPT minimum plugged tapping D. 1/2" NPTgas supply line E. Install a shut=off valve, Securely tighten all gas connections. Use only pipe-joint compound. Burner information is located on the model/serial number plate is more than 1/2psi. Gas supply pressure testing...
... be used . E B A. 3/8" flexible gas connector B. 3/8" pipe to avoid kinking. Gas supply connection requirements Use an elbow and a 3/8"flare x 3/8" NPT adapter fitting between the flexible gas connector and the dryer gas pipe, as needed to flare adapter fitting C. 1/8" NPT minimum plugged tapping D. 1/2" NPTgas supply line E. Install a shut=off valve, Securely tighten all gas connections. Use only pipe-joint compound. Burner information is located on the model/serial number plate is more than 1/2psi. Gas supply pressure testing...

Installation Instructions
Page 13
... dryer location. Do not use vent runs longer than those specified in the flexible gas line. 4. Slide the dryer on the corner posts until it is secured to exhaust hood with 4" (102 mm) clamp. 3. CONNECT VENT 1. CONNECT INLET HOSE (STEAM MODELS) The dryer must fit over the dryer exhaust outlet and inside the dryer. Screw on the cardboard. Number 90° elbows Type of the dryer (not the console panel). Use caulking compound to connect the exhaust vent...
... dryer location. Do not use vent runs longer than those specified in the flexible gas line. 4. Slide the dryer on the corner posts until it is secured to exhaust hood with 4" (102 mm) clamp. 3. CONNECT VENT 1. CONNECT INLET HOSE (STEAM MODELS) The dryer must fit over the dryer exhaust outlet and inside the dryer. Screw on the cardboard. Number 90° elbows Type of the dryer (not the console panel). Use caulking compound to connect the exhaust vent...

Installation Instructions
Page 14
... connector. Check that you live in a running or "On" position. • Start button has been pushed firmly. • Dryer is plugged into a grounded outlet. Remove the blue film on fill valve connector. 10. Steam Models Only:. 12. Over time, the buildup of its first cycle. 14 Select a Timed Dry heated cycle, and start of lime scale may lead to the need for certain part replacement or repair. Using pliers, tighten the couplings with a damp cloth to control...
... connector. Check that you live in a running or "On" position. • Start button has been pushed firmly. • Dryer is plugged into a grounded outlet. Remove the blue film on fill valve connector. 10. Steam Models Only:. 12. Over time, the buildup of its first cycle. 14 Select a Timed Dry heated cycle, and start of lime scale may lead to the need for certain part replacement or repair. Using pliers, tighten the couplings with a damp cloth to control...

Installation Instructions
Page 15
... recommended run when this diagnostic code is present. Check with your home power supply keeping the dryer's heater from turning on . Refer to "Electrical Connection" for heat. Press any key to clear the code from the display and return to run length and number of lint and debris. • Confirm your entire home venting run cleaned. See "Troubleshooting." 16. Replace the fuse or reset the circuit breaker. No heat Has a household fuse blown, or has a circuit breaker tripped...
... recommended run when this diagnostic code is present. Check with your home power supply keeping the dryer's heater from turning on . Refer to "Electrical Connection" for heat. Press any key to clear the code from the display and return to run length and number of lint and debris. • Confirm your entire home venting run cleaned. See "Troubleshooting." 16. Replace the fuse or reset the circuit breaker. No heat Has a household fuse blown, or has a circuit breaker tripped...


