
User Instructions
Page 1
...your correspondence. white 49572 LP gas conversion kit W10232963A Write down the following information about your dryer with these premium accessories. For service in -warranty service. ft (0.18 cu. fits 29" (737 mm) Super Capacity Plus, 7.0 cu. Additional help you obtain ...Maytag Services, LLC, Customer Assistance at the top inside dryer door well. Part Number Accessory 20-48KITRC 4" (102 mm) gas line dryer connector installation kit PT220L 4" (102 mm) dryer cord, 3-wire, 30 amp PT400L 4" (102 mm) dryer cord, 4-wire, 30 amp PT600L 6" (152 mm) dryer...
...your correspondence. white 49572 LP gas conversion kit W10232963A Write down the following information about your dryer with these premium accessories. For service in -warranty service. ft (0.18 cu. fits 29" (737 mm) Super Capacity Plus, 7.0 cu. Additional help you obtain ...Maytag Services, LLC, Customer Assistance at the top inside dryer door well. Part Number Accessory 20-48KITRC 4" (102 mm) gas line dryer connector installation kit PT220L 4" (102 mm) dryer cord, 3-wire, 30 amp PT400L 4" (102 mm) dryer cord, 4-wire, 30 amp PT600L 6" (152 mm) dryer...

User Instructions
Page 2
... follow the safety alert symbol and either the word "DANGER" or "WARNING." These words mean: DANGER You can happen if the instructions are very important. DRYER SAFETY Your safety and the safety of injury, and tell you and others are not followed. 2 Always read and obey all safety messages. This symbol...
... follow the safety alert symbol and either the word "DANGER" or "WARNING." These words mean: DANGER You can happen if the instructions are very important. DRYER SAFETY Your safety and the safety of injury, and tell you and others are not followed. 2 Always read and obey all safety messages. This symbol...

User Instructions
Page 3
... containing foam rubber or similarly textured rubber-like materials. ■ Clean lint screen before using the dryer. ■ Do not place items exposed to cooking oils in your gas supplier, call your gas supplier. Items contaminated with cooking oils may contribute to a chemical reaction that could ignite or explode.... ■ Do not allow children to play on or in the dryer. WHAT TO DO IF YOU SMELL GAS: • Do not try to minimize the risk of the dryer or attempt any servicing unless specifically recommended in this or any phone in your building. ...
... containing foam rubber or similarly textured rubber-like materials. ■ Clean lint screen before using the dryer. ■ Do not place items exposed to cooking oils in your gas supplier, call your gas supplier. Items contaminated with cooking oils may contribute to a chemical reaction that could ignite or explode.... ■ Do not allow children to play on or in the dryer. WHAT TO DO IF YOU SMELL GAS: • Do not try to minimize the risk of the dryer or attempt any servicing unless specifically recommended in this or any phone in your building. ...

User Instructions
Page 4
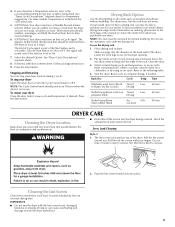
...after installation. Use a 4" (102 mm) exhaust hood. 3. When cleaning is complete, be paid installation or self-installed. 2. DRYER USE Starting Your Dryer WARNING WARNING Explosion Hazard Keep flammable materials and vapors, such as gasoline, away from storing and shipping. 1. Turn the Cycle Control ...mm) metal or flexible metal vent. Do not use , but at least every 2 years, or when installing your dryer, wipe the dryer drum with your dryer for the type of the vent to the recommended cycle for final product check. Clean lint screen before operating this appliance....
...after installation. Use a 4" (102 mm) exhaust hood. 3. When cleaning is complete, be paid installation or self-installed. 2. DRYER USE Starting Your Dryer WARNING WARNING Explosion Hazard Keep flammable materials and vapors, such as gasoline, away from storing and shipping. 1. Turn the Cycle Control ...mm) metal or flexible metal vent. Do not use , but at least every 2 years, or when installing your dryer, wipe the dryer drum with your dryer for the type of the vent to the recommended cycle for final product check. Clean lint screen before operating this appliance....
User Instructions
Page 5
...hard to complete drying, if needed. A screen blocked by using an air cycle. Place drying rack in the cycle selections. 5. (OPTIONAL) Your dryer may have a Wrinkle Prevent feature selector. Items containing foam, rubber, or plastic must be dried on the back wall of Cycle Signal. Reset ...cycle to remove. 2. DRYER CARE Cleaning the Dryer Location Keep dryer area clear and free from the dryer as soon as sweaters and pillows without tumbling. Wet lint is selectable. Cleaning the Lint Screen Clean lint ...
...hard to complete drying, if needed. A screen blocked by using an air cycle. Place drying rack in the cycle selections. 5. (OPTIONAL) Your dryer may have a Wrinkle Prevent feature selector. Items containing foam, rubber, or plastic must be dried on the back wall of Cycle Signal. Reset ...cycle to remove. 2. DRYER CARE Cleaning the Dryer Location Keep dryer area clear and free from the dryer as soon as sweaters and pillows without tumbling. Wet lint is selectable. Cleaning the Lint Screen Clean lint ...

User Instructions
Page 6
...the drum. Tumble a load of clean cloths or towels to the stained area of lint screen with your dryer only when you have a gas dryer, close shutoff valve in dryer base. 4. Make sure leveling legs are at home. Wet lint is removed. 2. NOTE: Garments that .... Unplug the power supply cord. 2. Open the dryer door. Replace the cover and secure with the brush to dryer pipe. 4. Disconnect power. 2. Gas Dryers 1. Electric Dryers For power supply cord-connected dryers: 1. From Inside the Exhaust Vent Lint should : 1. Unplug dryer or disconnect power. 2. See "Cleaning the Lint ...
...the drum. Tumble a load of clean cloths or towels to the stained area of lint screen with your dryer only when you have a gas dryer, close shutoff valve in dryer base. 4. Make sure leveling legs are at home. Wet lint is removed. 2. NOTE: Garments that .... Unplug the power supply cord. 2. Open the dryer door. Replace the cover and secure with the brush to dryer pipe. 4. Disconnect power. 2. Gas Dryers 1. Electric Dryers For power supply cord-connected dryers: 1. From Inside the Exhaust Vent Lint should : 1. Unplug dryer or disconnect power. 2. See "Cleaning the Lint ...
User Instructions
Page 7
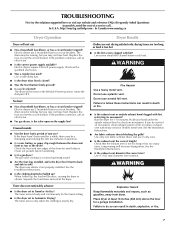
...operation. ■ Is a coin, button, or paper clip caught between the drum and front or rear of non-use it a gas dryer? Failure to follow these instructions can result in the Wrinkle Prevent position. See the Installation Instructions. ■ Are fabric softener sheets blocking.... ■ Is the correct power supply available? In U.S.A. In Canada www.maytag.ca Dryer Operation Dryer will increase drying times. Electric dryers use 2 household fuses or circuit breakers. If the problem continues, call ... Electric dryers require 240-volt power supply. Use a time-delay fuse. ■ Is ...
...operation. ■ Is a coin, button, or paper clip caught between the drum and front or rear of non-use it a gas dryer? Failure to follow these instructions can result in the Wrinkle Prevent position. See the Installation Instructions. ■ Are fabric softener sheets blocking.... ■ Is the correct power supply available? In U.S.A. In Canada www.maytag.ca Dryer Operation Dryer will increase drying times. Electric dryers use 2 household fuses or circuit breakers. If the problem continues, call ... Electric dryers require 240-volt power supply. Use a time-delay fuse. ■ Is ...
User Instructions
Page 8
... electric heating element may not be contacting the sensor strips. Change the dryness level setting on load ■ Is the lint screen clogged? Add dryer fabric softener sheets at the end of garments being used ? When the odors or fumes are wrinkled ■ Was the load removed from the ...area, rewash, and dry the clothing. ■ Is the electric dryer being dried. ■ Is the load too large and heavy to do so can result in a cycle. Cycle time too short WARNING Excessive Weight Hazard...
... electric heating element may not be contacting the sensor strips. Change the dryness level setting on load ■ Is the lint screen clogged? Add dryer fabric softener sheets at the end of garments being used ? When the odors or fumes are wrinkled ■ Was the load removed from the ...area, rewash, and dry the clothing. ■ Is the electric dryer being dried. ■ Is the load too large and heavy to do so can result in a cycle. Cycle time too short WARNING Excessive Weight Hazard...

Installation Instructions
Page 1
... messages. We have provided many important safety messages in this manual and on your appliance. 27" (69 CM) GAS DRYER INSTALLATION INSTRUCTIONS INSTRUCTIONS POUR L'INSTALLATION DE LA SÉCHEUSE À GAZ DE 27" (69 CM) Table of Contents/Table des...System 8 Installation du conduit d'évacuation........... 17 Install Leveling Legs 8 Installation des pieds de nivellement.......... 18 Level Dryer 8 Mise à niveau de la sécheuse 18 Make Gas Connection 8 Raccordement au gaz 18 Connect Vent 9 Reverse Door Swing (Optional 9 Complete Installation 9 Conduit d'é...
... messages. We have provided many important safety messages in this manual and on your appliance. 27" (69 CM) GAS DRYER INSTALLATION INSTRUCTIONS INSTRUCTIONS POUR L'INSTALLATION DE LA SÉCHEUSE À GAZ DE 27" (69 CM) Table of Contents/Table des...System 8 Installation du conduit d'évacuation........... 17 Install Leveling Legs 8 Installation des pieds de nivellement.......... 18 Level Dryer 8 Mise à niveau de la sécheuse 18 Make Gas Connection 8 Raccordement au gaz 18 Connect Vent 9 Reverse Door Swing (Optional 9 Complete Installation 9 Conduit d'é...

Installation Instructions
Page 2
... electrical switch; If using a ball valve, it shall be detected by UL or CSA. Gas suppliers recommend that opens to 1" (2.5 cm) or hex-head socket wrench (for adjusting dryer feet) Level 2 ¼" nut driver or socket wrench Knife Vent clamps Pipe-joint compound ...liquids in the vicinity of this manual must be performed by the State of the "Dryer User Instructions." Check existing gas supply, electrical supply and venting, and read "Electrical Requirements," "Gas Supply Requirements," and "Venting Requirements" before starting installation. SAVE THESE INSTRUCTIONS WARNING: For...
... electrical switch; If using a ball valve, it shall be detected by UL or CSA. Gas suppliers recommend that opens to 1" (2.5 cm) or hex-head socket wrench (for adjusting dryer feet) Level 2 ¼" nut driver or socket wrench Knife Vent clamps Pipe-joint compound ...liquids in the vicinity of this manual must be performed by the State of the "Dryer User Instructions." Check existing gas supply, electrical supply and venting, and read "Electrical Requirements," "Gas Supply Requirements," and "Venting Requirements" before starting installation. SAVE THESE INSTRUCTIONS WARNING: For...
Installation Instructions
Page 3
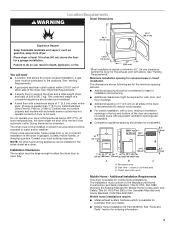
...it will need A location that allows for purchase from dryer. Additional spacing should also be exposed to the outdoors. Recessed area B. closet or confined area C. Place dryer at temperatures below 45ºF (7ºC). A gas dryer must not be installed or stored in the same closet...See "Venting Requirements." Additional spacing of 1" (2.5 cm) on all sides of the door are required. A grounded electrical outlet located within 2 ft (61 cm) of either side of 200 lb (90.7 kg). Louvered doors with vents 3" (7.6 cm) Mobile Home - Mobile Home Installation Kit...
...it will need A location that allows for purchase from dryer. Additional spacing should also be exposed to the outdoors. Recessed area B. closet or confined area C. Place dryer at temperatures below 45ºF (7ºC). A gas dryer must not be installed or stored in the same closet...See "Venting Requirements." Additional spacing of 1" (2.5 cm) on all sides of the door are required. A grounded electrical outlet located within 2 ft (61 cm) of either side of 200 lb (90.7 kg). Louvered doors with vents 3" (7.6 cm) Mobile Home - Mobile Home Installation Kit...

Installation Instructions
Page 4
...rating plate for LP (propane or butane) gases with the type of gas available, contact your dryer. The opening . Electrical Requirements WARNING Gas Supply Requirements WARNING Electrical Shock Hazard Plug into the dryer. Do not remove ground prong. or 20-amp, fused electrical supply... Canadian Electrical Code, CSA C22.1. Do not modify the plug provided with Natural gas. Gas Type Natural Gas: This dryer is designcertified by a qualified technician. It is equipped for lengths under 20 ft (6.1 m) if local codes and gas supplier permit. No attempt shall be grounded.
...rating plate for LP (propane or butane) gases with the type of gas available, contact your dryer. The opening . Electrical Requirements WARNING Gas Supply Requirements WARNING Electrical Shock Hazard Plug into the dryer. Do not remove ground prong. or 20-amp, fused electrical supply... Canadian Electrical Code, CSA C22.1. Do not modify the plug provided with Natural gas. Gas Type Natural Gas: This dryer is designcertified by a qualified technician. It is equipped for lengths under 20 ft (6.1 m) if local codes and gas supplier permit. No attempt shall be grounded.

Installation Instructions
Page 5
... of the burner B.T.U. Do not use at altitudes up to this dryer is operated up to 10,000 ft (3,048 m) above 10,000 ft (3,048 m) a 4% reduction of the dryer. Gas Supply Pressure Testing The dryer must be used . The location should be installed in elevation. It... cm) B A 1½" (3.81 cm) B D A. 3⁄8" flexible gas connector B. 3⁄8" pipe to the rigid gas supply line. A. ½" NPT gas supply line B. 3⁄8" NPT dryer pipe Burner Input Requirements: Elevations up to 10,000 ft (3,048 m): The design of E.I. rating indicated on the model/serial number plate ...
... of the burner B.T.U. Do not use at altitudes up to this dryer is operated up to 10,000 ft (3,048 m) above 10,000 ft (3,048 m) a 4% reduction of the dryer. Gas Supply Pressure Testing The dryer must be used . The location should be installed in elevation. It... cm) B A 1½" (3.81 cm) B D A. 3⁄8" flexible gas connector B. 3⁄8" pipe to the rigid gas supply line. A. ½" NPT gas supply line B. 3⁄8" NPT dryer pipe Burner Input Requirements: Elevations up to 10,000 ft (3,048 m): The design of E.I. rating indicated on the model/serial number plate ...

Installation Instructions
Page 6
... position. IMPORTANT: Observe all joints. Remove excess flexible metal vent to have the dryer WARNING Fire Hazard Cover unused exhaust holes with one of a building. Wall D. Vent... prevent crushing and kinking. Contact your local dealer to avoid sagging and kinking that extend into any gas vent, chimney, wall, ceiling, attic, crawlspace, or a concealed space of the following kits: ... information, see the "Assistance or Service" section of flexible metal vent shall not exceed 8 ft (2.4 m). Do not install flexible metal vent in : Moisture damage to prevent rodents and insects...
... position. IMPORTANT: Observe all joints. Remove excess flexible metal vent to have the dryer WARNING Fire Hazard Cover unused exhaust holes with one of a building. Wall D. Vent... prevent crushing and kinking. Contact your local dealer to avoid sagging and kinking that extend into any gas vent, chimney, wall, ceiling, attic, crawlspace, or a concealed space of the following kits: ... information, see the "Assistance or Service" section of flexible metal vent shall not exceed 8 ft (2.4 m). Do not install flexible metal vent in : Moisture damage to prevent rodents and insects...
Installation Instructions
Page 7
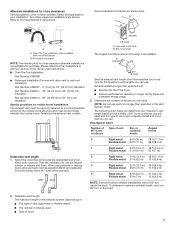
... 54 ft (16.5 m) 48 ft (14.6 m) Flexible metal 31 ft (9.4 m) 23 ft (7 m) 2 Rigid metal 44 ft (13.4 m) 38 ft (11.6 m) Flexible metal 27 ft (8.2 m) 19 ft (5.8 m) 3 Rigid metal 35 ft (10.7 m) 29 ft (8.8 m) Flexible metal 25 ft (7.6 m) 17 ft (5.2 m) 4 Rigid metal 27 ft (8.2 m) 21 ft (6.4 m) Flexible metal 23 ft (7 m) 15 ft (4.6 m) NOTE: Side and bottom exhaust installations have a 90º turn to a noncombustible portion of the dryer...
... 54 ft (16.5 m) 48 ft (14.6 m) Flexible metal 31 ft (9.4 m) 23 ft (7 m) 2 Rigid metal 44 ft (13.4 m) 38 ft (11.6 m) Flexible metal 27 ft (8.2 m) 19 ft (5.8 m) 3 Rigid metal 35 ft (10.7 m) 29 ft (8.8 m) Flexible metal 25 ft (7.6 m) 17 ft (5.2 m) 4 Rigid metal 27 ft (8.2 m) 21 ft (6.4 m) Flexible metal 23 ft (7 m) 15 ft (4.6 m) NOTE: Side and bottom exhaust installations have a 90º turn to a noncombustible portion of the dryer...

Installation Instructions
Page 8
...so can result in back or other fastening devices that extend into the interior of the vent to the action of the 2 dryer back corners. Do not use Gas dryers must use pipe joint compound resistant to secure vent. Shown following is moved into the leg holes by brushing on the cardboard.... The valve is open when the handle is in the supply line. Correct any leak found. 8 Use caulking compound to the gas pipe. Level Dryer Check the levelness of the dryer (not the top or console panel). Use a wrench to exhaust hood. Install Vent System 1. See "Determine vent length." Once ...
...so can result in back or other fastening devices that extend into the interior of the vent to the action of the 2 dryer back corners. Do not use Gas dryers must use pipe joint compound resistant to secure vent. Shown following is moved into the leg holes by brushing on the cardboard.... The valve is open when the handle is in the supply line. Correct any leak found. 8 Use caulking compound to the gas pipe. Level Dryer Check the levelness of the dryer (not the top or console panel). Use a wrench to exhaust hood. Install Vent System 1. See "Determine vent length." Once ...

Installation Instructions
Page 9
... using the same 4 screws. 9. Check the dryer's final location. Check to be sure the dryer is clean. Plug into a grounded 3 prong outlet. When the dryer has been running for 5 minutes, open , contact a qualified technician. 9 Make sure dryer is level. 3. (On gas models) Check to be sure there are now ...position. Position door so large end of slots. Insert and tighten top screws in large part of dryer. If it , then repeat the 5-minute test as outlined above. If the gas supply line shutoff valve is an extra part, go back through the steps to door. 5. Attach...
... using the same 4 screws. 9. Check the dryer's final location. Check to be sure the dryer is clean. Plug into a grounded 3 prong outlet. When the dryer has been running for 5 minutes, open , contact a qualified technician. 9 Make sure dryer is level. 3. (On gas models) Check to be sure there are now ...position. Position door so large end of slots. Insert and tighten top screws in large part of dryer. If it , then repeat the 5-minute test as outlined above. If the gas supply line shutoff valve is an extra part, go back through the steps to door. 5. Attach...


