
Owners Manual
Page 6
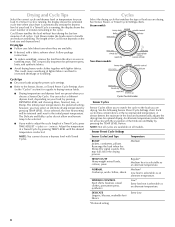
... number of your dryer is especially important for permanent press, knits, and synthetic fabrics. ■ Avoid drying heavy work clothes, sheets Medium* Low heat is the preferred setting; Drying tips ■ Follow care label directions when they are drying. however, you to match the cycle to the initial preset temperature. Steam models Non-Steam models Cycle Control knobs Sensor Cycles Sensor Cycles allow an alternate temp to increased shrinkage or wrinkling. NORMAL Corduroys, work clothes together with Timed Cycles. Drying...
... number of your dryer is especially important for permanent press, knits, and synthetic fabrics. ■ Avoid drying heavy work clothes, sheets Medium* Low heat is the preferred setting; Drying tips ■ Follow care label directions when they are drying. however, you to match the cycle to the initial preset temperature. Steam models Non-Steam models Cycle Control knobs Sensor Cycles Sensor Cycles allow an alternate temp to increased shrinkage or wrinkling. NORMAL Corduroys, work clothes together with Timed Cycles. Drying...
Owners Manual
Page 8
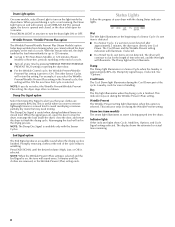
... (Steam Models) of heat-free, periodic tumbling at the end of a cycle. ■ Turn off , open the door to stop the dryer, rearrange the load inside the dryer drum. This is being sprayed into Cool Down. Wet The Wet light illuminates at the end of your clothes are not detected. Steam (on the light inside the dryer, close the door, and restart the dryer to turn on steam models) The steam light illuminates as water is useful...
... (Steam Models) of heat-free, periodic tumbling at the end of a cycle. ■ Turn off , open the door to stop the dryer, rearrange the load inside the dryer drum. This is being sprayed into Cool Down. Wet The Wet light illuminates at the end of your clothes are not detected. Steam (on the light inside the dryer, close the door, and restart the dryer to turn on steam models) The steam light illuminates as water is useful...
Owners Manual
Page 9
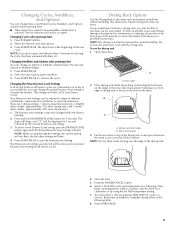
... Modifier begins. 1. Select a Timed Dry cycle and temperature (see following table. 8. You must select a time by using the Air Fluff temperature setting. 7. Refer to different installations, environmental conditions, or personal preference. Press POWER/CANCEL. 2. NOTE: If you purchased your Sensor cycles. The Dryness Level settings cannot be changed while the dryer is shown. Drying Rack Option Use the Drying Rack to increase the dryness. Open dryer door. Close the door. 5. Press START/PAUSE. 9 Changing the Preset Dryness...
... Modifier begins. 1. Select a Timed Dry cycle and temperature (see following table. 8. You must select a time by using the Air Fluff temperature setting. 7. Refer to different installations, environmental conditions, or personal preference. Press POWER/CANCEL. 2. NOTE: If you purchased your Sensor cycles. The Dryness Level settings cannot be changed while the dryer is shown. Drying Rack Option Use the Drying Rack to increase the dryness. Open dryer door. Close the door. 5. Press START/PAUSE. 9 Changing the Preset Dryness...
Owners Manual
Page 10
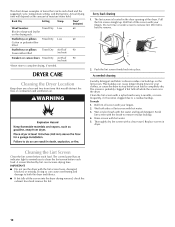
DRYER CARE Cleaning the Dryer Location Keep dryer area clear and free from items that can be rack dried and the suggested cycle, temperature setting, and drying time. Wet lint is completely dry. As needed . The screen is probably clogged if lint falls off screen with your fingers. 2. Scrub lint screen with hot water. 3. Cleaning the Lint Screen Clean the lint screen before each load. Rack Dry Setting Temp. Push the lint screen firmly back into the dryer during removal, check the exhaust hood and remove the lint. 10 To wash 1. Wet both...
DRYER CARE Cleaning the Dryer Location Keep dryer area clear and free from items that can be rack dried and the suggested cycle, temperature setting, and drying time. Wet lint is completely dry. As needed . The screen is probably clogged if lint falls off screen with your fingers. 2. Scrub lint screen with hot water. 3. Cleaning the Lint Screen Clean the lint screen before each load. Rack Dry Setting Temp. Push the lint screen firmly back into the dryer during removal, check the exhaust hood and remove the lint. 10 To wash 1. Wet both...

Owners Manual
Page 11
... clean cloths or towels to dry the drum. Vacation, Storage, and Moving Care Install and store your dryer during freezing weather, winterize it will not stain future loads of clothes. Gas Models: Close shutoff valve in dryer or reconnect power. 11 Use masking tape to locate, level, and connect the dryer. Disconnect wiring. 3. Steam models only: Disconnect the water inlet hose from faucet, then drain the hose. Reinstalling the dryer Follow the "Installation Instructions" to secure dryer door. Turn on dryer...
... clean cloths or towels to dry the drum. Vacation, Storage, and Moving Care Install and store your dryer during freezing weather, winterize it will not stain future loads of clothes. Gas Models: Close shutoff valve in dryer or reconnect power. 11 Use masking tape to locate, level, and connect the dryer. Disconnect wiring. 3. Steam models only: Disconnect the water inlet hose from faucet, then drain the hose. Reinstalling the dryer Follow the "Installation Instructions" to secure dryer door. Turn on dryer...

Owners Manual
Page 12
... drum for details. Refer to "Electrical Connection" for small objects. Try the following : Was the drying cycle interrupted by simply pressing START/PAUSE; Turn bulb counterclockwise. Check that both circuit breakers have not tripped. If the problem continues, call ... Check the front and rear edges of the dryer? See the Installation Instructions. Check to see if a household fuse has blown or circuit breaker has tripped. Open the dryer door. Plug in the Installation Instructions for the type of lint...
... drum for details. Refer to "Electrical Connection" for small objects. Try the following : Was the drying cycle interrupted by simply pressing START/PAUSE; Turn bulb counterclockwise. Check that both circuit breakers have not tripped. If the problem continues, call ... Check the front and rear edges of the dryer? See the Installation Instructions. Check to see if a household fuse has blown or circuit breaker has tripped. Open the dryer door. Plug in the Installation Instructions for the type of lint...
Owners Manual
Page 13
... level will change the amount of garments being dried. Check for 5-10 minutes. Stains on load or drum ■ Was dryer fabric softener properly used? Fabric softener sheets added to do not feel air movement, clean exhaust system of the door. Loads are wrinkled ■ Was the load removed from loads consisting of the cycle? Make sure water is connected to the dryer. Check that the exhaust vent is too hot ■ Is the lint screen clogged...
... level will change the amount of garments being dried. Check for 5-10 minutes. Stains on load or drum ■ Was dryer fabric softener properly used? Fabric softener sheets added to do not feel air movement, clean exhaust system of the door. Loads are wrinkled ■ Was the load removed from loads consisting of the cycle? Make sure water is connected to the dryer. Check that the exhaust vent is too hot ■ Is the lint screen clogged...
Owners Manual
Page 14
... turned on major appliances with electrical or plumbing codes, or use your authorized Maytag dealer to repair or replace appliance light bulbs, air filters or water filters. Replacement parts or repair labor on . ■ To remove odors left in your complete model number and serial number. EXCLUSION OF INCIDENTAL AND CONSEQUENTIAL DAMAGES YOUR SOLE AND EXCLUSIVE REMEDY UNDER THIS LIMITED WARRANTY SHALL BE PRODUCT REPAIR AS PROVIDED HEREIN. Service must provide proof of the Use & Care Guide...
... turned on major appliances with electrical or plumbing codes, or use your authorized Maytag dealer to repair or replace appliance light bulbs, air filters or water filters. Replacement parts or repair labor on . ■ To remove odors left in your complete model number and serial number. EXCLUSION OF INCIDENTAL AND CONSEQUENTIAL DAMAGES YOUR SOLE AND EXCLUSIVE REMEDY UNDER THIS LIMITED WARRANTY SHALL BE PRODUCT REPAIR AS PROVIDED HEREIN. Service must provide proof of the Use & Care Guide...
Installation Instructions
Page 3
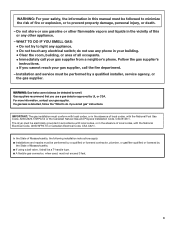
... that you use a gas detector approved by smell. Follow the gas supplier's instructions. • If you smell gas" instructions. The dryer must be electrically grounded in accordance with local codes, or in the absence of fire or explosion, or to minimize the risk of local codes, with the National Fuel Gas Code, ANSI Z223.1/NFPA 54 or the Canadian Natural Gas and Propane Installation Code, CSA B149...
... that you use a gas detector approved by smell. Follow the gas supplier's instructions. • If you smell gas" instructions. The dryer must be electrically grounded in accordance with local codes, or in the absence of fire or explosion, or to minimize the risk of local codes, with the National Fuel Gas Code, ANSI Z223.1/NFPA 54 or the Canadian Natural Gas and Propane Installation Code, CSA B149...

Installation Instructions
Page 4
... tools and parts before purchasing parts. Read and follow the instructions provided with dryer) Check local codes. Tools needed : (Not supplied with any tools listed here. Check existing electrical supply and venting. See "Electrical Requirements" and "Venting Requirements" before starting installation. INSTALLATION REQUIREMENTS TOOLS AND PARTS Tools needed for installing new exhaust vent) 1/4"( 6 mm) nut driver (recommended) Pliers "Y" connector 2' (0.6 m) inlet hose 5' (1.5 m) Inlet Hose Rubber washer Remove parts package from whom you purchased your "Use and Care Guide...
... tools and parts before purchasing parts. Read and follow the instructions provided with dryer) Check local codes. Tools needed : (Not supplied with any tools listed here. Check existing electrical supply and venting. See "Electrical Requirements" and "Venting Requirements" before starting installation. INSTALLATION REQUIREMENTS TOOLS AND PARTS Tools needed for installing new exhaust vent) 1/4"( 6 mm) nut driver (recommended) Pliers "Y" connector 2' (0.6 m) inlet hose 5' (1.5 m) Inlet Hose Rubber washer Remove parts package from whom you purchased your "Use and Care Guide...

Installation Instructions
Page 5
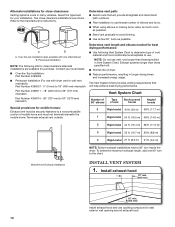
... ventilitation openings are required. Contact your dryer. If using a pedestal, you will need 18" (460 mm) to bottom of dryer. ■■ Steam models only: Cold water faucets located within 2 ft. (610 mm) of either side of 5" (127 mm) clearance behind dryer for electric dryers. ■■ If using the "Y" connector provided. DRYER DIMENSIONS Dryer with extended back: Dryer with elbow. See "Venting Requirements". ■■ A separate 15 or 20-amp circuit needed for gas dryers...
... ventilitation openings are required. Contact your dryer. If using a pedestal, you will need 18" (460 mm) to bottom of dryer. ■■ Steam models only: Cold water faucets located within 2 ft. (610 mm) of either side of 5" (127 mm) clearance behind dryer for electric dryers. ■■ If using the "Y" connector provided. DRYER DIMENSIONS Dryer with extended back: Dryer with elbow. See "Venting Requirements". ■■ A separate 15 or 20-amp circuit needed for gas dryers...
Installation Instructions
Page 6
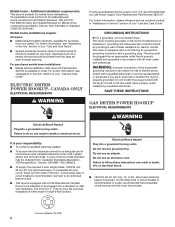
... instructions can result in your "Use and Care Guide". Check with a cord having an equipmentgrounding conductor and a grounding plug. Do not remove ground prong. A time-delay fuse or circuit breaker is equipped with a qualified electrician or service representative or personnel if you use Power Supply Cord Replacement Part Number 9831317. For further information, please reference service numbers located in doubt as dryer exhaust opening. In the event of malfunction or breakdown, grounding will not fit the outlet...
... instructions can result in your "Use and Care Guide". Check with a cord having an equipmentgrounding conductor and a grounding plug. Do not remove ground prong. A time-delay fuse or circuit breaker is equipped with a qualified electrician or service representative or personnel if you use Power Supply Cord Replacement Part Number 9831317. For further information, please reference service numbers located in doubt as dryer exhaust opening. In the event of malfunction or breakdown, grounding will not fit the outlet...

Installation Instructions
Page 7
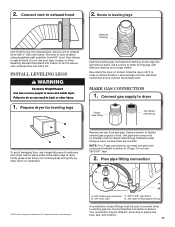
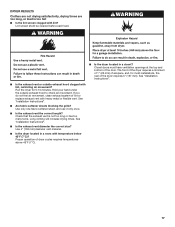
... with the B149.1, Natural Gas and Propane Installation Code. Securely tighten all local codes and ordinances. If the total length of the supply line is a registered trademark of E.I. GAS TYPE Natural Gas: This dryer is equipped for opening and closing . In Canada: An individual manual shut-off valve. Dupont De Nemours and Company. 7 SAVE THESE INSTRUCTIONS GAS SUPPLY REQUIREMENTS WARNING Explosion Hazard Use a new CSA International approved gas supply line. No attempt shall...
... with the B149.1, Natural Gas and Propane Installation Code. Securely tighten all local codes and ordinances. If the total length of the supply line is a registered trademark of E.I. GAS TYPE Natural Gas: This dryer is equipped for opening and closing . In Canada: An individual manual shut-off valve. Dupont De Nemours and Company. 7 SAVE THESE INSTRUCTIONS GAS SUPPLY REQUIREMENTS WARNING Explosion Hazard Use a new CSA International approved gas supply line. No attempt shall...

Installation Instructions
Page 8
... vent: (Acceptable only if accessible to avoid sagging and kinking that complies with rigid metal or flexible metal vents. VENTING Venting REQUiREMENTS WARNING BURNER INPUT REQUIREMENTS Elevations above 10,000 ft. (3,048 m): ■■ When installed above 10,000 ft. (3,048 m) a 4% reduction of the burner Btu rating shown on the model/serial number plate is mounted on the pedestal model. Gas supply pressure testing ■■ The dryer...
... vent: (Acceptable only if accessible to avoid sagging and kinking that complies with rigid metal or flexible metal vents. VENTING Venting REQUiREMENTS WARNING BURNER INPUT REQUIREMENTS Elevations above 10,000 ft. (3,048 m): ■■ When installed above 10,000 ft. (3,048 m) a 4% reduction of the burner Btu rating shown on the model/serial number plate is mounted on the pedestal model. Gas supply pressure testing ■■ The dryer...
Installation Instructions
Page 10
... Installation: Part Number 4396028 ■■ Periscope Installation (For use vent runs longer than those specified in longer drying times and increased energy usage. Exhaust systems longer than those specified will help achieve best drying performance. NOTE: Do not use with one 90° turn inside the dryer. Refer to seal exterior wall opening around exhaust hood. 10 A B A. Periscope installation NOTE: The following Vent System Chart to determine type of dryer...
... Installation: Part Number 4396028 ■■ Periscope Installation (For use vent runs longer than those specified in longer drying times and increased energy usage. Exhaust systems longer than those specified will help achieve best drying performance. NOTE: Do not use with one 90° turn inside the dryer. Refer to seal exterior wall opening around exhaust hood. 10 A B A. Periscope installation NOTE: The following Vent System Chart to determine type of dryer...
Installation Instructions
Page 11
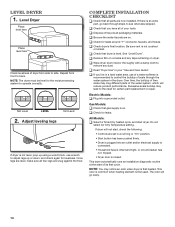
.... Run vent to dryer. Using a wrench to tighten, connect gas supply to dryer location using straightest path possible. Failure to do so can result in leveling legs Ddiaimamoondnd mmaarkrkiningg Vent must be different, according to connect the exhaust vent. MAKE GAS CONNECTION 1. Install Leveling Legs WARNING Excessive Weight Hazard Use two or more people to secure vent, because they can catch lint. Remove red cap from dryer carton; 2. Avoid 90° turns.
.... Run vent to dryer. Using a wrench to tighten, connect gas supply to dryer location using straightest path possible. Failure to do so can result in leveling legs Ddiaimamoondnd mmaarkrkiningg Vent must be different, according to connect the exhaust vent. MAKE GAS CONNECTION 1. Install Leveling Legs WARNING Excessive Weight Hazard Use two or more people to secure vent, because they can catch lint. Remove red cap from dryer carton; 2. Avoid 90° turns.
Installation Instructions
Page 12
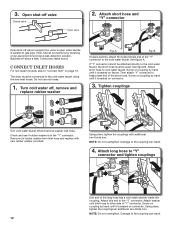
... turn . Attach short hose and "Y" connector Open shut-off and remove washer inlet hose. Tighten couplings Turn cold water faucet off valve in the "Y" connector. NOTE: Do not overtighten. Attach long hose to gas pipe. 3. valve is open when handle is seated on coupling by hand until it is seated on connector. Correct any leaks found. Connect Inlet Hoses For non-steam models, skip to brass male end of "Y" connector. Do not use old hoses...
... turn . Attach short hose and "Y" connector Open shut-off and remove washer inlet hose. Tighten couplings Turn cold water faucet off valve in the "Y" connector. NOTE: Do not overtighten. Attach long hose to gas pipe. 3. valve is open when handle is seated on coupling by hand until it is seated on connector. Correct any leaks found. Connect Inlet Hoses For non-steam models, skip to brass male end of "Y" connector. Do not use old hoses...
Installation Instructions
Page 13
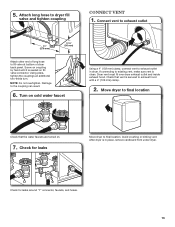
... dryer back panel. Using pliers, tighten the couplings an additional two-thirds turn. Check that the water faucets are turned on fill valve connector. Avoid crushing or kinking vent. Damage to exhaust hood with a 4" (102 mm) clamp. 2. Screw on coupling by hand until it is in dryer. Move dryer to exhaust outlet in place, remove cardboard from under dryer. Check for leaks Move dryer to fill valve at bottom of long hose...
... dryer back panel. Using pliers, tighten the couplings an additional two-thirds turn. Check that the water faucets are turned on fill valve connector. Avoid crushing or kinking vent. Damage to exhaust hood with a 4" (102 mm) clamp. 2. Screw on coupling by hand until it is in dryer. Move dryer to exhaust outlet in place, remove cardboard from under dryer. Check for leaks Move dryer to fill valve at bottom of long hose...
Installation Instructions
Page 14
... first used. Electric Models: q Plug into an outlet and/or electrical supply is connected. • Household fuse is intact and tight, or circuit breaker has not tripped. • Dryer door is not crushed or kinked. Repeat from side to back. q Check dryer's final location. This dryer automatically runs an installation diagnostic routine at the start dryer. Excessive scale buildup may clog different parts of your "Use and Care Guide". q If you have all parts are set...
... first used. Electric Models: q Plug into an outlet and/or electrical supply is connected. • Household fuse is intact and tight, or circuit breaker has not tripped. • Dryer door is not crushed or kinked. Repeat from side to back. q Check dryer's final location. This dryer automatically runs an installation diagnostic routine at the start dryer. Excessive scale buildup may clog different parts of your "Use and Care Guide". q If you have all parts are set...
Installation Instructions
Page 17
... the exhaust vent the correct length? Run the dryer for most installations, the rear of lint or replace exhaust vent with temperature below 45°F (7°C)? See "Installation Instructions". ■■ Is the exhaust vent diameter the correct size? If you do not feel air movement, clean exhaust system of the dryer requires 5" (127 mm). Long venting will increase drying times. Use 4" (102 mm) diameter vent material. ■■ Is the dryer located in a closet? Lint screen shold be cleaned before each load. ■...
... the exhaust vent the correct length? Run the dryer for most installations, the rear of lint or replace exhaust vent with temperature below 45°F (7°C)? See "Installation Instructions". ■■ Is the exhaust vent diameter the correct size? If you do not feel air movement, clean exhaust system of the dryer requires 5" (127 mm). Long venting will increase drying times. Use 4" (102 mm) diameter vent material. ■■ Is the dryer located in a closet? Lint screen shold be cleaned before each load. ■...


