Use and Care Guide
Page 3
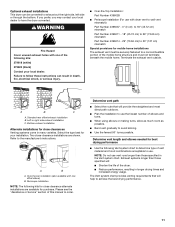
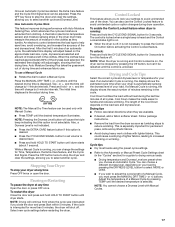
...all safety messages. Do not store or use any other appliance. - do not use gasoline or other flammable vapors and liquids in this manual must be followed to minimize the risk of fire or explosion, or to potential hazards that can be killed or seriously injured if you... must not exceed 3 feet. 3 Always read and obey all occupants. • Immediately call your safety, the information in the vicinity of this manual and on your gas supplier, call the fire department. - All safety messages will follow instructions. DRYER SAFETY Your safety and the safety of others .
...all safety messages. Do not store or use any other appliance. - do not use gasoline or other flammable vapors and liquids in this manual must be followed to minimize the risk of fire or explosion, or to potential hazards that can be killed or seriously injured if you... must not exceed 3 feet. 3 Always read and obey all occupants. • Immediately call your safety, the information in the vicinity of this manual and on your gas supplier, call the fire department. - All safety messages will follow instructions. DRYER SAFETY Your safety and the safety of others .
Use and Care Guide
Page 5
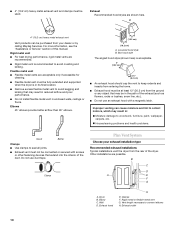
...15.5" (39.4 cm) Black WHP1500SB Stack Kit Are you purchased your dryer or refer to the "Assistance or Service" section of this manual. Optional pedestal To order, call the dealer from dryer drum. Ask for this manual. s Metal exhaust system hardware. 5 Check that opens to 1" ...(2.5 cm) or hex-head socket wrench (for adjusting dryer feet) s ¹⁄₄" nut driver or socket wrench (recommended) s Level s Knife s Vent clamps s Pipe-joint compound resistant to LP gas ...
...15.5" (39.4 cm) Black WHP1500SB Stack Kit Are you purchased your dryer or refer to the "Assistance or Service" section of this manual. Optional pedestal To order, call the dealer from dryer drum. Ask for this manual. s Metal exhaust system hardware. 5 Check that opens to 1" ...(2.5 cm) or hex-head socket wrench (for adjusting dryer feet) s ¹⁄₄" nut driver or socket wrench (recommended) s Level s Knife s Vent clamps s Pipe-joint compound resistant to LP gas ...

Use and Care Guide
Page 8
...) or Standard CAN/CSA-Z240 MH. Do not modify the plug provided with appropriate conversion. SAVE THESE INSTRUCTIONS Gas Type Natural gas: This dryer is available for mobile home installations. Mobile home installations require: s Metal exhaust system hardware, which is equipped for... Home Installation Kit Part Number 346764. If connected to whether the dryer is equipped with Natural gas. s ¹⁄₂" IPS pipe is required. Securely tighten all local codes and ordinances. If this manual. grounding conductor can result in a risk of electric shock by ...
...) or Standard CAN/CSA-Z240 MH. Do not modify the plug provided with appropriate conversion. SAVE THESE INSTRUCTIONS Gas Type Natural gas: This dryer is available for mobile home installations. Mobile home installations require: s Metal exhaust system hardware, which is equipped for... Home Installation Kit Part Number 346764. If connected to whether the dryer is equipped with Natural gas. s ¹⁄₂" IPS pipe is required. Securely tighten all local codes and ordinances. If this manual. grounding conductor can result in a risk of electric shock by ...
Use and Care Guide
Page 9
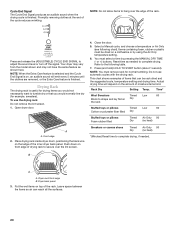
... Nemours and Company. 9 B *6¼" (15.9 cm) A 1½" (3.8 cm) A. ½" NPT gas supply line B. ³⁄₈" NPT dryer pipe *NOTE: If the dryer is required for opening and closing. Gas supply pressure testing s The dryer must be disconnected from the floor. In Canada: An individual manual shutoff valve must be installed in death or fire. Do...
... Nemours and Company. 9 B *6¼" (15.9 cm) A 1½" (3.8 cm) A. ½" NPT gas supply line B. ³⁄₈" NPT dryer pipe *NOTE: If the dryer is required for opening and closing. Gas supply pressure testing s The dryer must be disconnected from the floor. In Canada: An individual manual shutoff valve must be installed in death or fire. Do...
Use and Care Guide
Page 10
... problems and health problems. Good Better Clamps s Use clamps to connect elbows H. Clamp Plan Vent System Choose your dealer or by calling Maytag Services. Elbow C. Rigid metal vent s For best drying performance, rigid metal vents are acceptable only if accessible for cleaning. Flexible metal ...that may result in: Moisture damage to keep rodents and insects from the rear of the dryer. Do not use an exhaust hood with screws or other fastening devices that extend into the interior of this manual. Exhaust Recommended hood styles are possible. A 4" (10.2 cm) 4" (10.2 cm...
... problems and health problems. Good Better Clamps s Use clamps to connect elbows H. Clamp Plan Vent System Choose your dealer or by calling Maytag Services. Elbow C. Rigid metal vent s For best drying performance, rigid metal vents are acceptable only if accessible for cleaning. Flexible metal ...that may result in: Moisture damage to keep rodents and insects from the rear of the dryer. Do not use an exhaust hood with screws or other fastening devices that extend into the interior of this manual. Exhaust Recommended hood styles are possible. A 4" (10.2 cm) 4" (10.2 cm...
Use and Care Guide
Page 11
...and turns. s Plan the installation to use the fewest number of vent material and hood combinations acceptable to use . NOTE: Do not use with dryer vent to wall vent mismatch): Part Number 4396037 - 0" (0 cm) to 18" (45.72 cm) mismatch Part Number 4396011 - 18" ... offset elbow) B. s Use the fewest 90° turns possible. Refer to have the dryer converted. Exhaust systems longer than those specified will help to a noncombustible portion of this manual to avoid kinking. Left or right side exhaust installation C. Two close clearance alternate installations are ...
...and turns. s Plan the installation to use the fewest number of vent material and hood combinations acceptable to use . NOTE: Do not use with dryer vent to wall vent mismatch): Part Number 4396037 - 0" (0 cm) to 18" (45.72 cm) mismatch Part Number 4396011 - 18" ... offset elbow) B. s Use the fewest 90° turns possible. Refer to have the dryer converted. Exhaust systems longer than those specified will help to a noncombustible portion of this manual to avoid kinking. Left or right side exhaust installation C. Two close clearance alternate installations are ...
Use and Care Guide
Page 12
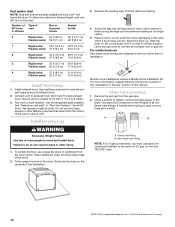
...manual. Use a wrench to finish turning the legs until it is no kinks. Mobile home installations require a Mobile Home Installation Kit. Make Gas Connection 1. Use caulking compound to dryer location. Do not use duct tape, screws or other injury. 1. To protect the floor, use Gas dryers... ft (7 m) 2 Rigid metal 44 ft (13.4 m) 38 ft (11.6 m) Flexible metal 27 ft (8.2 m) 19 ft (5.8 m) 3 Rigid metal 35 ft (10.7 m) 29 ft (8.8 m) Flexible metal 25 ft (7.6 m) 17 ft (5.2 m) 4 Rigid metal 27 ft (8.2 m) 21 ft (6.4 m) Flexible metal 23 ft (7 m) 15 ft (4.6 m) Install Vent...
...manual. Use a wrench to finish turning the legs until it is no kinks. Mobile home installations require a Mobile Home Installation Kit. Make Gas Connection 1. Use caulking compound to dryer location. Do not use duct tape, screws or other injury. 1. To protect the floor, use Gas dryers... ft (7 m) 2 Rigid metal 44 ft (13.4 m) 38 ft (11.6 m) Flexible metal 27 ft (8.2 m) 19 ft (5.8 m) 3 Rigid metal 35 ft (10.7 m) 29 ft (8.8 m) Flexible metal 25 ft (7.6 m) 17 ft (5.2 m) 4 Rigid metal 27 ft (8.2 m) 21 ft (6.4 m) Flexible metal 23 ft (7 m) 15 ft (4.6 m) Install Vent...
Use and Care Guide
Page 16
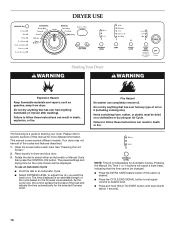
... containing foam, rubber, or plastic must be . s Press the EXTRA CARE feature button if this manual for the selected Dryness Level. s Press the CYCLE END SIGNAL button to set signal volume to starting your dryer. The following is desired. s Press and hold HOLD TO START button until... dryer starts (about 1 second). 16 This manual covers several different models. Your dryer may not have all of this option is a guide to desired level...
... containing foam, rubber, or plastic must be . s Press the EXTRA CARE feature button if this manual for the selected Dryness Level. s Press the CYCLE END SIGNAL button to set signal volume to starting your dryer. The following is desired. s Press and hold HOLD TO START button until... dryer starts (about 1 second). 16 This manual covers several different models. Your dryer may not have all of this option is a guide to desired level...
Use and Care Guide
Page 17
... on the load size and dryness level. or +) buttons. NOTE: You cannot choose a Dryness Level with Manual Cycles. A thermistor (electronic temperature sensor) and moisture sensing strips in the dryer drum help save time, avoid overdrying, and increase the accuracy of lighter fabrics, leading to lock your load... the Control Locked status light is running, the display shows the exact number of all cycles. If a Manual Cycle is on , the dryer can be used only with Manual Cycles. 17 Cool Down makes the loads easier to desired level. When the clothes have reached approximately 80%...
... on the load size and dryness level. or +) buttons. NOTE: You cannot choose a Dryness Level with Manual Cycles. A thermistor (electronic temperature sensor) and moisture sensing strips in the dryer drum help save time, avoid overdrying, and increase the accuracy of lighter fabrics, leading to lock your load... the Control Locked status light is running, the display shows the exact number of all cycles. If a Manual Cycle is on , the dryer can be used only with Manual Cycles. 17 Cool Down makes the loads easier to desired level. When the clothes have reached approximately 80%...
Use and Care Guide
Page 18
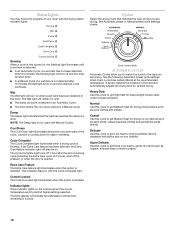
... is first turned on when a wet item has been detected in the dryer. If the Extra Care feature has been selected, the Extra Care feature indicator light will remain on . See Automatic preset or Manual preset cycle settings charts. Laundry is opened. Cycle control knob AUTOMATIC CYCLES...control panel show Cycle, Temperature and Cycle End Signal settings selected. Status Lights You may follow the progress of the cycle. s In a Manual Cycle, if a wet item is enabled. See the following Automatic preset cycle settings chart. Control Locked The Control Locked light illuminates when ...
... is first turned on when a wet item has been detected in the dryer. If the Extra Care feature has been selected, the Extra Care feature indicator light will remain on . See Automatic preset or Manual preset cycle settings charts. Laundry is opened. Cycle control knob AUTOMATIC CYCLES...control panel show Cycle, Temperature and Cycle End Signal settings selected. Status Lights You may follow the progress of the cycle. s In a Manual Cycle, if a wet item is enabled. See the following Automatic preset cycle settings chart. Control Locked The Control Locked light illuminates when ...
Use and Care Guide
Page 19
...Minutes) TIMED DRY High 40 Heavyweight, bulky items, bedspreads, work clothes TOUCHUP Helps to smooth out wrinkles Medium 20 RAPID DRY Small loads High 27 Additional Features Extra Care Feature When you are slow to 120 minutes of items that can be dried using Air Only s Check that need a ... soon as it stops, wrinkles can change the actual time in the dryer too long. When using Air Only. Foam rubber pillows are unable to remove a load of drying time and a drying temperature. When a Manual Cycle is also useful for items that require drying without heat such as bedspreads ...
...Minutes) TIMED DRY High 40 Heavyweight, bulky items, bedspreads, work clothes TOUCHUP Helps to smooth out wrinkles Medium 20 RAPID DRY Small loads High 27 Additional Features Extra Care Feature When you are slow to 120 minutes of items that can be dried using Air Only s Check that need a ... soon as it stops, wrinkles can change the actual time in the dryer too long. When using Air Only. Foam rubber pillows are unable to remove a load of drying time and a drying temperature. When a Manual Cycle is also useful for items that require drying without heat such as bedspreads ...
Use and Care Guide
Page 20
...Reset time as shown here. Do not use the drying rack Do not remove the lint screen. 1. Dryer rack front edge B. Put the wet items on a clothesline or by pressing the MANUAL DRY TIME (- Leave space between the items so air can be dried on top of the rack. ...Press and release the (ADJUSTABLE) CYCLE END SIGNAL to complete drying. Place drying rack inside dryer drum, positioning the back wire on the amount of items that you would normally line dry (for normal tumbling. Select a Manual cycle, and choose a temperature or Air Only (see following table. 7. Time* Wool ...
...Reset time as shown here. Do not use the drying rack Do not remove the lint screen. 1. Dryer rack front edge B. Put the wet items on a clothesline or by pressing the MANUAL DRY TIME (- Leave space between the items so air can be dried on top of the rack. ...Press and release the (ADJUSTABLE) CYCLE END SIGNAL to complete drying. Place drying rack inside dryer drum, positioning the back wire on the amount of items that you would normally line dry (for normal tumbling. Select a Manual cycle, and choose a temperature or Air Only (see following table. 7. Time* Wool ...


