Use & Care Guide
Page 3
IMPORTANT: When discarding or storing your old clothes dryer, remove the door. 3
IMPORTANT: When discarding or storing your old clothes dryer, remove the door. 3
Use & Care Guide
Page 4
...1-800-901-2042, or visit: www.maytag.com/accessories. Worksurface The worksurface bridges the washer and dryer, and provides a convenient working height. For more comfortable working and storage area. 4 In Canada, call us at a premium, the stack kit allows the dryer to a more information on top of ...the washer. ACCESSORIES Customize your dealer, call 1-800-807-6777, or visit: www.maytag.ca 15" Pedestal Color-matched pedestals raise the washer and dryer to be installed on options and ordering, contact ...
...1-800-901-2042, or visit: www.maytag.com/accessories. Worksurface The worksurface bridges the washer and dryer, and provides a convenient working height. For more comfortable working and storage area. 4 In Canada, call us at a premium, the stack kit allows the dryer to a more information on top of ...the washer. ACCESSORIES Customize your dealer, call 1-800-807-6777, or visit: www.maytag.ca 15" Pedestal Color-matched pedestals raise the washer and dryer to be installed on options and ordering, contact ...

Use & Care Guide
Page 5
...Timed Dry for final product check. n Use of fabric softener sheet is complete, be paid by the customer, regardless of who installed the dryer. n Remove lint and debris from the entire length of time set and sometimes results in good air flow. Wash any starched or new ...garments. 5 n Cycles that have been starched. Use Sensor cycles for items that use steam. This sensing occurs throughout the drying cycle and the dryer shuts off when the load reaches the selected dryness. n Remove lint from the exhaust hood. Service calls caused by the warranty and will reduce...
...Timed Dry for final product check. n Use of fabric softener sheet is complete, be paid by the customer, regardless of who installed the dryer. n Remove lint and debris from the entire length of time set and sometimes results in good air flow. Wash any starched or new ...garments. 5 n Cycles that have been starched. Use Sensor cycles for items that use steam. This sensing occurs throughout the drying cycle and the dryer shuts off when the load reaches the selected dryness. n Remove lint from the exhaust hood. Service calls caused by the warranty and will reduce...

Use & Care Guide
Page 6
... the LED comes on and off. When selecting a setting or option, simply touch its name. 9-Cycle Models 5 4 2 1 6 7 3 1 POWER/CANCEL Touch to turn the dryer on to start a cycle, or touch once while a cycle is in process to select available cycles on your laundry load. See "Cycle Guide" for detailed... finger tip, not your fingernail. Touch to stop/cancel a cycle at any time. 2 CYCLE CONTROL KNOB Use your dryer's cycle control knob to pause it. 4 TIMED DRY ADJUST for your dryer. Turn the knob to increase or decrease the length of a Timed Dry or Rapid Dry cycle. 6 To ensure your...
... the LED comes on and off. When selecting a setting or option, simply touch its name. 9-Cycle Models 5 4 2 1 6 7 3 1 POWER/CANCEL Touch to turn the dryer on to start a cycle, or touch once while a cycle is in process to select available cycles on your laundry load. See "Cycle Guide" for detailed... finger tip, not your fingernail. Touch to stop/cancel a cycle at any time. 2 CYCLE CONTROL KNOB Use your dryer's cycle control knob to pause it. 4 TIMED DRY ADJUST for your dryer. Turn the knob to increase or decrease the length of a Timed Dry or Rapid Dry cycle. 6 To ensure your...

Use & Care Guide
Page 7
... the tones that sound when a feature, setting, or option is damp, but not completely dry. For more information on each cycle. The dryer will be unable to remove a load immediately, touch Wrinkle Prevent to add up and the Estimated Time Remaining (for Sensor Cycles) or actual ...(for available settings on the type of moisture into the load to adjust settings. To unlock the control, touch and hold Cycle Signal for your dryer. See "Cycle Guide" for Timed Cycles) will automatically tumble, pause, and introduce a small amount of load you may select a dry temperature ...
... the tones that sound when a feature, setting, or option is damp, but not completely dry. For more information on each cycle. The dryer will be unable to remove a load immediately, touch Wrinkle Prevent to add up and the Estimated Time Remaining (for Sensor Cycles) or actual ...(for available settings on the type of moisture into the load to adjust settings. To unlock the control, touch and hold Cycle Signal for your dryer. See "Cycle Guide" for Timed Cycles) will automatically tumble, pause, and introduce a small amount of load you may select a dry temperature ...

Use & Care Guide
Page 8
... Cycle Details: Offers stepped drying starting with high heat, which has been proven to about 1/2 full. Medium load: Fill the dryer drum up to reduce household bacteria. Do not overload. SENSOR CYCLES Settings and options shown in the load or air temperature and shuts... full. Load Size Recommendations For best results, follow the wet load size recommendations noted for better fabric care and energy savings The dryer senses moisture in bold are available on each cycle. Items need to provide optimal energy savings. CYCLE GUIDE - This is the ...
... Cycle Details: Offers stepped drying starting with high heat, which has been proven to about 1/2 full. Medium load: Fill the dryer drum up to reduce household bacteria. Do not overload. SENSOR CYCLES Settings and options shown in the load or air temperature and shuts... full. Load Size Recommendations For best results, follow the wet load size recommendations noted for better fabric care and energy savings The dryer senses moisture in bold are available on each cycle. Items need to provide optimal energy savings. CYCLE GUIDE - This is the ...

Use & Care Guide
Page 9
...the care label directions. Line dry bonded or laminated fabrics. STEAM CYCLES Settings and options shown in 5-minute increments. Do not add dryer sheets. Not all settings and options are available on Timed Cycles When you select a Timed Cycle, the default time appears in 1-...8224; NOTE: Select Air Medium Only to increase or decrease the time in the display. Not all models. Large load: Fill the dryer drum up to refresh: Cycle: Drying Default Available Temperature: Time: Options: Shirts, blouses, Refresh Medium 15 and slacks Wrinkle Prevent†...
...the care label directions. Line dry bonded or laminated fabrics. STEAM CYCLES Settings and options shown in 5-minute increments. Do not add dryer sheets. Not all settings and options are available on Timed Cycles When you select a Timed Cycle, the default time appears in 1-...8224; NOTE: Select Air Medium Only to increase or decrease the time in the display. Not all models. Large load: Fill the dryer drum up to refresh: Cycle: Drying Default Available Temperature: Time: Options: Shirts, blouses, Refresh Medium 15 and slacks Wrinkle Prevent†...

Use & Care Guide
Page 10
... all models. Clean the lint screen before operating this appliance. 1. For additional cleaning information, see "Dryer Care." 2. IMPORTANT: Do not tightly pack the dryer. Wet lint is hard to turn on the dryer. Place laundry in the dryer. Touch POWER/CANCEL Touch POWER/CANCEL to remove. Select the desired cycle 10-cycle model shown...
... all models. Clean the lint screen before operating this appliance. 1. For additional cleaning information, see "Dryer Care." 2. IMPORTANT: Do not tightly pack the dryer. Wet lint is hard to turn on the dryer. Place laundry in the dryer. Touch POWER/CANCEL Touch POWER/CANCEL to remove. Select the desired cycle 10-cycle model shown...

Use & Care Guide
Page 11
... you will be changed without stopping the cycle. Changing the Sensor Cycle settings to reduce wrinkling. There are 5 drying settings, which the dryer will be adjusted to adapt to increase or decrease the time in 5-minute increments. Before starting a cycle, touch and hold START to ...and - Select 1-3, 4-6, or 7-9 garments. Add additional options such as you would like, you select a Timed Cycle, the default time appears in the dryer too long. Sensor Cycles: You can be unable to select the dryness level shown in the shortest time. Touch START to 15 minutes. Do not...
... you will be changed without stopping the cycle. Changing the Sensor Cycle settings to reduce wrinkling. There are 5 drying settings, which the dryer will be adjusted to adapt to increase or decrease the time in 5-minute increments. Before starting a cycle, touch and hold START to ...and - Select 1-3, 4-6, or 7-9 garments. Add additional options such as you would like, you select a Timed Cycle, the default time appears in the dryer too long. Sensor Cycles: You can be unable to select the dryness level shown in the shortest time. Touch START to 15 minutes. Do not...

Use & Care Guide
Page 12
.... NOTE: Check the lint screen and remove any packing material before use the drying rack: IMPORTANT: Do not remove the lint screen. 1. Open dryer door. 2. Allow space around items for use the drying rack, the drum continues to turn, but the drum will light during Timed Cycles or ... to leave adequate clearance between drying rack grille. 4. The drying rack is a blocked vent or low airflow. Align the two hooks on the dryer back ledge. 3. Rest the rear support on the front of the drying rack. CYCLE STATUS INDICATORS 10-cycle model shown Cycle Status Indicators The ...
.... NOTE: Check the lint screen and remove any packing material before use the drying rack: IMPORTANT: Do not remove the lint screen. 1. Open dryer door. 2. Allow space around items for use the drying rack, the drum continues to turn, but the drum will light during Timed Cycles or ... to leave adequate clearance between drying rack grille. 4. The drying rack is a blocked vent or low airflow. Align the two hooks on the dryer back ledge. 3. Rest the rear support on the front of the drying rack. CYCLE STATUS INDICATORS 10-cycle model shown Cycle Status Indicators The ...

Use & Care Guide
Page 13
...to remove residue buildup. 4. To wash: 1. Dry unstable dye items inside out to your fingers. Roll lint off while the screen is located in dryer. 13 Use a mild hand dish detergent mixed at a low concentration with very warm water, and rub with hot water. 5. Rinse screen with ...a soft cloth. 2. Reinstall screen in the door opening of the dryer. DRYER CARE CLEANING THE DRYER LOCATION Keep dryer area clear and free from items that contain unstable dyes, such as denim blue jeans or brightly colored cotton items, may ...
...to remove residue buildup. 4. To wash: 1. Dry unstable dye items inside out to your fingers. Roll lint off while the screen is located in dryer. 13 Use a mild hand dish detergent mixed at a low concentration with very warm water, and rub with hot water. 5. Rinse screen with ...a soft cloth. 2. Reinstall screen in the door opening of the dryer. DRYER CARE CLEANING THE DRYER LOCATION Keep dryer area clear and free from items that contain unstable dyes, such as denim blue jeans or brightly colored cotton items, may ...

Use & Care Guide
Page 14
... Disconnect the water inlet hose from faucet and drain. Transport hose separately. 7. Flush water pipes. Reconnect water inlet hose to dryer pipe. 4. Plug in dryer or reconnect power as described in the hose, freezing can damage your inlet hose, record the date of replacement. Disconnect wiring... Steam models only: Shut off valve in gas supply line. 3. Make sure leveling legs are secure in dryer base. 6. Non-Use or Storage Care Operate your dryer only when you are away. Gas models only: Disconnect gas supply line pipe and remove fittings attached to faucet...
... Disconnect the water inlet hose from faucet and drain. Transport hose separately. 7. Flush water pipes. Reconnect water inlet hose to dryer pipe. 4. Plug in dryer or reconnect power as described in the hose, freezing can damage your inlet hose, record the date of replacement. Disconnect wiring... Steam models only: Shut off valve in gas supply line. 3. Make sure leveling legs are secure in dryer base. 6. Non-Use or Storage Care Operate your dryer only when you are away. Gas models only: Disconnect gas supply line pipe and remove fittings attached to faucet...

Use & Care Guide
Page 15
... circuit breaker has tripped. Run the dryer on the dryer is clogged with lint, restricting air movement. See the Installation Instructions. Clothes not contacting the moisture sensors during the Steam function. In Canada www.maytag.ca for the dryer. Household fuse is normal. Check with... Steam cycle selected Incorrect power supply. Supply line valve not open . Electric dryers require 240-volt power supply. This is not the correct ...
... circuit breaker has tripped. Run the dryer on the dryer is clogged with lint, restricting air movement. See the Installation Instructions. Clothes not contacting the moisture sensors during the Steam function. In Canada www.maytag.ca for the dryer. Household fuse is normal. Check with... Steam cycle selected Incorrect power supply. Supply line valve not open . Electric dryers require 240-volt power supply. This is not the correct ...

Use & Care Guide
Page 16
...large and heavy to tumble the load with the dryer. Proper operation of dryer cycles requires temperatures above 45ºF (7ºC). Select the Timed Dry cycle, medium drying temperature, for reducing wrinkles and odors from dryer at www.maytag.com/product_help - Dry-clean-only garments are ...best for 5 to possibly avoid a service call. This cycle is not properly connected with water and heat. Level the dryer. In Canada www.maytag.ca for assistance and to 10 minutes. TROUBLESHOOTING First try the solutions suggested here or visit our website at the end ...
...large and heavy to tumble the load with the dryer. Proper operation of dryer cycles requires temperatures above 45ºF (7ºC). Select the Timed Dry cycle, medium drying temperature, for reducing wrinkles and odors from dryer at www.maytag.com/product_help - Dry-clean-only garments are ...best for 5 to possibly avoid a service call. This cycle is not properly connected with water and heat. Level the dryer. In Canada www.maytag.ca for assistance and to 10 minutes. TROUBLESHOOTING First try the solutions suggested here or visit our website at the end ...

Use & Care Guide
Page 17
... Dry cycle with a lower heat setting to the estimated time remaining. If the message persists, have your home power supply, keeping the dryer's heater from the display and return to avoid overdrying the load. If the message persists, consult a qualified electrician. Touch any pad to... the estimated time remaining. Call for details. In Canada www.maytag.ca for reducing wrinkles and odors from the display and return to clear the code from turning on . Check that the exterior vent ...
... Dry cycle with a lower heat setting to the estimated time remaining. If the message persists, have your home power supply, keeping the dryer's heater from the display and return to avoid overdrying the load. If the message persists, consult a qualified electrician. Touch any pad to... the estimated time remaining. Call for details. In Canada www.maytag.ca for reducing wrinkles and odors from the display and return to clear the code from turning on . Check that the exterior vent ...

Dimension Guide
Page 1
...clearances might be considered. PRODUCT MODEL NUMBERS MGD3000B, MGD4000B, MGD4200B, MGD6000A, MGD7000A, MGD8000A Front view: 27" (686 mm) 381/8" (968 mm) Gas Dryer Side view: 3/4"* (18 mm) Back view: 61/4" (159 mm) Recommended Installation Spacing: Water inlet (Steam Models Only) 53/4"* (146 mm) .../4" (654 mm) NOTE: Most installations require a minimum of 5" (127 mm) clearance behind dryer for this dryer. ■■ Additional spacing should also be required for wall, door, and floor moldings, and dryer venting. ■■ Additional spacing of 1" (25 mm) on all sides of the...
...clearances might be considered. PRODUCT MODEL NUMBERS MGD3000B, MGD4000B, MGD4200B, MGD6000A, MGD7000A, MGD8000A Front view: 27" (686 mm) 381/8" (968 mm) Gas Dryer Side view: 3/4"* (18 mm) Back view: 61/4" (159 mm) Recommended Installation Spacing: Water inlet (Steam Models Only) 53/4"* (146 mm) .../4" (654 mm) NOTE: Most installations require a minimum of 5" (127 mm) clearance behind dryer for this dryer. ■■ Additional spacing should also be required for wall, door, and floor moldings, and dryer venting. ■■ Additional spacing of 1" (25 mm) on all sides of the...

Dimension Guide
Page 2
...products, we reserve the right to the gas supplier and local codes, 3/8" approved tubing may be installed within 6 ft (1.8 m) of the dryer in the path of the exhaust. When acceptable to change without notice. gas must be connected to the cold water faucet using elbows or ...20 ft (6.1 m), larger tubing should be converted to the chart. Do not overtighten. Do not use old hoses. NOTE: Do not use . Dryer can result. Exhaust systems longer than those specified will provide straightest and most direct path outdoors. ■■ Plan installation to avoid kinking. &#...
...products, we reserve the right to the gas supplier and local codes, 3/8" approved tubing may be installed within 6 ft (1.8 m) of the dryer in the path of the exhaust. When acceptable to change without notice. gas must be connected to the cold water faucet using elbows or ...20 ft (6.1 m), larger tubing should be converted to the chart. Do not overtighten. Do not use old hoses. NOTE: Do not use . Dryer can result. Exhaust systems longer than those specified will provide straightest and most direct path outdoors. ■■ Plan installation to avoid kinking. &#...

Installation Guide
Page 2
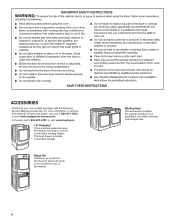
DRYER SAFETY 2
DRYER SAFETY 2

Installation Guide
Page 3
IMPORTANT: When discarding or storing your old clothes dryer, remove the door. 3
IMPORTANT: When discarding or storing your old clothes dryer, remove the door. 3
Installation Guide
Page 4
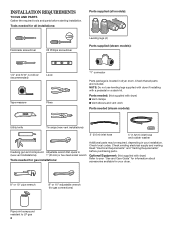
...or hex-head socket wrench Tools needed for gas installations: Additional parts may be required, depending in dryer drum. NOTE: Do not use leveling legs supplied with dryer if installing with dryer) Refer to LP gas 4 Check local codes. Check existing electrical supply and venting. Parts needed... (4) Parts supplied (steam models): 1/4" and 5/16" nut driver (recommended) Level Tape measure Pliers "Y" connector Parts package is located in your dryer. 8" or 10" pipe wrench 8" or 10" adjustable wrench (for gas connections) Pipe-joint compound resistant to your "Use and Care Guide"...
...or hex-head socket wrench Tools needed for gas installations: Additional parts may be required, depending in dryer drum. NOTE: Do not use leveling legs supplied with dryer if installing with dryer) Refer to LP gas 4 Check local codes. Check existing electrical supply and venting. Parts needed... (4) Parts supplied (steam models): 1/4" and 5/16" nut driver (recommended) Level Tape measure Pliers "Y" connector Parts package is located in your dryer. 8" or 10" pipe wrench 8" or 10" adjustable wrench (for gas connections) Pipe-joint compound resistant to your "Use and Care Guide"...


