Maytag MGD5030MW Support and Manuals
Get Help and Manuals for this Maytag item
View All Support Options Below
Free Maytag MGD5030MW manuals!
Problems with Maytag MGD5030MW?
Ask a Question
Free Maytag MGD5030MW manuals!
Problems with Maytag MGD5030MW?
Ask a Question
Popular Maytag MGD5030MW Manual Pages
Door Reversal Instructions - Page 1

... applicable for models with putty knife or screwdriver. Loosen (do so could result in large part of Acument Intellectual Property, LLC.
1 Remove screws from dryer cabinet side of dryer. Do not pull on top of hinges.
5. Set door (handle side up) on door seal or plastic door catches.
DRYER DOOR REVERSAL INSTRUCTIONS
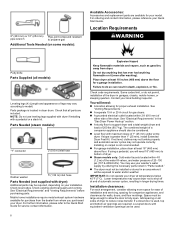
Tools Needed...
Door Reversal Instructions - Page 3

... screws are in bottom of a service call.
3 Tighten screws halfway. Insert and tighten top screws in hinge holes on left or right within slot to reinstall door.
Check door strike alignment
Close door and check that door strike aligns with door catch. Troubleshooting
See your Owner's Manual or visit our website and reference...
Owners Manual - Page 2

...safety messages. This is moving.
� Do not install or store this manual and on or in published user-repair instructions that the heat is dissipated.
� Do not use... spotted with controls.
� Do not repair or replace any part of the appliance or attempt any servicing unless specifically recommended in the usermaintenance instructions or in the appliance. All safety messages ...
Owners Manual - Page 3
.... • Immediately call your gas supplier, call the fire department. − Installation and service must be performed by the appliance manufacturer as suitable for use any phone in accordance with the installation instructions of the manufacturer of a specific type identified by a qualified installer, service agency, or the gas supplier.
3 "Risk of this
or any electrical switch...
Owners Manual - Page 5
....
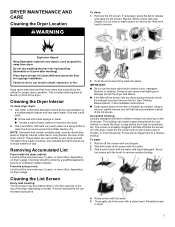
A screen blocked by a qualified appliance service or ventilation system cleaner. Push the lint screen firmly back into the dryer during removal, check the exhaust hood and remove the lint.
Wet both the dryer and fabrics.
� If lint falls off while the screen is in the Installation Instructions.
� Clean space where lint...
Owners Manual - Page 6
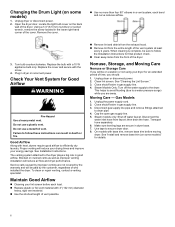
... driver or socket wrench, remove the screw located in dryer or reconnect power. each load. � Replace plastic or foil vent material with heat, dryers require good airflow to follow the Installation Instructions for an extended period of the dryer. Replace the bulb with the screw.
4. Check Your Vent System for details.
6
To clean or repair...
Owners Manual - Page 8
...Guide for a garage installation. If a closet door is located in death, explosion, or fire. Check local codes. Do not dry anything flammable on some models):
Available Accessories:
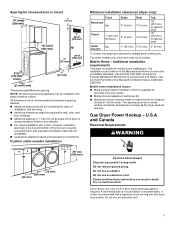
Accessories and replacement parts...460 mm) above the floor for service contact information. Lower temperatures may not operate correctly. Installation clearances:
For each arrangement, consider ...
Owners Manual - Page 9
...steam models only, inlet hose must conform to the Manufactured Home Construction and Safety Standard, Title 24 CFR, Part ...Part 280) or the Standard for wall, door, and
floor moldings. � Additional spacing of 1" (25 mm) on all sides of
installation and servicing... not use an extension cord. Failure to follow these instructions can be installed in mobile homes to cabinet/ shelf
0" (0 mm)...
Owners Manual - Page 10
...INSTRUCTIONS
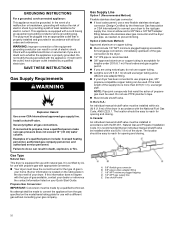
Gas Supply Requirements
WARNING
Explosion Hazard Use a new CSA International approved gas supply line. Securely tighten all local codes... is located on the model/serial rating plate for ...manual shutoff valve must have a proper outlet installed by providing a path of a qualified person include: licensed heating personnel, authorized gas company personnel, and authorized service...
Owners Manual - Page 13
...� Must be fully extended and supported in final dryer location. � ...other outside debris.
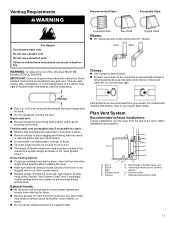
� Replace plastic of the home is...codes and ordinances. Plan Vent System
Recommended exhaust installations:
Typical installations vent the dryer from the entire length of the system before installing... these instructions can be at least 12" (305 mm) from your Quick Start Guide. Rigid...
Owners Manual - Page 14
...exhaust vent outside. Some models can result in many varieties.
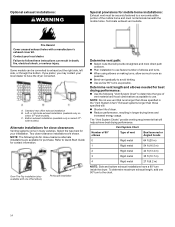
Bottom exhaust installation (available only on
select 27"-wide models). Refer to Quick Start Guide for best drying performance...side, left side, or through the bottom. A. Alternate installations for your installation. Failure to follow these instructions can be securely fastened to a noncombustible portion of elbows and...
Owners Manual - Page 15

...Models)
Number of 90° elbows
Type of "Y" connector.
Remove old rubber washer from inlet hose and replace with additional two-thirds turn . Connect vent to dryer location using the new inlet hoses. Run vent to exhaust hood
Vent must be BJAV-NATXXXXXXX-XXX or BWFB-NAT-XXXXXXX-XXX.
Record hose installation or replacement... model has a long vent system, refer to the type code ...
Owners Manual - Page 17

... or
kinked. � Check that all packaging materials. � Check dryer's final location.
WARNING
All Models:
� Set the heat cycle for 20 minutes and start , check the following: � Controls are set in a running for certain part replacement or repair.
17 If you live in death, fire, or electrical shock.
� Plug into an outlet...
Dimension Guide - Page 2

... leveling legs fully extended)
G
Depth with Door Open
in your appliance's Owner's Manual, before installing and operating this appliance.
DETAILED PLANNING DIMENSIONS
WARNING: To reduce the risk of fire, electric shock, or injury to persons, read the IMPORTANT SAFETY INSTRUCTIONS and INSTALLATION INSTRUCTIONS, located in 421∕2 29 367∕8 287∕16 381∕...
Dimension Guide - Page 4

... mm/0 mm) *Recommended/Minimum spacing
1" (25 mm)
4 Louvered doors
with equivalent ventilations openings are acceptable. Ƀ Companion appliance spacing should be considered for ease of installation and servicing. Ƀ Additional clearances might be required for wall, door, and floor moldings. Ƀ Additional spacing of 1" (25 mm) on all sides of the dryer...
Maytag MGD5030MW Reviews
We have not received any reviews for Maytag yet.