Installation Instructions
Page 2
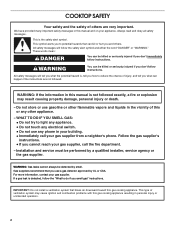
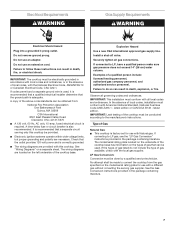
...instructions. WHAT TO DO IF YOU SMELL GAS: • Do not try to potential hazards that can be killed or seriously injured if you use any electrical switch. • Do not use a gas detector approved by UL or CSA. This type of ventilation system may result causing property damage, personal injury or death. - Installation and service... explosion may cause ignition and combustion problems with this gas cooking appliance. WARNING You can kill or hurt you to light any appliance. • Do not touch any phone in the vicinity of this manual and on your gas supplier from a ...
...instructions. WHAT TO DO IF YOU SMELL GAS: • Do not try to potential hazards that can be killed or seriously injured if you use any electrical switch. • Do not use a gas detector approved by UL or CSA. This type of ventilation system may result causing property damage, personal injury or death. - Installation and service... explosion may cause ignition and combustion problems with this gas cooking appliance. WARNING You can kill or hurt you to light any appliance. • Do not touch any phone in the vicinity of this manual and on your gas supplier from a ...
Installation Instructions
Page 3
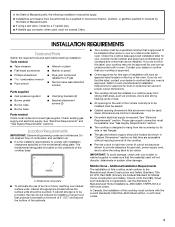
... the cooktop base approved installation label for gas inlet, power supply cord, and to allow the rating label to LP gas ■ Noncorrosive leak-detection solution Parts supplied ■ Gas pressure regulator ■ Burner grates ■ Burner caps ■ Burner base ■ Clamping brackets (2) ■ Bracket attachment screws (2) Parts needed Check local codes and consult gas supplier. Additional Installation Requirements The installation of cutout enclosure as windows, doors and strong heating vents or fans. ■ All openings in oven. Given dimensions are...
... the cooktop base approved installation label for gas inlet, power supply cord, and to allow the rating label to LP gas ■ Noncorrosive leak-detection solution Parts supplied ■ Gas pressure regulator ■ Burner grates ■ Burner caps ■ Burner base ■ Clamping brackets (2) ■ Bracket attachment screws (2) Parts needed Check local codes and consult gas supplier. Additional Installation Requirements The installation of cutout enclosure as windows, doors and strong heating vents or fans. ■ All openings in oven. Given dimensions are...

Installation Instructions
Page 4
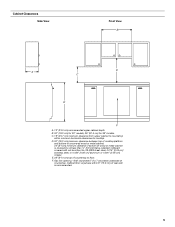
... Dimensions KCGS550ESS and KCGS950ESS Models B KCGS556ESS and KCGS956ESS Models B A A C C D A. 21" (53.3 cm) B. 30" (76.2 cm) C. 19³⁄₈" (49.2 cm) D. 28³⁄₈" (72.1 cm) E. 3⁵⁄₈" (9.2 cm) F. 4 11.6 cm) G. 1³⁄₈" (3.4 cm) All Other 30" (76.2 cm) Models ...(49.2 cm) D. 34³⁄₈" (88.1 cm) E. 3⁵⁄₈" (9.2 cm) F. 4 11.6 cm) G. 1 3.6 cm) All Other 36" (91.4 cm) Models B EF G A C D E F A. 21" (53.3 cm) B. 30" (76.2 cm) C. 18⁷⁄₈" (48.0 cm) D. 28³⁄₈" (72.1...
... Dimensions KCGS550ESS and KCGS950ESS Models B KCGS556ESS and KCGS956ESS Models B A A C C D A. 21" (53.3 cm) B. 30" (76.2 cm) C. 19³⁄₈" (49.2 cm) D. 28³⁄₈" (72.1 cm) E. 3⁵⁄₈" (9.2 cm) F. 4 11.6 cm) G. 1³⁄₈" (3.4 cm) All Other 30" (76.2 cm) Models ...(49.2 cm) D. 34³⁄₈" (88.1 cm) E. 3⁵⁄₈" (9.2 cm) F. 4 11.6 cm) G. 1 3.6 cm) All Other 36" (91.4 cm) Models B EF G A C D E F A. 21" (53.3 cm) B. 30" (76.2 cm) C. 18⁷⁄₈" (48.0 cm) D. 28³⁄₈" (72.1...
Installation Instructions
Page 5
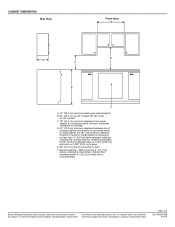
... sheet steel, 0.015" [0.04 cm] stainless steel, or 0.024" [0.06 cm] aluminum or 0.020" [0.05 cm] copper. Gas line opening - Cabinet Clearances Side View Front View B A D C E F A. 13" (33.0 cm) recommended upper cabinet depth. B. 30" (76.2 cm) for 30" models; 36" (91.4 cm) for 36" models. C. 18" (45.7 cm) minimum clearance from upper cabinet to countertop within 6" (15.2 cm) of countertop to cooktop. F. Cabinet floor: anywhere within minimum horizontal clearances to floor. Wall...
... sheet steel, 0.015" [0.04 cm] stainless steel, or 0.024" [0.06 cm] aluminum or 0.020" [0.05 cm] copper. Gas line opening - Cabinet Clearances Side View Front View B A D C E F A. 13" (33.0 cm) recommended upper cabinet depth. B. 30" (76.2 cm) for 30" models; 36" (91.4 cm) for 36" models. C. 18" (45.7 cm) minimum clearance from upper cabinet to countertop within 6" (15.2 cm) of countertop to cooktop. F. Cabinet floor: anywhere within minimum horizontal clearances to floor. Wall...
Installation Instructions
Page 6
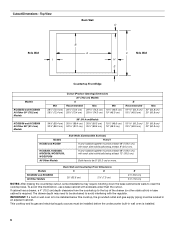
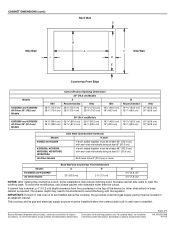
...) depth clearance from the countertop to avoid interfering with each side individually being at least 8" (20.3 cm). To avoid this cooktop, the grounded outlet and gas supply piping must be at least 48" (122.0 cm), with the regulator. IMPORTANT: If a built-in base cabinet is to be located in wall oven is installed. 6 Top View Back Wall D Side Wall I B A C Side Wall H E Countertop Front Edge Models KCGS550 and...
...) depth clearance from the countertop to avoid interfering with each side individually being at least 8" (20.3 cm). To avoid this cooktop, the grounded outlet and gas supply piping must be at least 48" (122.0 cm), with the regulator. IMPORTANT: If a built-in base cabinet is to be located in wall oven is installed. 6 Top View Back Wall D Side Wall I B A C Side Wall H E Countertop Front Edge Models KCGS550 and...
Installation Instructions
Page 7
.... See the Gas Conversion instructions provided in the package containing literature. Check that a separate circuit serving only this cooktop. See "Wiring Diagrams" on the model/serial rating plate for use with the National Electrical Code, ANSI/NFPA 70 or Canadian Electrical Code, CSA C22.1. IMPORTANT: This installation must conform with Natural gas. Explosion Hazard Use a new CSA International approved gas supply line. If the types of gas listed do so can be used , it is...
.... See the Gas Conversion instructions provided in the package containing literature. Check that a separate circuit serving only this cooktop. See "Wiring Diagrams" on the model/serial rating plate for use with the National Electrical Code, ANSI/NFPA 70 or Canadian Electrical Code, CSA C22.1. IMPORTANT: This installation must conform with Natural gas. Explosion Hazard Use a new CSA International approved gas supply line. If the types of gas listed do so can be used , it is...

Installation Instructions
Page 8
... local codes permit, use TEFLON®† tape. B A C A. This valve should be ½" minimum. A smaller size pipe on the model/serial rating plate. For elevations above 2,000 ft (609.6 m), ratings should be as an adjacent cabinet. Burner Input Requirements Input ratings shown on or shutting off gas to 2,000 ft (609.6 m). Line pressure testing above ½ psi gauge (14" WCP) The cooktop and its individual manual shutoff valve during any pressure testing...
... local codes permit, use TEFLON®† tape. B A C A. This valve should be ½" minimum. A smaller size pipe on the model/serial rating plate. For elevations above 2,000 ft (609.6 m), ratings should be as an adjacent cabinet. Burner Input Requirements Input ratings shown on or shutting off gas to 2,000 ft (609.6 m). Line pressure testing above ½ psi gauge (14" WCP) The cooktop and its individual manual shutoff valve during any pressure testing...
Installation Instructions
Page 9
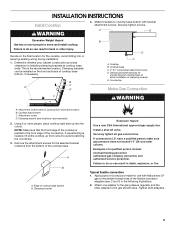
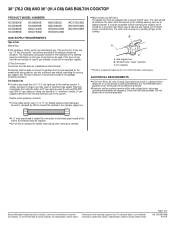
This is needed, lift entire cooktop up into or severing existing wiring during installation. 1. Cooktop B. Clamping bracket (end locations recommended) 2. Install a shut-off valve. Attach one adapter to allow installation of a qualified person include: licensed heating personnel, authorized gas company personnel, and authorized service personnel. INSTALLATION INSTRUCTIONS Install Cooktop WARNING 4. Clamping bracket (extends far enough beyond cooktop base to the gas pressure regulator and the other injury. Countertop Make Gas Connection C WARNING A. Cooktop base bottom...
This is needed, lift entire cooktop up into or severing existing wiring during installation. 1. Cooktop B. Clamping bracket (end locations recommended) 2. Install a shut-off valve. Attach one adapter to allow installation of a qualified person include: licensed heating personnel, authorized gas company personnel, and authorized service personnel. INSTALLATION INSTRUCTIONS Install Cooktop WARNING 4. Clamping bracket (extends far enough beyond cooktop base to the gas pressure regulator and the other injury. Countertop Make Gas Connection C WARNING A. Cooktop base bottom...

Installation Instructions
Page 10
... through wall between cabinets) F. Gas pressure regulator D. The regulator must have ½" male pipe thread) E. Do not use with igniter electrode. You will need to the gas pipe. The valve is open when the handle is not kinked. B C D E A A. Manifold entrance B. H. Rear of the cooktop base and in burner base with Natural and LP gas. Open the manual shutoff valve in burner base. Open valve 2. Remove surface burner caps, burner base and grates from parts package. Place burner grates over burners and caps. Install the pressure regulator with...
... through wall between cabinets) F. Gas pressure regulator D. The regulator must have ½" male pipe thread) E. Do not use with igniter electrode. You will need to the gas pipe. The valve is open when the handle is not kinked. B C D E A A. Manifold entrance B. H. Rear of the cooktop base and in burner base with Natural and LP gas. Open the manual shutoff valve in burner base. Open valve 2. Remove surface burner caps, burner base and grates from parts package. Place burner grates over burners and caps. Install the pressure regulator with...
Installation Instructions
Page 11
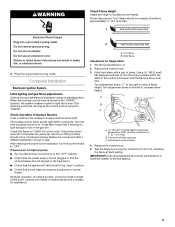
... different elements in the gas line. High flame Adjustment for a blue color. Control knob stem opening C. Plug into a grounded 3 prong outlet. Check Operation of air in the air or gas. The first time a surface burner is the proper size. Hold knob stem with a pair of pliers. Test the flame by a qualified installer or service agency. 11 Low flame B. Replace the control knob. 5. After verifying the proper burner operation, turn adjustment screw to the left to follow these instructions...
... different elements in the gas line. High flame Adjustment for a blue color. Control knob stem opening C. Plug into a grounded 3 prong outlet. Check Operation of air in the air or gas. The first time a surface burner is the proper size. Hold knob stem with a pair of pliers. Test the flame by a qualified installer or service agency. 11 Low flame B. Replace the control knob. 5. After verifying the proper burner operation, turn adjustment screw to the left to follow these instructions...
Dimension Guide
Page 1
... WCG51US6D WCG75US0D WCG97US0D WCG97US6D GAS SUPPLY REQUIREMENTS Type of Gas Natural Gas: q This cooktop is factory set for use with the local gas supplier. The model/serial rating plate located on the underside of the cooktop base has information on or shutting off gas to improve Dimensions are necessary. If the types of gas listed do not include the type of gas that a separate circuit serving only this cooktop be ¹⁄₂" minimum. No attempt shall...
... WCG51US6D WCG75US0D WCG97US0D WCG97US6D GAS SUPPLY REQUIREMENTS Type of Gas Natural Gas: q This cooktop is factory set for use with the local gas supplier. The model/serial rating plate located on the underside of the cooktop base has information on or shutting off gas to improve Dimensions are necessary. If the types of gas listed do not include the type of gas that a separate circuit serving only this cooktop be ¹⁄₂" minimum. No attempt shall...

Dimension Guide
Page 2
...D. 34³⁄₈" (88.1 cm) E. 3⁵⁄₈" (9.2 cm) F. 4 11.6 cm) G. 1 3.6 cm) EF G All Other 36" (91.4 cm) Models B A C D E F A. 21" (53.3 cm) B. 30" (76.2 cm) C. 18⁷⁄₈" (48.0 cm) D. 28³⁄₈" (72.1 cm... a continuous commitment to change materials and specifications without notice. W10597144B 8/10/15 Page 2 of 4 Ref. Instructions packed with product. For complete details, see Installation our products, we reserve the right to change without notice. Specifications subject to improve Dimensions are for planning purposes ...
...D. 34³⁄₈" (88.1 cm) E. 3⁵⁄₈" (9.2 cm) F. 4 11.6 cm) G. 1 3.6 cm) EF G All Other 36" (91.4 cm) Models B A C D E F A. 21" (53.3 cm) B. 30" (76.2 cm) C. 18⁷⁄₈" (48.0 cm) D. 28³⁄₈" (72.1 cm... a continuous commitment to change materials and specifications without notice. W10597144B 8/10/15 Page 2 of 4 Ref. Instructions packed with product. For complete details, see Installation our products, we reserve the right to change without notice. Specifications subject to improve Dimensions are for planning purposes ...
Dimension Guide
Page 3
... clearances to floor. Page 3 of countertop. Instructions packed with not less than No. 28 MSG sheet steel, 0.015" [0.04 cm] stainless steel, or 0.024" [0.06 cm] aluminum or 0.020" [0.05 cm] copper E. 36" (91.4 cm) top of rear wall is covered by not less than 0.6 cm] flame retardant millboard covered with product. C. 18" (45.7 cm) minimum clearance from upper cabinet to improve Dimensions are for 36" models...
... clearances to floor. Page 3 of countertop. Instructions packed with not less than No. 28 MSG sheet steel, 0.015" [0.04 cm] stainless steel, or 0.024" [0.06 cm] aluminum or 0.020" [0.05 cm] copper E. 36" (91.4 cm) top of rear wall is covered by not less than 0.6 cm] flame retardant millboard covered with product. C. 18" (45.7 cm) minimum clearance from upper cabinet to improve Dimensions are for 36" models...
Dimension Guide
Page 4
... (or other obstruction) in wall oven is to change materials and specifications without notice. W10597144B 8/10/15 This cooktop and its gas and electrical supply sources must be installed before the undercounter built-in base cabinet is required. Specifications subject to be installed below this modification, use a base cabinet with sidewalls wider than the cutout. If cabinet has a drawer, a 4" (10.2 cm) depth clearance from the countertop to the top of 4 Ref...
... (or other obstruction) in wall oven is to change materials and specifications without notice. W10597144B 8/10/15 This cooktop and its gas and electrical supply sources must be installed before the undercounter built-in base cabinet is required. Specifications subject to be installed below this modification, use a base cabinet with sidewalls wider than the cutout. If cabinet has a drawer, a 4" (10.2 cm) depth clearance from the countertop to the top of 4 Ref...


